Zoom is a platform that provides video telephony and online chat services. Can you share and record a presentation on Zoom? How to record a Zoom presentation? This article from the free file converter - MiniTool Video Converter will give you a brief introduction to Zoom and guide you on how to record a presentation on Zoom and use other screen recorders for recording.
Zoom can consolidate communications and connect with others easily. You can use Zoom to make video communication, voice calls, video conferences, messaging, and more. Zoom enables you to create and join online meeting rooms where you can communicate with other people using video and audio. What’s more, you can also share your screen and files or use text chat. Therefore, you can use Zoom to share your presentations. Can you record a Zoom presentation and how to record a Zoom Presentation? In the following content, you will find the answer.
Can You Record a Zoom Presentation
Making a presentation is a good way to show your ideas and thoughts on certain topics. You can use pictures, videos, audio, graphics, tables, and other elements to make your presentation attractive. You can use Zoom to share a presentation in an online meeting. Can you record a Zoom presentation? Of course, you can record a Zoom presentation.
Zoom provides you with a built-in screen recording feature. Can each participant use the built-in recording feature? Unfortunately, only the host of a meeting can use the built-in screen recorder. If you are only a participant, you need to request permission from the host or use other third-party screen recorders.
How to Record a Presentation on Zoom
It is easy and convenient to use the built-in screen recorder of Zoom to record a presentation. If you are the host of the meeting, you can refer to the following guidance on how to use Zoom to record a presentation with its built-in screen recording feature.
Step 1. Launch Zoom on your computer and click the Settings icon. Then click the Recording tab, in this page, you should toggle on the Local Recording option. Also, you can choose a destination folder to save your recordings.
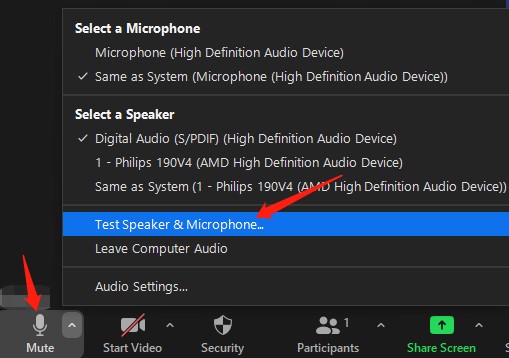
Step 2. Return to the home screen and click on the New Meeting button to start a new meeting. Then there will appear a prompt, you can choose the Join with Computer Audio option. To make sure your audio is working, you can open the Mute menu and click Test Speaker & Microphone to check them.
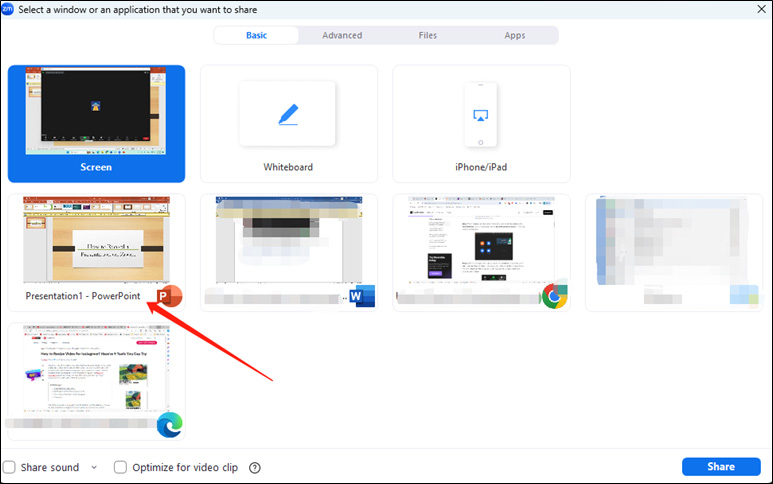
Step 3. You need to open the presentation file in advance. Click the Share Screen option, choose the window you need to share under the default Basic tab, and click the Share button. Also, you can choose the option PowerPoint as Virtual Background under the Advanced tab to utilize a slideshow presentation as your virtual background. Alternatively, you can choose the Files option to choose content from Dropbox, Google Drive, or other platforms.
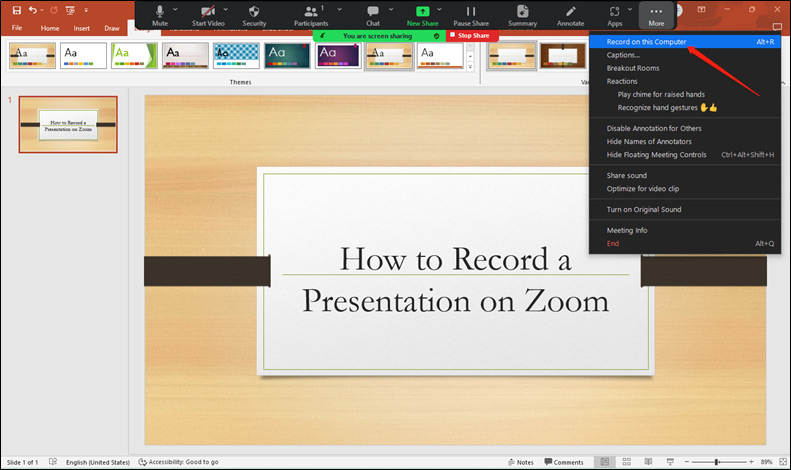
Step 4. Later, you can start recording. Just click the More tab and select the Record on this Computer option.
Step 5. If you want to pause the recording, you can click More and choose Pause Recording or press Alt + P on the keyboard. Once your presentation is finished, you can click Stop Recording or press Alt + R. Next, to stop sharing your presentation files, you can go to the navigation bar and click the Stop Share button.
How to Find Zoom Recordings
Where does Zoom recording go? By default, the local recordings of Zoom of be stored in the following directory:
- Windows: C:\Users\[Username]\Documents\Zoom
- Mac: /Users/[Username]/Documents/Zoom
- Linux: home/[Username]/Documents/Zoom
Also, you can find recordings via the Zoom app. You can find your Zoom recordings by clicking the Meetings button and switching to the Recorded tab.
How to Allow Participants to Record a Presentation on Zoom
From the above, we know that only the meeting host can use the screen recorder on Zoom and the participant needs to request permission if they also want to use the built-in screen recording feature. How to allow participants to record a presentation on Zoom? Just follow the below steps:
Step 1. In the Zoom meeting room, click the Participants tab at the bottom of the screen to open the participants list.
Step 2. Find the participant who requests permission for screen recording and click More to view the options.
Step 3. Finally, click the Allow to Record Local Files option.
How to Record a Zoom Presentation with More Customized Options
Though the built-in screen recorder of Zoom helps you record Zoom presentations or meetings easily, it also has some drawbacks like low screen recording quality. Also, as a meeting participant, you are not free to use the built-in screen recorder but need to ask the meeting host for permission. To record a Zoom presentation freely and get a high-quality recording, you can try a good screen recorder.
MiniTool Video Converter – a Screen Recorder Worth Trying
MiniTool Video Converter is one of the best choices to record a Zoom presentation. It is an easy-to-use and free screen recorder that can record any activities happening on your computer. You can choose the entire screen or selected region according to your needs. What’s more, it enables you to record the microphone and system audio simultaneously or separately. Hence, it can meet your needs for recording Zoom presentations.
Besides, MiniTool Video Converter offers you more customized options. It provides you with several output formats including MP4, WMV, MKV, AVI, MOV, FLV, and TS. Also, you can select the recording quality, frame rate as well as codec according to your needs. Furthermore, it allows you to record the mouse cursor movement.
In addition to recording screens, MiniTool Video Converter is also a free file converter that can convert video and audio files in various formats. Also, it can help you download videos, audio, subtitles, and playlists from YouTube.
Main Features of MiniTool Video Converter:
- It saves recordings in high quality.
- It supports saving recordings in some popular formats.
- It is a screen recorder without time limits and watermarks.
- It is a batch video converter.
- It can convert video to 4K.
- …
How to Record a Zoom Presentation with MiniTool Video Converter
Once you are in the Zoom meeting room and ready to record a Zoom presentation, you can refer to the below detailed steps to record a Zoom presentation using MiniTool Video Converter.
Step 1. You can click the below download button to get the installer of MiniTool Video Converter and install it on your desktop based on the screen prompts.
MiniTool Video ConverterClick to Download100%Clean & Safe
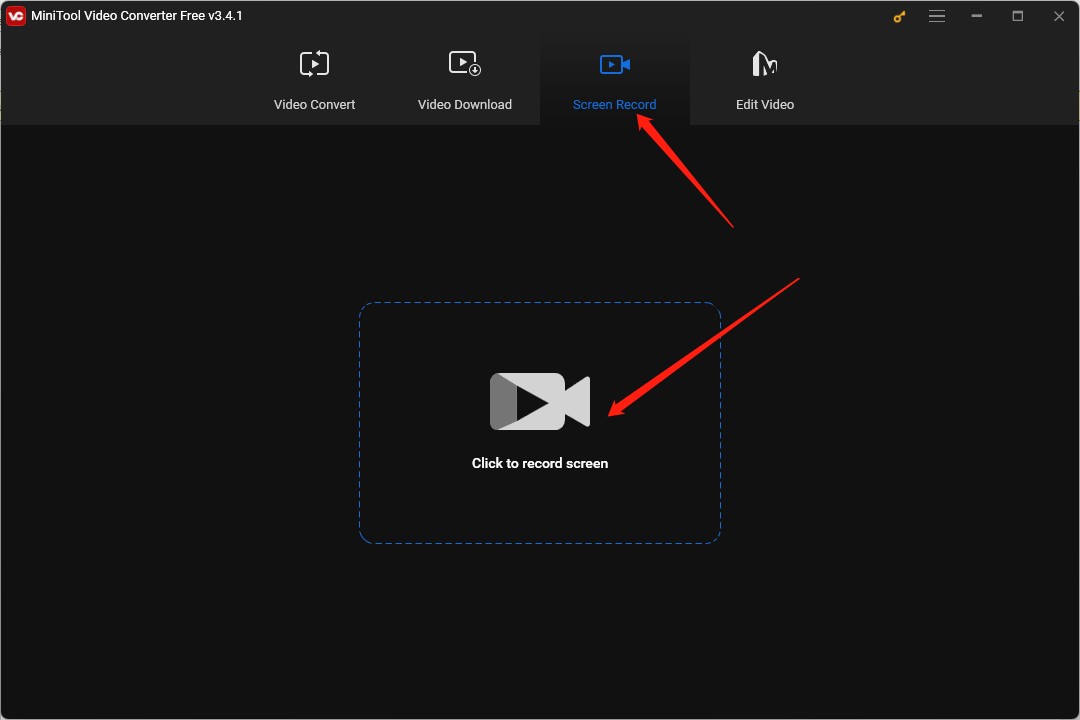
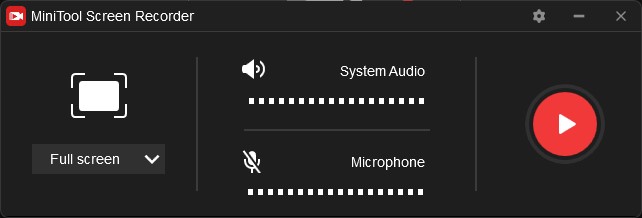
Step 2. Launch MiniTool Video Converter and click the Screen Record tab. Click the Click to record screen area to open the MiniTool Screen Recorder.
Step 3. You can keep the default option Full screen to record the entire screen. Or if you want to record a selected area, you can click the inverted arrow next to Full screen to choose the Select region option and drag the mouse cursor to choose the recording area.
Step 4. For the audio recording settings, you can choose to record the system audio and audio from a microphone according to your needs.
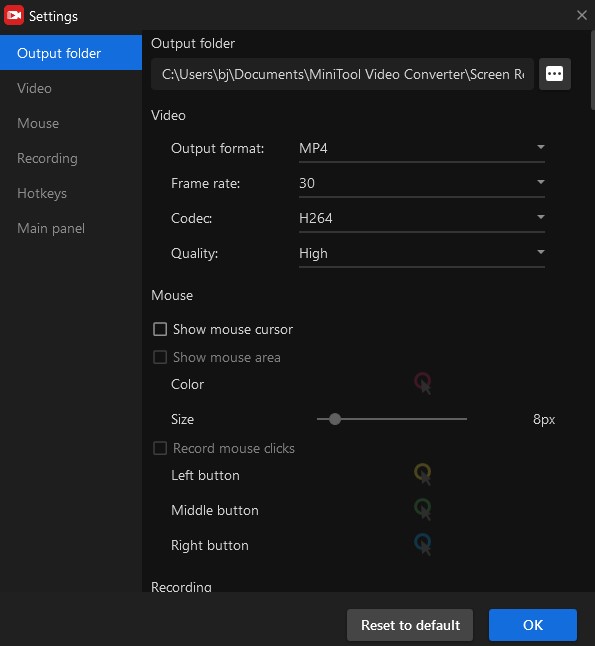
Step 5. To make further settings, you can click the Settings icon. In the Settings window, you can choose a folder to save the recordings, select a desired format, and change other settings. Then click OK to save the changes.
Step 6. To start recording, you can click the Record button or press the F6 key on the keyboard. During the recording, you can press F9 to stop and resume recording. After the Zoom presentation is over, you can press F6 again to stop the recording. Later, you can right-click on the recording to preview, rename, or locate the recording.
![How to Record Messenger Video Calls [Windows/Mac/Phone/Online]](https://images.minitool.com/videoconvert.minitool.com/images/uploads/2023/12/how-to-record-messenger-video-call-thumbnail.jpg)
Other Useful Third-party Screen Recorders for Zoom Presentation
To give you more choices, this part also has rounded up several screen recorders for your reference.
#For Windows Users
If you are using a Windows computer, you can try to use Xbox Game Bar, which is an easy-to-use-screen recorder and pre-installed on Windows. Although it is designed to record game clips, it can also help you record a Zoom presentation or other types of videos. Moreover, it not only enables you to record system audio but also allows you to add voiceovers through microphones or other sound input devices. Here are the brief steps:
1. Press Win + G to enable Xbox Game Bar.
2. Click the Capture option and click the Start recording icon or press Windows + Alt + R to start recording.
3. Click Stop recording or press Windows + Alt + R to end recording.
#For Mac Users
For Mac users, there are two recommended screen recording tools for you. The first one is using the built-in shortcut keys to record the screen. You just need to press Shift + Command + 5 on the keyboard to open the Screenshot toolbar, select the recording area, and click Record to start recording. later, you can click the Stop button or press Command + Control + Escape to end the recording.
The second one is using QuickTime Player which is a default application for Mac. It can not only play media but also record screens. You can use it to record all activities on your screen like Zoom presentations, online video conferences, website videos, and others. What’s more, it enables you to make basic editions like trimming, cropping, or rotating videos. For more details, you can read this post: How to Record Video on Mac – QuickTime Player. Furthermore, it can work as a video converter to convert MOV to MP4.
A Recommended Video Editor to Edit Zoom Presentation Recordings
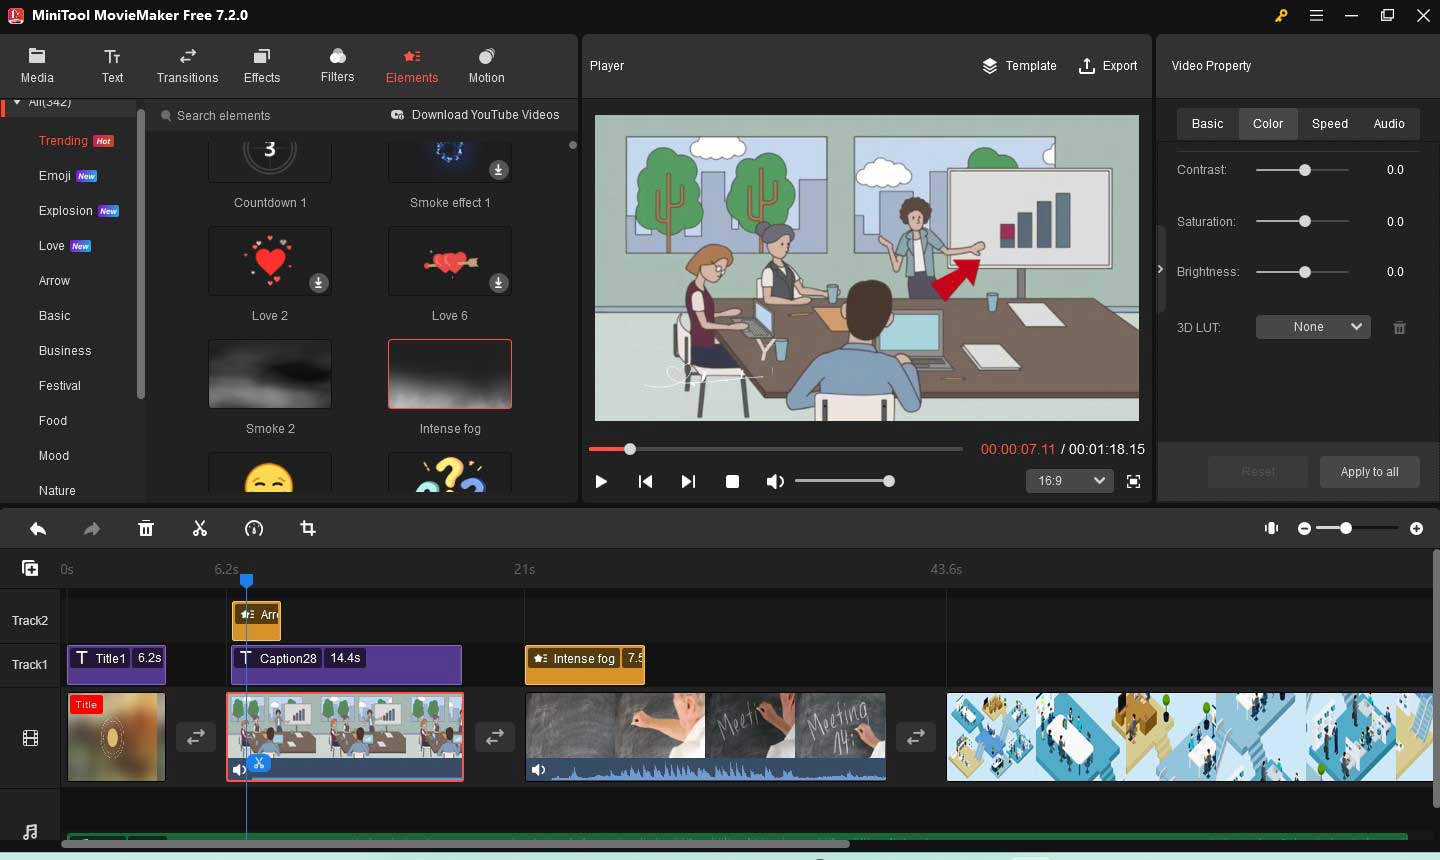
We can't guarantee that every video we record will be perfect. In most cases, we need to edit the recordings in the post-production if we need to share them with others. MiniTool MovieMaker is a good choice for Windows users.
MiniTool MovieMaker is an easy-to-use video editor that is suitable for beginners. It comes with a variety of editing features and royalty-free resources, such as music, transitions, filters, effects, and stickers. Moreover, it supports importing videos, audio as well as pictures in various formats like MP4, MOV, MKV, WMV, MP3, M4A, AAC, PNG, JPG, GIF, and more. Hence, don’t worry your recording format is not supported by MiniTool MovieMaker.
You can use its useful editing features to make your Zoom presentation recordings better. For instance, you can use its trimming, splitting, or cropping tools to remove unwanted and unnecessary parts. Also, MiniTool MovieMaker offers you various elements like arrows or other animated stickers to make your recordings interesting and attractive. Furthermore, you can merge several recording clips into a complete one, add text like captions, titles, and end credits to display information, or make other editions.
With MiniTool MovieMaker, you can edit your Zoom presentation recordings easily and effectively. What’s more, it offers several professional video templates that help you create excellent videos easily and quickly.
MiniTool MovieMakerClick to Download100%Clean & Safe
Wrapping Up
In some cases, you need to record a Zoom presentation. The above has told you how to record a Zoom presentation whether you are a host or participant. You can use MiniTool Video Converter to get a good recording and a better recording experience. Hopefully, this article is helpful to you! If you have any questions or comments about MiniTool Video Converter, please don’t hesitate to email us at support@minitool.com.
You may also like:
About The Author

Position: Columnist
Olivia is always full of enthusiasm for life and loves to record. She often records beautiful and memorable moments of life with her camera and then uses some editing tools to put the photos, videos and audio together. She also has a passion for writing and offers suggestions to readers on images, audio, videos and news. To provide more professional articles and solve problems for readers, she is continuing to learn multimedia as well.
User Comments :