This post explains how to fix the “converting MKV to MP4 no sound” issue. It covers common causes, such as missing audio tracks or conversion errors. Also, it provides solutions like adjusting VLC media player settings or using MiniTool Video Converter and FFmpeg for conversion.
MKV is a video container format that can store video, audio, subtitles, and images in a single file. MP4 (MPEG-4 Part 14) is also a multimedia container format for video, audio, subtitles, and images. Many users convert MKV to MP4 because MP4 offers better compatibility across devices and platforms.
Some users may find that their MP4 videos have no sound after converting MKV to MP4, especially with VLC media player.
Why No Sound When Converting MKV to MP4?
The causes vary for different situations. In general, the following reasons are the most common ones that will result in converting MKV to MP4 no sound.
- No audio data in the original MKV video file.
- Audio data loss/damage during conversion.
- Audio data in the target MP4 file is unreadable.
Below are several possible causes and fixes for this issue.
How to Fix Converting MKV to MP4 No Sound?
- Adjust the VLC conversion settings.
- Use a VLC alternative.
If the converted MP4 has no sound, try adjusting the conversion settings in VLC or using the VLC alternatives.
#1 Adjust Conversion Settings
The second method I would like to introduce lies within the conversion process:
Fast Track:
- Open VLC and choose Convert/Save.
- Import the MKV file.
- Select an MP4 profile and open Profile edition.
- Choose MP4/MOV and keep the original video/audio tracks.
Step 1: Open VLC and choose Convert/Save.
Launch the VLC media player on your device. Then, click on Media in the top left menu and select Convert/Save in the dropdowns.

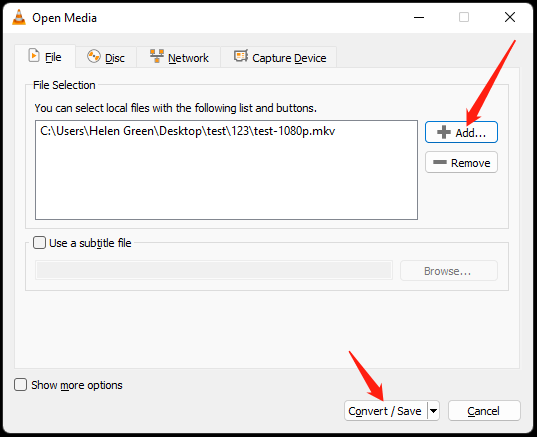
Step 2: Import the MKV file.
In the new window, click the Add button to add the target MKV file. Then, click the Convert/Save button in the lower right.
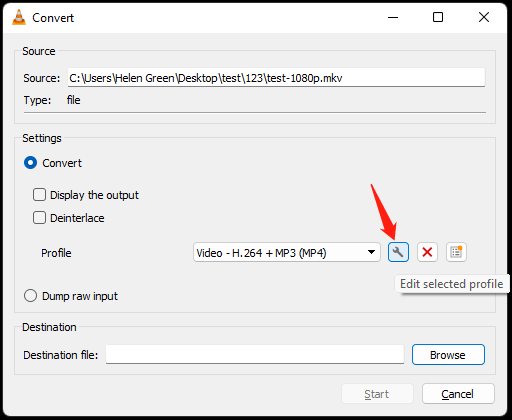
Step 3: Select an MP4 profile and open Profile edition.
Next, select an MP4 profile in the Settings section. Click on the Edit selected profile option next to the selected MP4 profile.
Step 4: Choose MP4/MOV and keep the original video/audio tracks.
In the pop-up Profile edition window, under the Encapsulation tab, choose MP4/MOV.
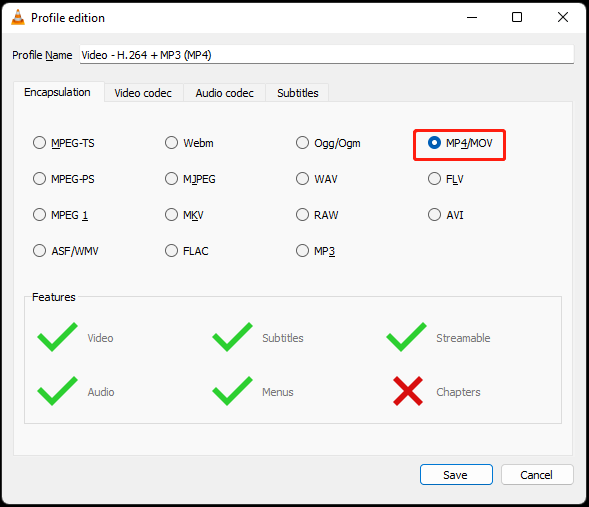
In the Video codec and Audio codec tab, check the Keep original video track option and the Keep original audio track option respectively.

With these settings, it will only change the container of the video from MKV to MP4 without re-encoding anything. Such an operation will avoid audio data loss, damage, or compatibility issues. Therefore, it can prevent converting MKV to MP4 no sound.
#2 Use VLC Alternatives
One way to fix the “converting MKV to MP4 no sound” problem is to use an alternative to VLC media player. Below are two VLC alternatives you can try: MiniTool Video Converter and FFmpeg.
1. Use MiniTool Video Converter
MiniTool Video Converter is a professional and reliable video/audio converting program that can help convert your media files from one format to another with little effort.
“The free version is genuinely fast and clean. No registration, no mandatory account, no ads inside the interface. That’s increasingly rare.”crepal.ai
Here is how to use it to convert MKV to MP4 quickly:
Fast Track:
- Install and open MiniTool Video Converter.
- Import target MKV file.
- Set output format.
- Start the conversion.
- Locate the new file.
Step 1: Install and open MiniTool Video Converter.
Download and install MiniTool Video Converter on the Windows PC.
MiniTool Video ConverterClick to Download100%Clean & Safe
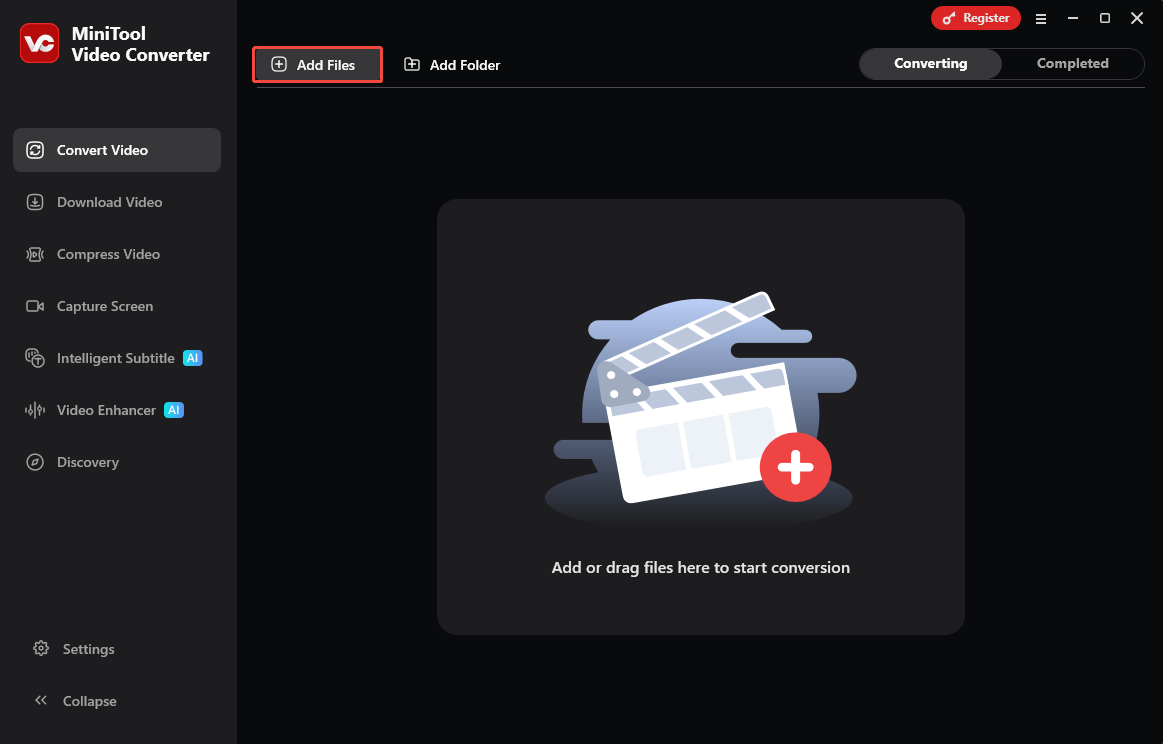
Step 2: Import target MKV file.
Launch the application, choose Add Files to import the MKV file.
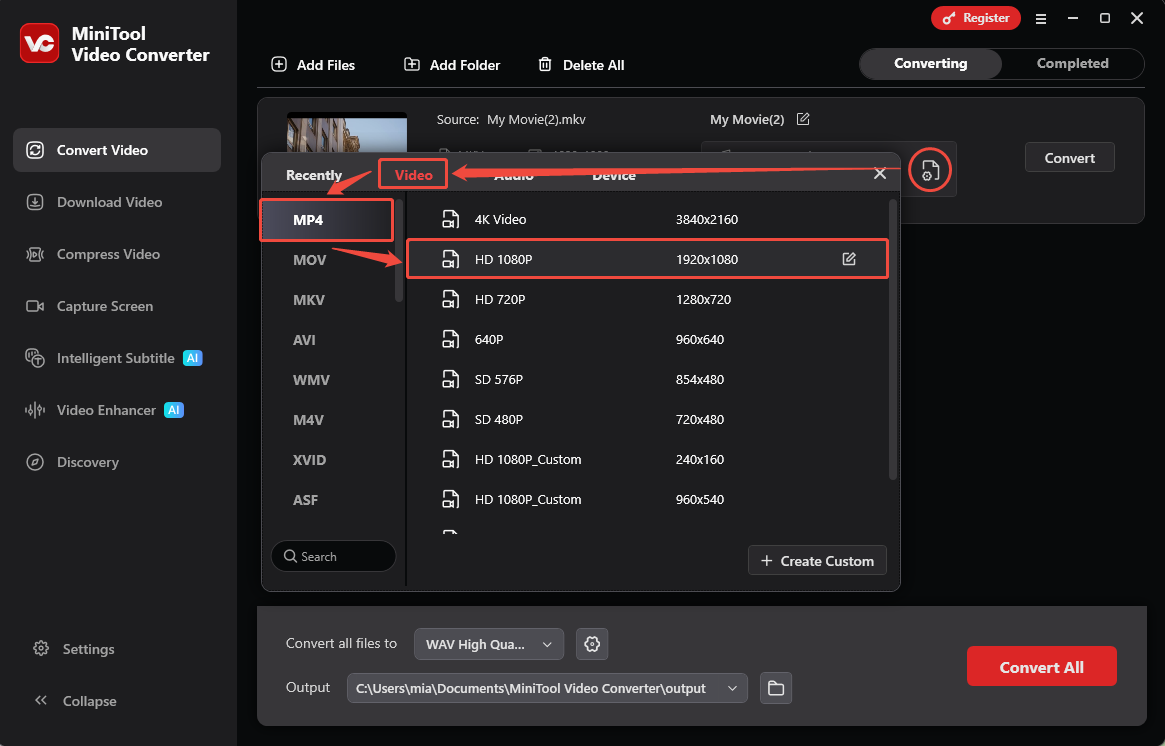
Step 3: Set output format.
Click the gear icon to open the output format window. Then, go to the Video tab, choose MP4, and select the video quality.
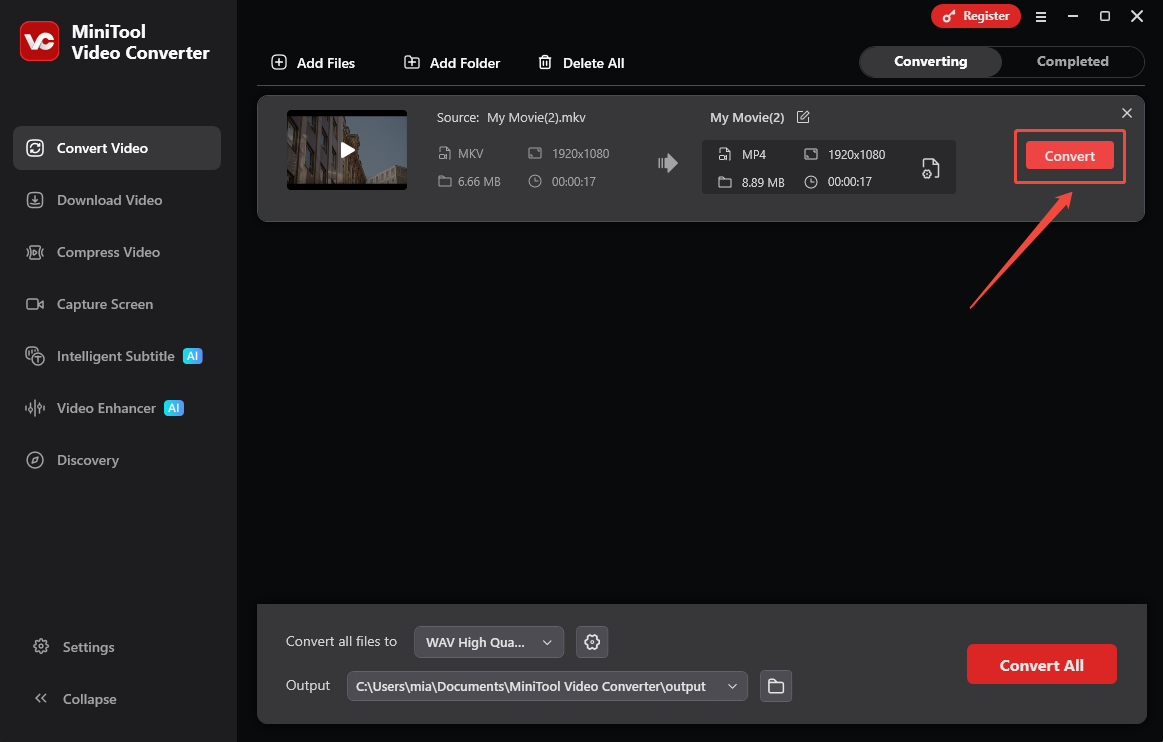
Step 4: Start the conversion.
Click Convert to start conversion.
Step 5: Locate the new file.
Once the conversion process is completed, click the folder icon to locate and view the MP4 file.

Besides MKV and MP4, MiniTool Video Converter also supports formats like MOV, VOB, AVI, FLV, WEBM, XVID, WMV, WMA, WAV, AAC, MP3, and. Try it to convert other videos and audio files with ease.
2. Use FFmpeg
FFmpeg is a free and open-source software project that contains a set of programs and libraries for handling video, audio, as well as other multimedia files. The core of FFmpeg is the command-line ffmpeg tool, which is aimed at processing video and audio files. Thus, it focuses on format transcoding, video scaling, basic editing, video post-production effects, and standards compliance.
Besides, FFmpeg is part of the workflow of lots of other applications. Moreover, its libraries are a core part of many media players like VLC. Furthermore, FFmpeg includes encoders and decoders for many audio and video file formats. Therefore, it is widely used for the transcoding of common and uncommon media files.
Here, you can make use of the copy codec option of FFmpeg to transfer a long video in seconds without the long process of re-encoding by other software:
ffmpeg -i myvideo.mkv myvideo.mp4
Just a simple command without extra complicated options.
![How to Use FFmpeg to Convert MKV to MP4 [Step-by-Step Guide]](https://images.minitool.com/videoconvert.minitool.com/images/uploads/2024/08/ffmpeg-mkv-to-mp4-thumbnail.jpg)
Other useful solutions to the “converting MKV to MP4 no sound” problem are:
- Alter audio sample rate, bitrate, etc. while VLC processing.
- Change strict standard compliance in VLC.
- Update or reinstall VLC.
- Disable all enhancements in the Control Panel.
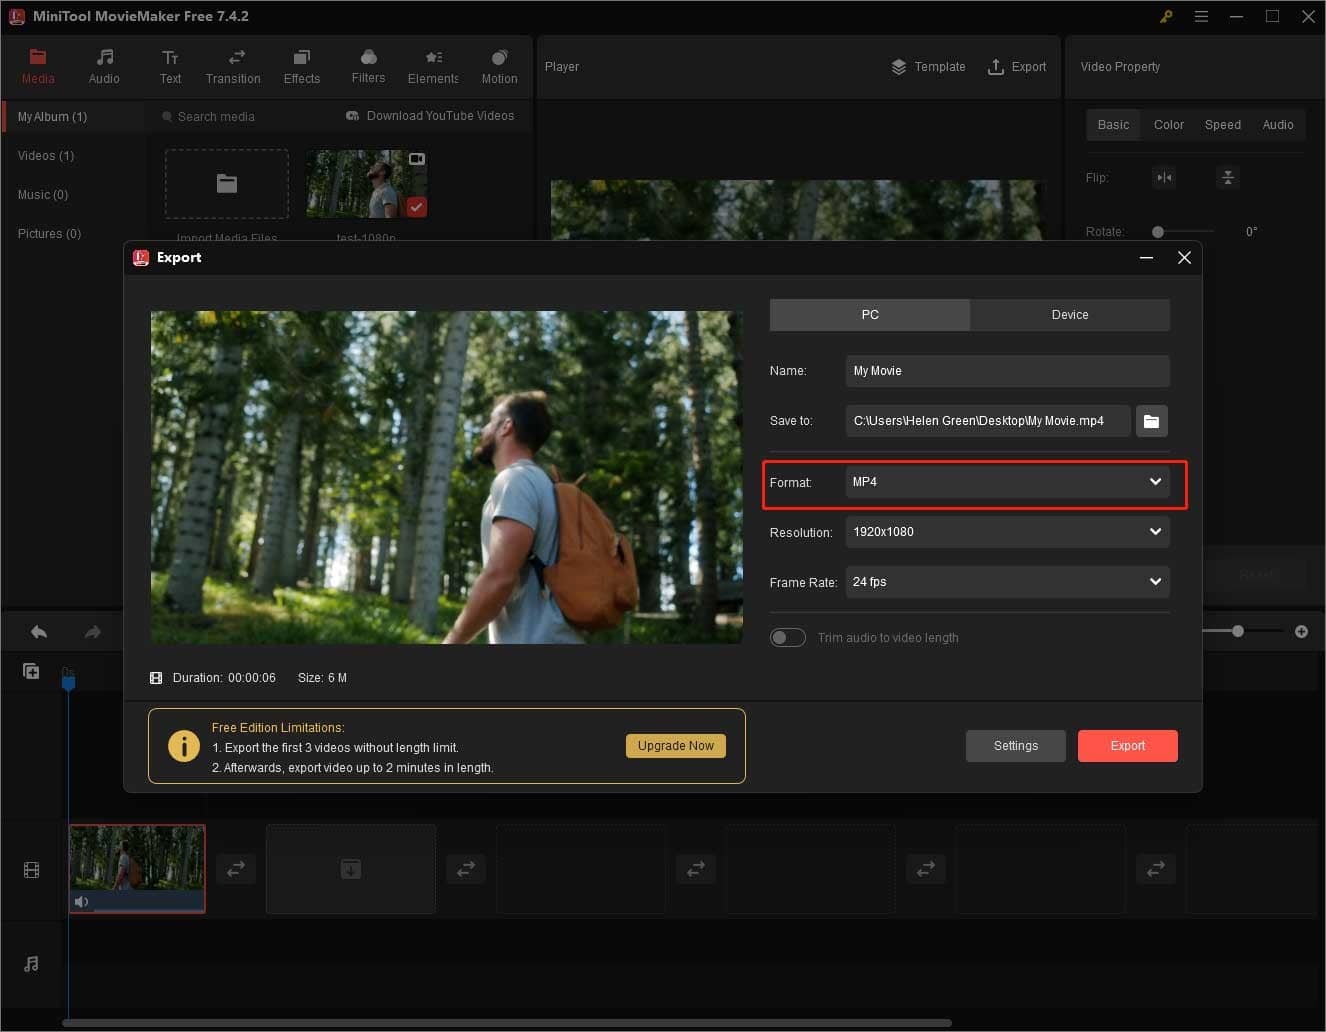
In addition to that, MiniTool MovieMaker can also assist you in converting MKV to MP4 effortlessly. You just need to import the MKV file into this software, add the file to the timeline, and export it in MP4 format.
MiniTool MovieMakerClick to Download100%Clean & Safe
That’s all about the possible fixes for the no sound when converting MKV to MP4 issue. If you have any questions while using MiniTool products, don’t hesitate to contact support@minitool.com.
Converting MKV to MP4 No Sound FAQ
2. Select Media > Convert/Save.
3. Click the Add button and select the video file.
4. Click the arrow on the Convert/Save button and select Convert.
5. Select Audio - MP3 for the profile.
Related articles:
User Comments :