VLC is a well-known media player that can play videos/movies in any format. But sometimes it faces issues when playing MKV files like choppy or laggy playback or even VLC won’t play MKV.
In this guide from MiniTool Video Converter, you’ll learn several possible methods to fix VLC not playing MKV and also help you enjoy a smooth playback in VLC.
Prat 1: Does VLC Support MKV Format
VLC is a free and open-source media player compatible with Windows, macOS, Linux, Android, ChromeOS, iOS, etc. It works with almost all video and audio formats as well as a long of subtitles formats.As for video formats, VLC supports MP4, MKV, AVI, ASF, M2TS, MOV, and more. There’s no doubt that VLC can play MKV files.Because of the powerful video playback functionality, many people change VLC as the default player. However, sometimes when they’re trying to use VLC watch a movie on the computer, it seems that VLC won’t play the MKV file.Also, they could face some issues when playing MKV is VLC, including no sound during the playback, choppiness video, skipping of MKV video, failing to load MKV subtitles, a black when playing MKV, VLC stopping abruptly, or VLC keeping crashing.Why VLC can’t play MKV files well? Here’re some common reasons.#1. Outdated VLC version.If you’re using an out-of-date version of the VLC media player, you might encounter some issues when playing videos.#2. Missing codecs.If the required codec for MKV is missing from the VLC media player, VLC won’t play the file because it can’t identify the video or audio codec.#3. The MKV file is corrupted.VLC won’t play MKV files if the file itself is damaged.#4. Improper playback settings in VLC.Improper playback settings in VLC can also be the reason for VLC not playing MKV, such as hardware decoding.It must be disappointing when VLC won’t play your MKV files or has problems during playback. To help you play MKV videos smoothly in VLC, you can try the following tips.Note:
MKV is a Matroska video container format, usually used for storing movies and TV shows. It supports several types of audio and video codecs. Learn more about MKV files.
Part 2: VLC Won’t Play MKV Files? How to Fix It
Here’s a step-by-step guide on how to fix VLC not playing MKV on Windows.Fix 1: Close and Restart VLC
When VLC isn’t working properly, you can close it and restart it. When it has issues with playing MKV files, the simplest solution is to restart it and try again.Fix 2: Update VLC to the Latest Version
If you haven’t updated the VLC media player for a long time and still using an older version to play MKV files, try to update VLC to the latest version to fix the problem.To update VLC, open this application, click Help in the top menu bar, and select Check for Updates.... If a new version is available, click Yes to continue.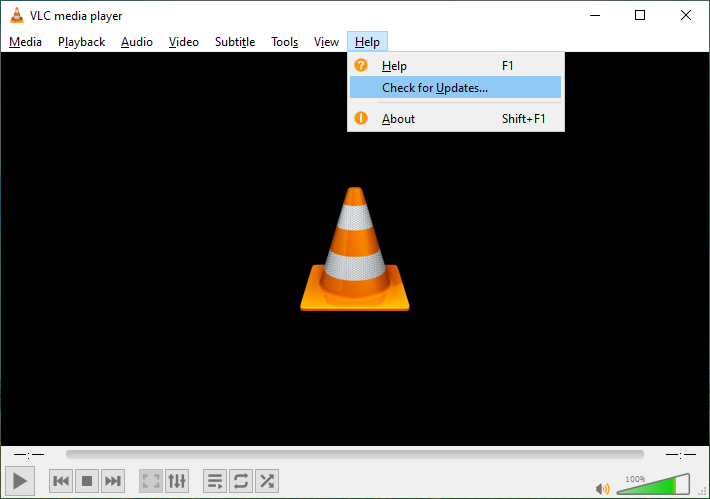
Fix 3: Increase the File Caching Value
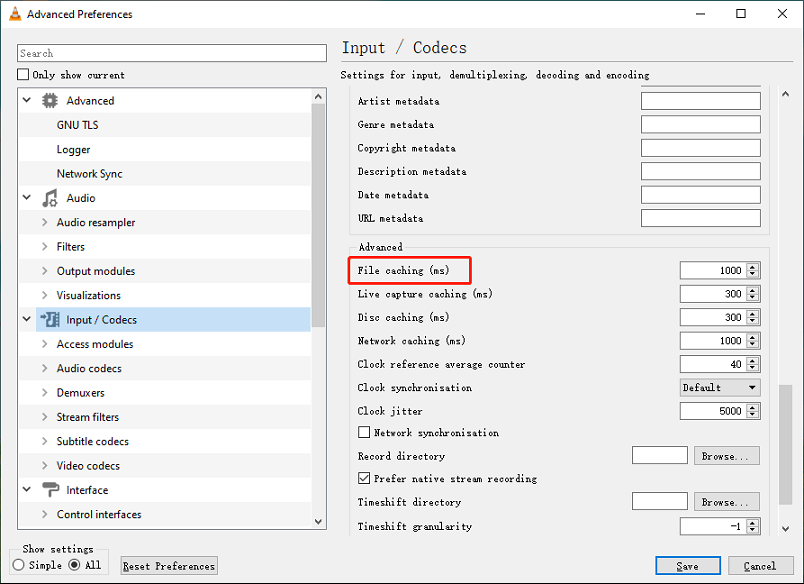
If the playback is choppy or skipped when playing MKV in VLC, you can increase the file caching value to fix the issue. Follow these steps:- Open the VLC media player, and select Tools > Preferences.
- At the bottom left corner, select All for Show settings
- Click the Input / Codecs under Advanced on the left side.
- Scroll down and go to the Advanced section, and change the value of File caching (ms) to a higher value like 1000. Click Save to save your changes.
 After that, restart VLC and open your MKV file and check if it can play MKV video files correctly. If not, continue to try the next method.
Fix 4: Change the Video Output Setting
Follow the steps below to change the video output settings in VLC.- Launch the VLC media player, and click Tools > Preferences.
- Click the Audio tab at the top, make sure the Enable audio option is selected, and click Save.
- Move to the next Video tab, make sure the Enable video option is selected, change the Output setting from Automatic to OpenGL video output, and click Save.
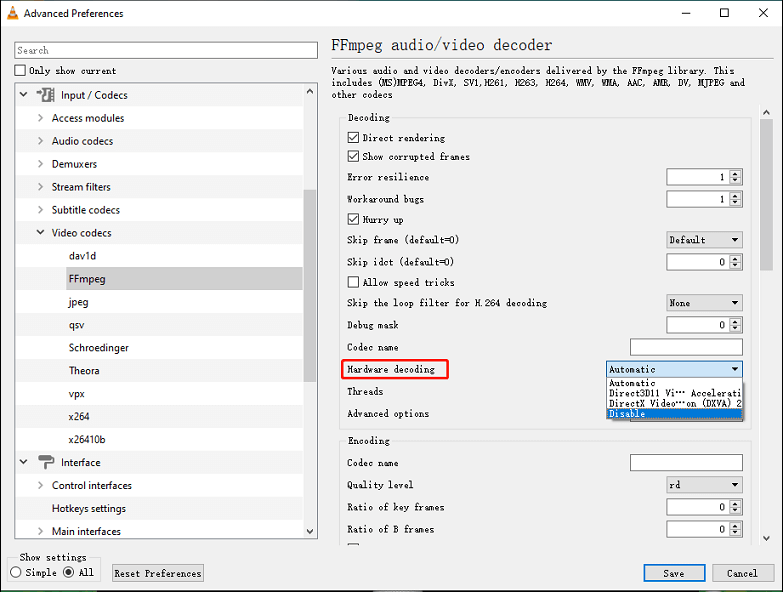
Fix 5: Disable Hardware Decoding
When VLC won’t play MKV files, you can disable the hardware decoding feature in VLC to make this application work better. This might also fix the MKV file not playing on VLC.- Open the VLC media player and click Tools > Preferences.
- Click All at the bottom left corner.
- Expand the Input / Codecs tab, click Video codecs, and choose FFmpeg.
- On the right side, change the Hardware decoding setting from Automatic to Disable.
- Click Save to save your changes. Relaunch VLC and load your MKV file again.
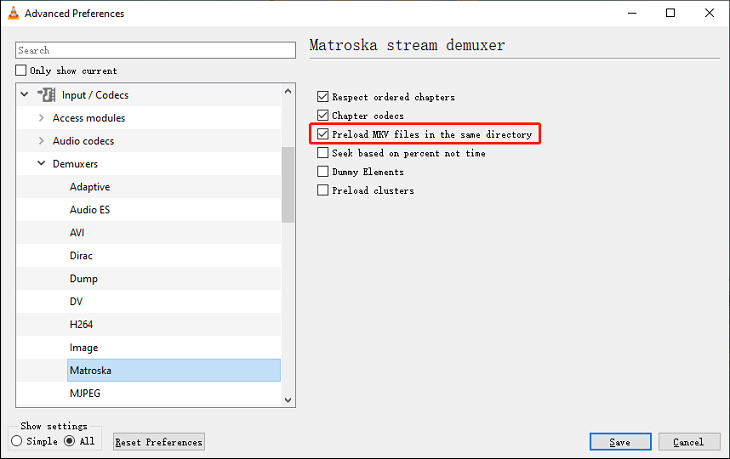
Fix 6: Disable MKV File Preloading
Another possible solution to MKV file playback issues is to disable MKV file preloading in VLC. Here’s how:- Open the VLC media player and click Tools > Preferences.
- Click All at the bottom left corner.
- Click on the Input / Codecs tab, click Video codecs, and choose Demuxers > Matroska.
- Deselect Preload MKV files in the same directory on the right side, and click Save.
Fix 7: Reinstall VLC
To fix VLC not playing MKV, you can also uninstall and reinstall the VLC media player on your computer.Related: [Official] Download VLC Media Player for Windows 11 & Fix IssuesFix 8: Install VLC Codec for VLC or Convert MKV to MP4
When you’re trying to play MKV in VLC, if an error message says VLC could not identify the audio or video codec. You can install the MKV codec for VLC to address the issue.K-Lite Codec Pack is recommended here to install new codecs. It has a collection of video and audio codecs for Windows to help users play various video and audio formats that are not supported by the Windows operating system.Alternatively, you can convert the MKV file to another format like MP4. To convert MKV to MP4, you can try MiniTool Video Converter. This software allows you to complete various conversion tasks between video and audio files.MiniTool Video Converter is simple to use and won’t add a watermark to your video.MiniTool Video ConverterClick to Download100%Clean & Safe
Step 1. Download and install MiniTool Video Converter on your PC. After the installation, launch it.Step 2. Click the Add or Drag files here to start conversion area to browse for the video you want to convert. Select this file and click Open.Step 3. Click the icon in the below screenshot that is marked out with a red square. Go to Video, click on MP4, and choose HD 1080P.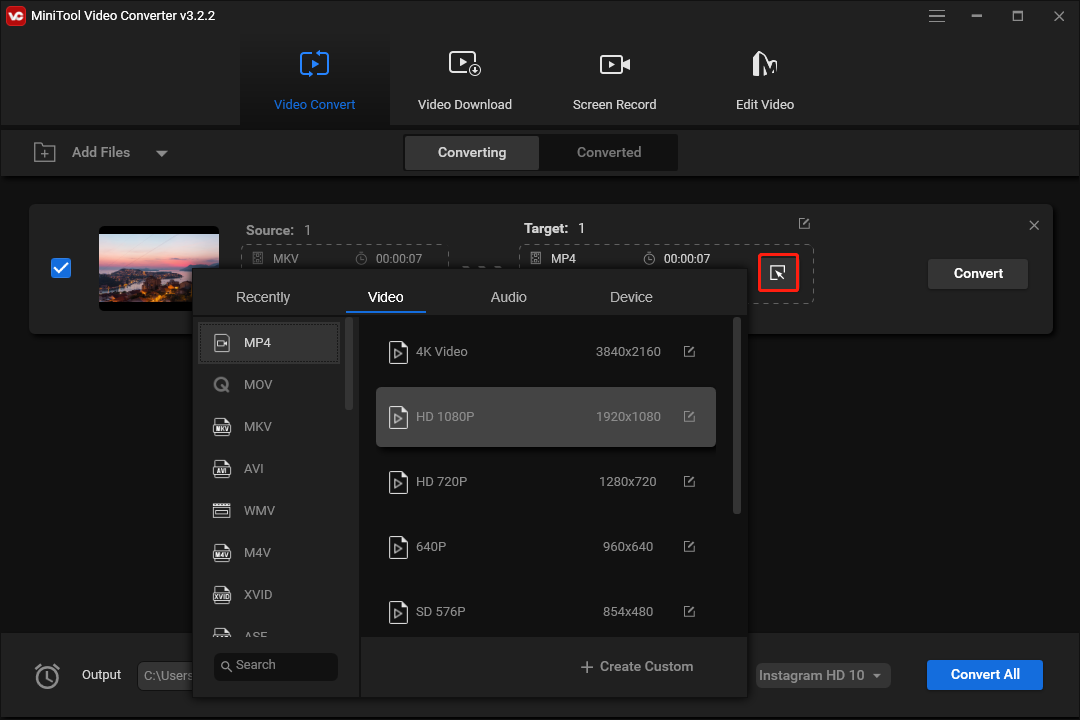 Step 4. Click Convert to start the conversion task. Once done, go to the Converted tab and click the Show in folder to locate the converted file. Then, open the MP4 file with VLC.Apart from that, you can use MiniTool Video Converter to convert a video to a format compatible with Android, iPhone, Samsung, and Huawei. This software also lets you record the computer screen and save your favorite videos from YouTube.
Fix 9: Use Another MKV Player
When the VLC media player can’t play your MKV videos, you can try other MKV players like 5K Player, KMPlayer, and more.Please note, if you want to use the Windows Media Player to play MKV, you have to install MKV codec on your PC, or you can’t play MKV in Windows Media Player as MKV is not a format supported by Windows Media Player.Fix 10: Repair MKV Files
If you still can’t play the MKV file with other media players, that’s probably because the MKV file is damaged. Repair it to fix the VLC not playing MKV problem. You can directly use VLC to fix the corrupted MKV file. Here’s how:- Open the VLC media player and click Media > Convert/Save.
- Click +Add to add the corrupted MKV file and click Convert/Save.
- Choose a profile like Video – H.264 + MP3 (MP4).
- Browse for the folder to save the video and click Start.
Note:
If you want to repair videos from GoPro, Sony, Canon, DJI drones, and other devices or common video files like MP4, MOV, M4V, F4V, etc, MiniTool Video Repair is recommended here because it can repair videos with the Advanced Repair function and supports preview before saving.
MiniTool Video RepairClick to Download100%Clean & Safe
Part 3: How to Fix VLC Pixelated MKV/AVI/MP4
Recently, some users reported that VLC pixelated their videos. When they played MKV, AVI, or MP4 files in full-screen mode, the video became pixelated. How to fix the VLC pixelation issues? Try these ways to fix VLC pixelated MKV/AVI/MP4.Way 1: Disable Hardware-accelerated decodingStep 1. Open the VLC media player and click Tools > Preferences.Step 2. Click on Reset Preferences at the bottom left corner and click OK.Step 3. Close VLC and restart it, and click Tools > Preferences.Step 4. Click on the Input / Codecs tab, click the drop-down menu next to Hardware-accelerated decoding, and choose Disable.Step 3. Click Save to save your changes. Relaunch VLC and try to play your video again.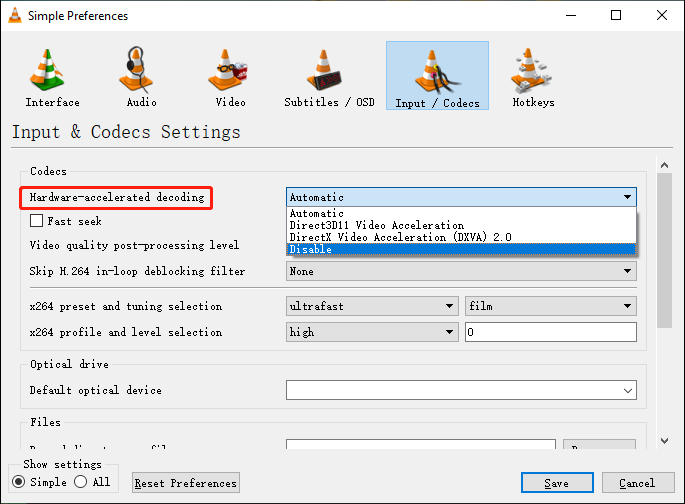 Way 2: Change the VLC buffer settingsStep 1. Open the VLC media player, and select Tools > Preferences.Step 2. Select All at the bottom left corner and click on Stream out.Step 3. On the right menu, change the value of the Stream output muxer caching (ms) to 1500, and click Save.
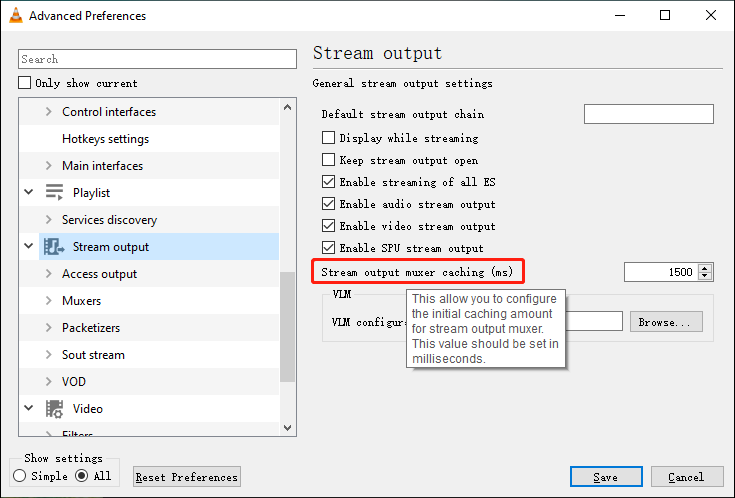 Way 3: Change the Video Output ModuleStep 1. Launch the VLC media player, and go to Tools and Preferences.Step 2. Click the All switch, expand Video options, and choose Output modules.Step 3. Set the Video output module setting to OpenGL video output, and click Save.
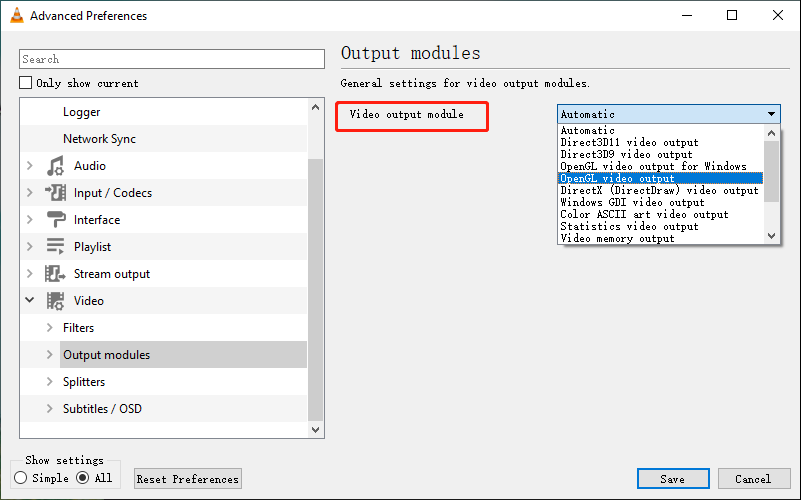 Hope the 3 methods can help you resolve the VLC player pixelated video issues. Alternatively, you can other video players to play your video.
![[4 Ways] Fix “VLC Could Not Open the MP4A Audio Encoder” Windows](https://images.minitool.com/videoconvert.minitool.com/images/uploads/2022/05/vlc-could-not-open-mp4a-audio-encoder-thumbnail.png)
Part 4: Best MKV Video Editor
How to edit MKV files on your Windows PC? There’re many available video editors. Here, MiniTool MovieMaker is recommended for you.MiniTool MovieMakerClick to Download100%Clean & Safe
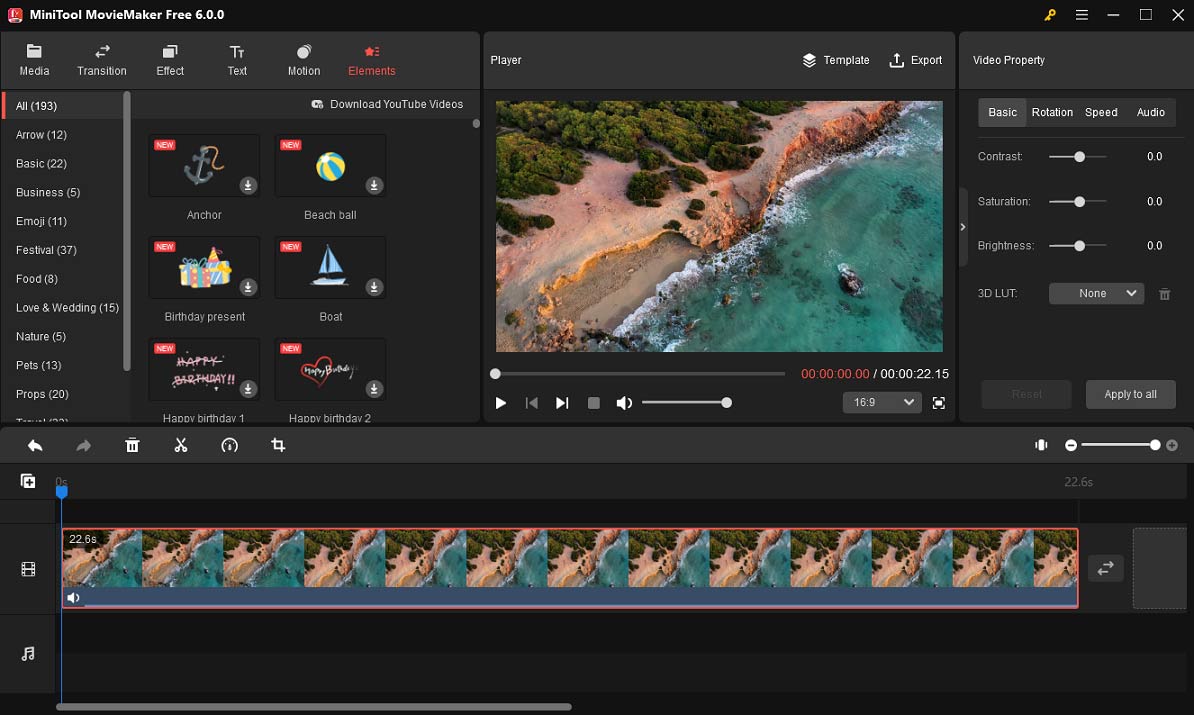 MiniTool MovieMaker lets you quickly play, trim, split, rotate, and crop your MKV video, change the playback speed, reverse videos, edit audio in the video clip, add filters, captions, and stickers to the video, change the video’s aspect ratio, and more.MiniTool MovieMaker is simple to use and doesn’t require any skills. Everyone can use it to create amazing videos without watermarks.
Part 5: Conclusion
When VLC won’t play MKV files properly, you can try the above ways to fix the MKV file not playing on VLC issues whatever VLC stops playback or pixelates the video file. Hope these solutions can help you enjoy smooth playback.Finally, if you have any problems while using MiniTool Video Converter or MovieMaker, you can contact us via support@minitool.com.You may also like:About The Author

Position: Columnist
Cora is a tech writer specializing in digital media workflows, with over six years of hands-on experience in video post-production, media transcoding, and screen capture. Her writing is always clear and practical. Cora also produces in-depth software reviews for users across skill levels to help them find the right tool and enjoy video editing.
User Comments :