How to fix the Windows 10 can’t play MP4 issue? This article shows 8 effective methods, including installing necessary codecs, changing other media players, running the Windows 10 troubleshooter, reinstalling Microsoft Live Essentials, disabling WMV DirectX Video Acceleration, changing the MP4 files’ extension name, modifying the VLC Settings, and converting MP4 to other formats.
MP4 (MPEG-4 Part 14) is known for great compatibility among video formats. Nevertheless, Windows 10 users may find their MP4 files unplayable on common media players. In fact, it is very common to see Windows 10 not play MP4. Perhaps you are being bothered by this issue. To help you get out of it, we have collected some solutions:
- Set up the essential codecs
- Change an MP4 media player
- Run Windows 10’s troubleshooting tool
- Reinstall the Microsoft Live Essentials suite
- Turn off DirectX Video Acceleration
- Adjust the file extension of MP4
- Modify the VLC Media Player settings
- Convert MP4 files into a compatible format
Solution 1: Install the Necessary Codecs
As you know, the MP4 video format is a digital multimedia container format. It is similar to MKV. Like other multimedia digital containers, MP4 relies on different codecs to work properly. If the necessary codecs are not correctly installed, you will be unable to play MP4 videos successfully on your Windows 10 computer.
So, when you encounter the issue that Windows 10 can’t play MP4, you can first try to install the necessary codecs and then check whether the issue can be solved or not.
Which codecs should be installed on your computer? One of the most commonly used codec packs is the K-Lite Codec Pack. You can download the K-Lite Codec Pack and then install it on your PC.
If you want to install other codec packs, you can search for them on the internet and use the official source to download these packs for installation.
After installing the necessary codec, your Windows should be able to play MP4 files. However, if the issue persists, you will need to try the next solution.
Solution 2: Try another MP4 Media Player
Usually, Windows Media Player doesn’t come with all the necessary video codecs and this is always the reason for the issue that Windows 10 can’t play MP4 files.
But if you don’t know which video codec should be installed or you don’t want to install any video codec, you can try other MP4 players on Windows 10, including VLC Media Player, Real Player, KM Player, and so on.
Most third-party MP4 players come with the necessary video codecs. You can just select one according to your situation.
Solution 3: Run the Troubleshooter on Windows 10
Windows 10 Troubleshooter is a Windows snap-in tool that focuses on solving a lot of hardware problems on your computer. Many users have reported that they have solved the issue of MP4 files not playing on Windows 10 by using this tool. So, you can also have a try.
1. Use Windows Troubleshooter via Settings
Here is a simple guide on how to use this tool to fix the issue that Windows 10 can’t play MP4 or MP4 files are not playing:
- Click Start.
- Go to Settings > Update & Security.
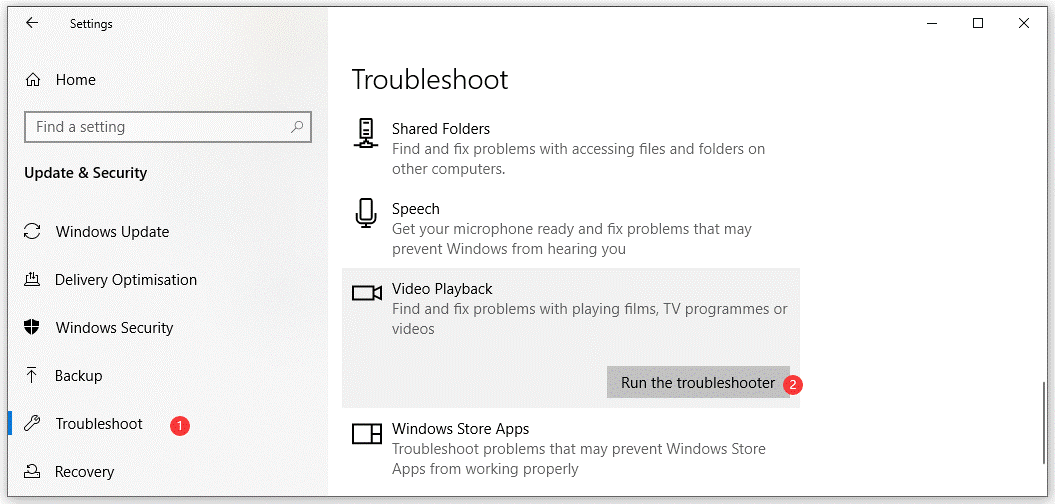
- Click Troubleshoot from the left menu to enter the Troubleshoot section.
- Scroll down to find Video Playback from the right panel and click it.
- Click Run the troubleshooter to open Windows Troubleshooter.
- Follow the on-screen guide to solve the issue you are facing.
2. Use Windows Troubleshooter via Control Panel
You can also access Troubleshooter via Control Panel:
- Use Windows Search to search for control panel and click the first search result.
- Click Troubleshooting from Control Panel.
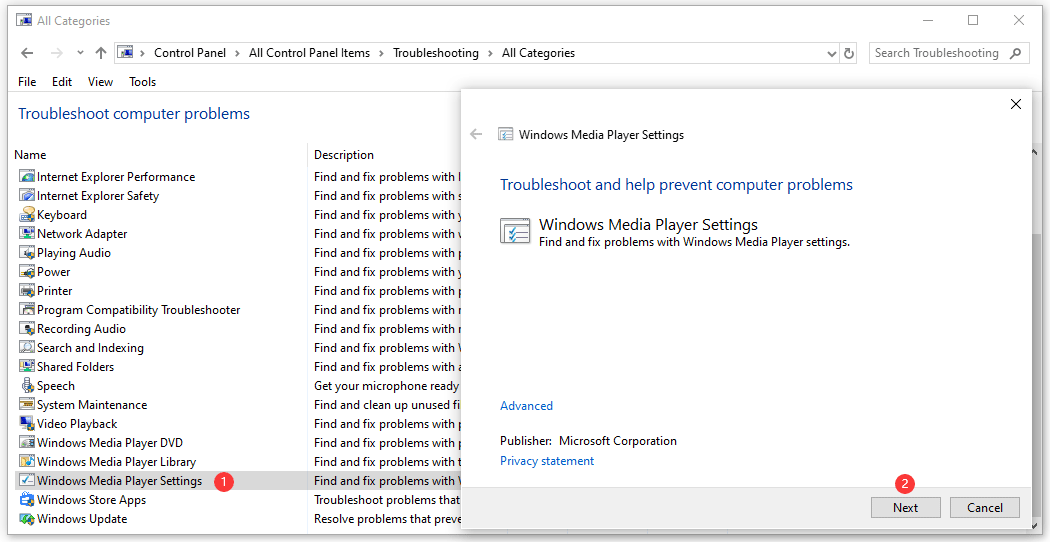
- Click View all from the right list.
- Select Windows Media Player Settings from the troubleshooter’s list.
- Follow the on-screen wizards to fix Windows 10 can’t play MP4 files.
Solution 4: Reinstall Microsoft Live Essentials
This solution is especially for Windows Movie Maker.
If you encounter the issue of Windows 10 can’t play MP4 files/MP4 files not playing when using Windows Movie Maker, you should consider whether there is something wrong with Microsoft Live Essentials.
The best way to fix this issue is to reinstall Microsoft Live Essentials. Before reinstalling it, you need to uninstall it from your computer. This post shows you different ways to uninstall a program from your PC: Four Perfect Ways – How to Uninstall Programs in Windows 10. You can just select one method according to your wishes.
After uninstalling Microsoft Live Essentials from your computer, you need to search for the latest version of it and then download & install it.
Solution 5: Disable WMV DirectX Video Acceleration
Some users report that WMV DirectX video acceleration can also cause the fact that Windows Media Player won’t play MP4 videos. To rule out this possibility, you can turn off this feature and then check whether the issue has been solved or not.
Here is a guide:
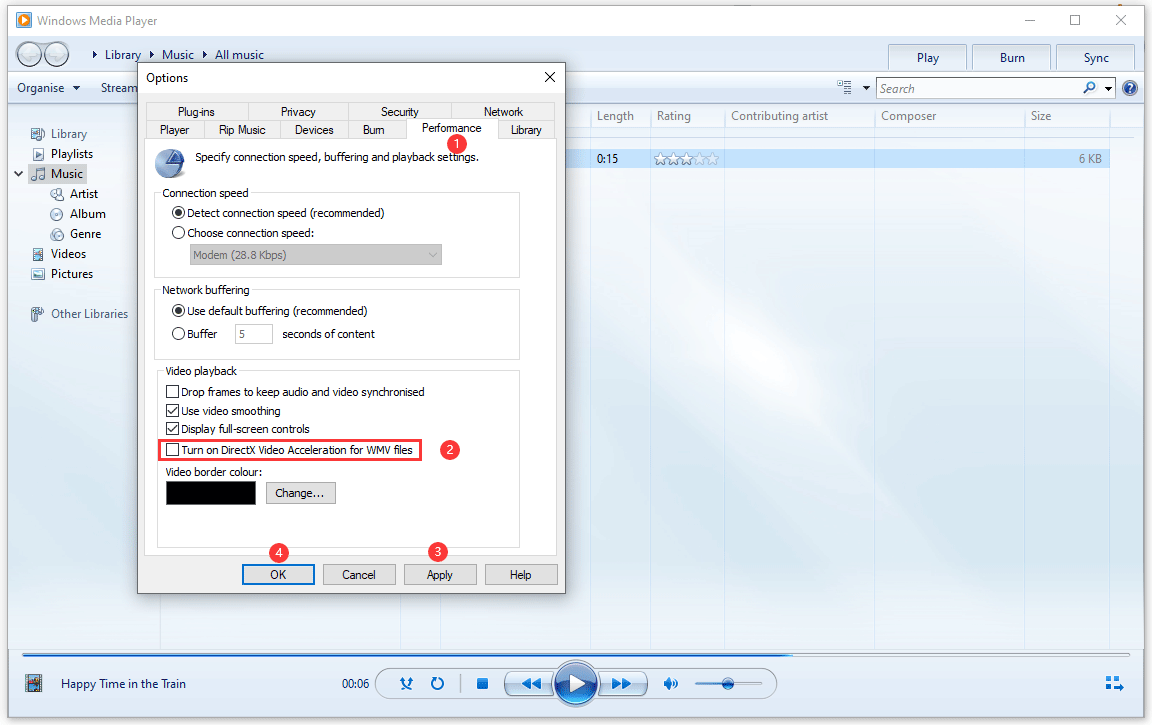
- Open Windows Media Player on your PC.
- Go to Organize > Options.
- Switch to the Performance section and then make sure the Turn on DirectX Video Acceleration for WMV files option is unchecked.
- Click Apply and OK successively to save the changes.
Now, you can restart Windows Media Player and check whether it can play MP4 files successfully.
Solution 6: Change the File Extension for Your MP4 Files
Some users solve the issue by changing the file extension for MP4 files. You can also try this method to see whether it can work. Before doing this, you need to make sure that your files’ extensions are revealed. If not, you can refer to this post to show them: How to Show File Extensions in Windows 10?
Besides, changing the file extension of an MP4 file may make it unavailable. So, you’d better back it up to another location before doing this.
It is very simple to change an MP4 file’s extension.
- Go to find the MP4 file you want to play
- Right-click on that file and then select Rename.
- Change the extension of the file from .mp4 to .mp4v.
- A small window will pop up, saying: If you change a file name extension, the file might become unusable. Are you sure you want to change it? Then, you need to click Yes to confirm the change.
After changing the file extension of the MP4 files, you can go to play the MP4 video again to see whether it works normally.
However, this solution is not available in all situations. It can even break the MP4 video you want to play. We will remind you again: please back up your MP4 file before changing its file extension.
Solution 7: Modify the VLC Settings
If you encounter the issue of MP4 files not playing while using the VLC media player, you should consider whether there is something wrong with the VLC settings. To rule out this possibility, you can change some settings in VLC media player. Here are the things you should do:
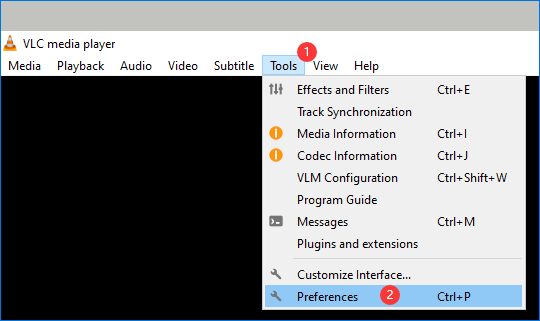
1.Open VLC media player.
2. Go to Tools > Preferences.
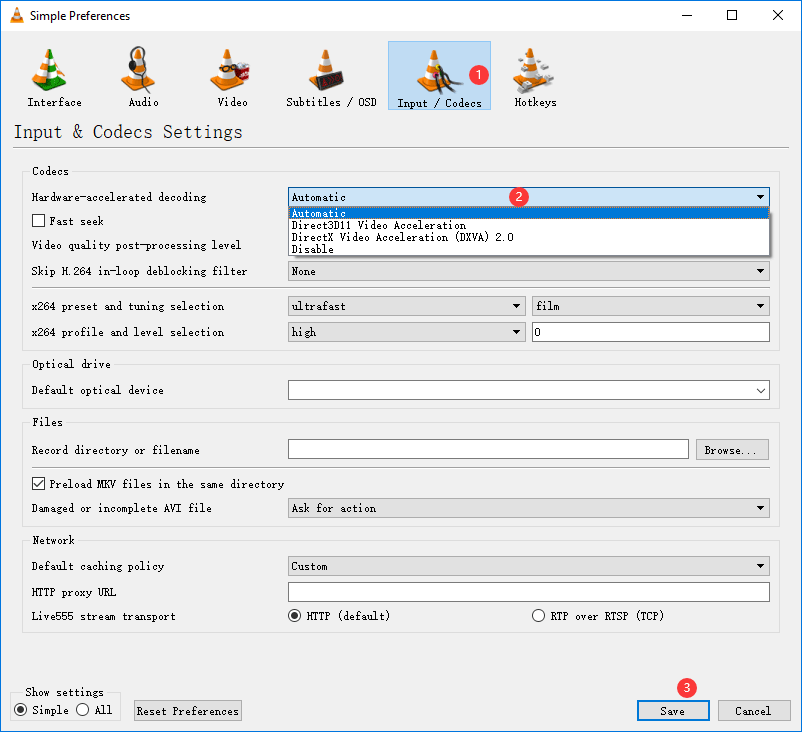
3.You will see the Simple Preferences interface. Then, you need to switch to the Input / Codecs section. Next, find Hardware-accelerated decoding in the Codecs. If it is set as Disable, you need to change it to Automatic.
4. Click Save to keep the change.
However, if Hardware-accelerated decoding is already set as Automatic, this solution will not work for you. You may need to change the video format to solve the issue of MP4 files not playing.
Solution 8: Convert MP4 to a Supported Format
The issue of Windows 10 can’t play MP4 files or MP4 files not playing always happens when the video format is not compatible. The effective method to solve this issue is to convert your MP4 file to a supported video format. MiniTool Video Converter is a good choice. This software is specially designed to convert a video from its current format to another format that you want. Below is a step-by-step guide on how to convert MP4 to MOV using MiniTool Video Converter.
Fast Steps:
- Get MiniTool Video Converter
- Import MP4 video
- Set MOV as the output format
- Start the conversion
- Check the result
Step 1: Download and Install MiniTool Video Converter
Download and follow the on-screen instructions to install MiniTool Video Converter. Then, launch it.
MiniTool Video ConverterClick to Download100%Clean & Safe
Step 2: Upload MP4 File
In the default Convert Video tab, click on the Add Files option to upload an MP4 video.

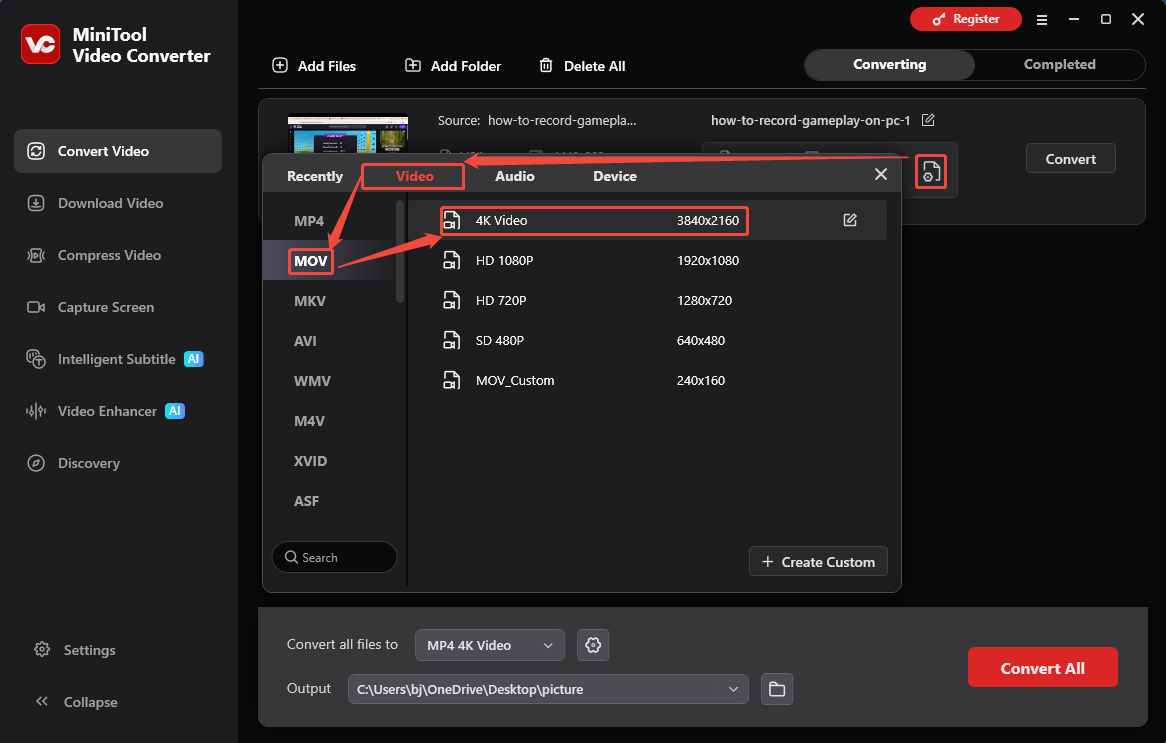
Step 3: Specify MOV as the Output Format
On the imported MP4 conversion task, click on the Gear icon to go to the output format window. There, switch to the Video tab and choose MOV. Then, select a desired resolution option, like 4K Video.
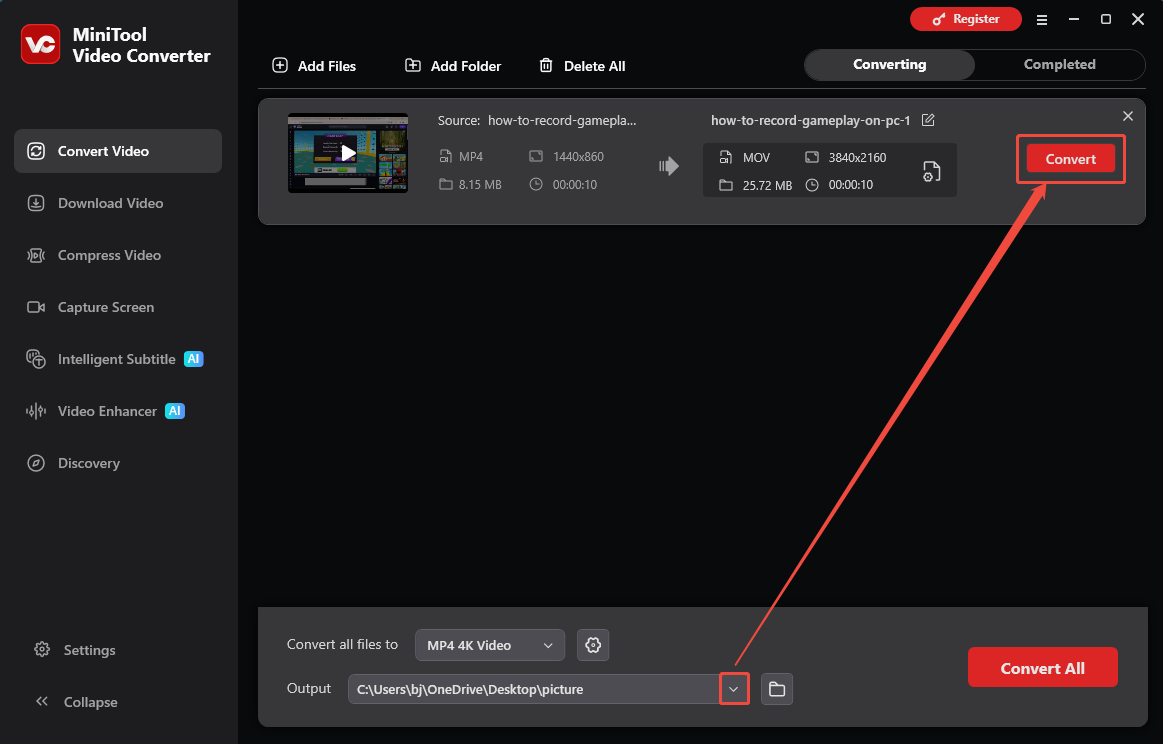
Step 4: Start the Conversion
After setting the output format, expand the Output format to choose a storage location for the converted video. Then, click on the Convert button to start the conversion.
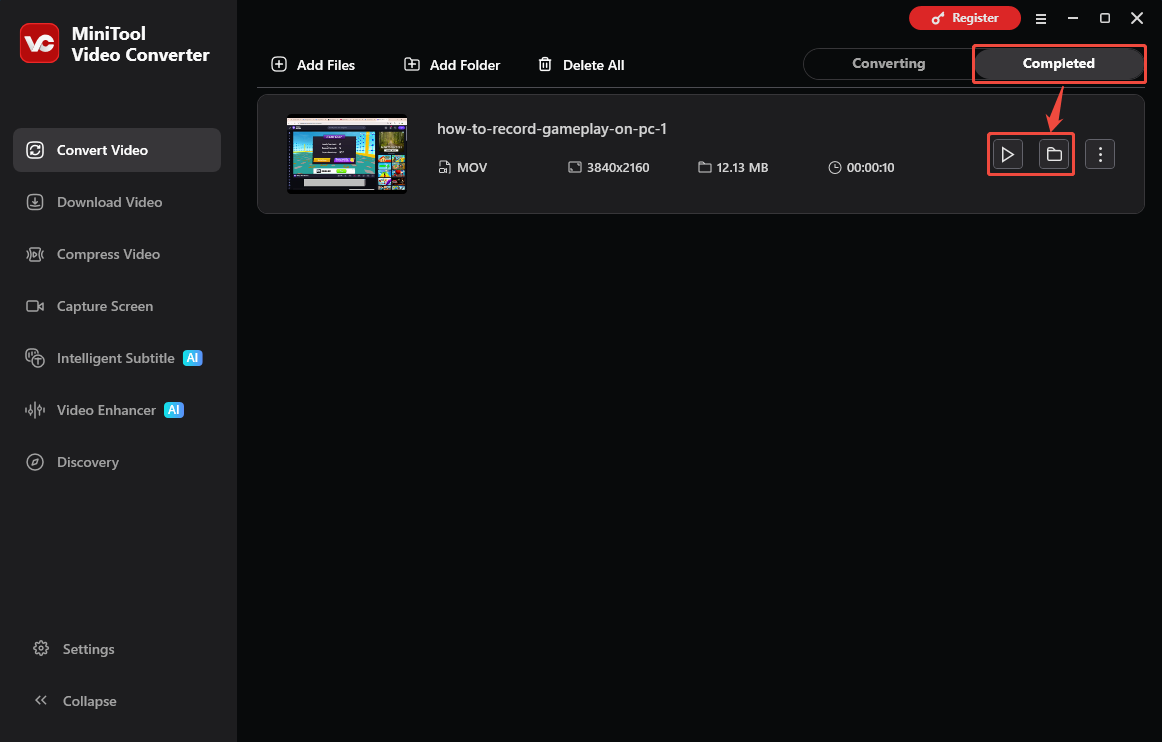
Step 5: Check and Locate the Converted Video
Once the converted video finishes, it will land on the Completed tab. There, click on the Play icon to check this output video. Or click on the Folder icon to locate it on your computer.
Converting MP4 to MOV using Minitool Video Converter is another effective way to solve the problem of Windows 10 not being able to play MP4 files. Additionally, MiniTool Video Converter supports various other video formats, including MKV, AVI, WMV, and M4V with different video qualities. Meanwhile, it also supports audio formats including MP3, WAV, M4A, WMA, AAC, and AC3 with high quality.
Conclusion
This article shows 8 solutions that can effectively solve the issue of Windows can’t play MP4 or MP4 files not playing that you are facing.
If you have any questions while using MiniTool Video Converter, please contact the MiniTool official via support@minitool.com for support.
People Also Ask
1. Try using a different media player.
2. Install the missing codecs.
3. Check if the file is corrupted. If the file is corrupted, download or re-transfer the original file.
4. Disable copy protection.
User Comments :