You just recorded a video clip with VLC but you don’t know where to find it. So where does VLC save recordings? In this MiniTool free video converter post, you will know the answer and how to change the record directory.
Where to Find VLC Recordings?
VLC has a record feature that allows you to record video clips and streaming videos (You can also try MiniTool Video Converter to record your computer screen). Once you stop recording, the recording will be saved to your computer automatically. But it’s hard to find the recording.
Where does VLC save recordings? On Windows, the default save folder is Videos. On Mac, the default save folder is Movies.
How to Change VLC Video Recording Directory?
After knowing the folder saving VLC recordings, you may want to change the default record directory in order to quickly find the recordings. Here’s how to change the VLC recording save path on the computer.
Step 1. Open VLC on your computer.
Step 2. Click Tools in the menu bar and select Preferences.
Step 3. On the Preferences window, switch to the Input / Codecs tab and find the Files section.
Step 4. In the Files section, click the Browse… button next to the Record directory or filename box and select a folder to save recordings.
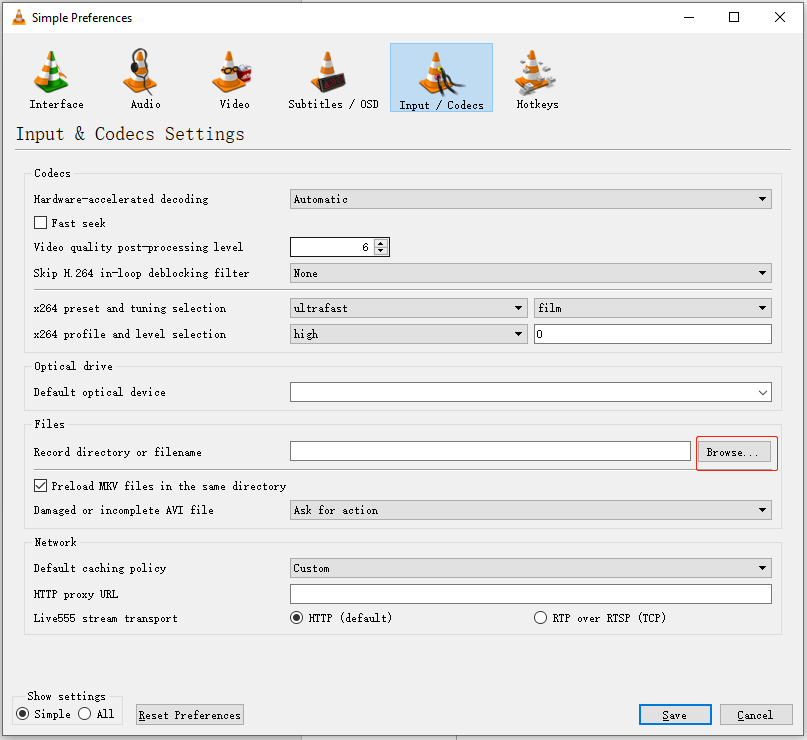
Step 5. Click on Save to save the change.
Also read: How to Trim/Cut a Video in VLC on Windows and Mac

How to Screen Record Video with VLC?
This part will show you how to screen record videos with VLC on Windows and Mac.
On Windows
- Open the video you want to record in VLC.
- Navigate to View > Advanced Control and you will see the red Record button.
- Click on it when you want to record the video.
- Click the Record button again to stop the recording.
On Mac
- Launch VLC and drag and drop the target video file to VLC.
- Click on Playback in the menu bar.
- From the drop-down list, choose the Record option.
- To stop the recording, choose Playback > Stop.
Best VLC Alternative to Record Video on Windows
Though VLC is a free tool that can help you record videos, its interface is not intuitive and outdated. What’s more, some of you may encounter various recording issues, like “VLC not recording streaming video”, “VLC record not working”, “VLC recordings show black screen”, or “VLC only record audio not video”. Here’s an excellent VLC alternative for screen recording, called MiniTool Video Converter.
Overview of MiniTool Video Converter
MiniTool Video Converter is a reliable screen recorder that enables you to record everything happening on the screen without time limits or watermarks. This free screen recorder supports recording the 4K screen at standard, high, or original quality. Compared with VLC, its interface is intuitive and user-friendly. You can use it to record a video easily.
How to Record a Video Using MiniTool Video Converter
Step 1. Click the button below to download MiniTool Video Converter and then install it on your computer.
MiniTool Video ConverterClick to Download100%Clean & Safe
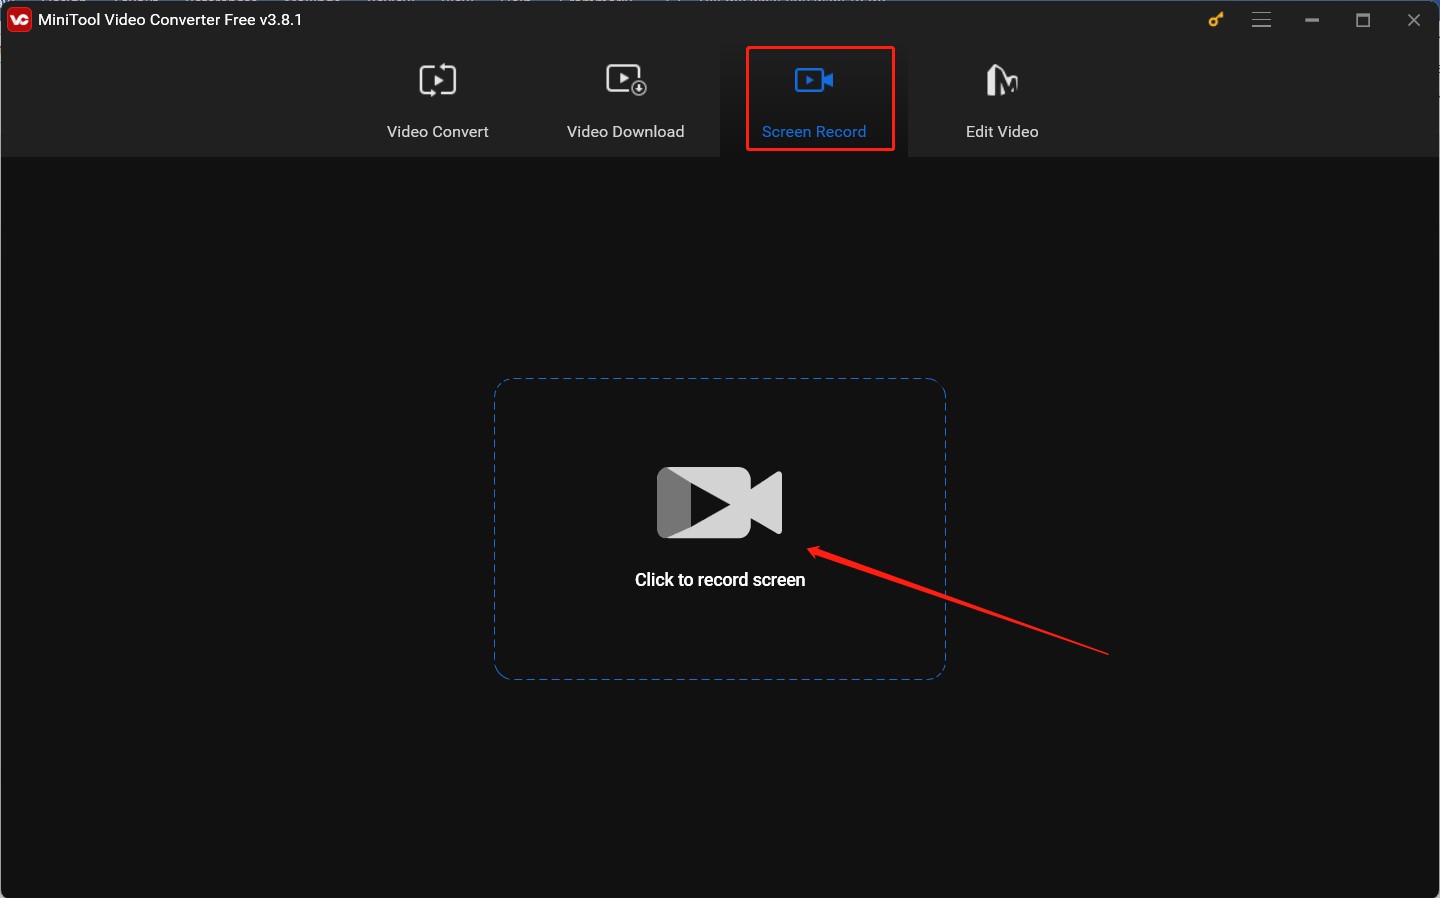
Step 2. Run this program and click the Screen Record option from the top four options. Next, click the Click to record screen region and then the MiniTool Screen Recorder panel will pop up.
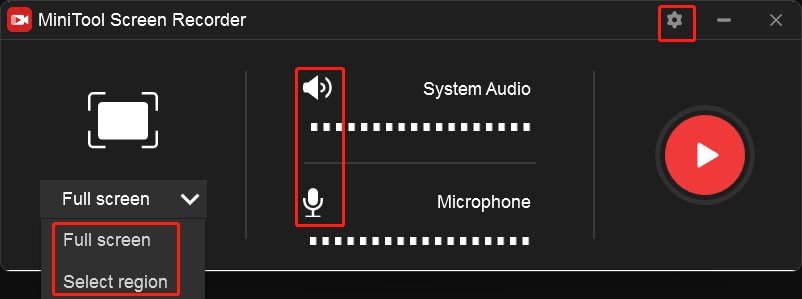
Step 3. On this panel, you can choose to record the video in the Full screen mode or the Select region mode. Meanwhile, you can turn on or turn off the System Audio and Microphone options by clicking the speaker and microphone icons. Furthermore, you can click the Settings icon to adjust other recording settings.
Step 4. Open the video you want to record and press the default F6 key on the keyboard. After the 3-second countdown, play the target video to record it. During the recording process, you can press F9 to pause and resume recording.
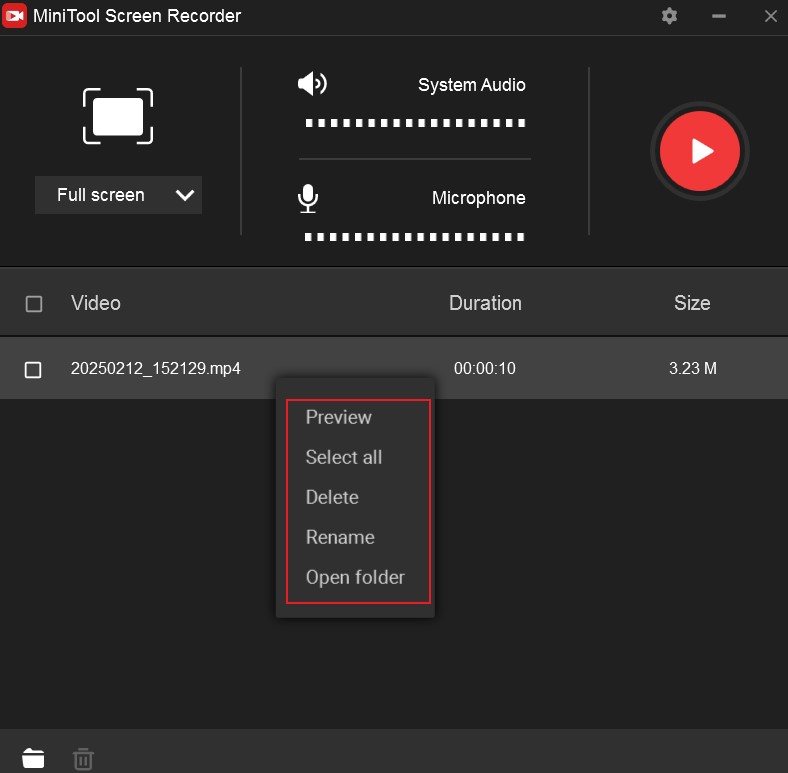
Step 5. When the video is over, you can press F6 to complete the recording. Then the recording will appear in the MiniTool Screen Recorder list. You can right-click on it to make operations like previewing, renaming, or locating the recorded video.
Conclusion
Where does VLC save recordings? After reading this post, you must know the answer. In this post, I also show you how to change the VLC video recording directory and how to screen record video using VLC. Besides, an easy and free way to record videos is also included.
About The Author

Position: Columnist
Olivia is always full of enthusiasm for life and loves to record. She often records beautiful and memorable moments of life with her camera and then uses some editing tools to put the photos, videos and audio together. She also has a passion for writing and offers suggestions to readers on images, audio, videos and news. To provide more professional articles and solve problems for readers, she is continuing to learn multimedia as well.
User Comments :