VLC is a versatile program with multiple features. It enables you to record not only streaming videos but also audio only. Sometimes, you need to record the music or audio part of a video. It is quite easy to make VLC record audio only. How to record audio with VLC? In the following content, I will walk you through the detailed steps to make an audio recording with VLC.
How to Make VLC Record Audio on Windows
At the beginning, I’d like to introduce you to how to make VLC record audio on Windows PC. Below are detailed steps for your reference.
Step 1. Download VLC from its official website and then install it on your Windows PC. Next, run it.
Step 2. To facilitate stop recording, you can click the View tab from the top menu first and choose the Advanced Controls option. This operation can help you set a new row of controls to feature a Record icon above the Play icon.
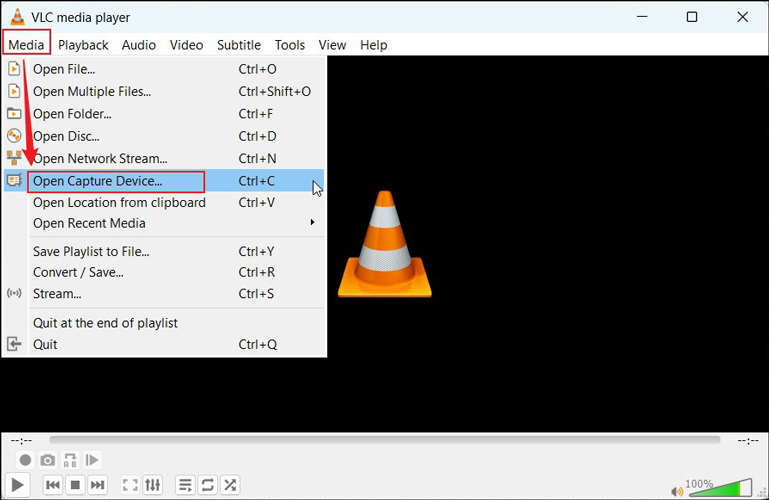
Step 3. Click the Media tab from the top menu and select the Open Capture Device option. Then you will be guided to the Capture Device subtab on the Open Media window.
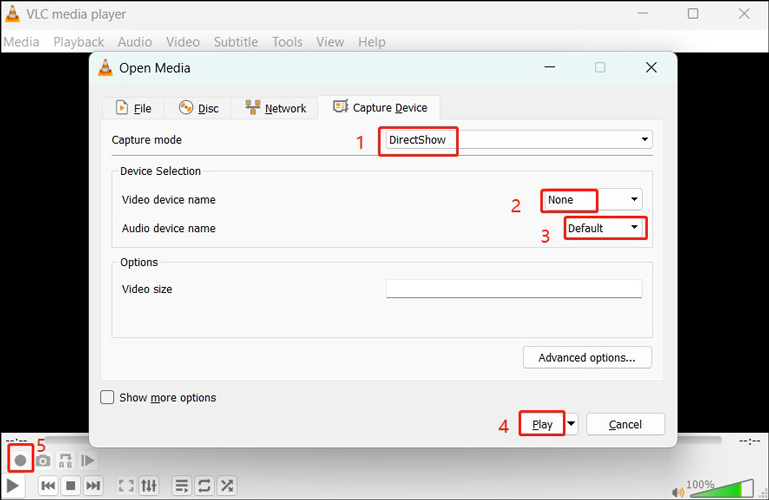
Step 4. Open the Capture mode option and choose a needed one. If you want to record audio from a microphone, choose DirectShow. If you want to record audio from the internal, choose Desktop. Because we don’t need to record the screen, set None for Video device name. Next, open the Audio device name menu and choose your audio input device. Then click on the Play button. Play the audio you want to capture and click the Record icon to start recording.
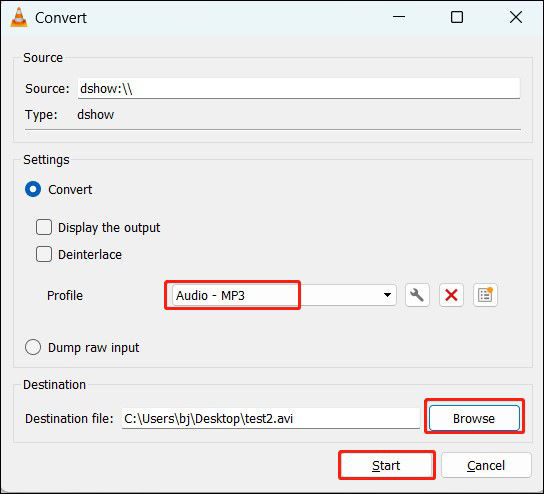
Alternatively, you can click the inverted triangle next to Play to choose the Convert option. Then you can open the Profile list to choose the audio format for the recording and choose a specific destination to save the recorded audio. Next, click the Start button. The recording process will begin after a few seconds. You can go to play the audio you want to record.
Step 5. To end the audio recording, simply hit the square icon behind the Play icon. Then you can go to the selected final destination to find the recorded audio.
MiniTool Video ConverterClick to Download100%Clean & Safe
How to Record Audio with VLC on Mac
If you are a Mac user, you can find how to record audio only using VLC in this part. You can download and install VLC first and then follow the steps below to have a try. Now, let’s get into it.
Step 1. Launch VLC on your Mac computer, click the Media tab, and hit on the Open Capture Device option.
Step 2. To capture audio only, you need to make sure the Video checkbox is not ticked. What you need to do is tick the Audio checkbox and open the Audio list to choose the audio source you want to record. You can choose the Built-in Microphone option to capture the audio from the internal microphone of the Mac. Or you can select the Built-in Input option to choose to record audio from an external microphone. Next, click on the Open button.
Step 3. Hit on the Playback option from the top menu and choose the Record option to start audio recording. Once you want to finish recording, simply hit the square icon at the bottom.
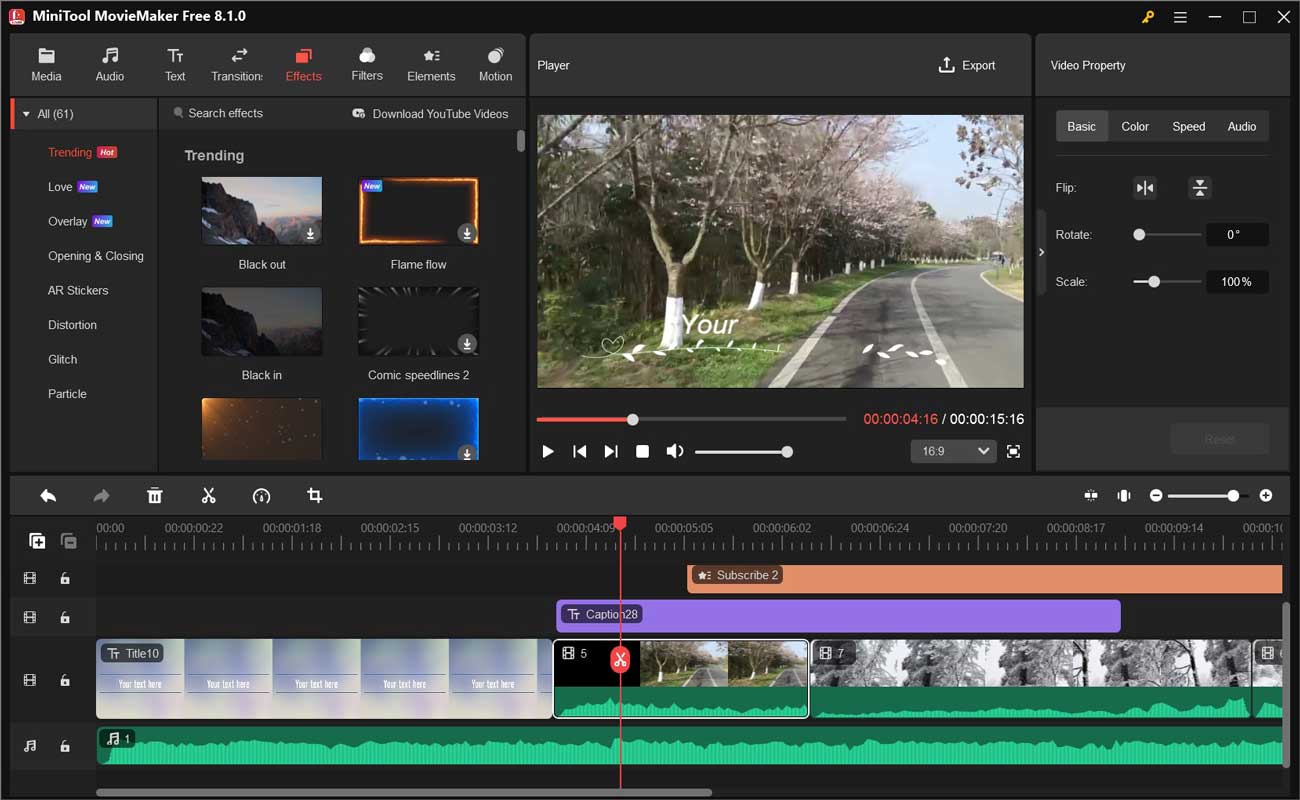
BONUS: How to Edit Recorded Audio and Video Files with Ease
MiniTool MovieMaker is a feature-rich video editor without watermark. It is a multi-track video editor providing various editing features for videos, audio, and images. Moreover, it has many royalty-free resources for editing. It enables you to edit audio and video files in most common formats, including but not limited to MP4, MOV, 3GP, FLV, MP3, M4A, WAV, and WV. You can use it to perfect the recorded audio and video files from VLC. Just click the download button to get this free program and explore your unlimited creativities for video creation.
MiniTool MovieMakerClick to Download100%Clean & Safe
Conclusion
VLC is a powerful tool that can help you not only play media but also record audio and screen. How to make VLC record audio only? The above has provided you an ultimate guidance. After reading the above tutorial, you can also learn how to record screen with audio using VLC. Hopefully, this post will be helpful to you.
About The Author

Position: Columnist
Olivia is always full of enthusiasm for life and loves to record. She often records beautiful and memorable moments of life with her camera and then uses some editing tools to put the photos, videos and audio together. She also has a passion for writing and offers suggestions to readers on images, audio, videos and news. To provide more professional articles and solve problems for readers, she is continuing to learn multimedia as well.
User Comments :