This essay elucidated by MiniTool official website mainly provides you with four useful methods to deal with the “Streaming / Transcoding failed: VLC could not open the mp4a audio encoder” problem.
“VLC Could Not Open the MP4A Audio Encoder” Error Cases
When you use the VLC media player, you may encounter the “VLC could not open the MP4A audio encoder” issue similar to the following situations.
Case 1
I am attempting to use the Convert/Save feature of VLC to convert an mkv file to an mp4. (H.264 video with MPEG-4 AAC audio)
I get the following error:
VLC could not open the mp4a audio encoder
Case 2
I installed VLC, and works well apparently, on Suse Linux Enterprise Desktop 11 SP3, but when I streamed some video (.flv format) I get this error.-
Streaming / Transcoding failed
Or, your error may be another similar one like “VLC could not open the MPGA audio encoder”, “VLC does not support the audio or video format mp4a”, “VLC cannot find audio encoder mp4a”, “VLC cannot open mp4a audio encoder”, or “VLC could not open the MP4V video encoder“. How to deal with those problems?
#1 Fix “VLC Could Not Open the MP4A Audio Encoder” Issue by Altering “Strict Standard Compliance” Setting
First of all, you can handle the VLC media player problem by changing its strict standard compliance setting.
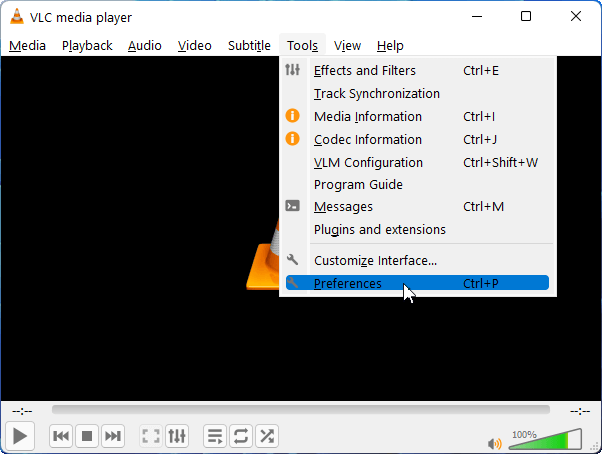
1. Go to Tools > Preferences in the VLC media player.
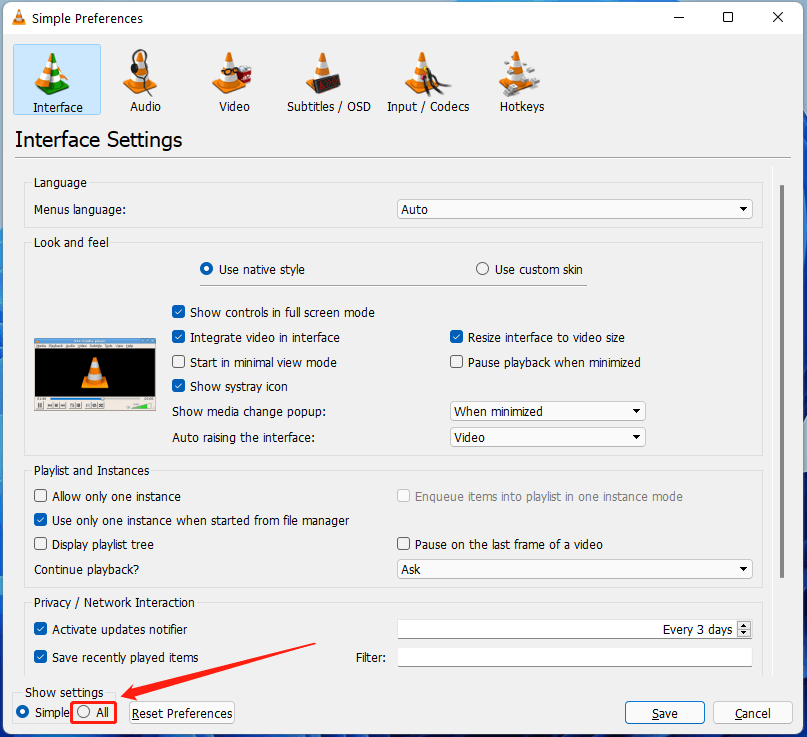
2. In the Simple Preferences popup, select All under Show settings in the bottom left corner.
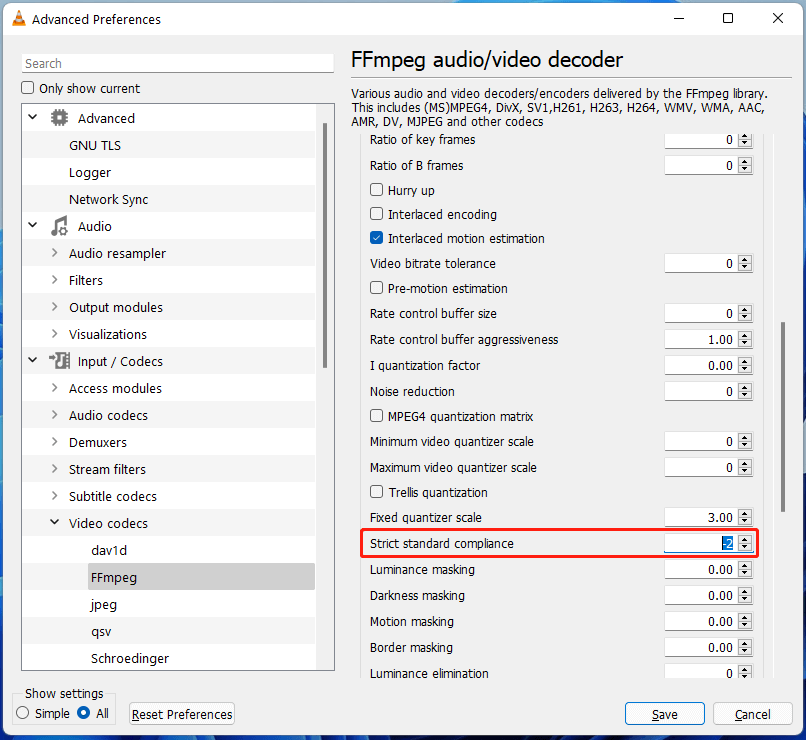
3. In the new Advanced Preferences window, unfold the Video codecs option under the Input / Codecs section and choose FFmpeg.
4. Scroll down in the right area and find the Strict standard compliance. Then, decrease its value from 0 to -2.
5. Finally, click the Save button to save the change.
#2 Handle “VLC Could Not Open the MP4A Audio Encoder” Error Through Resetting Preferences
Secondly, you can try to deal with the error message by relying on resetting the preferences settings to their default configurations. Just navigate to the Simple Preferences window with the steps described above and click on the Reset Preferences button next to the Show settings option. Then, it will ask for your confirmation, just click OK to confirm.
#3 Solve “VLC Could Not Open the MP4A Audio Encoder” Problem via changing Video & Audio Codec Settings
Thirdly, you are able to avoid the bad situation by doing some changes to both video and audio codec settings.
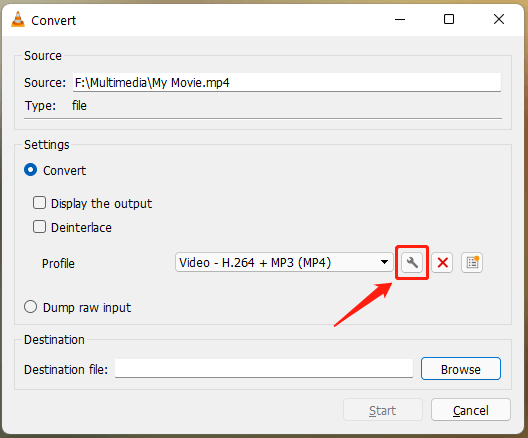
1. Proceed with the video conversion process until you arrive at the Convert window.
2. Click on the Edit selected profile icon (wrench).

3. In the pop-up Profile edition window, switch to the Video codec tab.
4. Check the Keep original video track option.
5. Move to the Audio codec tab and tick the same option.
6. Lastly, click the Save button to store the changes.
Then, you can continue your conversion without the “VLC could not open the MP4A audio encoder” warning.
#4 Avoid the “VLC Could Not Open the MP4A Audio Encoder” Message by Reinstalling VLC
If you come across this error message while playing a video with VLC, the most probable reason is that the current version of VLC lacks the MPEG AAC audio encoder. You can either update your VLC player to the latest edition or uninstall and reinstall it on your computer.
Related Articles
- 5 Ways to Fix Adobe Media Encoder Crashes When Rendering
- Adobe Media Encoder Not Activated & How to Get It for Free?
- [9 Ways] Fix Adobe Media Encoder Not Connecting to Project
- [Solved] How to Fix After Effects Not Sending to Media Encoder?
- Microsoft Expression Encoder: A Comprehensive Tool for Video Encoding and Screen Capture


User Comments :