

The MKV file no sound issue can result from an unsupported audio codec, a corrupted file, an outdated audio driver, or an unsuitable media player. Try another player, convert the MKV or change its audio codec with MiniTool Video Converter, install K-Lite Codec Pack, update or reinstall the audio driver, run Windows Troubleshooter, or repair the damaged MKV file.
MKV is a popular container format that can hold video, audio, subtitles, and picture tracks in one file. It is open and free without patent or license restrictions and is widely used to store multimedia content, such as movies and TV shows.
However, some MKV files may have no sound when played. This article explains the potential causes and provides 6 feasible solutions.
What Causes the Problem of MKV File No Sound
- Unsupported MKV Audio Codec
- Corrupted MKV File
- Outdated Audio Drivers
- Unsuitable Media Player
#Cause 1. Unsupported MKV Audio Codec
Audio in the MKV file can be encoded by various codecs, such as AAC, MP3, DTS, AC3, and FLAC. Generally, audio encoded by MP3 or AAC is compatible with most video players. However, if the MKV file uses a DTS (Digital Theatre System) audio codec, it can’t play in some video players.
#Cause 2. Corrupted MKV File
If the MKV file is damaged, it can also cause the MKV file no sound or even no video. MKV files downloaded from unauthorized sites or unverified sources can be easily corrupted. Furthermore, there are other factors that can make MKV files corrupted, including improper transfer, device crash, unreliable media player, memory card issues, or improper video conversion.
#Cause 3. Outdated Audio Drivers
Audio drivers play an important role in the quality and performance of the audio system. When you encounter a file with no sound issue, you can suspect that the sound driver is one of the causes of the problem. Because proper audio drivers can make your audio hardware work seamlessly with your operating system and software. There may be various audio problems, like no sound or malfunctioning audio features.
#Cause 4. Unsuitable Media Player
On the one hand, if the media player doesn’t support playing MKV files or MKV files encoded with DTS, you can’t play them successfully. On the other hand, if your media player is installed improperly or is outdated, it may also result in audio problems, such as no sound or audio fading.
After understanding the causes of the MKV file no audio issue, it’s time to learn solutions to it. Let’s explore the following 6 feasible solutions.

Fix 1. Check the Media Player or Try Another Player
In the beginning, you need to check if your media player works properly and supports playing MKV files. If it doesn’t support playing MKV files, you’d better try other MKV players, such as VLC media player and KMPlayer.
Fix 2. Convert the MKV File
Fast steps:
- Install MiniTool Video Converter.
- Import the MKV file.
- Choose the output format and audio codec.
- Choose a destination folder.
- Convert and access the file.
One of the easiest and quickest ways to solve the MKV no audio error is to convert the MKV format or change its audio codec. It is a good choice to convert MKV to MP4.
MiniTool Video Converter is an exceptional video and audio converter. It supports many formats, such as MKV, MP4, M4V, WMV, WebM, MP3, AAC, and more. Furthermore, it enables you to customize output format parameters, including the codec, resolution, frame rate, and bitrate of the video, and the codec, channel, sample rate, and bitrate of audio.
Just follow the steps below to convert MKV to MP4 and change the MKV audio codec with MiniTool Video Converter.
 MiniTool Video Converter
-
 Batch convert video/audio files among 1000+ formats.
 - Quickly compress videos for easy storage and transfer.
- Accurately extract subtitles from video/audio files.
- Effectively enhance video quality.

1. Install MiniTool Video Converter.
Download MiniTool Video Converter and then follow the on-screen instructions to install it on your Windows PC.
2. Import the MKV file.
Launch this free video converter to get to the default Video Convert module. Click the Add Files option, locate the target MKV video, and click Open to import it.
3. Choose the output format and audio codec.
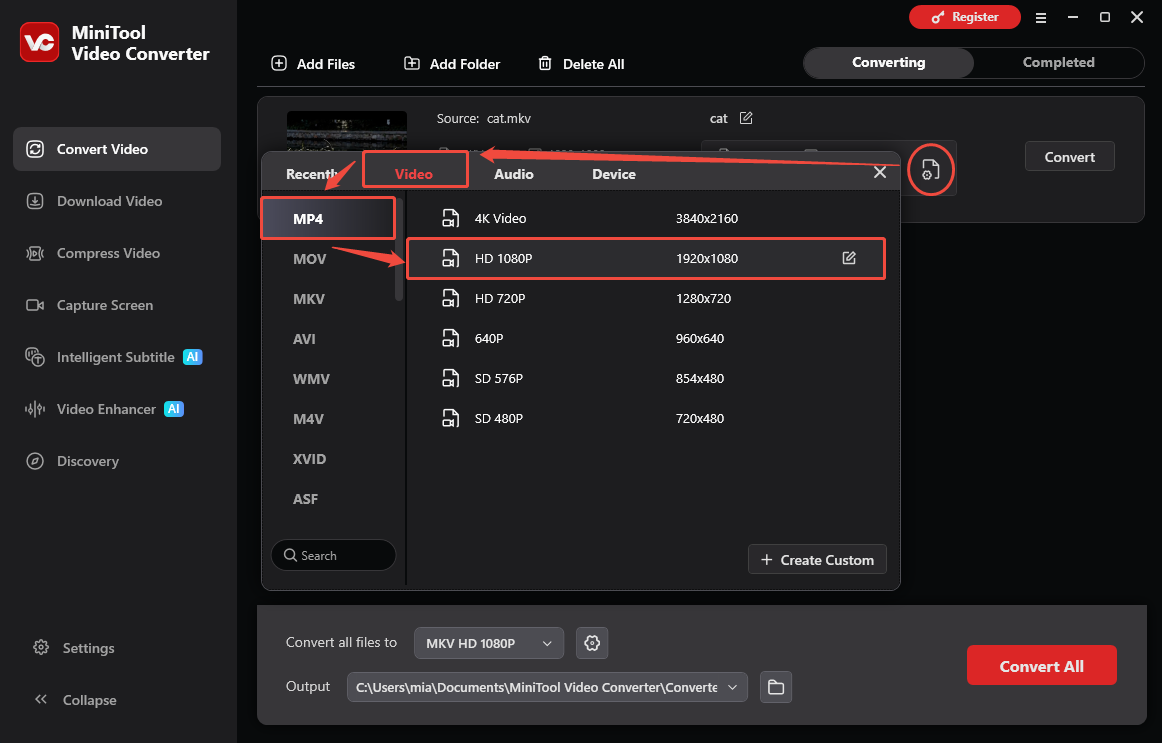
Click the gear icon in the screenshot below to open the output format window, go to the Video tab, choose MP4 as the output format, and choose the video quality you need.
Alternatively, you can select to keep the original MKV format but only change the audio codec:
- Under the Video tab, choose MKV and click the + Create Custom option.
- In this pop-up, open the Encoder list in the Audio section and select MP3 or AAC.
- Personalize other parameters and click the Create button.
- Choose the newly created MKV format.
4. Choose a destination folder.
Open the Output menu and select a folder to save the converted file.
5. Convert and access the file.
Click the Convert button to start the conversion process. Once the conversion is successful, go to the Completed tab, click the play icon to play it, or click the folder icon to locate it.

Fix 3. Install the K-Lite Codec Pack
Fast steps:
- Download K-Lite Codec Pack.
- Install K-Lite Codec Pack.
- Check whether the MKV sound issue is fixed.
Besides, you can try to download and install the K-Lite Codec Pack. It is a collection of audio and video codecs for Microsoft Windows DirectShow. With it, you can play various audio and video formats not supported by the operating system natively. It has 4 editions and all of them are free of charge.
The Basic edition is the smallest version and helps your Windows PC to play files in various formats, including MKV (with DTS audio codec), Ogg, and more. You can install it to resolve the MKV no audio error.
1. Download K-Lite Codec Pack.
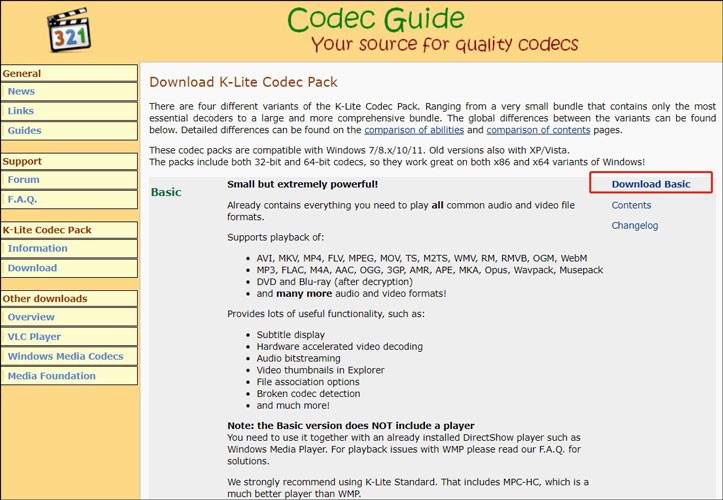
Go to the official download website of K-Lite Codec Pack and choose the Download Basic option to get the installer.
2. Install K-Lite Codec Pack.
Run the downloaded installer, follow the on-screen setup wizard, and click the Install button to begin the installation.
3. Check whether the MKV sound issue is fixed.
Click Finish to exit the setup wizard after the installation process is finished. Then you can replay your MKV file to check if the sound error has been resolved.
Fix 4. Check and Reinstall the Audio Driver
With the Audio Driver, your computer can interact with audio hardware like speakers, headphones, and microphones. It helps process audio data to make sure the sound can be played back properly and without interruption.
If you use an outdated audio driver, it may cause audio problems like no sound. You can follow the steps below to update the audio driver or reinstall the audio driver.
How to Check for an Update for the Audio Driver
Fast steps:
- Open Device Manager.
- Update the audio driver.
- Search for available driver updates.
1. Open Device Manager.
In the Start search box, type in Device Manager to find it and click Open to access it.
2. Update the audio driver.
Expand the Sound, video and game controllers dropdown, right-click on the sound card or audio device you use, and choose the Update driver option.
3. Search for available driver updates.
Select the Search automatically for drivers option, and your computer will go to search for available updates for your sound card and audio device.
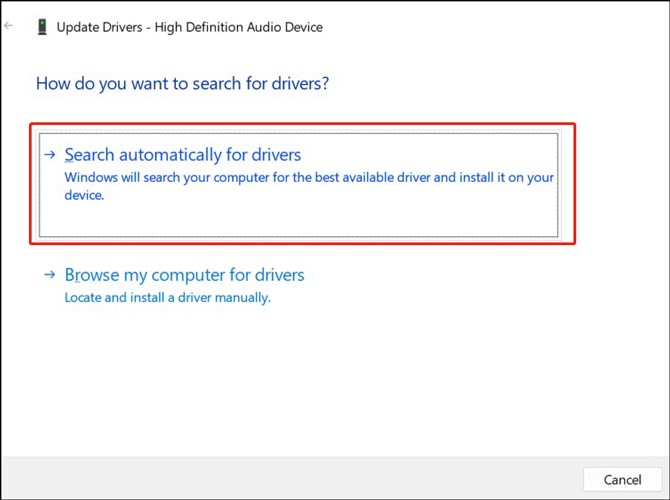
You can follow the instructions to finish the update process if there is an update available. If Windows doesn’t find any updates, you can also go to the manufacturer's website to check if any updates are available.
How to Reinstall Audio Driver
You can also choose to reinstall the audio driver when there is no update. After opening the Sound, video and game controllers menu, you can right-click on the audio driver you want to reinstall and choose the Uninstall device option. Then tick the Delete the driver software for this device checkbox and click Uninstall. Next, restart your computer and Windows will prompt you to reinstall the audio driver.
Fix 5. Use the Windows Troubleshooter
Fast steps:
- On Windows 11, go to Settings > System > Troubleshoot.
- Under Get up and running, click Run the troubleshooter next to Play Audio.
Windows Troubleshooter is a useful tool for Windows users to diagnose and fix common problems with their computers. It can identify audio playback and recording problems and detect other issues like disabled audio services and incorrect audio device selection. Then it can fix many common audio problems automatically.
If the problem can’t be fixed automatically, it will provide you with step-by-step guidance to resolve the problem. When you encounter the MKV no audio issue, you can try Windows Audio Troubleshooter.
1. Open the audio troubleshooter.
Click the Start icon to choose Settings, click the Update & Security option in the left sidebar, and choose Troubleshoot.
2. Run the Play Audio troubleshooter.
Under the Get up and running section, click the Run the troubleshooter button behind Play Audio to activate the audio troubleshooter.
Then the audio troubleshooter will start to detect the audio error when you are playing audio or video and try to fix the error. Once the process ends, you can replay the MKV file to check if the no sound issue is solved.
![[Solved] How to Fix WhatsApp Not Receiving Messages | 9 Solutions](https://images.minitool.com/videoconvert.minitool.com/images/uploads/2024/08/whatsapp-not-receiving-messages-thumbnail.jpg)
Fix 6. Repair the Damaged MKV File
Once the MKV file is corrupted, you may experience the MKV file with no sound or can’t open the MKV file error. It is recommended to use a video repair tool like Wondershare Repairit to restore damaged MKV files. If your MP4, MOV, M4V, or F4V files are corrupted, you can try MiniTool Video Repair, which is completely free and easy to use.
MiniTool Video RepairClick to Download100%Clean & Safe
To Wrap Things Up
If MKV file no sound, check the media player and audio codec first. If the MKV file is corrupted, try repairing it. If the audio codec is unsupported, convert the file or change its audio codec. Updating audio drivers and running Windows Troubleshooter can also help resolve playback problems.
If you encounter any problems using MiniTool Video Converter, please send an email to support@minitool.com for help.
User Comments :