This article refined by videoconvert.minitool.com gives a complete review on a former Windows media file encoding software well known as Windows Media Encoder. It elaborates on the definition, versions, encoding theory, downloading, installing, as well as using. Since Windows Media Encoder is discontinued by Microsoft, this post recommended an easy-to-use alternative.
What Is Windows Media Encoder?
Windows Media Encoder (WME) is a discontinued free media encoder software developed by Microsoft. It allows content developers to capture or convert prerecorded or live screen images, audio, or videos to Windows Media formats for on-demand and live delivery.
Windows Media Encoder is the successor of NetShow Encoder. Its download page says that it does not support Windows 7. So, there is no Windows Media Encoder for Windows 7.
Now, Windows Media Encoder has been replaced by a free edition of Microsoft Expression Encoder. The Media 8 Encoding Utility is still listed. Windows Media Encoder is available in both 64 bit and 32 bit.
What Is Windows Media Encoder 9 Series?
Windows Media Encoder 9.0 can encode video taking advantage of Windows Media Video (WMV) version 7, 8, or 9. Audio encoding makes use of many Windows Media Audio (WMA) version 9.2 or 10 (if the version 10 codecs are installed) profiles and a Windows Media Audio 9 Voice speech codec. Besides, content can also be created as uncompressed video or audio.
Windows Media Encoder version 9 ensures two-pass encoding to optimize quality for on-demand (download-and-play or streamed) content. Also, Windows Media Encoder supports variable bitrate (VBR) encoding for down-and-play scenarios. The VBR can be used over the entire duration of a high-motion sequence while ensuring the highest quality.
Windows Media Encoder edition 9 also enables scripted encoding with the wmcmd.vbs VBScript file while permitting content developers to encode large numbers of prerecorded media files. Some Windows media programs are bundled with Windows Media Encoder 9 including Windows Media File Editor, Windows Media Profile Editor, as well as Windows Media Stream Editor.
The graphical user interface (GUI) encoder application is a wrapper of the encoder itself. Developers are able to write their apps using Visual Studio to perform the same features found in the program. Those programs can be applied to automate video and audio production. In addition to that, an SDK is also available.
With the removal of the Windows Media Digital Rights Management (WMDRM) service in the anniversary update in Windows 10, Windows Media Encoder 9 is no longer compatible with the later version of Windows since May 2017. Thus, Windows Media Encoder is discontinued by Microsoft.
![[7+1 Ways] How to Fix Adobe Media Encoder Error Code 3?](https://images.minitool.com/videoconvert.minitool.com/images/uploads/2023/03/adobe-media-encoder-error-code-3-thumbnail.png)
Versions of Windows Media Encoder
The following are the historical versions of Windows Media Encoder. The Windows Media Encoder latest version is Windows Media Encoder x64 Edition.
- NetShow Encoder 3.0
- NetShow Encoder 3.0.1 (comes with PowerPoint 2000)
- Windows Media Encoder 4.0 (part of the Windows Media Tools)
- Windows Media Encoder 7.1 (for Windows 98, Windows Me, and Windows 2000)
- Windows Media Encoder 8.0 Encoding Utility (command-line) for Windows 98, Windows Me, and Windows 2000
- Windows Media Encoder 9.0
- Windows Media Encoder x64 Edition (based on Windows Media 10 SDK)
Windows Media Encoder Studio Edition was a separate planned version for Windows Media Encoder 9 with support for segment encoding and multiple audio channels. After Beta 1, it was eventually canceled. Later, Microsoft published the commercial software, Microsoft Expression Encoder as part of its Expression Studio suite.
Windows Media Tools 4.1 was the last release for Windows 95 and Windows NT 4.0.
Windows Media Encoder Process Theory
Typically, an encoder converts uncompressed videos or audio into compressed packets in a format specified by the encoder software. To convert media files into Advanced System Format (ASF), you can rely on Windows Media video and audio codecs.
An encoder is identified by the globally unique identifier (GUID) that represents the category, video or audio. The encoder’s output type is represented by a media type’s major and the sub-type GUID.
The following are the codecs of Windows Media video and audio.
Windows Media Video (WMV) Codecs
- Category: MFT_CATEGORY_VIDEO_ENCODER
- Major type: MFMediaType_Video
- SubType: MFVideoFormat_WVC1, MFVideoFormat_WMV3, MFVideoFormat_WMV2, MFVideoFormat_WMV1
Windows Media Audio (WMA) Codecs
- Category: MFT_CATEGORY_AUDIO_ENCODER
- Major type: MFMediaType_Audio
- Sub-Type: MFAudioFormat_WMAudioV9, MFAudioFormat_WMAudioV8, MFAudioFormat_WMAudio_Lossless, MFAudioFormat_WMASPDIF
Those encoders are implemented as Media Foundation transform (MFT). Media Foundation offers access to the app through the IMFTransform interface of the encoder. If you are using pipeline layer components for ASF encoding, the encoder MFT is inserted into the pipeline as a transform node since its responsible for transforming media data that flows through the source to the sink. If the source data is compressed, the pipeline will add the required decoders to convert the source into an uncompressed type.
An encoder has 1 input and 1 output stream. It receives input data. Then, it produces encoded data according to the configuration and format set by the app before the encoding session. The output stream format is described by a media type.
![[9 Ways] Fix Adobe Media Encoder Not Connecting to Project](https://images.minitool.com/videoconvert.minitool.com/images/uploads/2023/03/adobe-media-encoder-not-connecting-to-project-thumbnail.png)
Windows Media Encoder Download Free
Below are some resources for downloading Windows Media Encoder app.
# uptodown
Windows Media Encoder 9 Series download >>
# CNET
Windows Media Encoder 7.0 download >>
# SOFTPEDIA
Download Windows Media Encoder 9 >>
How to Install Windows Media Encoder?
After you pick up a downloading source above and get the installation file of Windows Media Encoder, you can follow the below steps to install it on your Windows PC. Here, we take Windows Media Encoder 9 for example to show you the process.
Step 1. Find the downloaded wmencoder.exe file on your computer.
Step 2. Double-click on the installation file and click Yes to allow the app to make changes to your device in the User Account Control (UAC) window.
Step 3. Then, you will enter the Windows Media Encoder Setup window. There, it informs you that the installation wizard will install not only Windows Media Encoder, but also its bundles including Windows Media File Editor, Windows Media Stream Editor, Windows Media Profile Editor, Windows Media Encoding Script, and User documentation. To continue, click Next.
Step 4. Next, you will be directed to the License Agreement window. Just read the end user license agreement for Microsoft Windows Media Encoder, select “I accept the terms in the License Agreement”, and click Next to go on.
Step 5. Specify the installation folder or keep the default C:Program Files (x86)Windows Media ComponentsEncoder. Click Next.
Step 6. Finally, the wizard is ready to begin the installation. Just click Install to begin the installation. Click Back to review or change any installation settings. Click Cancel to exit Setup and close the wizard.
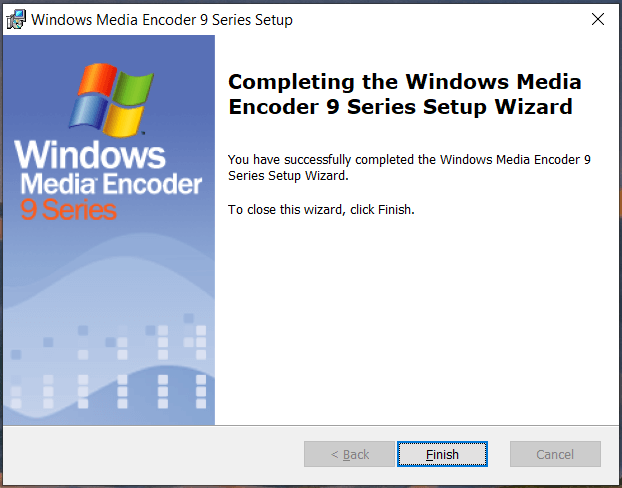
Wait until the installation process completes. Then, click the Finish button to close and exit the wizard.
Windows Media Encoder User Guide
Here in this section, let’s see how to make use of Windows Media Encoder. Still, it will take Windows Media Encoder series 9 for instance.
First of all, you need to find and launch Windows Media Encoder on your computer. It seems that there is no shortcut created on your desktop. Then, you can find Windows Media Encoder in the Start Menu. Or, search for it through the Windows Search utility. When you finally find the program, double-click to open it.
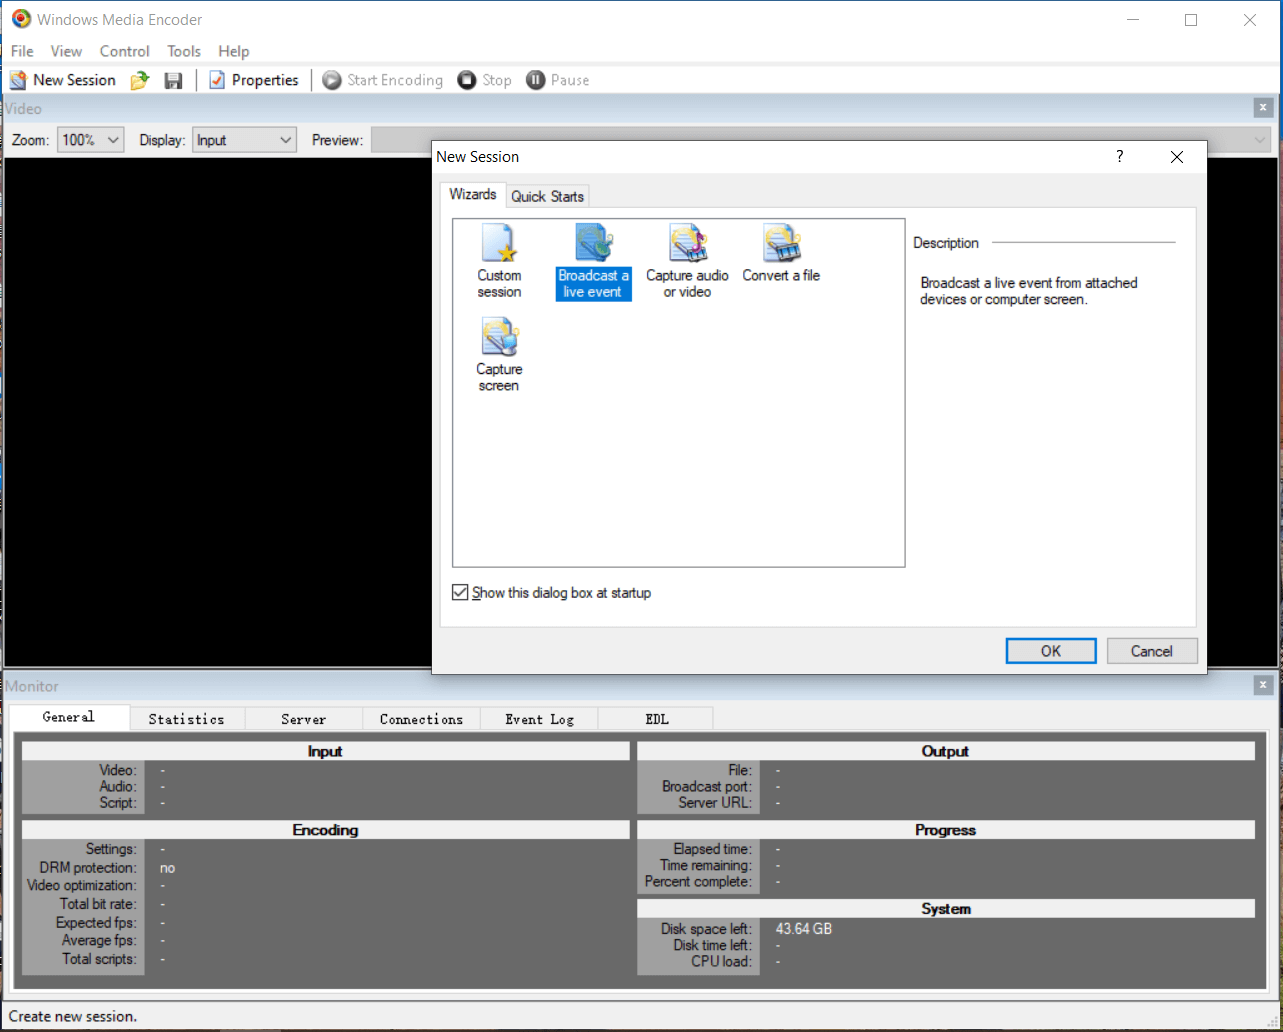
# New Session
When you open Windows Media Encoder for the first time, in addition to the main interface of Windows Media Encoder, the New Session window will also pop up guiding you to make your first activity.
There are two tabs in the New Session window.
1. Wizards
In the Wizards tab, you can do the following operations.
- Custom session: create a custom encoding session.
- Broadcast a live event (default): broadcast a live event from attached devices or computer screens.
- Capture audio or video: capture audio or video content from attached devices and save it to a Windows Media file.
- Convert a file: convert an audio or video file into a Windows Media file.
- Capture screen: capture screen images from this computer and save them to a Windows Media file.
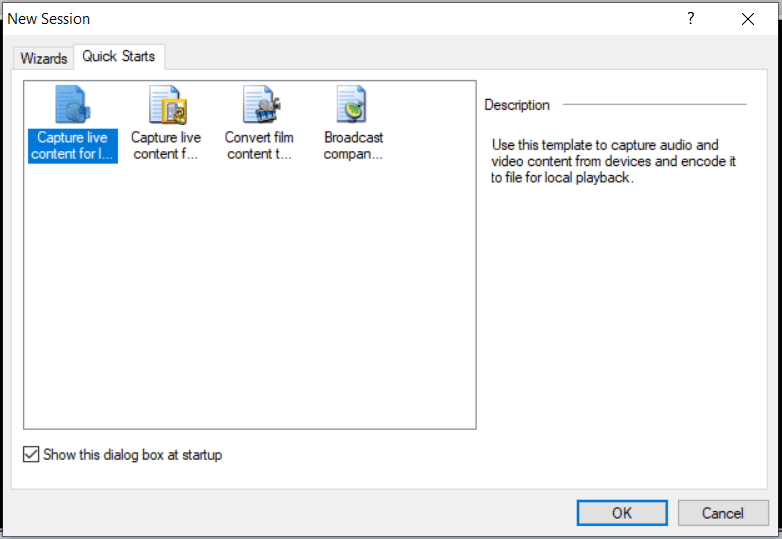
2. Quick Starts
- Capture live content for local playback: use this template to capture audio and video content from devices and encode it to a file for local playback.
- Capture live content for streaming (MBR): use this template to capture audio and video content from devices and encode it to a file for on-demand streaming from a Windows Media Server using Multiple Bit Rates.
- Convert film content to video: use this template to convert file-based content that was originally produced on film to Windows Media Format. This template uses bit-rate-based variable bit rate encoding to produce content that is suitable for playback on CD or DVD. It also applies the inverse telecine filter to restore your content to its original 24 fps format.
- Broadcast company meeting: use this template to broadcast a live event, such as a company meeting, via a Windows Media Server and create an archive of the broadcast for later viewing.
- If you don’t want to see the New Session window whenever you launch Windows Media Encoder in the future, just uncheck the “Show this dialog box at startup” option at the bottom left of the New Session window.
- In the main user interface (UI) of Windows Media Encoder, you can trigger the New Session window from the upper left toolbar.
How to Encode with Quick Starts / New Session Wizard?
Before encoding any content, you have to configure an encoding session. You can make easy access by the New Session Wizard or quick starts.
Quick starts are session files that are included with Windows Media Encoder. They are designed to deal with common encoding scenarios. Quick starts contain most of the settings you need to begin encoding without delay. With quick starts, all you need to do is to provide your source content specifics like file names or server names.
Besides, you can take advantage of New Session Wizard to encode your source files. New Session Wizard will guide you through the steps needed to set up 4 of the most common encoding scenarios.
After you customize your encoding session, you are ready to encode the content. If you want to run the same session in the future, you can save the settings to a session file of .wme extension.
1. In the Wizard tab in the New Session window, click on the Convert a file option and click OK.
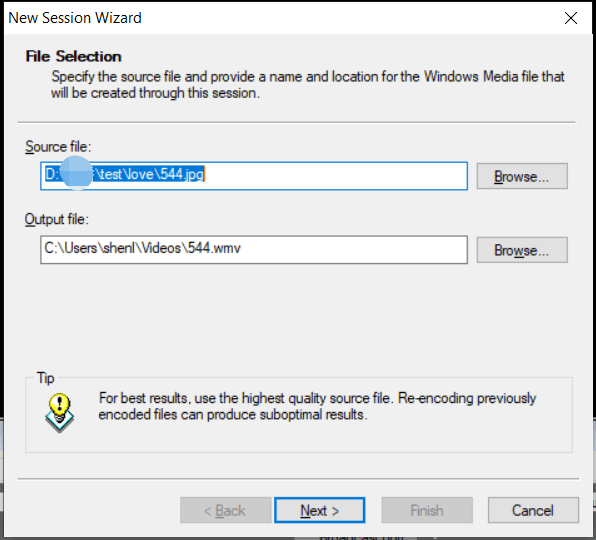
2. Specify the source file and provide a name and location for the Windows Media file that will be created through this session.
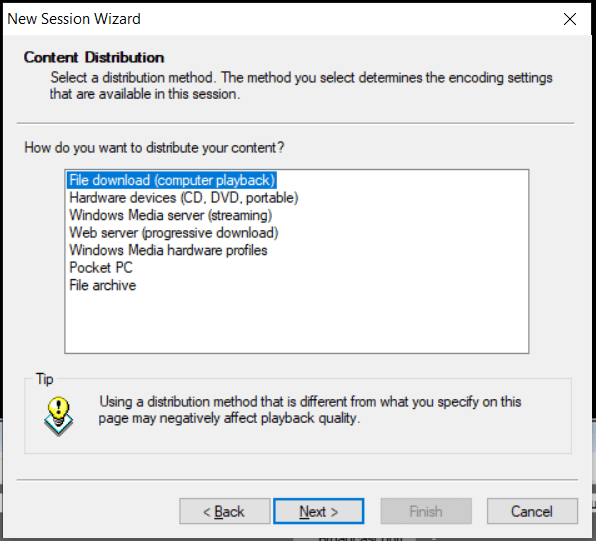
3. To determine the encoding settings, select a distribution method for the encoded content file.
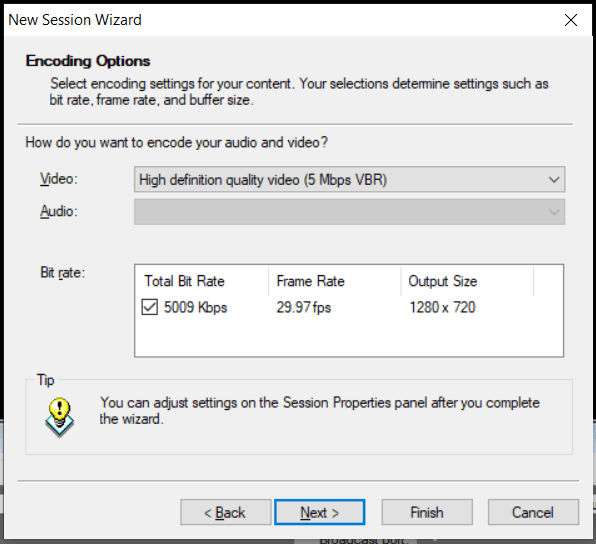
4. Select encoding settings for your content. Your selections determine settings such as bit rate, frame rate, and buffer size.
5. Until now, you can click Finish to complete your settings and begin the conversion. Or, you can click Next to continue additional settings.
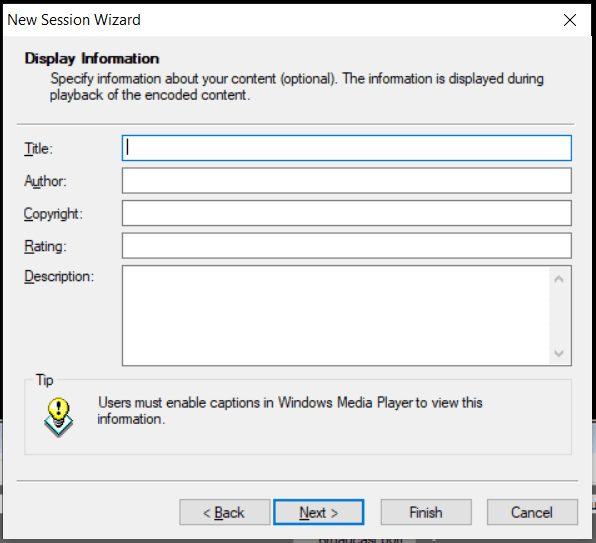
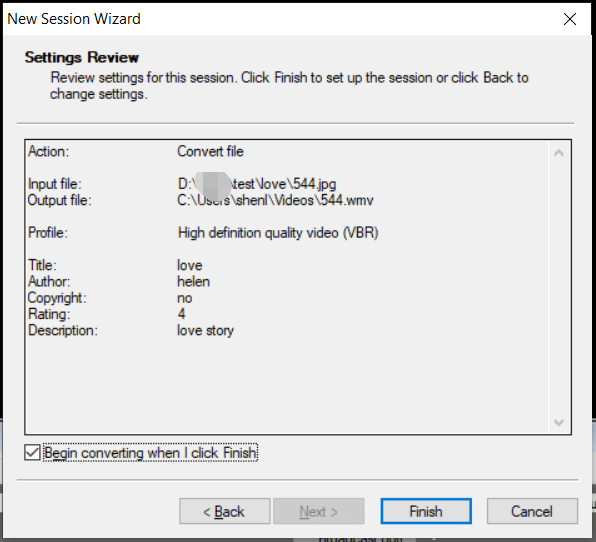
6. Specify information about your content including title, author, copyright, rating, and description. Those specifics will be shown during the playback.
7. Review settings for this session. Click Finish to set up the session or click Back to change settings.
Wait patiently until the process completes.
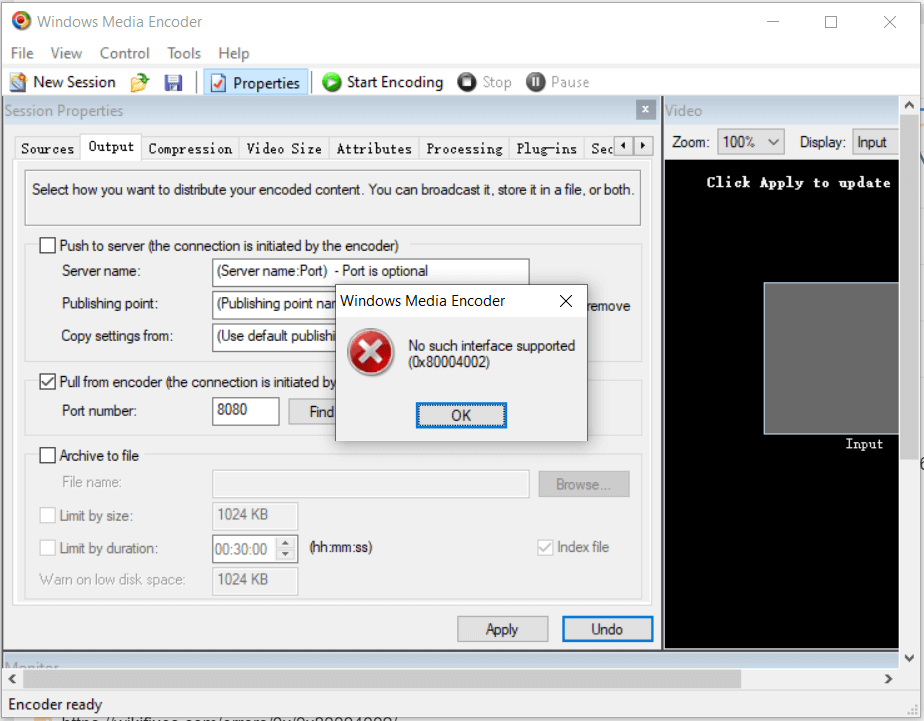
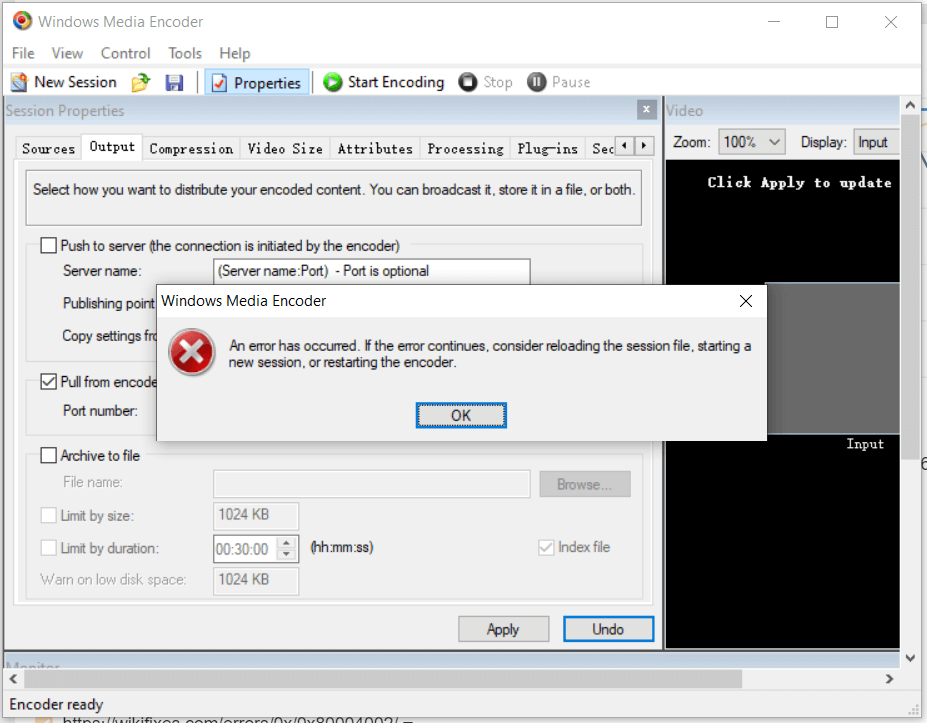
Windows Media Encoder is powerful and stable. Yet, sometimes, you may encounter some problems like Windows Media Encoder slow or stops working with these errors:
No such interface supported (0x80004002)
An error has occurred. If the error continues, consider reloading the session file, starting a new session, or restarting the encoder.
When you come across the above errors or similar ones, you can search online for solutions. Or, you can turn to the help of an alternative of Windows Media Encoder.
Alternative Windows Media Encoder for Windows
Just as mentioned above, if your Windows Media Encoder fails to convert a media file for you or capture your screen, you can rely on one of its replacements such as MiniTool Video Converter, which can assist you to convert video and audio files to common file formats of various encoders. Besides, it can capture your computer in many video formats.
Moreover, as a continued video/audio encoder, MiniTool Video Converter usually releases a new version with new updates and features.
Furthermore, you can use MiniTool Video Converter without any charge. It is completely free and there is no watermark in the converted video or sound mark in the converted audio.
MiniTool Video ConverterClick to Download100%Clean & Safe
1. Download, install, and launch MiniTool Video Converter on your PC.
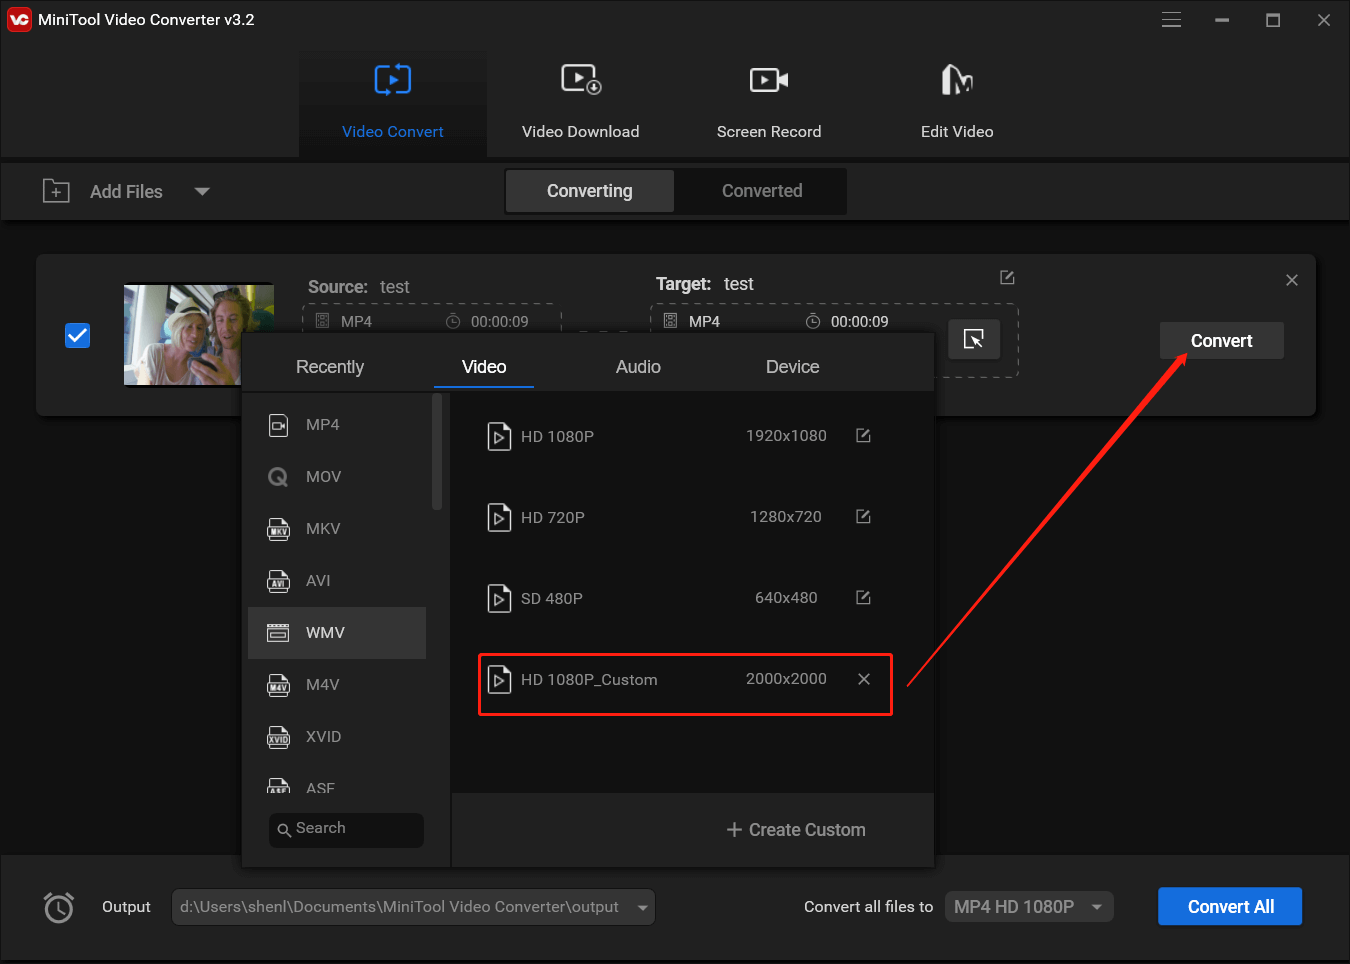
2. In the default Video Convert tab, under the Converting sub-tab, click Add or Drag files to start conversion to select your source content.
3. Click on the settings icon (an arrow points inside a square) to open a new window.
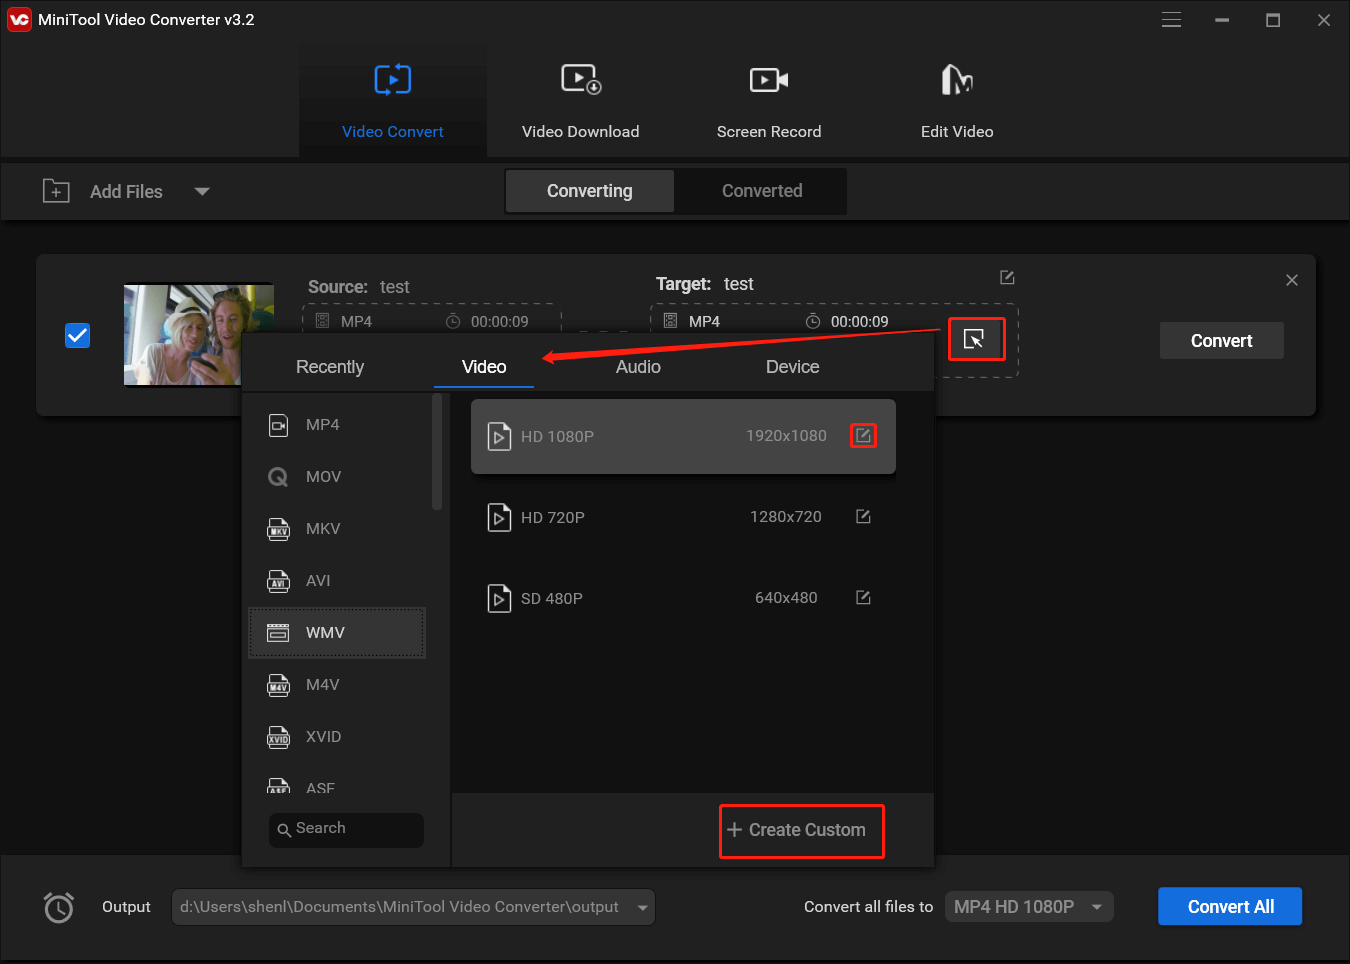
4. In the new popup, move to the Video tab, select your preferred video format, and choose a video quality in the right section.
5. You can further personalize the selected video quality by clicking the settings icon behind it. Or, you can directly click Create Custom in the bottom right.
6. In the next window, you can change the following settings of the output video file.
- Title
- Quality
- Video: encoder, resolution, frame rate, bitrate.
- Audio: encoder, channel, sample rate, bitrate.
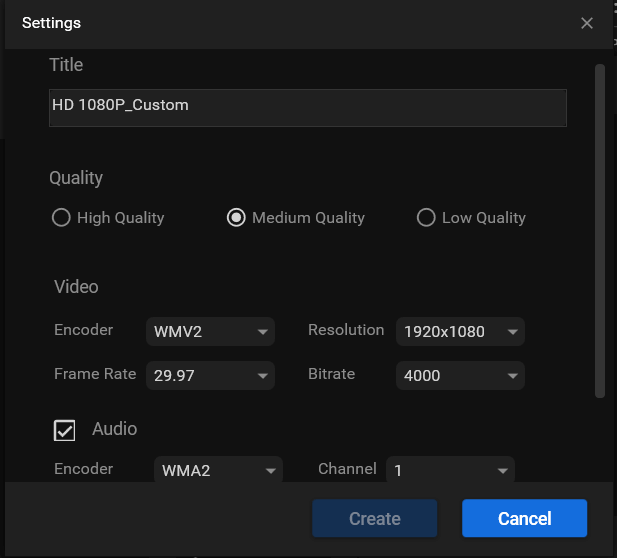
7. Select your customized video format.
8. Finally, click the Convert button to start converting.
Visit this article to learn how to capture a screen with MiniTool Video Converter. Besides, this tool can also download YouTube videos for you.
Compare and Conclusion
Why choose MiniTool Video Converter? Let’s compare it with Windows Media Encoder!
| MiniTool Video Converter | Windows Media Encoder | |
| Development status | continued | discontinued |
| Supported OS | Windows 11/10 |
|
| Supported input video format | Most common video formats | Only a few video formats (mp4 not supported) |
| Batch conversion | yes | yes |
| Stability | high | Low especially in higher OSes. |
| License | free | free |
The above table is a simple comparison between MiniTool Video Converter and Windows Media Encoder. According to the comparison, you can find out that MiniTool Video Converter is more suitable for converting videos or songs nowadays since Windows Media Encoder is completely out-of-date.
Related Articles
- Microsoft Expression Encoder: A Comprehensive Tool for Video Encoding and Screen Capture
- 5 Ways to Fix Adobe Media Encoder Crashes When Rendering
- Adobe Media Encoder Not Activated & How to Get It for Free?
- [9 Ways] Fix Adobe Media Encoder Not Connecting to Project
- [Solved] How to Fix After Effects Not Sending to Media Encoder?
About The Author

Position: Columnist
Helen is a tech writer with over 10 years of experience. She specializes in creating easy-to-follow guides for video editing, media file conversion, and computer performance. Helen doesn't just write—she tests every software herself and listens to feedback from users and experts. Her goal is to make complex programs simple so that everyone can solve their tech problems with confidence.
User Comments :