MiniTool Video Converter (a professional free file converter) releases this article to guides you to record screen and audio free and offers five step-by-step tutorials to facilitate your recording tasks.
If you’d like to record screen and audio free on your Windows 10 computer to create a tutorial video, you can do this with an easy-to-use screen and audio recorder. However, some of you may be novices and know little about screen recording. No worries. This article will do you a favor.
This post introduces 5 ways to allow you to record screen and audio simultaneously on Windows 10. Check the details below.
Here is a quick video guide:
Way 1. Record Screen with Audio on Windows 10 via MiniTool Video Converter
A fabulous screen recorder is never dispensable in helping record screen with audio on Windows 10. Hence, in the following paragraphs, I will recommend a reliable screen recorder called MiniTool Video Converter and offer you a step-by-step recording tutorial.
About MiniTool Video Converter
MiniTool Video Converter is an offline screen recorder available on Windows. With it, you can record screen with audio for free. In addition, MiniTool Video Converter provides you with a recording experience that will never be limited by watermarks or the recording length.
More than that, MiniTool Video Converter, with a well-organized interface, enables neophytes to accomplish their recording tasks easily and quickly. Moreover, this application will automatically save the recording files in MP4, which facilitating your offline viewing and file sharing.
How to Record Screen and Audio Using MiniTool Video Converter
Below are the detailed steps to record screen and audio free.
Step 1. Download and Install MiniTool Video Converter on Your PC.
MiniTool Video ConverterClick to Download100%Clean & Safe
Click on the download button above to download and install MiniTool Video Converter on your Windows computer.
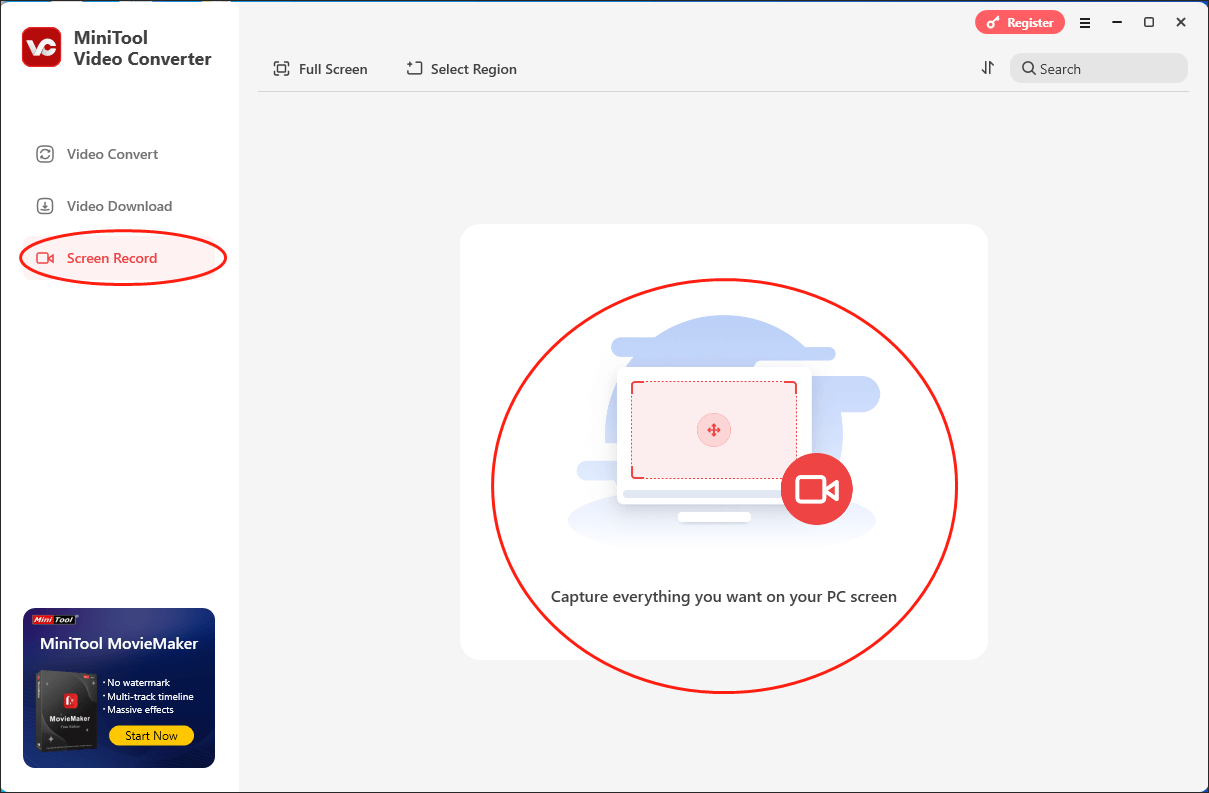
Step 2. Access the MiniTool Screen Recorder Panel.
After launching MiniTool Video Converter, switch to the Screen Record module and click on the Capture everything you want on your PC screen region to enter the MiniTool Screen Recorder window.
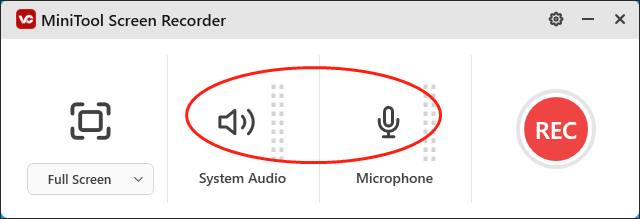
Step 3. Manage the Audio Recording.
Click on the System Audio icon or Microphone icon to determine whether record the system and microphone sounds or not. Considering that you plan to record screen and audio, turn on the system and microphone audio based on your needs.
Step 4. Configure the Recording Quality and Frame Rate.
Click on the upper-right gear icon to access the Settings window of MiniTool Screen Recorder.
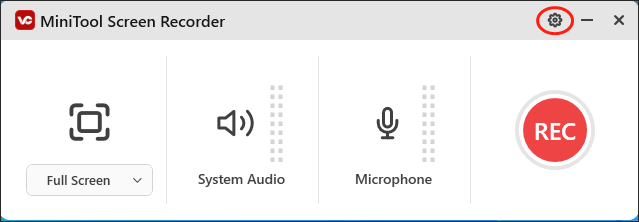
In the pop-up window, you are free to set the recording quality as high quality, original quality, or standard quality. Meanwhile, you can choose the frame rate among 15fps, 20fps, 25fps, 30fps, and 50fps. Finally, click on the OK button to confirm the changes.

Step 5. Customize the Recording Area
MiniTool Screen Recorder will adopt a full-screen recording mode by default. If you want customize the recording area, just press the Alt + R keys to implement the customization.
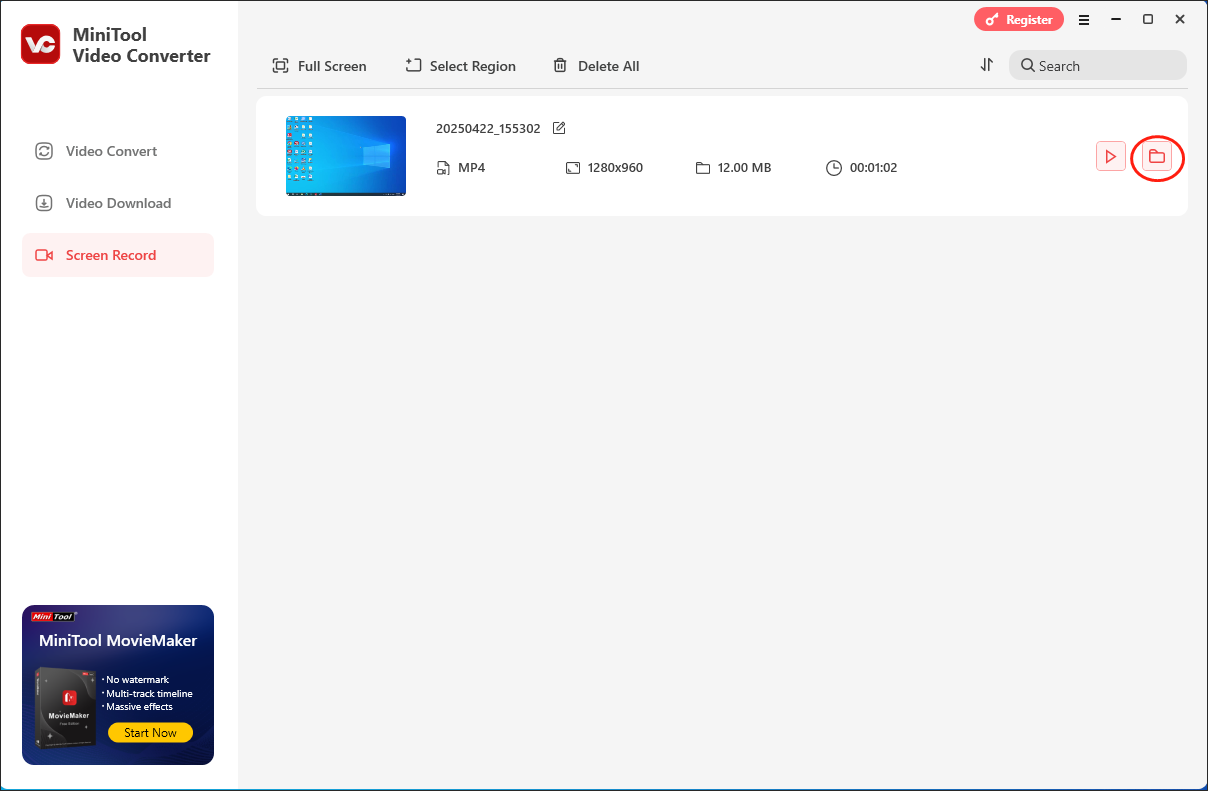
Step 6. Begin/End the Conversion Task and Check the Recorded Video.
Press the F6 key to begin the recording task. After a 3-second countdown, start the computer activities that you want to record. Once you have finished the recording, end it by pressing the F6 key again. Then, click on the folder icon in the file list to locate and check your recording file.
With the above-detailed steps, it will never be difficult for you to record screen and audio free on Windows 10.

Way 2. Record Screen and Audio for Free with Game Bar
Windows 10 system comes with a built-in screen and audio recorder that many of you might not know about. It is named Game Bar. It is a free screen recorder for Windows 10.
The Xbox Game Bar is designed to record clips of video games, but you can also use it to record anything on your Windows computer screen.
You can quickly access the Game Bar program on Windows 10, and use it to record screen with audio. It is easy to operate to totally free.
Check how to open Game Bar tool and use it to record PC screen and audio activity together.
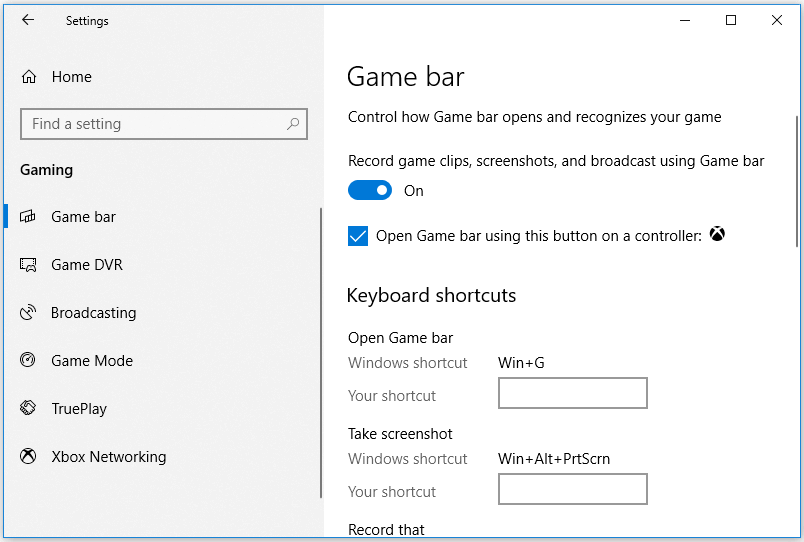
Step 1. Find and enable Game Bar on Windows 10
Firstly, you should check if your computer has turned on the Game Bar feature.
You can press Windows + I to open Windows Settings. Click Gaming -> Game Bar. In the right window, check if the option “Record game clips, screenshots, and broadcast using Game bar” is enabled, if not, turn it on.
Step 2. Record screen and audio on PC
After the Game Bar function is enabled, you can use this free screen recorder with audio to record video on Windows 10 now.
You can open the screen, window, video or game you want to record.
Press Windows + G to evoke the Game Bar tool. If it pops up a window asking you if it is a game, you can check the box “Yes, this is a game”.
To record the screen, you can directly click the red REC button. The keyboard shortcut key is Windows + Alt + R.
To record the screen and your microphone voice together, you can click the mic icon next to the record icon to turn on the mic while recording, thus, recording the computer screen and microphone audio simultaneously.

Step 3. Check the recorded video clips
After finishing the recording, you can click REC again to stop the recording.
Game Bar recordings are automatically saved in MP4 format, and you can go to your user folder on your computer, navigate to the Videos -> Captures folder to find and view the screen recording videos.
This way, you can record screen and audio free without hassle.
Way 3. Record Screen with Internal or Mic Audio with Bandicam
Windows Game Bar can run only if your computer meets its hardware requirements. If your Windows 10 computer can’t run Game Bar, you should turn to other third-party free screen and audio recorders in market to capture screen video with audio on Windows 10.
Bandicam is a popular tool that lets you record screen and audio together on Windows 10. It can record the system audio and your voice at the same time while recording screen.
Bandicam can record everything on your Windows computer and save the screencast videos in MP4 or AVI format. It can record various 2D/3D games with 4K resolution, and record external video devices like webcam, PS4/Xbox, mobile phone, etc.
Check how to use Bandicam to record screen with audio on Windows 10 PC below.
Step 1. Open Bandicam on your PC after you install it. On the main UI, select a recording mode. You can choose Screen Recording, Game Recording, or Device Recording mode.
Step 2. Next, you can choose a rectangle size, custom size or choose full screen. Click the red REC button to start recording.
If you want to record screen video with internal computer sound, you can click Video in the left pane, click Settings in the right window to open the Record settings window. Under the Sound tab, you can check Record Sound, and choose Default Sound Device as the Primary Sound Device.
To record screen with microphone voice, you can choose Default Sound Device as the primary sound device, and disable the second sound device. Then right-click the Sound icon in the system tray on your computer screen, and select Sound. Click the Recording tab and choose your microphone as the default recording device.
To record the screen with computer sound and your voice at the same time on Windows 10, you can select Default Sound Device as the primary sound device and select Microphone as the secondary sound device. Then tick the Two Sound Mixing (Primary+Secondary into one audio track) option. Click OK.
Step 3. After you finish recording, you can stop the recording and click the Videos tab at the top to check all recorded video clips.
Now, you have grasped a new way to record screen and audio free.
![How to Record R.E.P.O. Gameplay on Windows [3 Useful Methods]](https://images.minitool.com/videoconvert.minitool.com/images/uploads/2025/03/record-r.e.p.o.-gameplay-thumbnail.png)
Way 4. Screen Record with Sound via Screencast-O-Matic
Another easy free screen recorder with audio that can record screen and sound is Screencast-O-Matic. This screen and audio recorder allows you to capture any area of your computer screen and lets you add narration from the webcam video or your microphone.
One big merit of this program is that it also comes with a full-feature video editor, and you can easily edit the recorded video and share to social media sites.
Check the easy guide below for how to record screen with audio on Windows 10 with this tool.
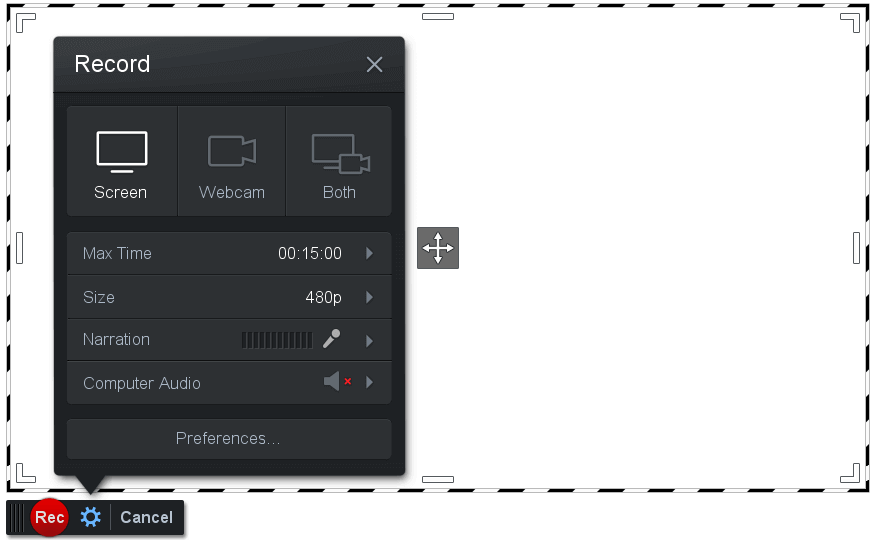
Step 1. You can go to the official website of Screencast-O-Matic, and click Launch Free Recorder to install the launcher of this program on your computer.
Step 2. After you launch this program, you can select Screen, Webcam, or Both to record. Next, you can click Size to select a size you’d like to record. To capture screen video on Windows 10 with computer audio and your microphone narration voice, you can turn on these two options.
Step 3. At last, you can click the red Rec button to begin the recording process.
It is believed that you won’t be bother by the question of how to record screen and audio free anymore.
Way 5. Record Screen and Audio with Camstudio
Camstudio is an open source free screen and audio recorder for Windows 10. It allows you to choose any region on your screen to record, and record microphone or speakers’ audio simultaneously.
The recorded video is saved in AVI format. If you want to upload the recorded video to video streaming sites, you can convert AVI to SWF format with its built-in AVI to SWF converter feature. Alternatively, you can also use a top free video converter for Windows 10 to convert AVI to MP4 or any other format.
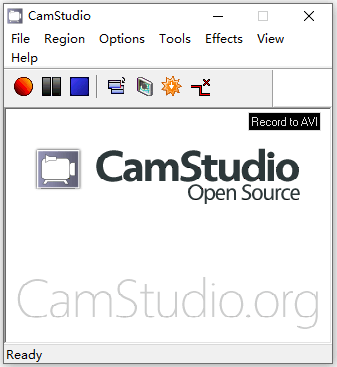
Step 1. After you download and install CamStudio on your PC, launch this free screen recorder with audio. Click the Region tab at the top and choose a region you want to record.
If you want to record screen with audio from a microphone or speakers, you can click the Options tab at the top, and tick Record audio from microphone or Record audio from speakers.
Step 2. Click the red Recording button to start to record screen and audio on Windows 10.
Step 3. To stop the recording, you can click the Stop button. Then you can select a destination to save the recorded AVI video clips.
Step 4. Go to the saving path to check your recording file.
Presently, you must know better about how to record screen and audio free.
To Wrap Things Up
To conclude, tools, including MiniTool Video Converter, Game Bar, Bandicam, Screencast-O-Matic, and Camstudio, enables you to record screen and audio free easily and quickly. In addition, if you have any problems when using MiniTool Video Converter, please send an e-mail to support@minitool.com to ask for help. Also, you can send me a message on Twitter. I will help you as quickly as possible.
Record Screen and Audio FAQ
Step 2. Long press the Screen Record icon.
Step 3. Choose the app where you want to save your screen recordings.
Step 4. Tap Microphone to turn on microphone recording.
Step 5. Tap Start Recording to record your iPhone screen with your voice.
About The Author

Position: Columnist
With over 6 years of experience as a tech writer, Eien specializes in creating clear, simple guides for video conversion, transcription, screen recording, etc. He stays connected with the tech community and its readers to understand the real-world problems users face. By combining their feedback with his own hands-on testing, Eien always provides proven solutions to complex software problems in time.
User Comments :