In this article offered by video converting software, we will explore some common problems related to Adobe Media Encoder not being installed or not working, and provide solutions to help you get back to your creative work.
Adobe Media Encoder is a powerful tool that allows users to convert video and audio files to various formats for playback on different devices. It is an essential component of Adobe's Creative Cloud suite and is commonly used by video editors and other creative professionals. However, sometimes users may encounter issues where Adobe Media Encoder is not installed or not working properly, particularly when trying to use it with other Adobe applications like After Effects or Premiere Pro.
Why Adobe Media Encoder Is Important?
Adobe Media Encoder is a tool that allows users to convert video and audio files to different formats. It is important because different devices and platforms support different file formats, and without a tool like Adobe Media Encoder, users may not be able to properly share or distribute their video and audio content. Adobe Media Encoder can also be used to optimize files for playback on social media platforms, and to create custom presets for frequently used output settings.
One of the main advantages of Adobe Media Encoder is its ability to work with other Adobe applications, like Premiere Pro and After Effects. Users can send their projects directly from these applications to Adobe Media Encoder for rendering and conversion, without having to save and export their projects manually.
Common Issues with Adobe Media Encoder
Despite its importance, users may sometimes encounter issues with Adobe Media Encoder. Some common problems include:
- Adobe Media Encoder is not installed.
- After Effects says Media Encoder is not installed.
- Adobe Media Encoder is not working properly.
- Adobe Media Encoder is not installed with Premiere Pro.
- Adobe Media Encoder is not installed on a cracked version of Adobe software.
Let's take a closer look at each of these issues and what you can do to resolve them.
#1 Adobe Media Encoder Is Not Installed
If Adobe Media Encoder is not installed on your computer, you won't be able to use it to convert or render video and audio files. This can happen if you have only installed a limited version of the Creative Cloud suite, or if you have uninstalled Adobe Media Encoder by mistake.
To check if Adobe Media Encoder is installed on your computer, follow these steps:
- Open the Creative Cloud desktop app.
- Click on the Apps tab.
- Look for Adobe Media Encoder in the list of installed apps. If it is not listed, it means it is not installed on your computer.
If you find that Adobe Media Encoder is not installed, you can easily install it by following these steps:
Step 1. Open the Creative Cloud desktop app.
Step 2. Click on the Apps tab.
Step 3. Scroll down to find Adobe Media Encoder.
Step 4. Click the Install button next to Adobe Media Encoder.
Step 5. Wait for the installation to complete.
Once the installation is complete, you should be able to use Adobe Media Encoder without any issues.
#2 After Effects Says Media Encoder Is Not Installed
If you are trying to render a video or audio file in After Effects and receive an error message that says "Adobe Media Encoder is not installed", it means that After Effects is unable to communicate with Adobe Media Encoder.
To fix this issue, follow these steps:
Step 1. Open After Effects.
Step 2. Go to Edit > Preferences > General.
Step 3. In the Preferences window, look for the Media & Disk Cache section.
Step 4. Click on Edit next to Disk Cache.
Step 5. In the Disk Cache Settings window, click on Clean Database & Cache.
Step 6. Close After Effects and restart your computer.
Step 7. Open After Effects and try to render your video or audio file again.
If the issue persists, you may need to reinstall Adobe Media Encoder as described in the previous section.
#3 Adobe Media Encoder Is Not Working Properly
If Adobe Media Encoder is installed but not working properly, there are several potential reasons for this. One common issue is that Adobe Media Encoder may be running out of memory or other system resources, which can cause it to crash or freeze.
To fix this issue, try closing any other applications that may be running and taking up system resources, and then restart Adobe Media Encoder. You may also want to check that your computer meets the minimum system requirements for Adobe Media Encoder, as specified by Adobe.
Another potential issue is that there may be a problem with your source media files, such as corrupted or damaged files. If this is the case, you may need to repair or replace the affected files before attempting to encode them with Adobe Media Encoder.
![[9 Ways] Fix Adobe Media Encoder Not Connecting to Project](https://images.minitool.com/videoconvert.minitool.com/images/uploads/2023/03/adobe-media-encoder-not-connecting-to-project-thumbnail.png)
#4 Adobe Media Encoder Is Not Installed with Premiere Pro
If you have installed Premiere Pro but Adobe Media Encoder is not listed as an installed app, it is possible that you may have installed a version of Premiere Pro that does not include Adobe Media Encoder.
To check if Adobe Media Encoder is included with your version of Premiere Pro, follow these steps:
- Open the Creative Cloud desktop app.
- Click on the Apps
- Look for Premiere Pro in the list of installed apps.
- Click on the three dots next to Premiere Pro and select View Details.
- Check the Components section to see if Adobe Media Encoder is listed.
If Adobe Media Encoder is not listed, it means that it is not included with your version of Premiere Pro. In this case, you can follow the instructions in section 1 to install Adobe Media Encoder separately.
#5 Adobe Media Encoder Is Not Installed on A Cracked Version of Adobe Software
Some users may attempt to use a cracked version of Adobe software that includes Adobe Media Encoder, rather than paying for a legitimate license. However, this can lead to a variety of issues, including the risk of malware or other security vulnerabilities, as well as the possibility that the software may not work properly.
If you are using a cracked version of Adobe software and are experiencing issues with Adobe Media Encoder, it is possible that the crack may have modified the software in a way that prevents it from working properly. In this case, the best course of action is to uninstall the cracked version of Adobe software and replace it with a legitimate license.
![[7+1 Ways] How to Fix Adobe Media Encoder Error Code 3?](https://images.minitool.com/videoconvert.minitool.com/images/uploads/2023/03/adobe-media-encoder-error-code-3-thumbnail.png)
Replace Adobe Media Encoder with Its Alternatives
If your situation belongs to none of the above-described ones and you can’t find a working solution. Stop bothering yourself with unlimited searching and boring reading. Just make your decision to take advantage of one of the replacements of Adobe Media Encoder, such as MiniTool Video Converter, a professional and easy-to-use media files encoder that can convert videos and audio from one format to another.
To learn how to make use of MiniTool Video Converter to encode a media file, follow this guide.
MiniTool Video ConverterClick to Download100%Clean & Safe
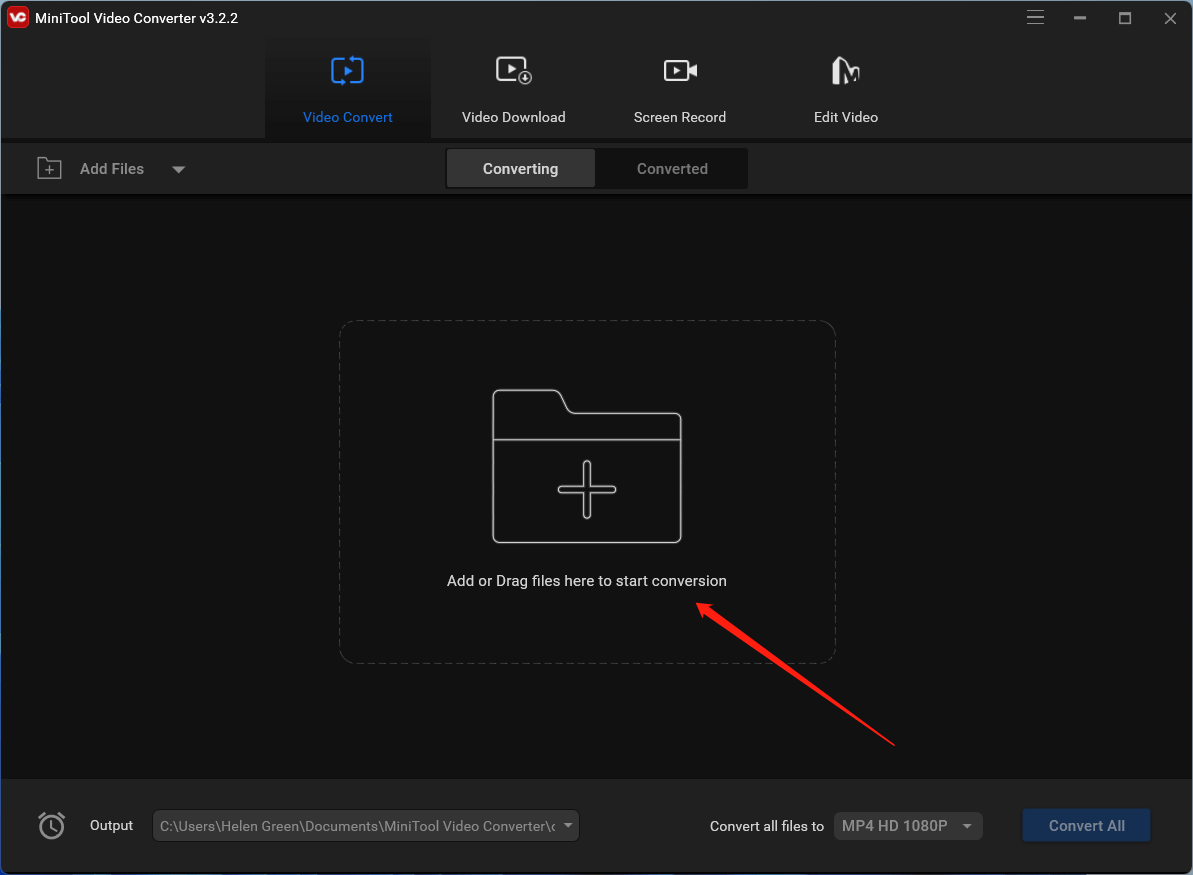
Step 1. Download, install, and launch MiniTool Video Converter on your Windows computer.
Step 2. In its main user interface (UI), under the default Video Convert main tab, click the Add or Drag files here to start conversion option to upload the target video or audio file that you would like to reencode with.
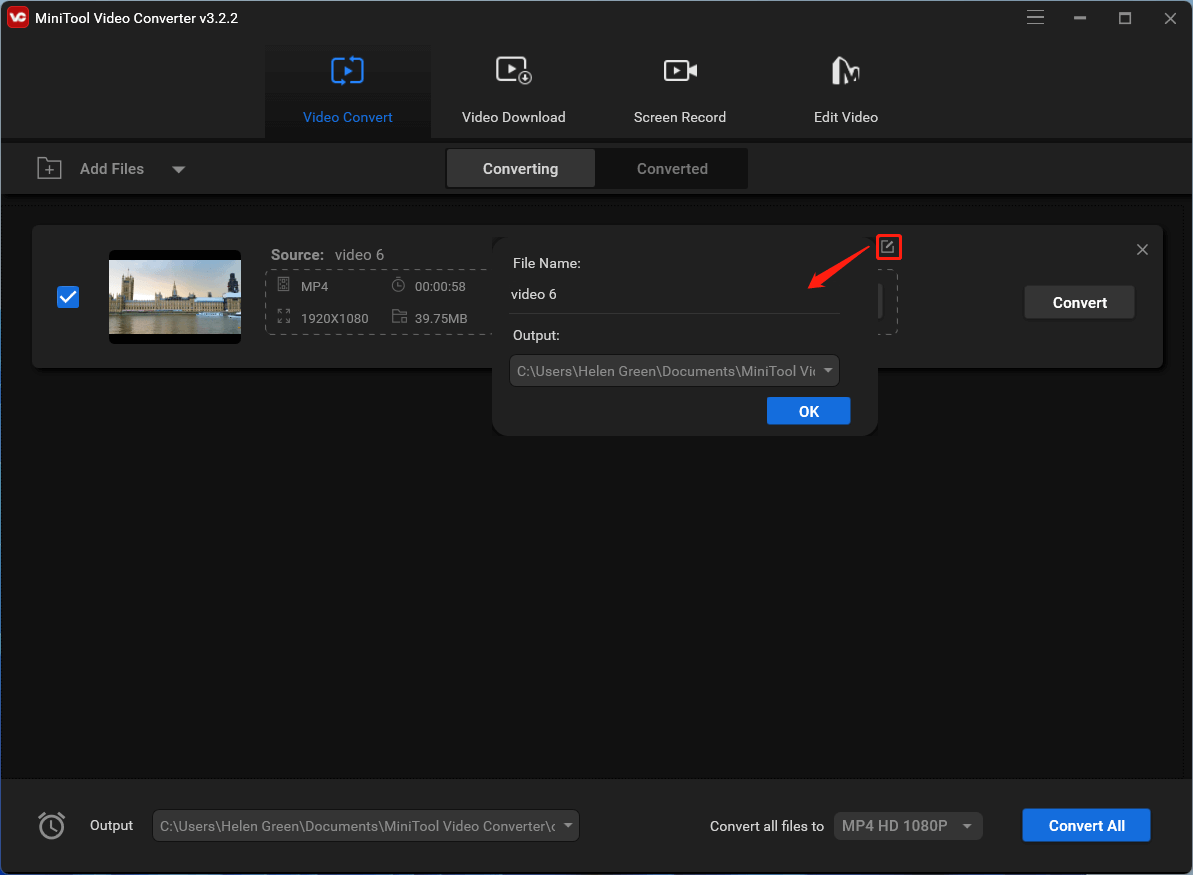
Step 3. Then, a task will be listed in the main window. There, you can click the settings icon behind the Target to customize the File Name and Output address of the converted video.
Step 4. Click the settings icon under the Target to trigger a format settings window. Within the window, move to the Video tab from the top menu and select your desired format in the left panel. Then, choose a video resolution. You can further specify the format parameters by clicking the settings icon behind the selected resolution. Or, you can directly choose the Create Custom option in the bottom right corner of the window to fully personalize your target video formats.
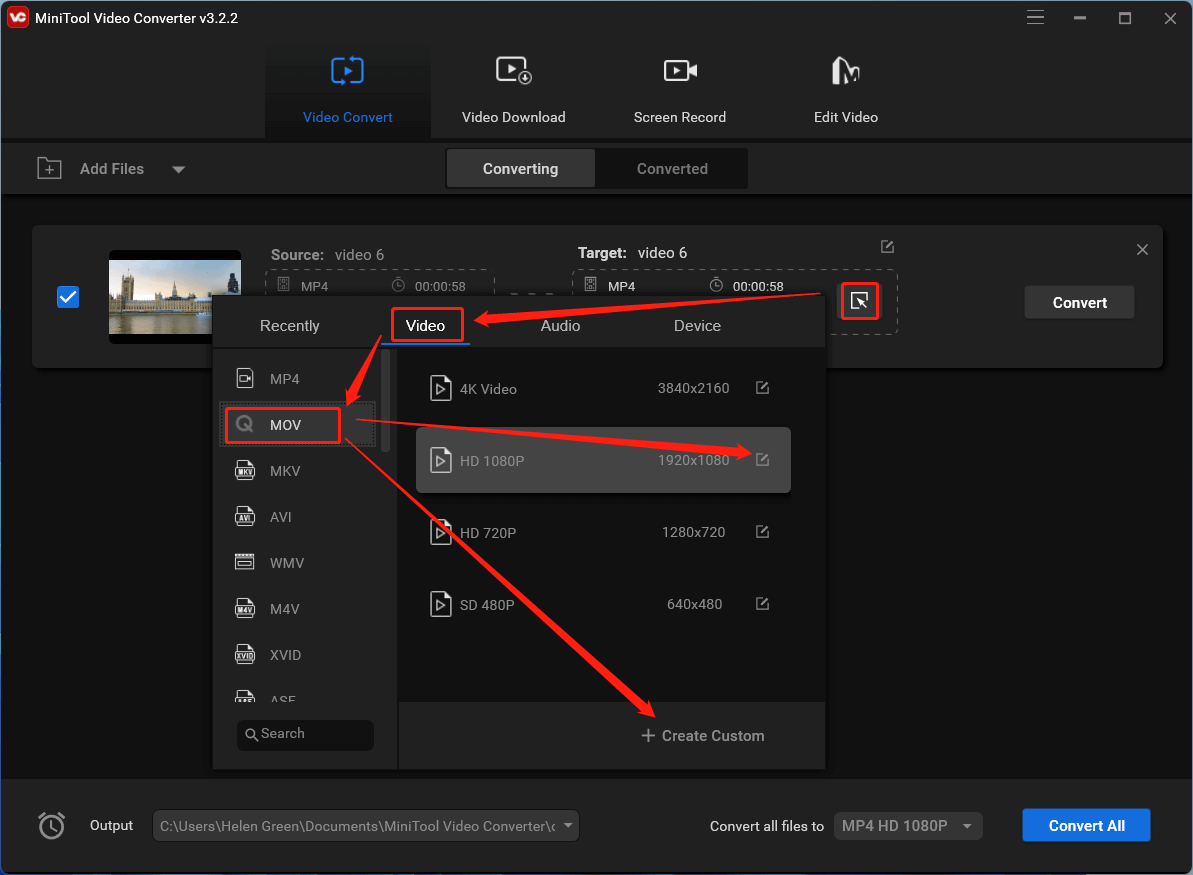
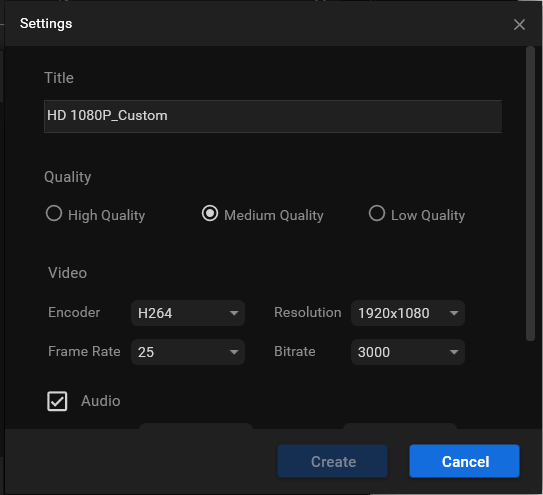
Step 5. Then, a new popup will appear. There, you are able to specify the title, quality, video encoder, video resolution, video frame rate, video bitrate, audio encoder, audio channel, audio sample rate, as well as the audio bitrate of the converted video.
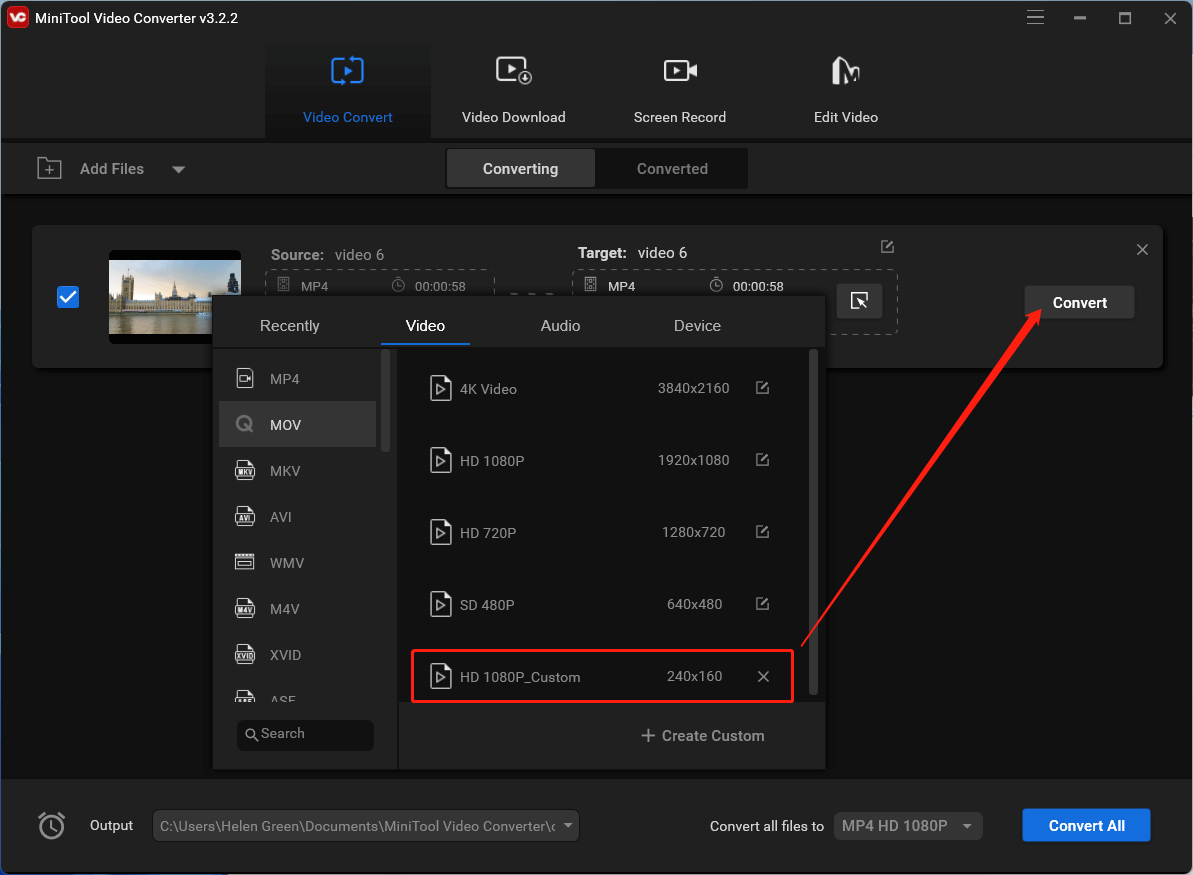
Step 6. If you have customized a target video format all by yourself, after you click the Create button in the above screen to save your settings, a new video format option will appear in the available choice list. There, just pick up the option and click Convert in the main window.
Then, wait patiently for the success of the conversion. It may take some time to complete the task. How much time will it spend depends on how larger the target media file is. The larger the longer. Also, the hardware equipment of your PC is a matter that can influence the duration of the video converting process. Yet, MiniTool Video Converter is a powerful program that can quickly handle your mission while ensuring success.
In addition to video/audio conversion, MiniTool Video Converter can also record computer screens for you and assist you to download videos from YouTube. To explore its more features, just download this free app and have a try!
MiniTool Video ConverterClick to Download100%Clean & Safe
Conclusion
Adobe Media Encoder is an essential tool for video and audio professionals, but it can sometimes encounter issues, such as not being installed, not working properly, or not being included with other Adobe applications. By following the steps outlined in this article, you should be able to resolve these issues and get back to creating high-quality video and audio content. Remember to always use legitimate software to ensure the best possible experience and to avoid security risks.
Related Articles
- 5 Ways to Fix Adobe Media Encoder Crashes When Rendering
- [5 Ways] How to Fix Adobe Media Encoder Not Working Issues?
- Fix Adobe Media Encoder Error Code: -1609629695 and Similar Issue
- Do I Need Adobe Media Encoder & What Can Media Encoder Do?
- Microsoft Expression Encoder: A Comprehensive Tool for Video Encoding and Screen Capture
About The Author

Position: Columnist
Helen is a tech writer with over 10 years of experience. She specializes in creating easy-to-follow guides for video editing, media file conversion, and computer performance. Helen doesn't just write—she tests every software herself and listens to feedback from users and experts. Her goal is to make complex programs simple so that everyone can solve their tech problems with confidence.
User Comments :