This article explores what affect video file size and provides solutions for reducing it. It delves into video and audio parameters such as video resolution, bitrate, and frame rate that impact file size. It also offers guidance on using MiniTool Video Converter and MiniTool MovieMaker to compress videos without losing their quality.
What Video Parameters Affect Video Size
The size of a video is influenced by various video parameters, such as the video encoder, resolution, frame rate, bitrate, and bit depth, as well as the audio encoder, bitrate, channel configuration, sample rate, and bit depth. I will now explain why these parameters affect video size in detail.
#1 Video Encoder
What affect video file size? The video encoder is one of the important factors that can affect the video size. In this section, I will delve into how video encoders affect video size.
What is Video Encoder
A video encoder is a tool or program that uses a codec to compress video data. The compressing process is called video encoding.
The video encoder is part of a codec. A codec consists of an encoder and a decoder. The video encoder compresses the video according to the codec’s compression instructions to reduce the data size. The video decoder receives the compressed data and decompresses it back to its original form.
By compressing video data, the video encoder makes it easier to transfer, store, or play videos between devices.
Video Encoder vs Video Format
Video encoders and video formats are different concepts. A video encoder is a tool that compresses video. Common video encoders include H.264, H.265, and VP9. Video formats, on the other hand, are the file types that contain the compressed video itself, such as MP4, MOV, and MKV.
Video formats can be divided into uncompressed and compressed formats based on whether the video encoder applies compression to the data:
- Uncompressed Video Formats: These are formats that save all the original video data, such as RAW. This format writes the raw data into the file when encoding.
- Compressed Video Formats: These are video formats that use compression algorithms during the encoding process.
How Video Encoder Influences Video Size
The compression algorithms used by video encoders are mainly categorized as lossy or lossless. Lossy compression permanently removes some data to significantly reduce file size. Lossless compression reduces the file size while retaining all the original information. Generally, lossy compression provides much greater compression than lossless compression.
Common Video Encoders that Generate Small Video Size
If you want to make your video files easy for storage and sharing, you can refer to the 5 common encoders that produce smaller video file sizes:
- H.264 (AVC): It uses advanced compression to perform motion compensation, resulting in smaller video files.
- H.265 (HEVC): It uses efficient compression techniques that delete some redundant data to reduce the video size.
- H.266 (VVC): This video encoder reduces video size by reducing data without sacrificing quality.
- VP9: It reduces video size through high-quality compression. It maintains excellent quality even at lower bitrates.
- AV1: This video encoder uses advanced techniques to compress video data while maintaining high quality.
#2 Video Resolution
Video resolution is also a factor that affects video file size. In this section, I’ll explain what video resolution is and how it affects video file size.
What is Video Resolution
Video resolution refers to the number of pixels in a video frame. More pixels mean higher resolution, and fewer pixels mean lower resolution. Common video resolutions include 1080p, 4K, 8K, etc.
Generally speaking, higher video resolutions provide more detail and produce clearer videos. For larger screens, higher resolutions are better. On smaller screens, like those on mobile phones, the difference in resolution may not be obvious.
Video Resolution vs Video Aspect Ratio
Video resolution and aspect ratio are two different things. Video resolution is the number of pixels in the frame. However, video aspect ratio refers to the ratio of the width to the height of the video frame. Common video aspect ratios include 16:9, 9:16, 4:3, 3:4, 1:1, etc.
To put it simply, video resolution determines the clarity of the video, while video aspect ratio determines the shape of the video.
How Video Resolution Influences Video Size
The higher the video resolution, the larger the file size. Higher resolution means more pixels it contains. These pixels represent the image information in the video. More pixels require more space to store them. For example, a 4K resolution video contains more pixels than a 1080p video. Therefore, 4K resolution videos are typically larger in file size than 1080p videos when both use the same bitrate and compression method.
Popular Video Resolutions
The resolution of a video is primarily determined by the number of pixels. The number of pixels is determined by the device you’re shooting with. Whether it’s a camera or a smartphone, you can pre-select the desired resolution before shooting.
Here are some popular video resolutions and their usages:
- 720p: 720p is a lower resolution, but it allows for smooth playback even on unstable connections.
- 1080p: 1080p is the most commonly used resolution. It’s suitable for video content or streaming on most smartphones and computers.
- 2K/1440p: 2K offers a higher resolution, providing crisp details. It’s often used on gaming monitors.
- 4K: 4K resolution is ideal for large screens. This high resolution provides an immersive viewing experience. Some professional video contents usually use this resolution.
- 8K: 8K can capture rich details and is often used in professional filmmaking.
#3 Video Frame Rate
Frame rate is a fundamental aspect of video content. It affects both the size and smoothness of the video. Next, I will explain how different frame rates impact video size in detail.
What is Video Frame Rate
Video frame rate refers to the number of images displayed per second. The higher the frame rate, the more images appear per second, and the smoother the video. You can think of video as a flipbook, with each page representing a frame. The faster you flip, the more pages appear per second, and the smoother the animation.
How Video Frame Rate Influences Video Size
Frame rate directly affects video file size. The higher the frame rate, the more images appear per second. This image information requires a lot of space to store. Therefore, the higher the frame rate, the larger the video file size.
Frame rates are divided into Constant Frame Rate (CFR) and Variable Frame Rate (VFR), which have different effects on file size:
1. Constant Frame Rate
A constant frame rate means the number of frames per second remains the same throughout the video. The number of frames remains consistent regardless of the scene. Therefore, video files using this frame rate can be very large.
2. Variable Frame Rate:
If a video uses a variable frame rate, the number of frames displayed per second may vary. The variable frame rate is more flexible than the constant frame rate. It adjusts the frame rate based on the video content.
For example, if the video clip has a lot of fast action, the frame rate may be higher to maintain a smooth video. Meanwhile, in less dynamic scenes, the frame rate may be low. By flexibly adjusting the frame rate, variable frame rate can reduce file size while maintaining visual quality.

Recommended Frame Rates for Different Situations
When creating a video, the best frame rate to choose depends on the content and the visual style you want:
- 24 FPS: 24 FPS is the standard rate in film, known for its cinematic quality.
- 30 FPS: 30 FPS is a common frame rate for television and online video content. Video creators can choose this frame rate.
- 60 FPS: 60 FPS is often used in slow-motion videos. It is excellent for capturing fast-moving objects.
- 120 FPS: 120 FPS is commonly used in sports and gaming for capturing high-action moments.
#4 Video Bitrate
Video bitrate also influences the size of the video file. Read the paragraph below to see why.
What is Video Bitrate
Video bitrate refers to the amount of information and data transmitted per second. The higher the video bitrate, the more information can be transmitted per second. Higher bitrates support higher video resolutions and frame rates, resulting in clearer videos. Conversely, lower bitrates can cause videos to be blurry.
How Video Bitrate Influences Video Size
What affect video file size? Video bitrate is one of the key factors. Video bitrate affects video file size by determining the amount of data stored per second. The higher the video bitrate, the more information is stored per second, resulting in larger video files. Using a lower bitrate results in smaller video files because less data is stored per second.
Recommended Video Bitrates for Different Situations
Different video bitrates are suitable for different situations. Video bitrate is related to the video resolution and frame rate. If both the video resolution and frame rate are high, a higher bitrate is necessary to maintain the video quality.
If you don’t know which bitrate to choose, here are some recommended video bitrates for various video resolutions and frame rates to refer to:
| Resolution | Frame Rate | Recommended Bitrate |
| 720p | 30fps | 2,500 – 4,000 Kbps |
| 60fps | 3,500 – 5,000 Kbps | |
| 1080p | 30fps | 3,000 – 6,000 kbps |
| 60fps | 6,000 – 10,000 Kbps | |
| 2K | 30fps | 6,000 – 13,000 kbps |
| 60fps | 9,000 – 18,000 kbps | |
| 4K | 30fps | 13,000 – 34,000 Kbps |
| 60fps | 20,000 – 51,000 kbps |
#5 Video Bit Depth (Color Depth)
Bit depth is related to the color information of the video. It significantly affects video size. Why? Read below to learn more about the relationship between bit depth and video size.
What is Video Bit Depth
Video bit depth, or color depth, is the number of bits used to represent the color information of a single pixel in a video. It decides the number of colors and shades of each color in the video image.
A video is composed of countless pixels. Each pixel is a mixture of red, green, and blue, each with varying brightness. The brightness of each pixel is represented by a binary representation of the three colors. A "bit" is the basic unit of binary. The bit depth determines the number of bits representing each color in each pixel.
How Video Bit Depth Influences Video Size
Video bit depth has a direct impact on video file size. It determines the level of detail in each color within the video. Higher bit depths require more data to represent the color information contained within each pixel. Therefore, higher bit depths increase video file size.
Recommended Video Bit Depths for Different Situations
Common video bit depths include 8-bit, 10-bit, and 12-bit. The following are their differences and usages:
- 8-bit: 8-bit video allows for 256 tonal variations per pixel in each color channel. The three colors can produce approximately 16.7 million colors. 8-bit video meets the standards of most streaming videos, such as YouTube videos.
- 10-bit: 10-bit video allows for 1,024 tonal variations per pixel in each color channel. This allows for a total of approximately 1.07 billion colors from three colors. Some professional video productions often use 10-bit.
- 12-bit: 12-bit video allows for 4,096 tonal variations and over 68 billion colors. 12-bit is typically used in professional film productions.
#6 Audio Encoder
The audio encoder has a certain impact on the video file size. Read the following paragraph for details on how different audio codecs affect audio quality and file size.
What is Audio Encoder
The audio encoder is a device or software that compresses raw audio data into a smaller file size. The audio encoding process will remove some less important audio information. However, it is difficult for us to detect this loss of information when listening to the audio.
Audio Encoder vs Audio Format
Audio encoder and audio format are two concepts that are often confused. They are related but different. An audio encoder is a program or software that compresses and decompresses data. An audio format, on the other hand, is a container used to store audio data.
Audio formats can be categorized into lossless and lossy. The difference between them is whether some data in the original audio is completely deleted. Here’s a comprehensive overview of the lossless audio format and the lossy audio format.
1. Lossless Audio Format
Lossless audio format only removes some redundant data, but completely retains the original audio information. It is ideal for archiving or professional use.
2. Lossy Audio Format
Lossy audio format permanently removes some data that is imperceptible to the human ear. The audio in this format is close to the original audio, but the quality is not as good as the original audio. Lossy audio format is commonly used on streaming platforms like YouTube and Spotify.
How Audio Encoder Influences Video Size
The impact of an audio encoder on video size depends on its efficiency. Using a more efficient encoder can provide higher sound quality at a lower bitrate. That means you can experience high-quality audio even with a smaller video file size. Conversely, using a less efficient encoder will result in a larger video file size for the same sound quality.
Common Audio Encoders that Generate Small Video Size
Here are 2 recommended audio encoders that allow you to enjoy high-quality audio with a lower file size:
- OPUS: OPUS uses efficient compression. Even at lower bitrates, the audio quality is generally better than MP3. It is usually suitable for video conferencing services like Zoom and Google Meet.
- AAC: AAC is a highly efficient encoder. It is compatible with almost all devices and is widely used on many online platforms such as YouTube, Vimeo, and Netflix.

#7 Audio Bitrate
What affect video file size? One of the key factors is audio bitrate. Here is a detailed explanation.
What is Audio Bitrate
Audio bitrate indicates the amount of audio data per second. The unit of bitrate is kbps. If the audio bitrate of a video is 128kbps, it means that the amount of audio data per second is 128kb.
How Audio Bitrate Influences Video Size
Generally speaking, the higher the audio bitrate, the better the sound quality, and the larger the audio portion of the video file, resulting in a larger video file size. However, different audio bitrate modes have different effects on file size. The following are two different bitrate modes and their impact on video file size:
1. Variable Bitrate (VBR):
Variable bitrate can adaptively adjust the bitrate according to the complexity of the audio content. Audio using this variable bitrate has a lower bitrate for simple audio segments and a higher bitrate for complex audio segments.
2. Constant Bitrate (CBR):
Constant bitrate maintains the same bitrate throughout the entire audio. It cannot adjust the bitrate as freely as a variable bitrate. If the audio content is simple, a high constant bitrate may result in wasted data, increasing the file size. Therefore, constant bitrate audio generally has larger files than variable bitrate audio.
Audio Bitrates for Different Situations
The following are some common audio bitrates and their application scenarios:
- 128kbps: Audio with a bitrate of 128kbps is considered standard quality. It is the default bitrate for some music platforms and is also a common bitrate for some voice broadcasts.
- 192kbps: 192kbps offers better audio quality and is suitable for some online streaming platforms.
- 256kbps: 256kbps offers very high audio quality. It is commonly used in high-quality music streaming.
- 320kbps: 320kbps provides extremely high audio quality. It is suitable for high-quality music listening.
#8 Audio Channel
The audio channel in the video affects the size of audio files, which in turn affects the video file size. The following details how different numbers of audio channels affect audio quality and file size.
What is Audio Channel
The audio channel refers to the path along which audio signals travel. Audio can have a single channel or multiple channels. The number of channels directly determines the richness of the audio.
The number of channels depends on the audio producer and the device that plays the audio. Producers may use multiple microphones or multitrack recording. However, the device you listen to may not be able to display all channels.
How Audio Channel Influences Video Size
The impact of audio channels on video file size depends on the number of channels and the bitrate of each channel. The more audio channels, the more information contained, and the larger the video file size.
Furthermore, the bitrate of each channel also affects the size of the audio portion of the video. A higher bitrate results in better sound quality, larger audio files, and consequently, larger video files.
Recommended Audio Channels for Different Situations
If you are looking for an immersive audio experience, consider these audio channel options:
- Stereo 2.0: This setup supports two independent channels, left and right. It is the basic configuration for music, radio, and TV programs.
- 5.1 surround sound: This channel configuration contains 6 channels, including 5 main channels and 1 low-frequency channel. It is widely used in movies and video games.
- 7.1 surround sound: This advanced setup consists of 8 channels, including 7 main channels and 1 subwoofer, making it ideal for home theaters and games that support 3D sound effects.
- Dolby Atmos: This setup provides a three-dimensional stereo audio experience and is widely used in cinemas and home theaters.
#9 Audio Sample Rate
The audio sample rate is directly related to the sound quality in audio files. It also affects video file size. Why? Discover more about the connection between sample rate and video file size below.
What is Audio Sample Rate
The audio sample rate refers to the number of times a sound wave is sampled in one second. Its unit is Hertz (Hz). For example, an audio sample rate of 48 kHz means that the sound is measured 48,000 times per second.
How Audio Sample Rate Influences Video Size
The audio sampling rate has a direct impact on the video file. A higher sample rate captures more data per second, which means more data needs to be stored. Consequently, the more detailed the audio, the larger the video file size is.
Recommended Audio Sample Rates for Different Situations
Different scenarios select different sampling rates. Here are some common sampling rates and when they are commonly used:
- 32 kHz: Commonly used for recording FM radio, cassette recordings, or telephone calls.
- 44.1 kHz: Usually used in podcasting, CD-quality recording, and digital audio files.
- 48 kHz: The standard sample rate for DVDs and TV. Usually used for professional audio production.
- 96 kHz: A high standard sample rate that is used for professional audio recording.
#10 Audio Bit Depth
The bit depth of the audio affects the size of the video file by affecting the size of the audio portion. Read below to explore the connection between audio bit depth and video file size.
What is Audio Bit Depth
Audio bit depth refers to the difference between the loudest and quietest sounds in an audio. It determines the dynamic range of the signal in an audio file. The higher the audio bit depth, the more detail is included in the audio.
How Audio Bit Depth Influences Video Size
Audio bit depth directly affects the size of audio files. A higher audio bit depth means more audio data needs to be stored, resulting in a larger overall video file. Conversely, a lower audio bit depth results in a smaller video file.
Recommended Audio Bit Depths for Different Situations
How to choose the right audio bit depth depends on your purpose. Below are some recommended audio bit depths for you to choose from.
- 16-bit: It offers a dynamic range of up to 96 dB, which is standard for CDs. It maintains a balance between file size and high-quality audio.
- 24-bit: It provides a dynamic range of up to 144 dB and is commonly used in professional music mixing.
- 32-bit: It offers an extremely high dynamic range, exceeding 1500 dB, which helps to eliminate unwanted noise such as "pops" during recording.
In the above section, we discussed what affect video file size, including both video and audio parameters. Among these factors, video bitrate and video resolution have the most significant impact on the file size of the video. Increasing either of these will result in a larger file size. If your video size is large, reducing its file size can bring many benefits. Next, let’s explore more deeply why we need to consider reducing the size of video files.
Why Need to Reduce Video File Size
When your video file is large, it is very necessary to reduce the video file size. Here are some reasons.
1. Save Storage Space
Large video files can take up a lot of storage space on devices like phones, computers, or tablets, which can lead to insufficient space. In order to free up more space on your device to store other applications and important files, it is necessary to reduce the size of some larger video files.
In addition, some cloud storage services, such as Google Drive and iCloud, provide limited free storage space. If you want to store larger videos in these cloud storage spaces without paying, you need to reduce the video file size.
Furthermore, you may also store videos on some external storage devices, such as external hard drives. These drives are usually expensive. Reducing video file size allows you to store more videos while using as little external storage as possible.
2. Save Transmission Time
The size of a video file directly affects its transfer speed, because larger video files require a larger amount of data to be transferred. The smaller the video file, the less the transmission time. When you upload videos on social media such as YouTube, Facebook, Twitter, etc., smaller video files can also be uploaded faster.
3. Ensure Successful File Transfer
Some instant messaging platforms, such as WhatsApp, Facebook Messenger, Telegram, etc., have certain file size limits when sending videos. This results in some huge video files not being sent to your contacts at all. You can only successfully transfer video files by reducing the video file size.
4. Reduce Network Consumption
The larger the video file, the more data needs to be transmitted on the network, resulting in greater data consumption. Video size is particularly important for users with limited mobile data. Watching some larger videos consumes a lot of mobile data. Additionally, smaller video files make them more accessible to users with slower internet connections.
5. For Easier Video Editing
Some videos with large file sizes may have very high resolutions and bitrates. Low-performance computers cannot handle these files, which can cause the computer to freeze or slow down when editing large videos.
Furthermore, some video editing software requires real-time decoding and previewing of video files. If the file size is too large, the software interface may freeze or crash during editing. Therefore, you need to reduce video size to avoid the above situations from happening.
How to Reduce Video File Size?
Reducing video file size is necessary to free up storage space, speed up upload and transfer speeds, and enhance playback and streaming performance.
How to reduce a video file size? The above already introduced what affect video file size, including video encoders, video bitrates, video resolution, audio sample rate, audio bit depth, and more. So, we can reduce these video and audio parameters to decrease the file size. Alternatively, you can use a practical video compressor, which is a simple and effective way.
Furthermore, since video file size is also related to video length, reducing the video length can also effectively decrease the file size. You can also remove the audio from the video to reduce its size. Below are 2 applications that support reducing video file size.
#1 Using MiniTool Video Converter
MiniTool Video Converter is a completely free video converter. It supports converting video and audio files in a wide range of formats, including MP4, MOV, MKV, WMV, MP3, OGG, and more. This application allows you to adjust the parameters of the video or audio files. So, you can use this tool to lower the bitrate, resolution, frame rate, sample rate, and audio channel of the video to reduce its file size.
Furthermore, MiniTool Video Converter also offers a video compression feature. It supports compressing videos up to 8K resolution. Moreover, it has no file size or file duration restrictions. MiniTool Video Converter supports compressing videos from 10% to 100% of their original size. You can compress your video files to your intended file size with this free tool.
Regardless of the audio and video conversion feature or video compression feature, the processed files will not have any watermarks. Below, I will show you how to use these two features of MiniTool Video Converter to reduce video size.
1. Adjust Video Parameters
First, let’s learn how to reduce video file size by adjusting the video parameters with MiniTool Video Converter.
Step 1: Download and Install MiniTool Video Converter
To get started with MiniTool Video Converter, click the button below to download and install it on your computer.
MiniTool Video ConverterClick to Download100%Clean & Safe
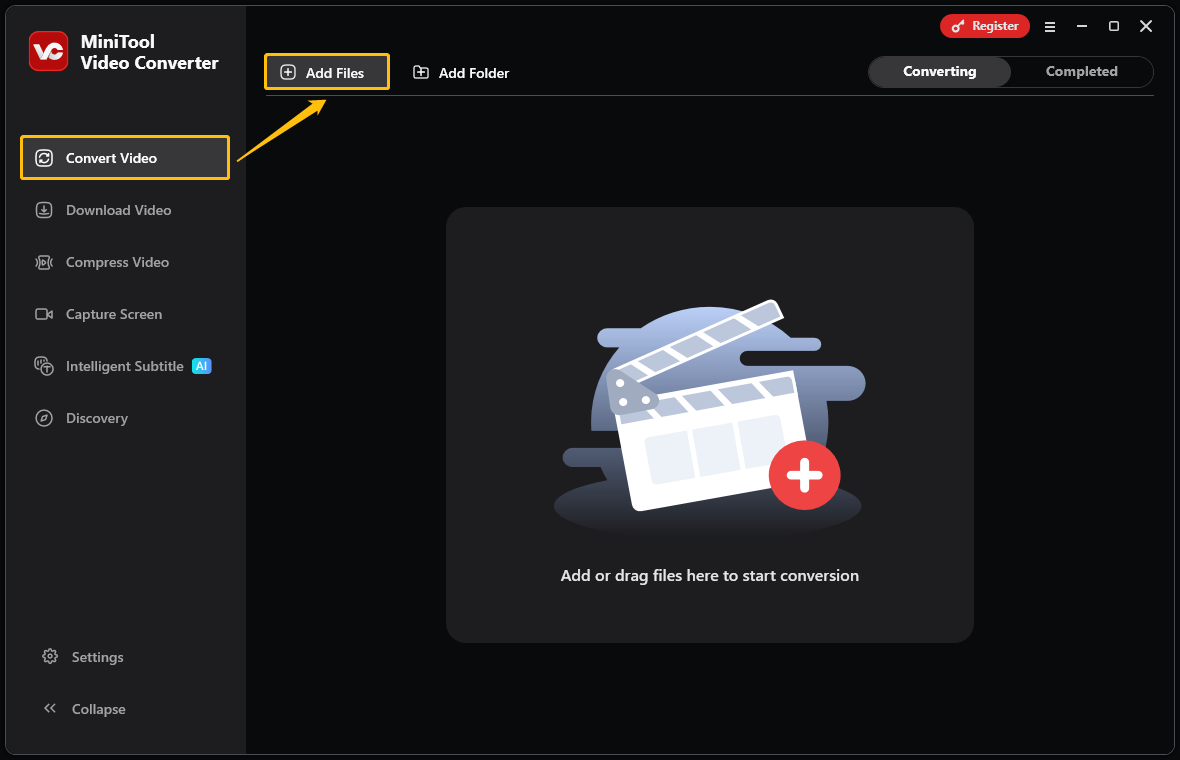
Step 2: Import Your Videos
Run this application and select the Convert Video tab on the left menu. There, you can upload your video files by clicking the Add Files option or the Add or drag files here to start conversion area.
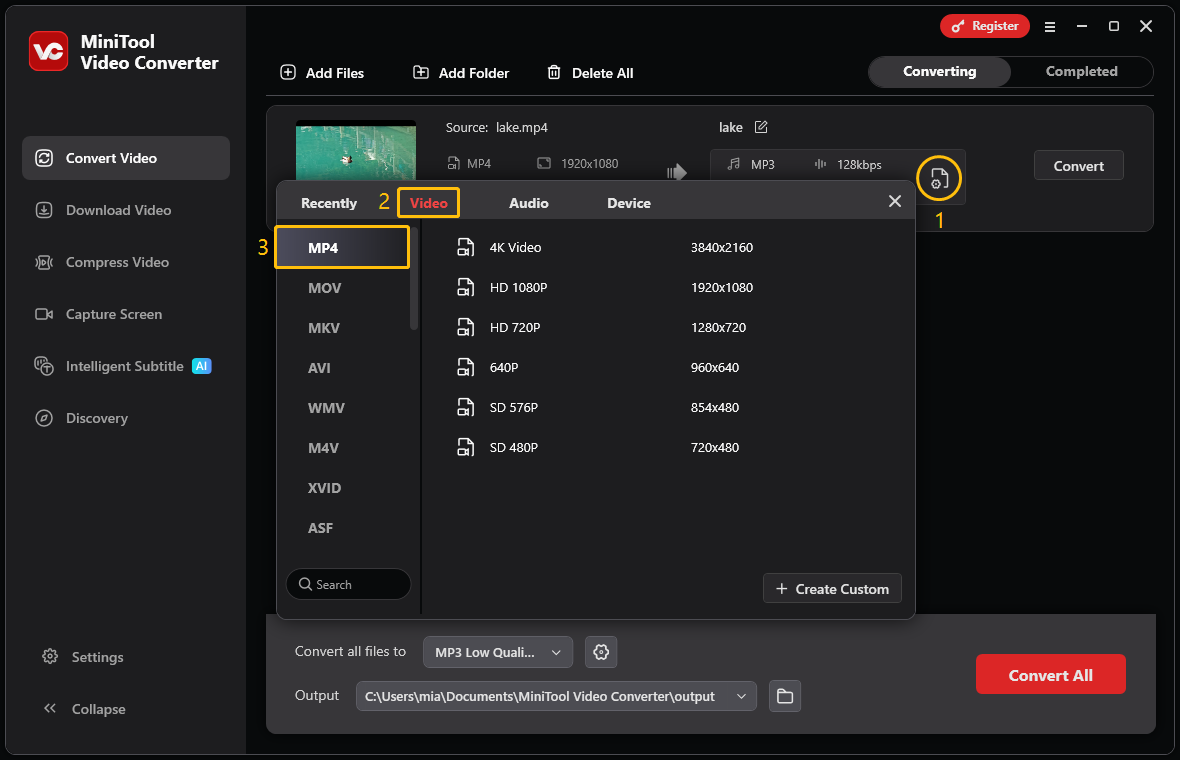
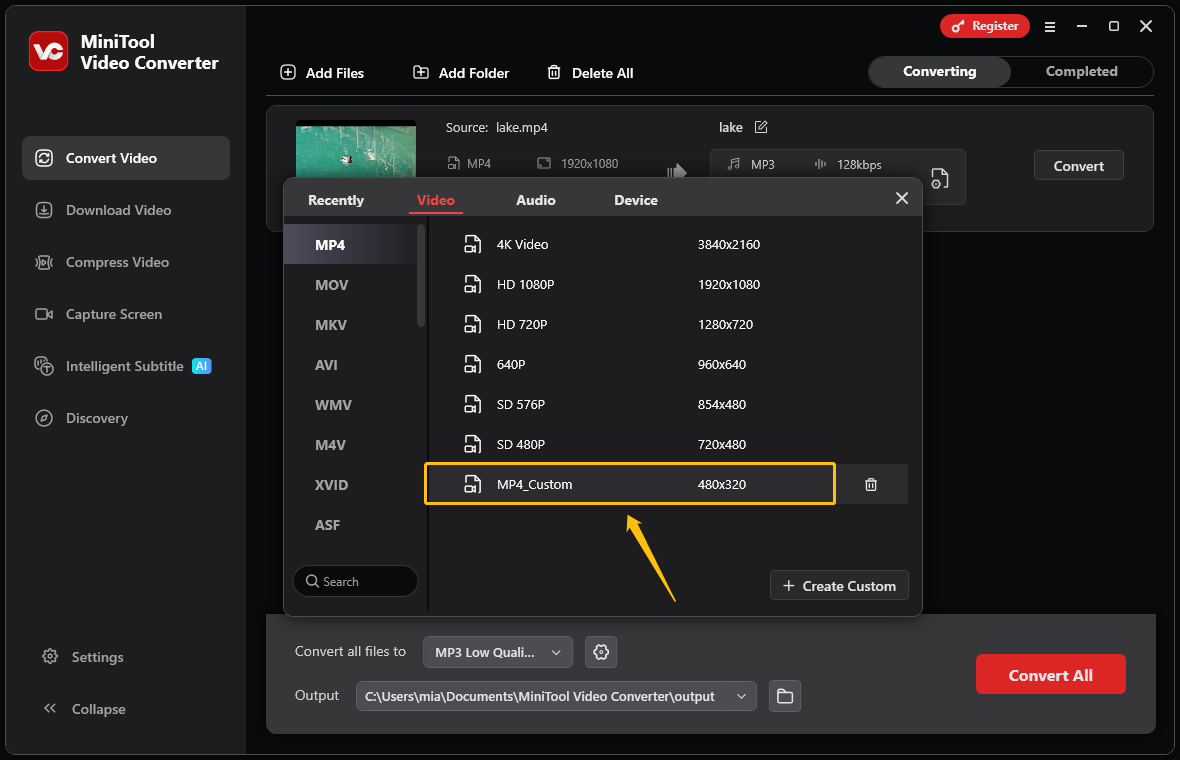
Step 3: Set the Output Format
Click the settings icon. Then, you will see a window pop up. Click the Video tab, choose the video format on the left menu. Here, I choose the same MP4 format as the original video.
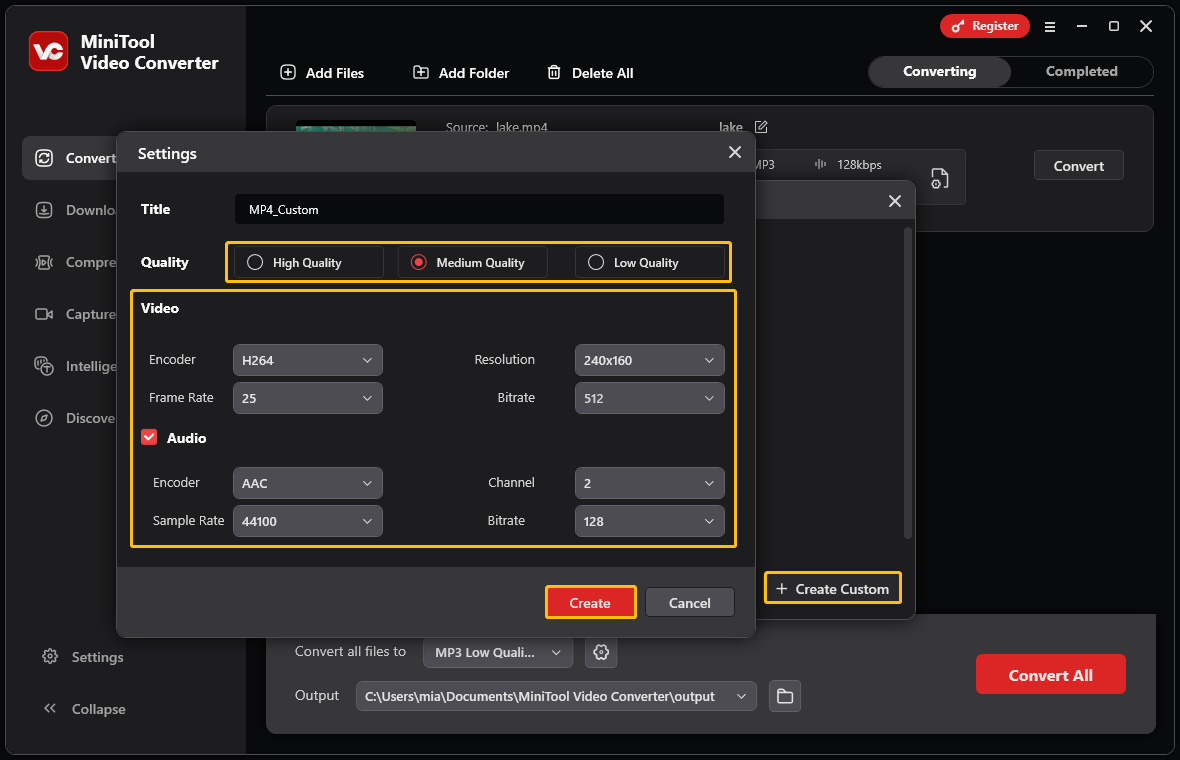
Step 4: Customize Output Format Parameters
Click the + Create Custom button to open the Settings window. Then, you can choose the video quality and lower the video encoder, resolution, frame rate, bitrate, audio encoder, audio channel, sample rate, and audio bitrate according to your needs. After making your selections, click Create.
You will return to the file selection window. Click the format you just customized.
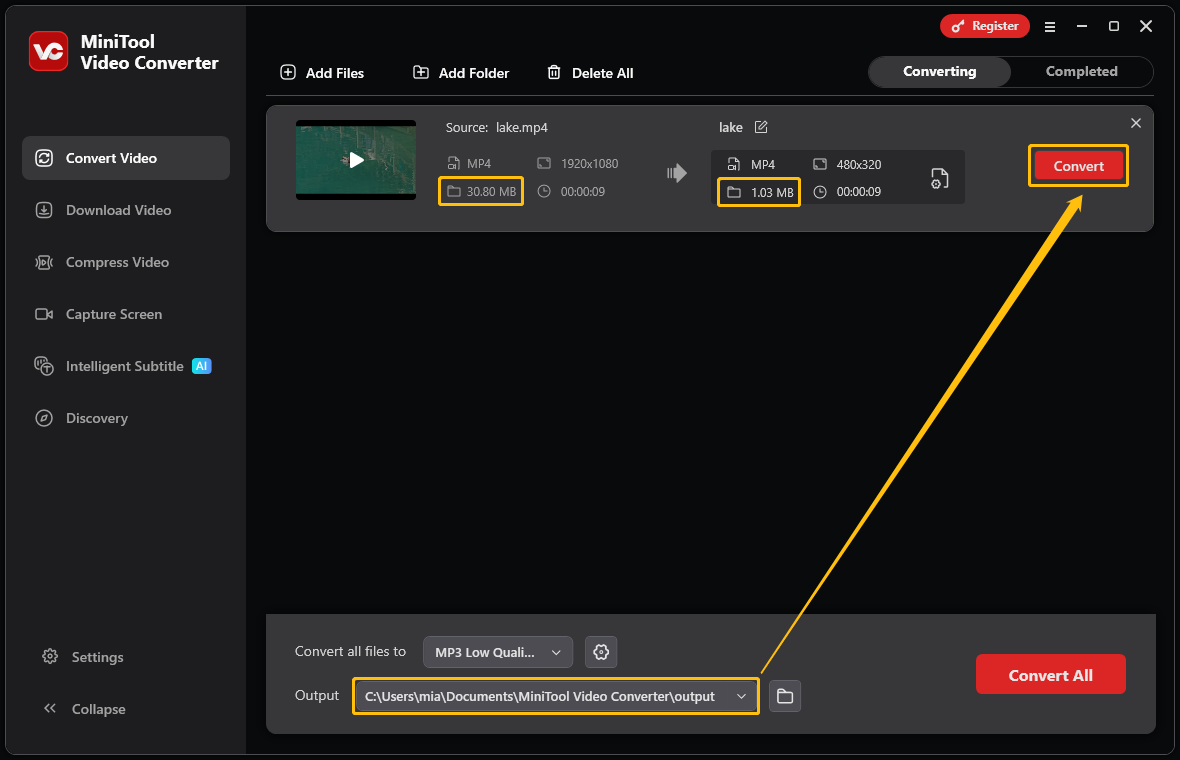
Step 5: Set the Storage Location and Start Conversion
You can view the source file size and the estimated size of the converted file in the conversion task section. Expand the Output option to save the converted files. Then, click the red Convert button to begin the conversion.
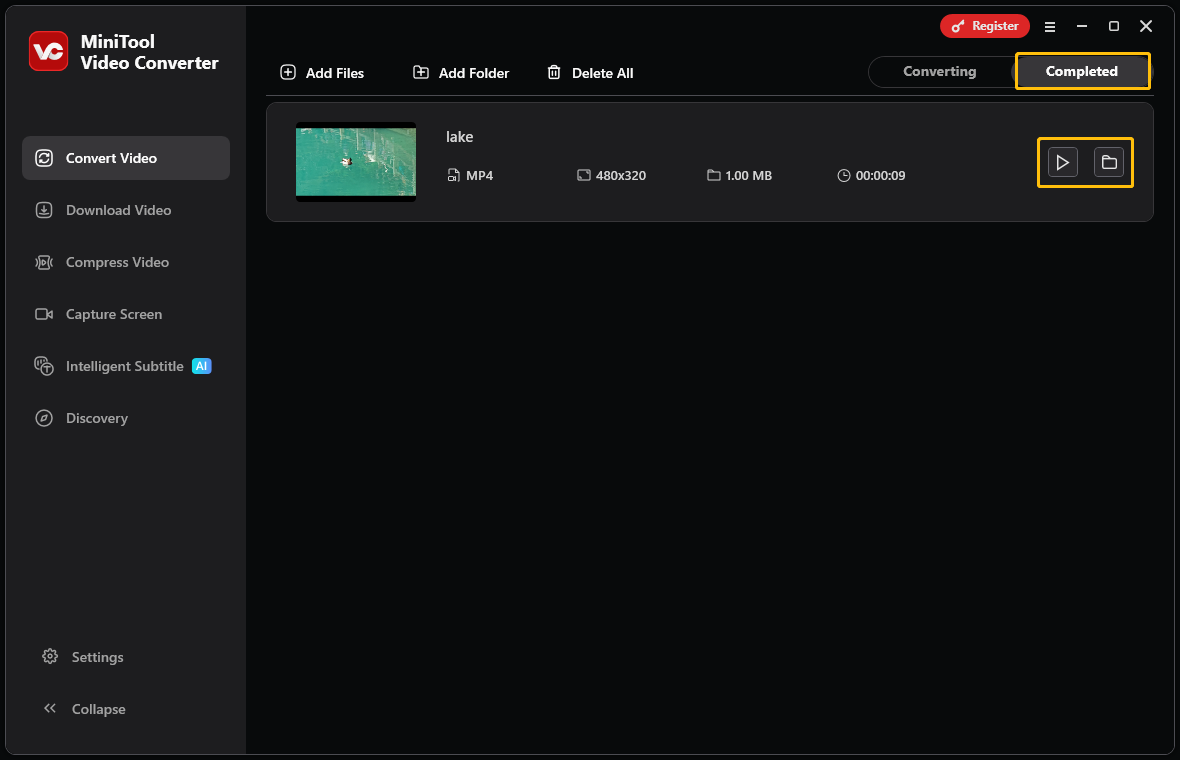
Step 6: Locate the Converted File
When the file conversion ends, this conversion tool will automatically navigate to the Completed section. There, click on the play icon to view the converted files or click on the folder icon to locate the converted file.
MiniTool Video Converter’s file conversion feature allows you to customize video parameters. You can selectively reduce certain video parameters without affecting the overall quality. If you want to reduce video file size more quickly and easily, you can also use its video compression feature.
2. Directly Compress the Video
MiniTool Video Converter’s video compression feature allows you to compress videos without losing quality. How to use this feature? Follow the steps below:
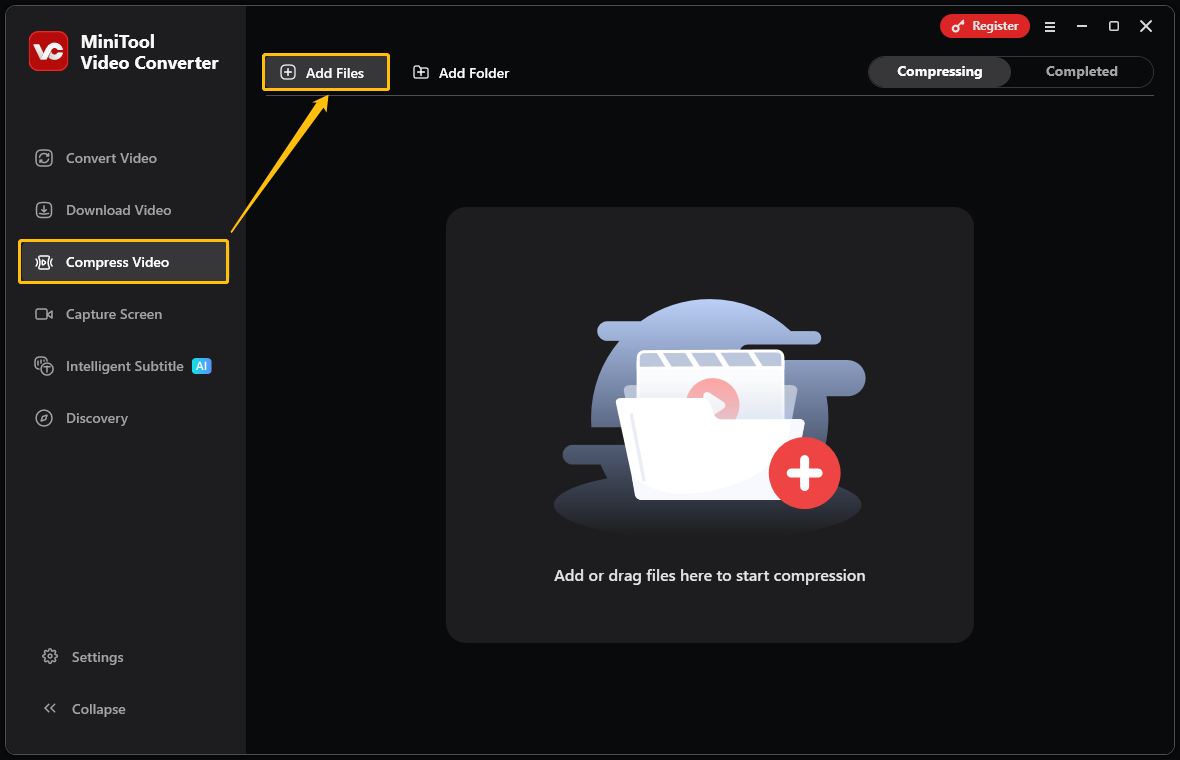
Step 1: Import Your Video
Launch MiniTool Video Converter and switch to the Compress Video tab. Then, click Add Files to import the video you want to compress.
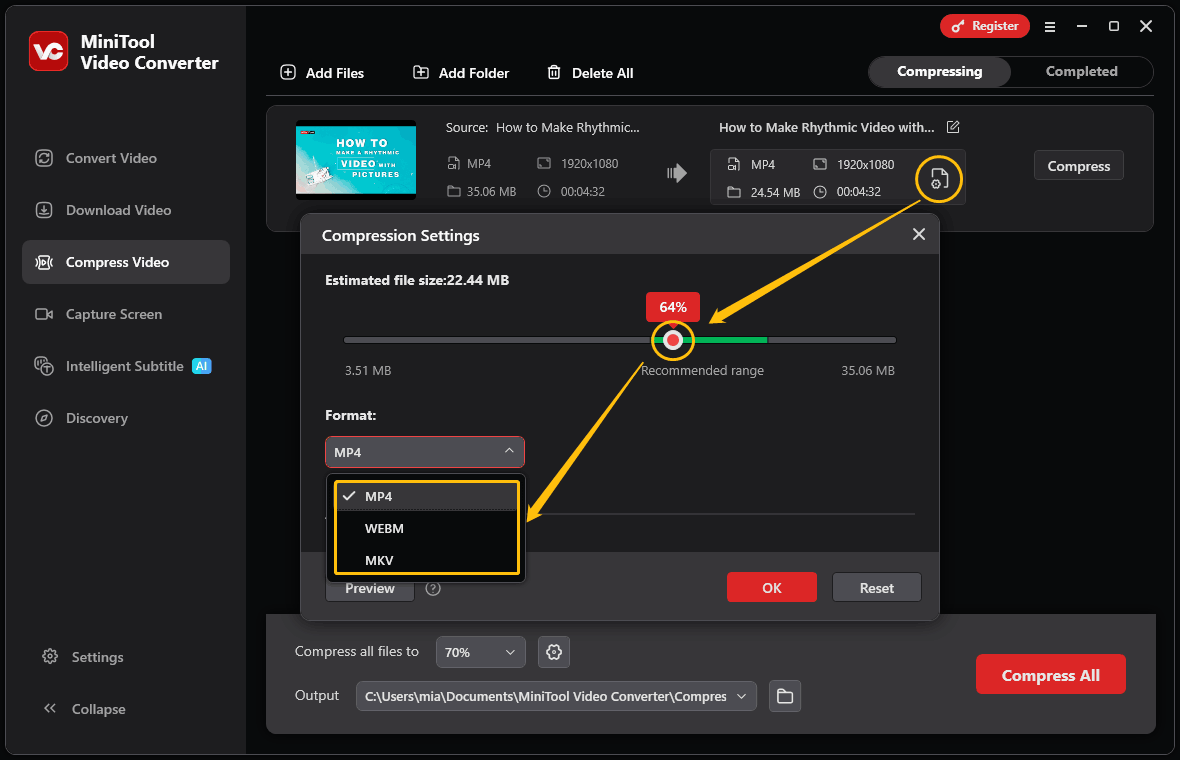
Step 2: Modify the Compression Options
Click the settings icon to access the Compression Settings window. Next, drag the red dot on the slider to adjust the compression level. After that, expand the Format option and select the output format.
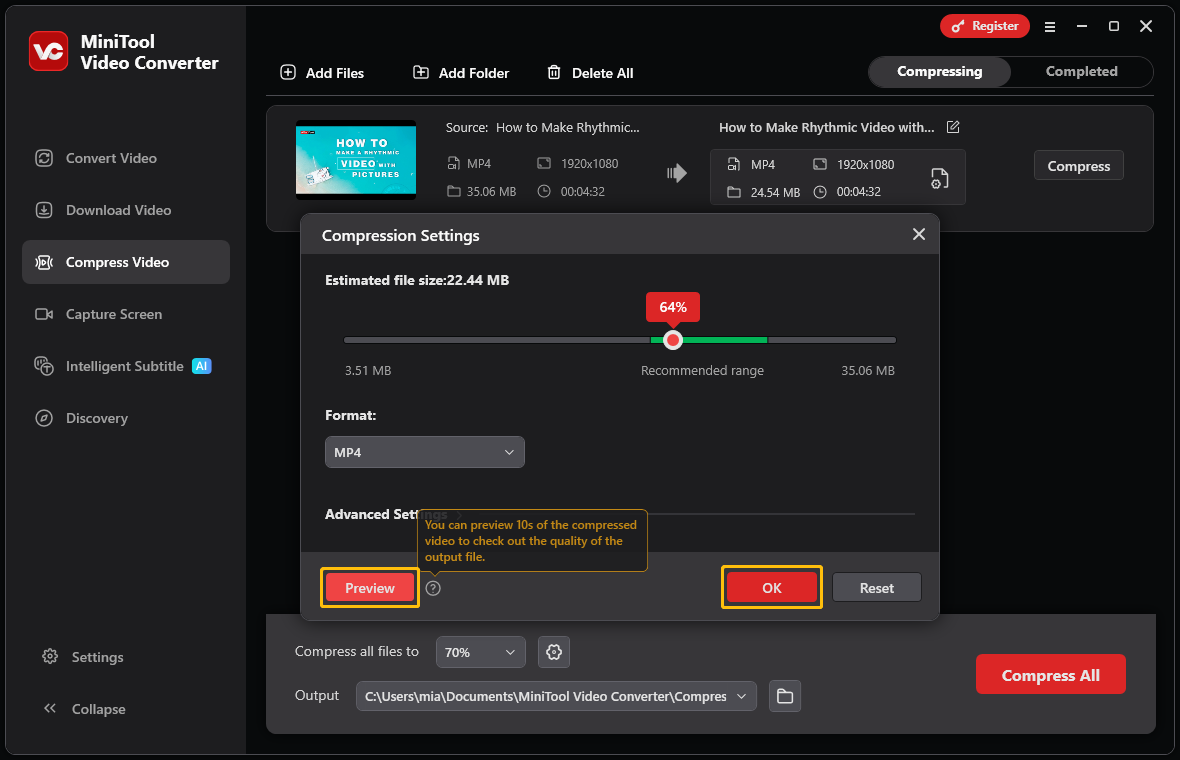
Next, you can click the Preview button to check the video quality. If it meets your requirements, click OK.
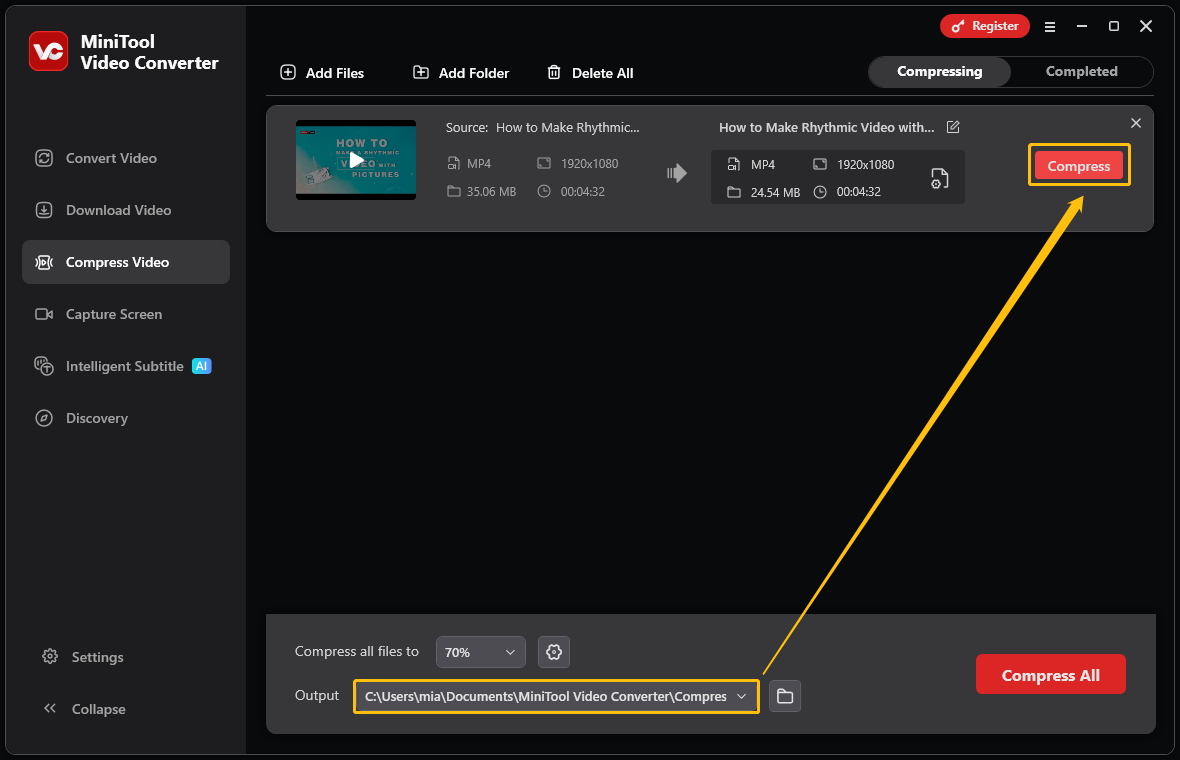
Step 3: Specify the File Storage Location
Click the Output option at the bottom of the interface and choose a folder to save the compressed video.
Step 4: Start Compression
Click the Compress button to initiate the compression process.
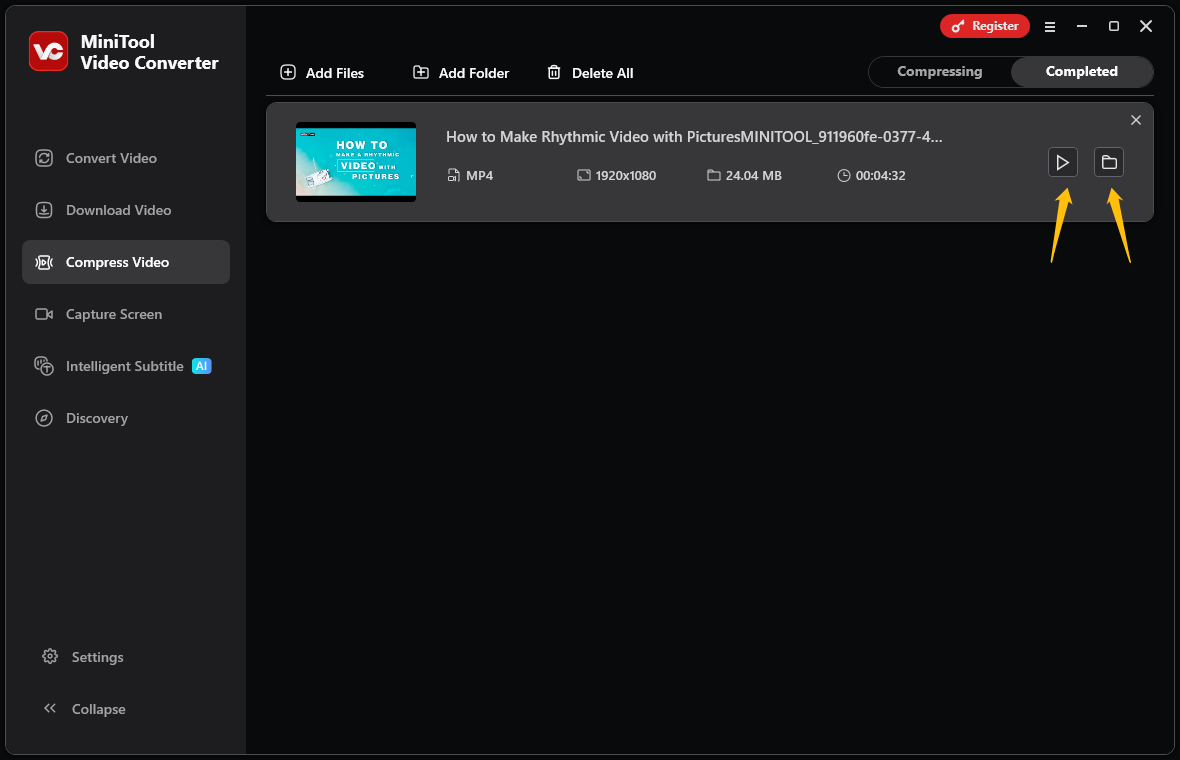
Step 5: Navigate to the Compressed Video
Once finished, you will be led to the Completed tab. You can click on the play icon to watch it or click on the folder icon to locate it.
MiniTool Video Converter can quickly compress your videos and offers multiple export formats. Besides video compression and file conversion, this software can also generate subtitles for your videos and convert video or audio into text.
#2 Using MiniTool MovieMaker
In addition to adjusting video parameters and compressing the video, you can also reduce the video file size using video editing techniques. For example, you can reduce your video length or mute the audio of your video.
Which video editor should you choose? I recommend MiniTool MovieMaker. This video editing tool is extremely user-friendly and supports all basic functions, such as speeding up, splitting, trimming, and cropping videos. It’s ideal for quickly processing a video to reduce its file size.
1. Reduce Video Length
There are several ways to reduce video length through video editing, such as speeding up the video, deleting unwanted sections, and trimming the video. MiniTool MovieMaker can handle all of these tasks effectively.
Next, I will explain to you how to use MiniTool MovieMaker to shorten video length, thereby reducing video file size.
Step 1: Download and Install MiniTool MovieMaker
Click the button below to download the MiniTool MovieMaker installation package and follow the on-screen instructions to install it on your computer.
MiniTool MovieMakerClick to Download100%Clean & Safe
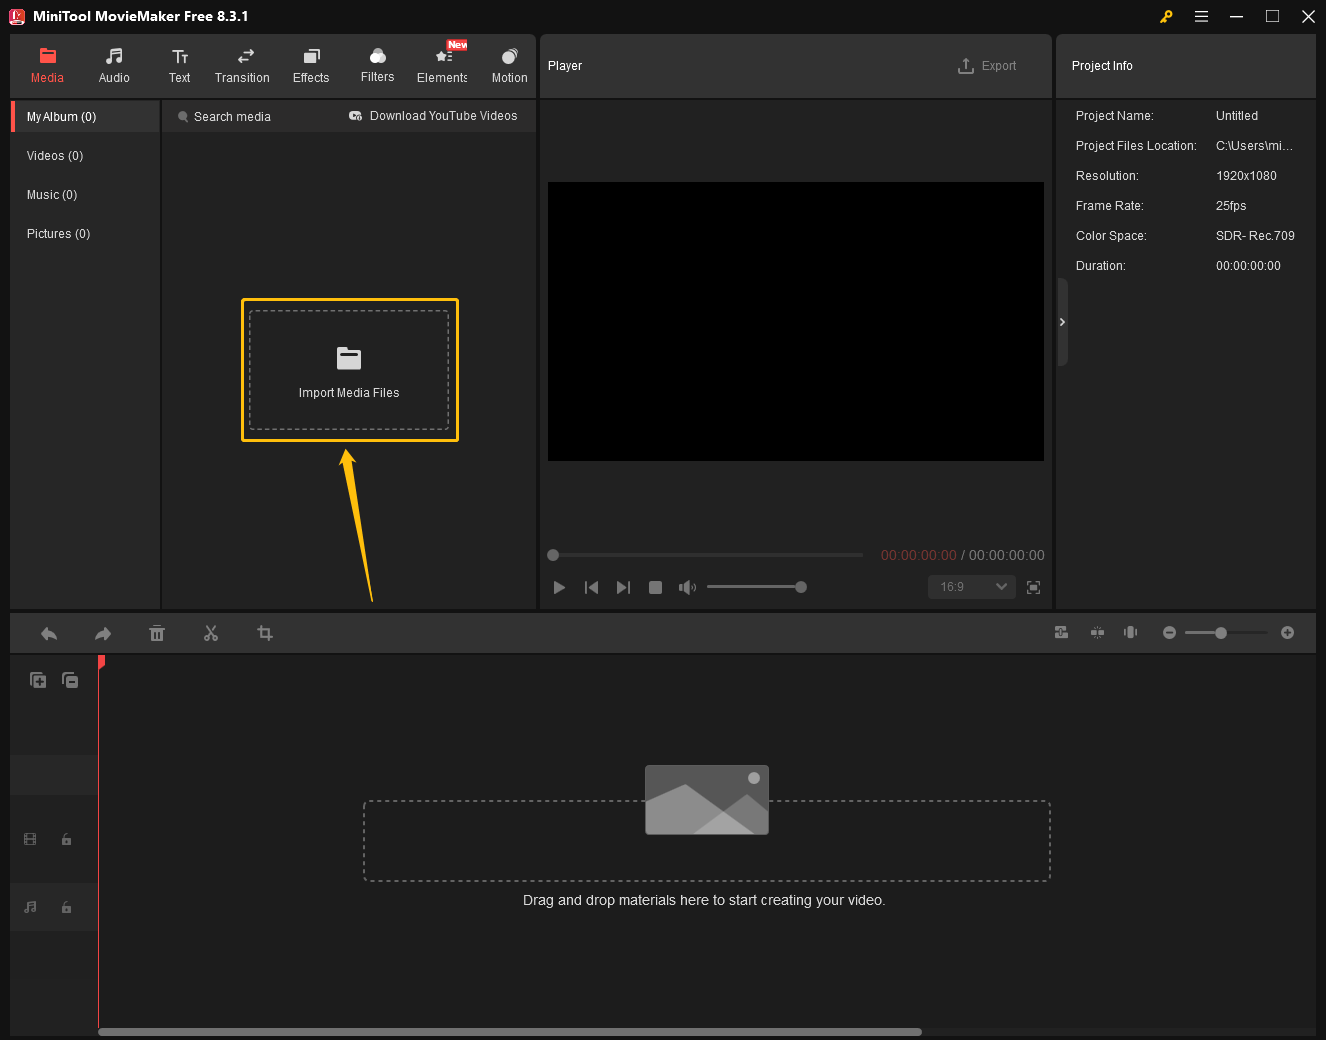
Step 2: Import Your Video
Launch MiniTool MovieMaker. Then, close the promotion window and click on the Import Media Files option to import your video.
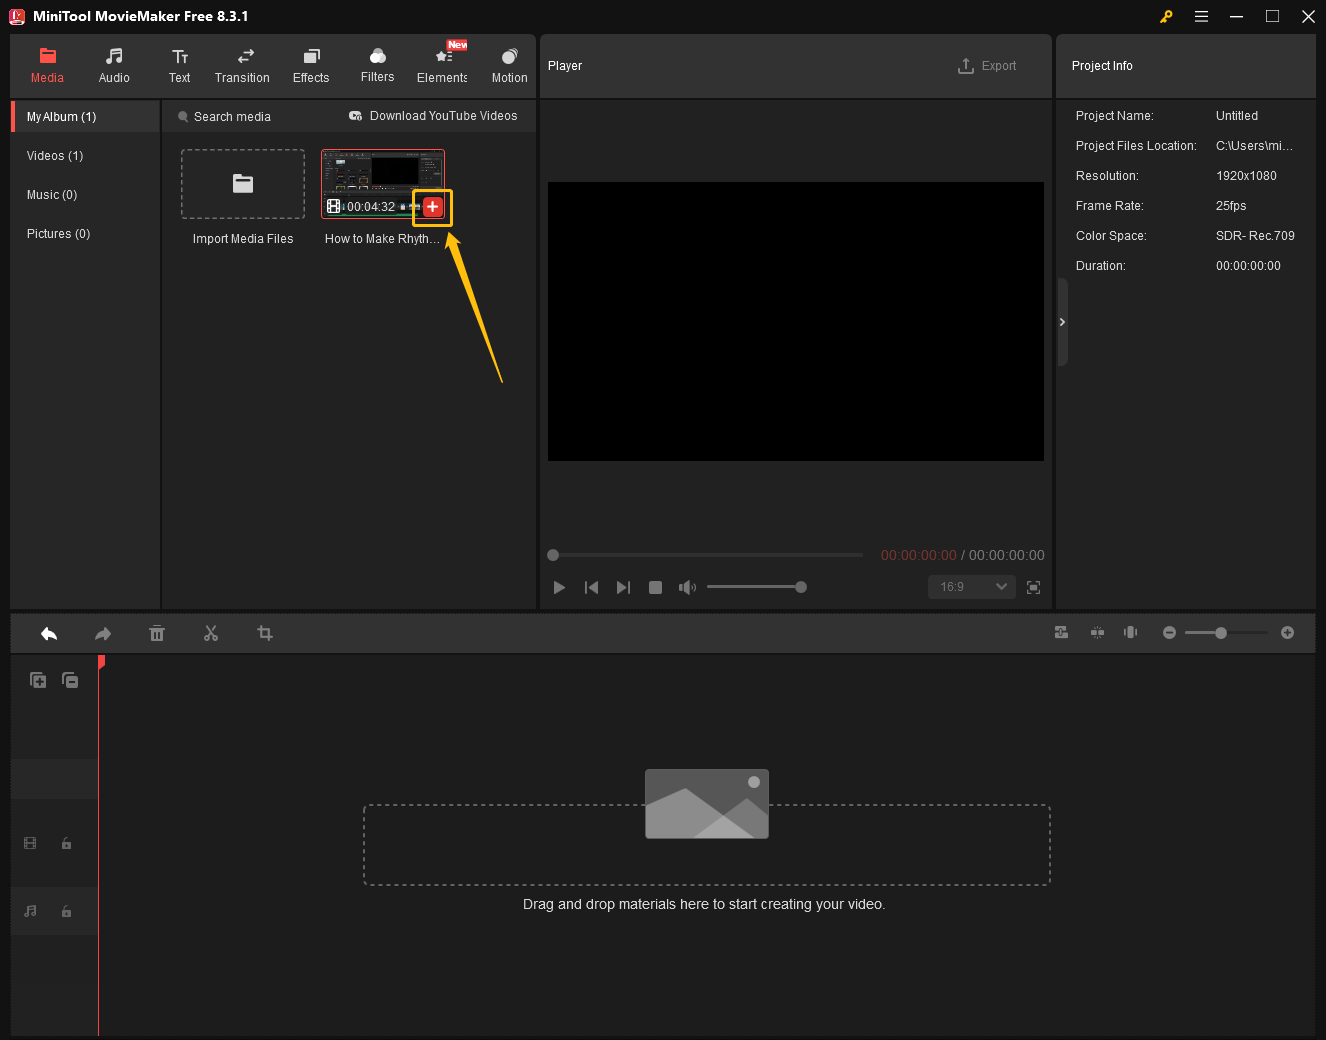
Step 3: Add the Video to the Timeline
Click the plus button located at the bottom right corner of the imported video to place the video on the timeline.
Step 4: Shorten the Video Length
Now, you can shorten the video length in 3 ways:
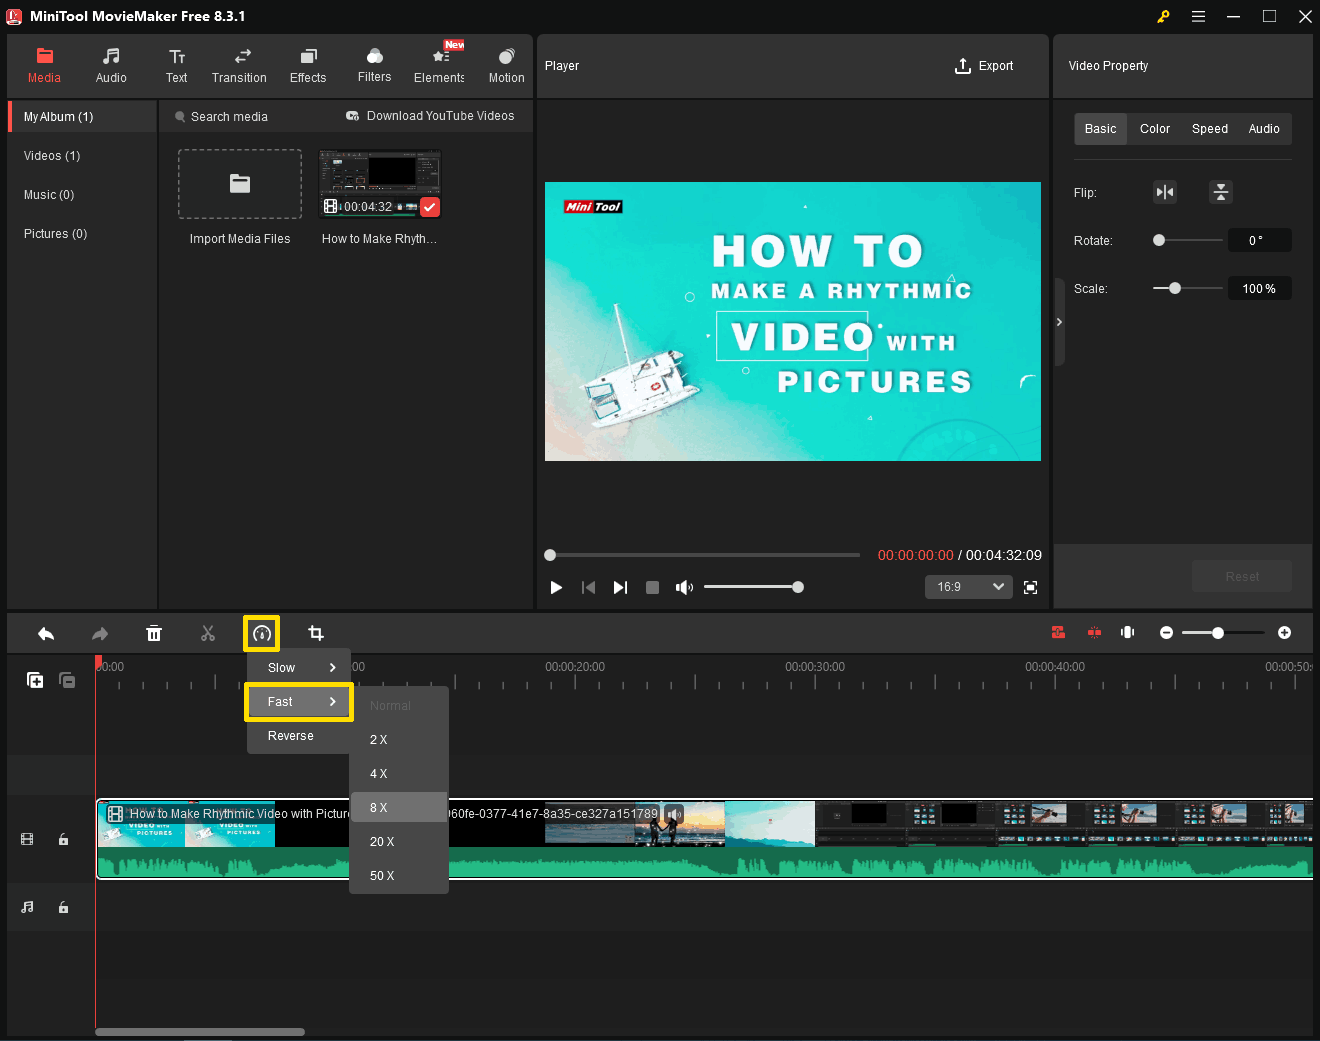
(1) Speed up the video
- Select the video on the timeline.
- Click the Speed icon.
- Move your cursor to the Fast option.
- Choose the playback speed multipliers (2X, 4X, 8X, 20X, or 50X).
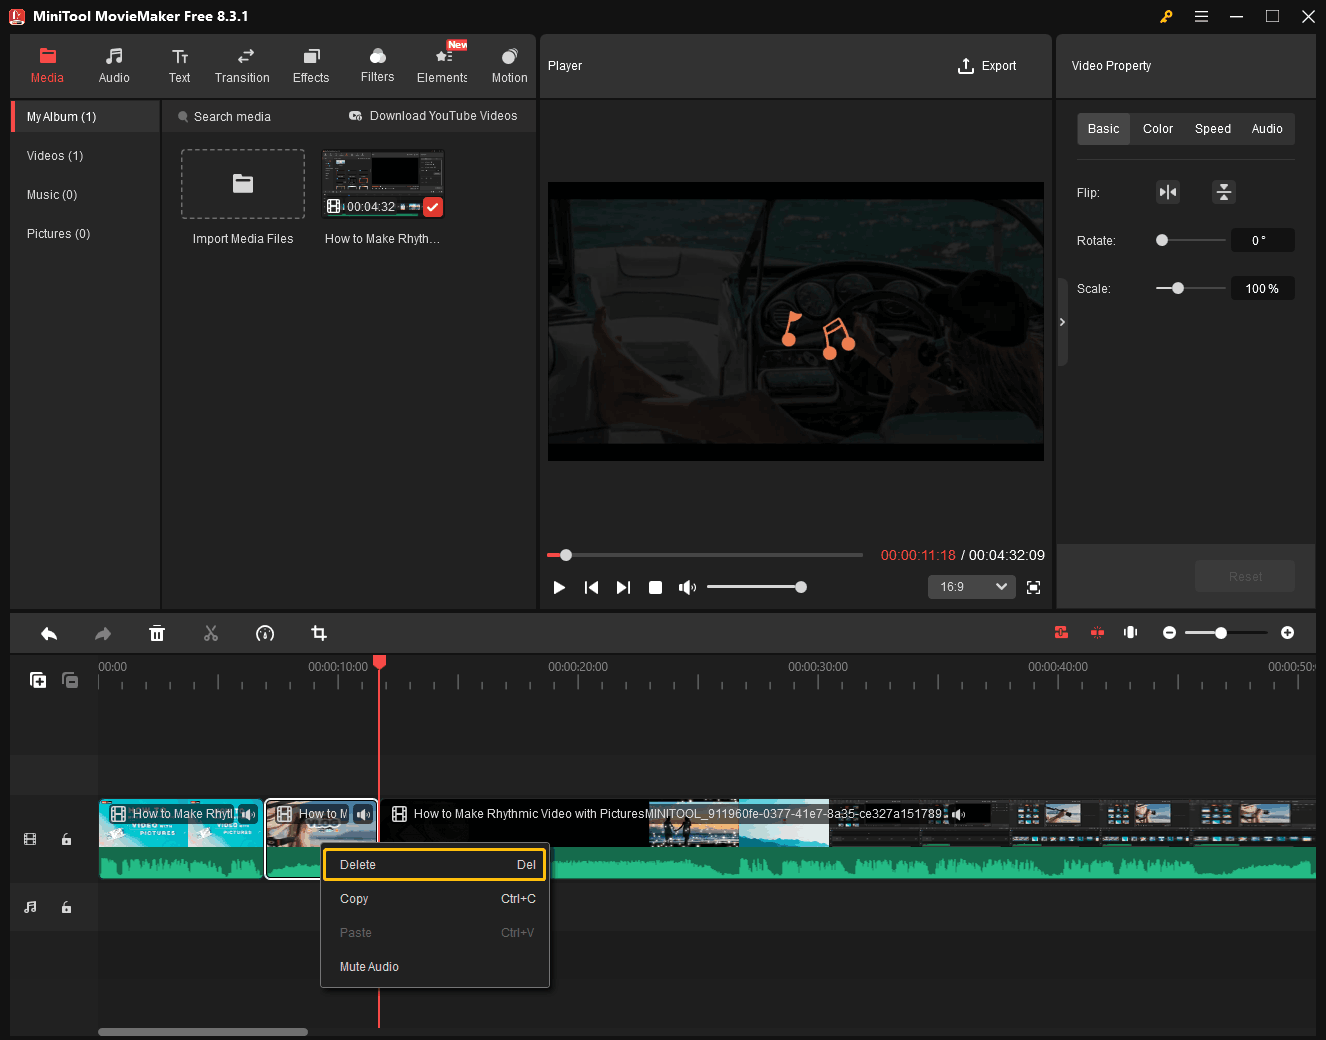
(2) Delete unnecessary parts of the video
A. Position the playhead at the start of the unwanted section and click the Split icon. Then, move the playhead to the end of that section and click the Split icon again.

B. Next, click on the split segment, right-click it, and choose Delete to remove the unwanted part.
(3) Trim the video
Some videos may have intros or outros that you can remove using the trim function:
- Move your cursor to the beginning of the video clip. When a right-pointing arrow appears, click and drag it to the desired start position.
- Move your cursor to the end of the video clip. When a left-pointing arrow appears, click and drag it to the desired end position.

Step 5: Export the Video
Click on the Export icon at the upper-right of the Player window. In the Export window, choose a save folder for the edited video. Also, you can select the output format, frame rate, and resolution you want. Finally, click on the Export button to save the video.
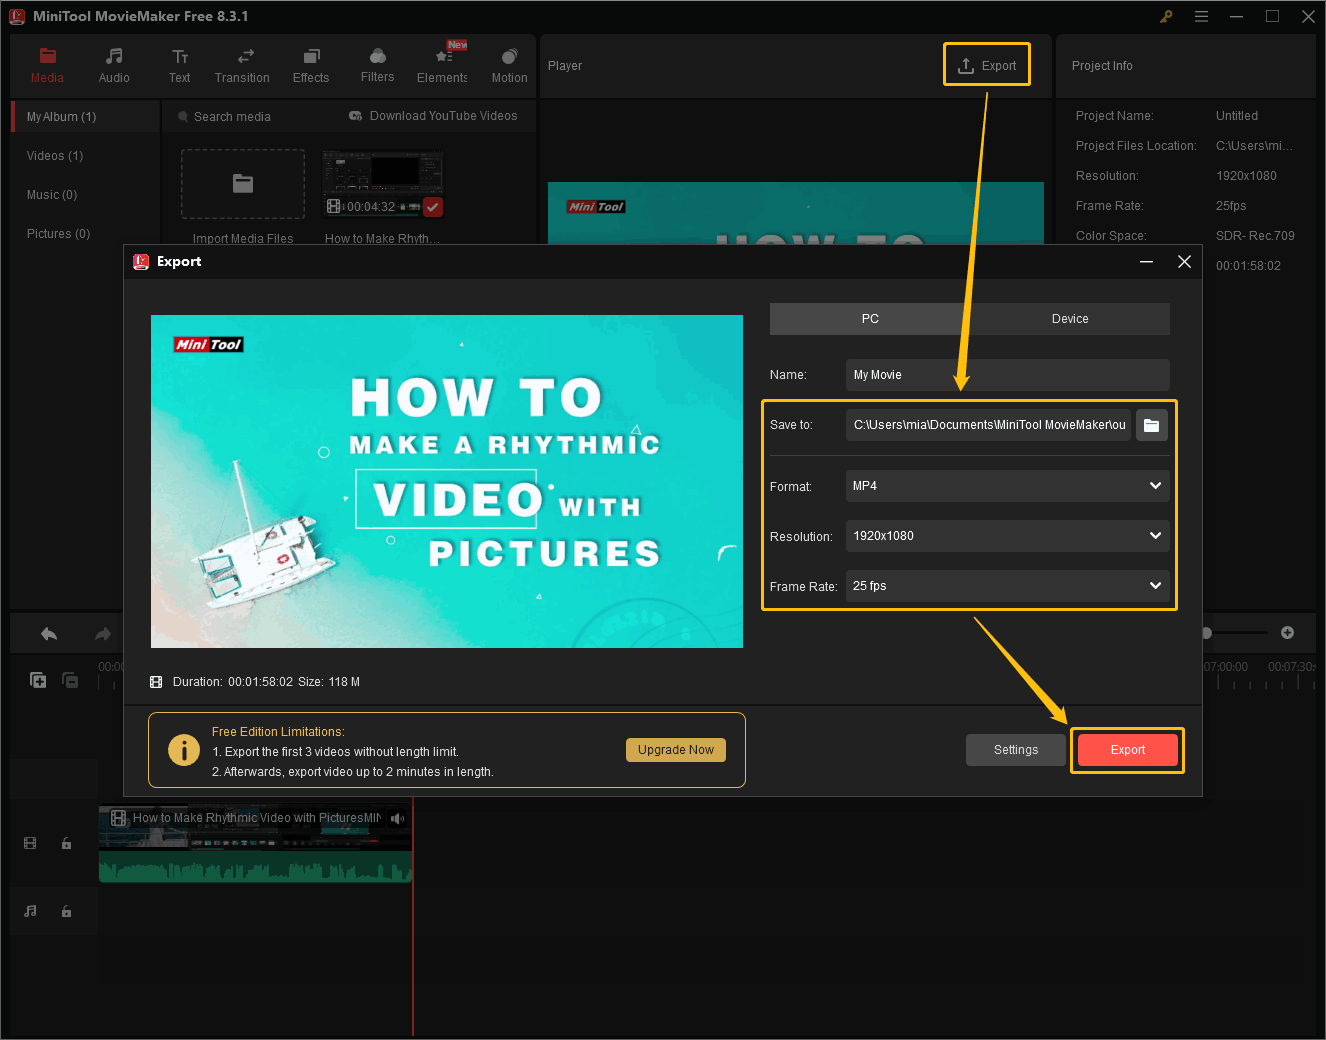
Once the Export dialog box appears, click Find Target to locate and check the output video.

All three methods mentioned above reduce video file size by reducing the video duration. If the audio in the video isn’t necessary, you can consider removing it to decrease the file size. MiniTool MovieMaker can help you!
2. Mute Audio
If your video has complex but not crucial audio, try muting the audio. This will significantly reduce the file size. Here’s how:
Right-click on the video in the timeline and select Mute Audio. Alternatively, you can click the loudspeaker icon on the video clip to mute the video.
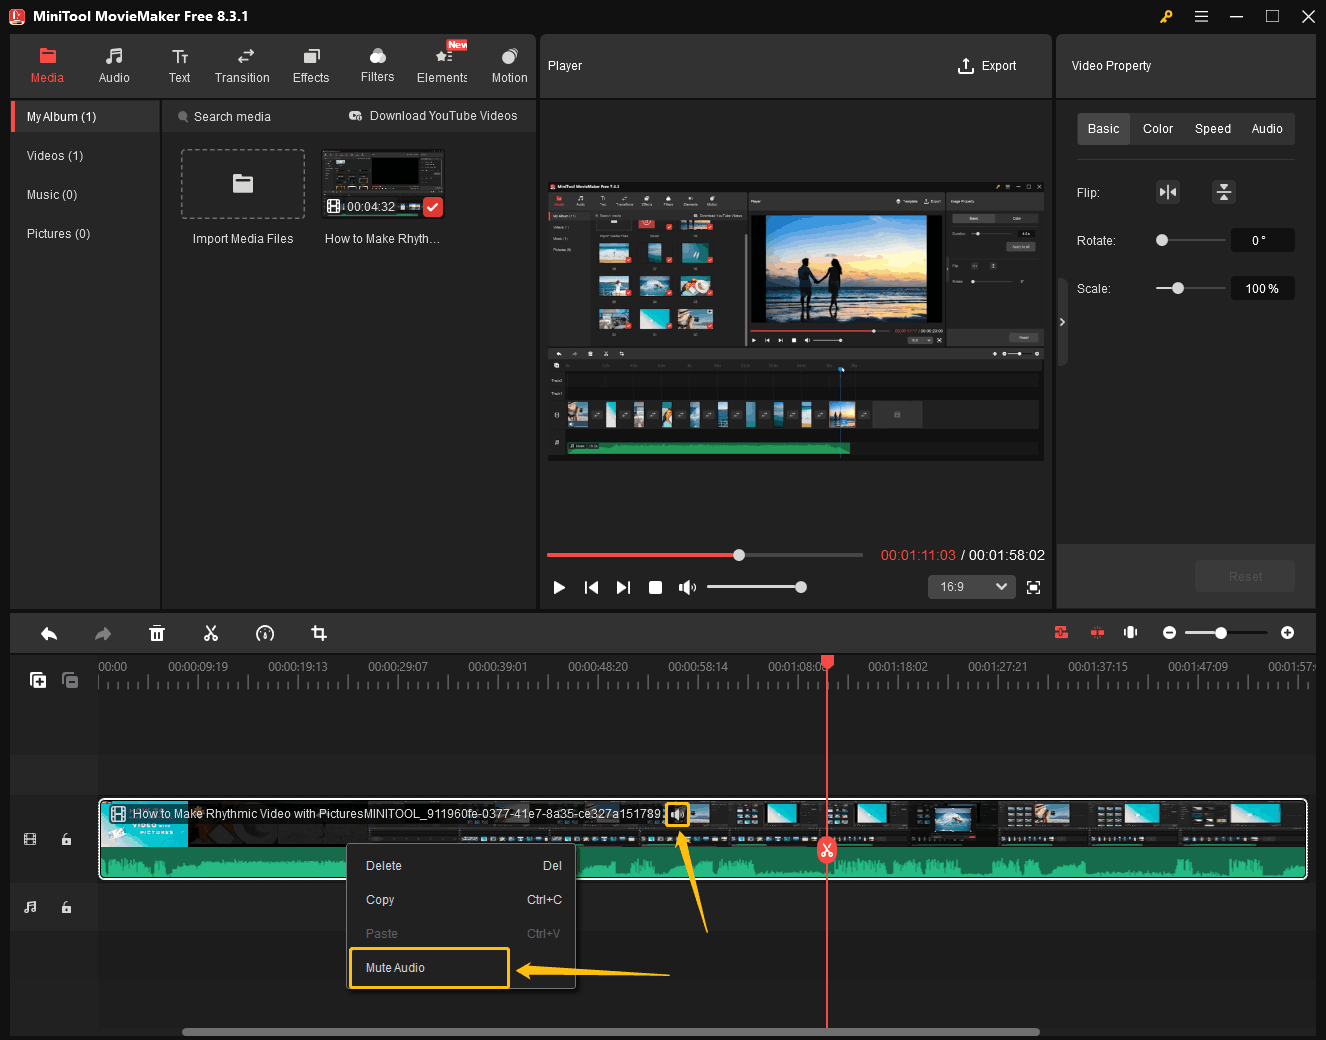
By following these simple steps, you can effectively reduce your video file size by muting the audio using MiniTool MovieMaker.
Conclusion
This article explains what affect video file size. The size of a video is significantly influenced by video and audio parameters. The two most significant factors are video bitrate and resolution.
If you want to reduce video size, try MiniTool Video Converter to adjust some of the video parameters or compress the video directly. Alternatively, you can use MiniTool MovieMaker to shorten the video or mute it to reduce the file size.
If you have any problems when using MiniTool Video Converter or MiniTool MovieMaker, please send an email to support@minitool.com to ask for help.
User Comments :