High-quality videos often come with larger file sizes, which can be cumbersome to upload, share, or store. Is it really possible to compress video without losing quality? The short answer is yes. In this article from a free file converter, we’ll highlight several effective methods to reduce your video size while maintaining the original quality.
Video content is everywhere today, with millions of users creating and sharing online videos daily. However, as video quality increases to 4K, 8K, and high frame rates, file sizes also increase significantly. Are you concerned about large video files that take up your storage space and take a long time to upload and share? If so, here’s the challenge: how can you reduce video file size while preserving the original quality?
If you need to reduce your video file size, this article is for you! In this guide, I will walk you through all the methods to compress video without losing quality, including using lossless video compressors. Let’s get started!
Understanding Video Compression
Video compression refers to the process of reducing the size of a video file. The goal is to make video easier to store and transmit while retaining as much quality as possible. There are two main types of video compression:
- Lossy compression: It reduces file size by removing some data from the video. This may result in a drop in video quality.
- Lossless compression: This reduces file size without affecting video quality. All original data is preserved.
Why Compress a Video
Before we dive into the methods, let’s understand why video compression is necessary:
- Save storage space: High-resolution videos take up a lot of space. Compressing them makes your videos smaller, saving your precious disk space on your device or cloud storage.
- Faster uploads & downloads: Smaller files upload to YouTube, Dropbox, Google Drive, or other platforms much quicker, and are easier to download, especially for users on slower Internet connections.
- Smooth streaming: Smaller files require less Internet bandwidth, ensuring smooth playback without annoying buffering, which is essential for platforms like Zoom, YouTube, or other live streaming apps.
- Easier file sharing: Many email services, messaging apps, and even cloud drives often have file size limits. Compressed videos are easier to share with colleagues, clients, or friends.
![How to Compress 1GB Video to 10MB [Desktop/Online]](https://images.minitool.com/videoconvert.minitool.com/images/uploads/2024/11/compress-1gb-video-to-10mb-thumbnail.jpg)
What Affects Video File Size During Compression
To compress video without quality loss, it’s important to understand what factors impact the output:
- Resolution: Reducing the resolution (e.g., from 1080p to 720p) lowers file size but also reduces image clarity.
- Bitrate: Lowering the bitrate reduces file size, but too low bitrate will make the video look choppy or blurry.
- Frame rate: Dropping from 60 fps to 30 fps can save space, but may affect smooth motion, especially for action-heavy videos.
- Codec: Modern video codecs like H.265 (HEVC) are more efficient than older ones like H.264 (AVC), and can reduce video size greatly while maintaining the quality.
4 Effective Methods to Compress Video Without Losing Quality
How to compress video files without losing quality? This section discusses 4 effective methods for lossless video compression. You can choose any of them.
Method 1: Compress Video Without Quality Loss Using Desktop Software
Firstly, you can compress video files without losing quality using desktop software, and this is the one I used most frequently:
What Is MiniTool Video Converter?
One effective solution is MiniTool Video Converter, a lightweight, free software that offers an easy way to compress videos with minimal or no quality loss. It has a user-friendly interface, making it easy to use even for beginners. Plus, there are no file size limits, ads, or watermarks.
This lossless video compressor allows you to customize the compression percentage. You can also preview the compressed video to check its quality before compressing. Moreover, it can also serve as a batch video compressor, which can compress up to 5 videos in bulk.
If you’d like to use it to compress your large video files, please download and install it on your PC by clicking the button below. Once installed, launch this app.
MiniTool Video ConverterClick to Download100%Clean & Safe
How to Reduce Video Size Without Losing Quality Using MiniTool Video Converter?
Then, start the compression process by following the step-by-step guide:
# Compress a single video:
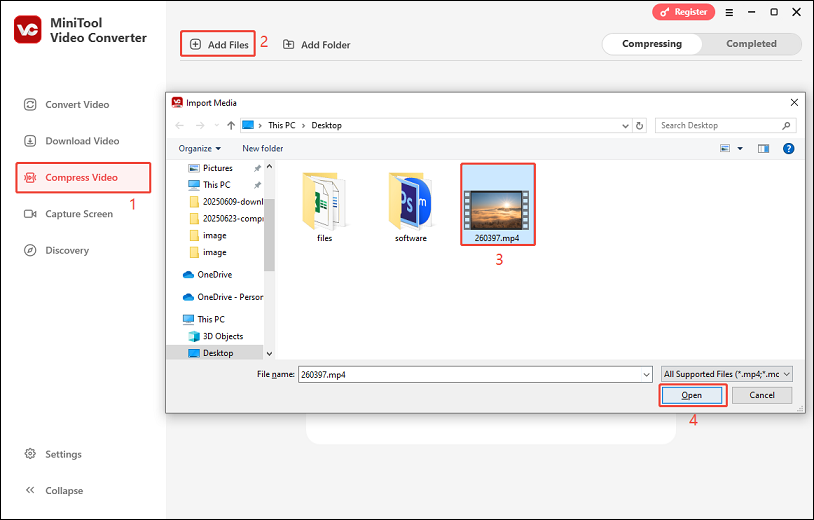
1. Switch to the Compress Video tab, click on Add Files, locate and select the video you want to compress, and click Open to import the video.
2. Click the settings icon to open the Compress Settings window. Drag the slider to the desired compression percentage. As you drag, it will show you the estimated file size. Expand the Format menu to set the output format to the same as the source video or change it to another format. You can click Preview to preview the compressed video. If you’re satisfied, click on OK.
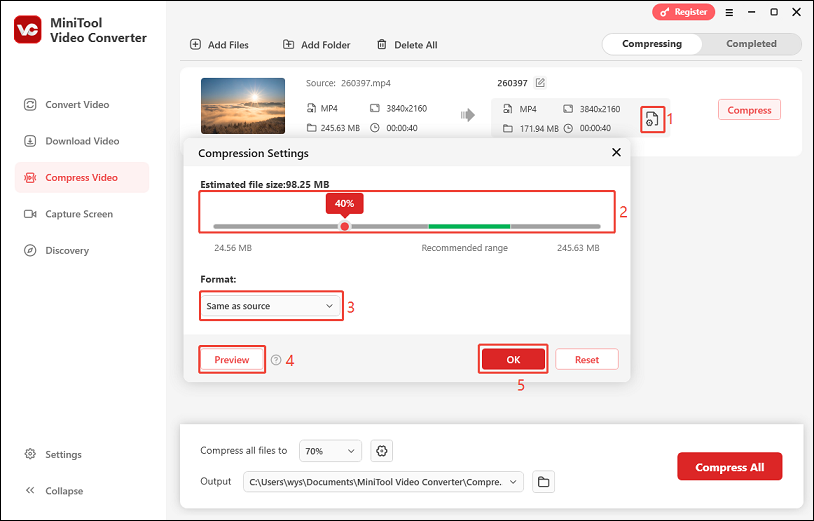
3. Click on Compress to start compressing the video.
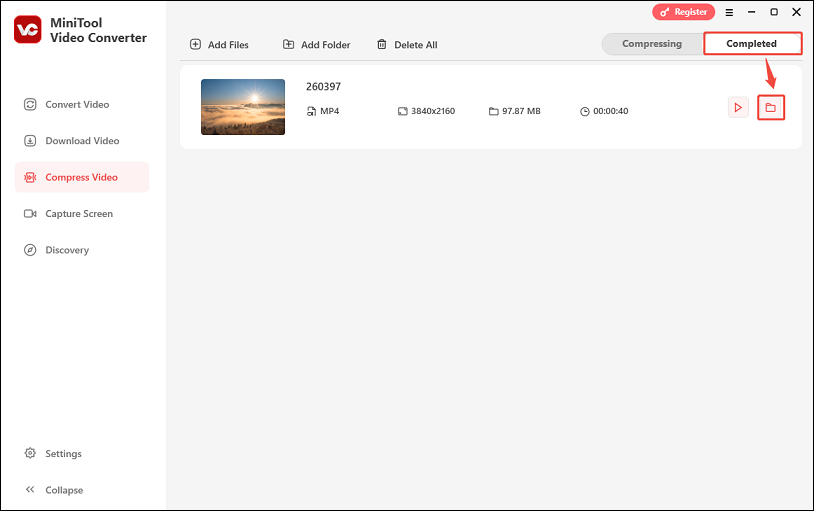
4. Once the compression finishes, you can check the compressed video by clicking the folder icon under the Completed tab.
# Compress multiple videos:
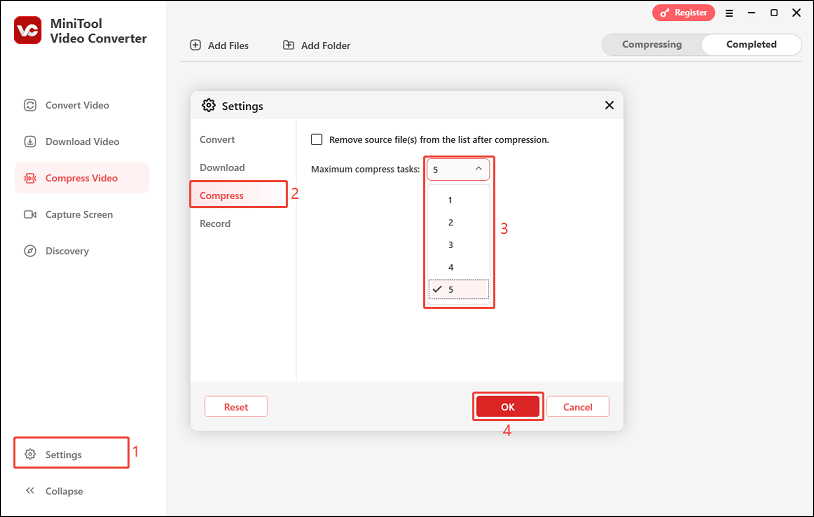
1. Click on the Settings button on the left panel and select the Compress tab. Here, you can set the number of videos to be compressed at the same time. Click OK to save the change.
2. Click on Add Folder to import the folder that includes all the videos you’d like to compress.
3. In the lower half of the screen, expand the box next to Compress all files to to choose a compression strength (30%, 40%, 50%, 60%, 70%, 80%, and 90%). If you want other percentages, you can click the settings icon to drag the percentage slider manually.
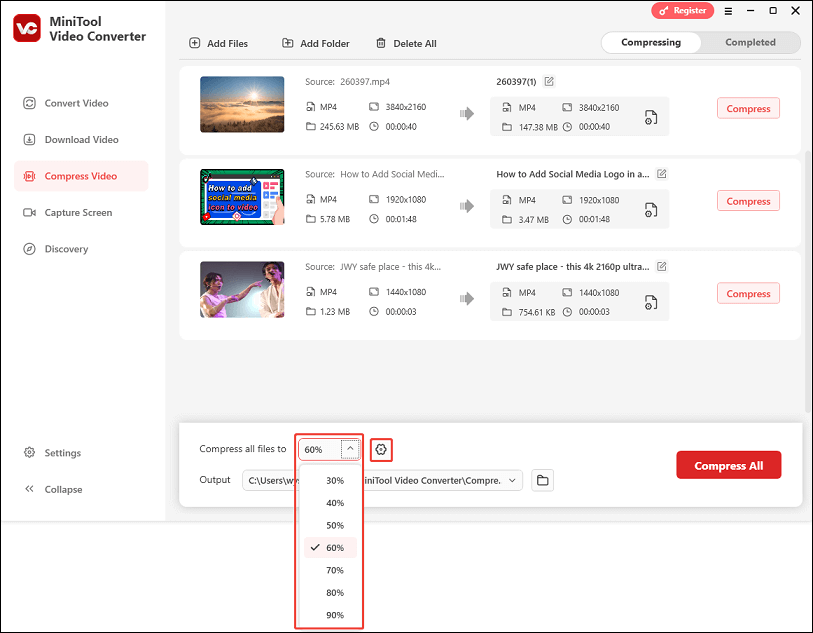
4. Click on the Compress All button to compress all the videos simultaneously.
5. After it’s done, go to the Completed tab to check all the compressed files.
Other Excellent Features of MiniTool Video Converter
In addition to video compression, MiniTool Video Converter also supports the following features:
# Video conversion:
This video converter allows you to convert video/audio files from one format to another. It supports a wide range of video formats, such as MP4, MOV, WebM, MKV, 3GP, M4V, etc., as well as popular audio formats, like MP3, WAV, M4A, and much more. Up to 5 files can be converted at once.
# Video downloading:
Within MiniTool Video Converter’s Download Video module, you can download online videos from several popular platforms, including YouTube, Instagram, Facebook, TikTok, and X. It provides you with different output formats and resolutions. If you plan to download a YouTube playlist, it enables you to batch download up to 10 video clips simultaneously.
# Screen recording:
MiniTool Video Converter can also serve as a screen recorder to capture any activity on your computer screen, such as gameplay and live streaming. You can record the entire screen or part of it, as well as record your system audio and microphone separately or simultaneously.
Method 2: Compress Video Without Losing Quality Using Online Video Compressors
Most online video compressors are designed to simplify the compression process as much as possible. They allow you to compress videos easily without needing to download or install any software; just a stable Internet connection and a web browser are enough. However, many of these services have strict size limits on the videos you can upload.
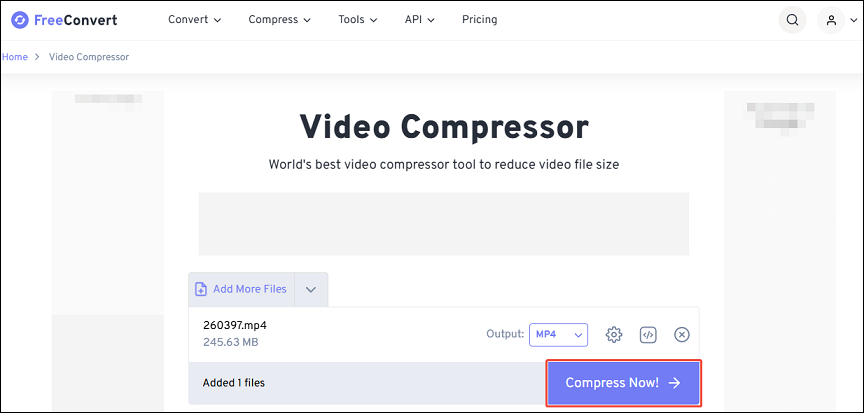
FreeConvert is one of the best online video compressors that I highly recommend, which supports importing videos up to 1GB for free users. With this tool, you can compress MP4, MKV, AVI, MOV, or any other video file without any hassle. Plus, FreeConvert lets you choose the compression method to compress files by size, quality, and codec, making it a versatile choice for your video compression needs.
Here's how to compress video files without losing quality with FreeConvert:
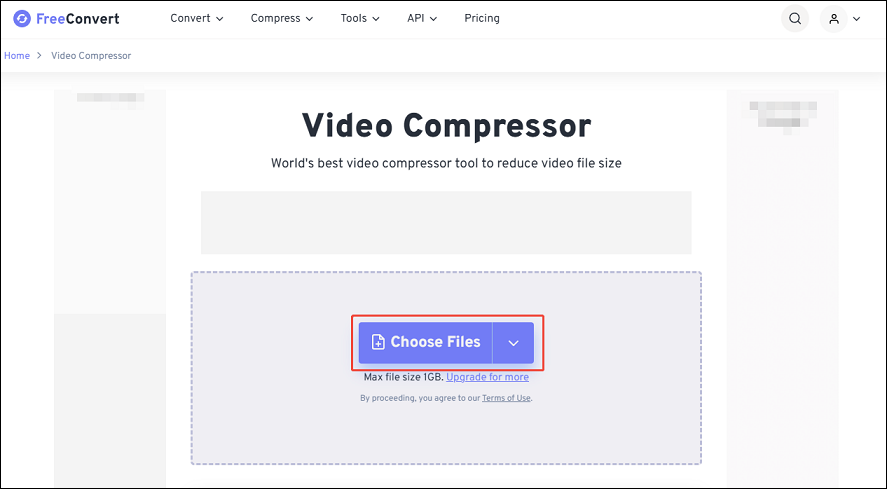
1. Go to https://www.freeconvert.com/video-compressor in your browser.
2. Click on the Choose Files button to upload your video. You can also import from Dropbox, Google Drive, OneDrive, or URL.
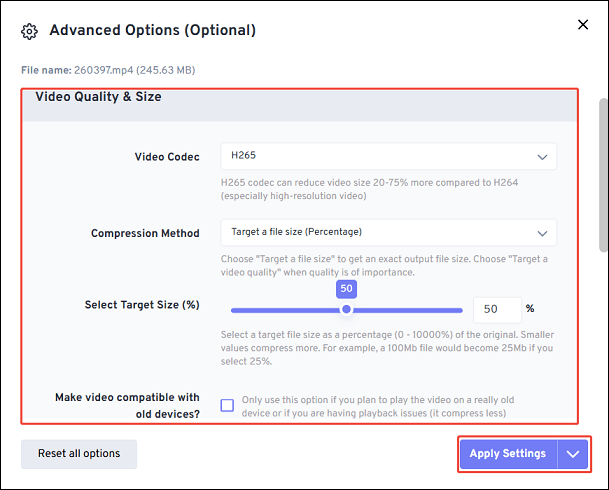
3. Once your file is uploaded, click on the gear icon next to the file name to open advanced settings. You’ll see multiple options:
Video Codec:
- Choose H.264 for better compatibility
- Choose H.265 for smaller file sizes and higher quality
Compression Method:
- Target a file size (Percentage)
- Target a file size (MB)
- Target a video quality
- Target a video resolution
- Target a max bitrate
Select Target Size: Drag the slider to set the compression percentage.
Make video compatible with old devices: Enable this option to play the video on old devices.
After completing the settings, click on Apply Settings.
4. Click the Compress Now button. The tool will process your video based on your settings.
5. Once compression completes, click the Download button to save the new file to your device.
Method 3: Compress Video Without Losing Quality by Trimming
Another easy and effective method to reduce video size without losing quality is to trim unnecessary parts from the beginning, end, or middle of the video. Unlike traditional compression methods that re-encode or reduce quality, trimming removes unwanted footage without touching the original resolution, bitrate, or frame rate. This makes it a truly lossless compression method.
You can do this with a video editor like MiniTool MovieMaker. It’s a free, beginner-friendly video editor for Windows that also functions as a basic video compressor. While it’s designed primarily for editing, it allows you to cut unnecessary segments to help reduce file size without loss in quality.
Follow these steps to compress your video without quality loss by trimming through MiniTool MovieMaker:
1. Download and install MiniTool MovieMaker.
MiniTool MovieMakerClick to Download100%Clean & Safe
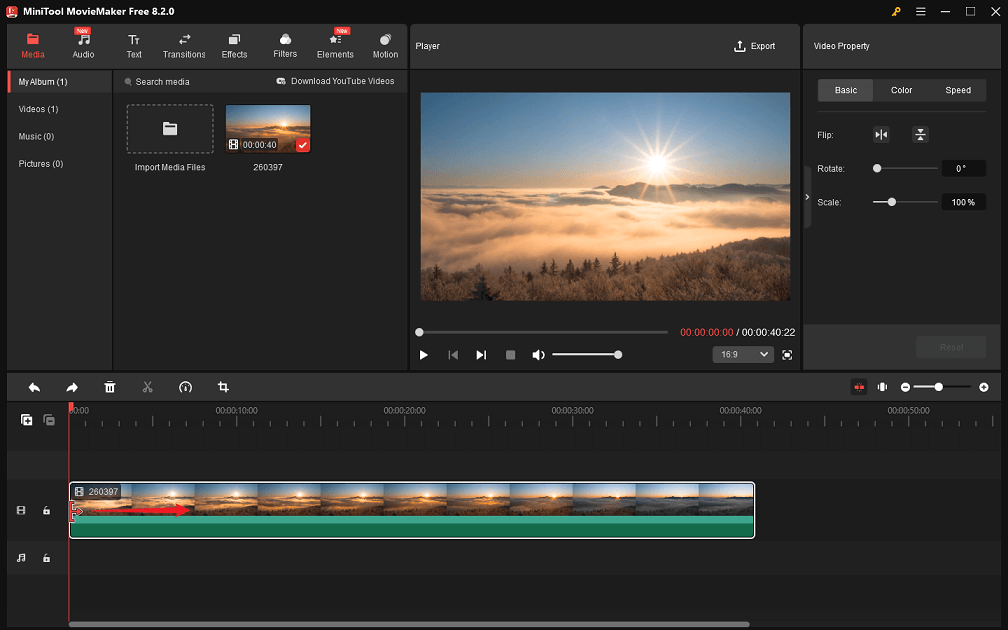
2. Open this software and import your video by clicking Import Media Files or dragging and dropping.
3. Drag the video into the timeline at the bottom of the screen.
4. Mouse over the start/end of the video clip until an arrow appears. Drag the arrow rightwards/leftwards to the beginning/end of the wanted part.
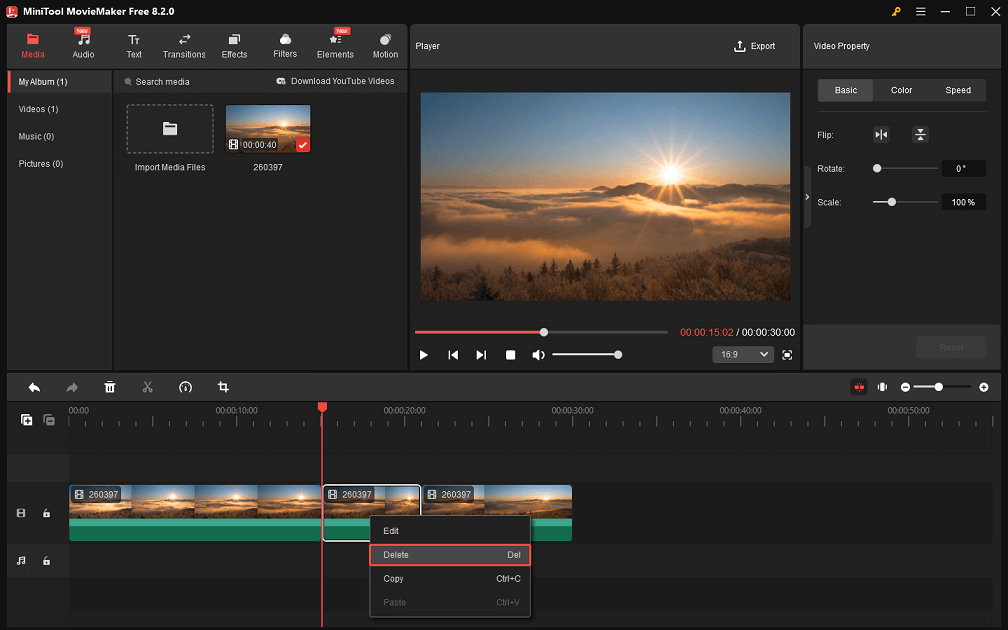
5. If you want to trim the middle part of the video, drag the playhead to the beginning of the unwanted part and click the scissors icon. Next, drag the playhead to the end of the unwanted part and click the scissors icon again. Select the unwanted part to highlight it, right-click it, and choose Delete.
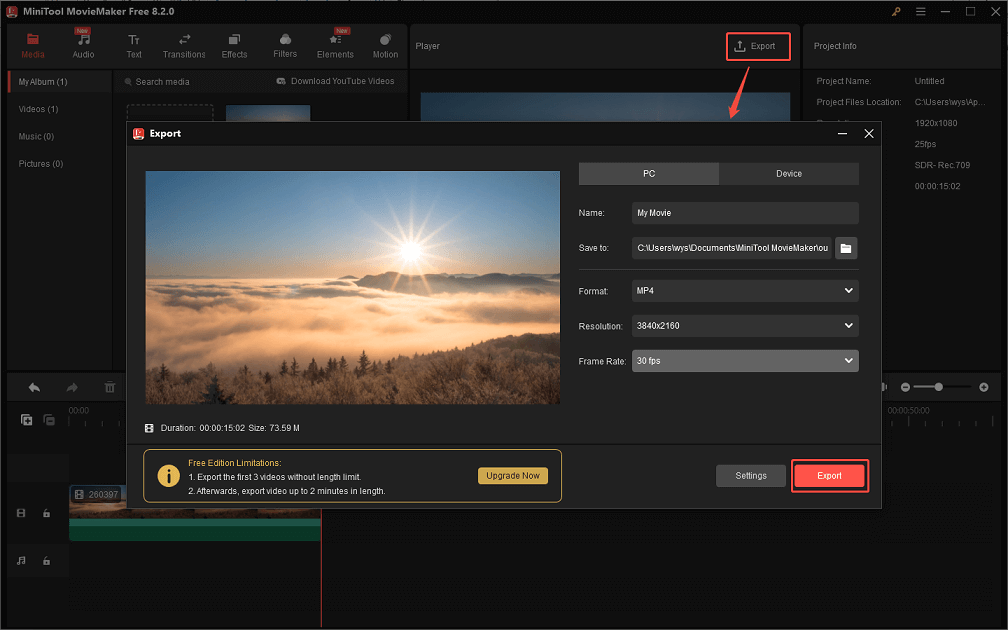
6. Click on Export in the upper right corner. In the export box, it’s recommended to keep the original format, resolution, and frame rate to avoid any quality loss. Finally, click the red Export button to begin exporting.
Method 4: Compress Video Without Losing Quality by Using ZIP Files
If you need to send or share a video file without intending to publish it, turning the video into a ZIP file is one of the simplest and lossless ways to reduce its size without losing quality. While it doesn’t shrink video files as much as re-encoding with codecs like H.265, it preserves 100% of the original quality and allows for quick and secure transfer.
To compress a video into a ZIP file, follow these steps:
1. Locate your video file on your computer.
2. Right-click on the file.
3. Select Send to and choose Compressed (zipped) folder.
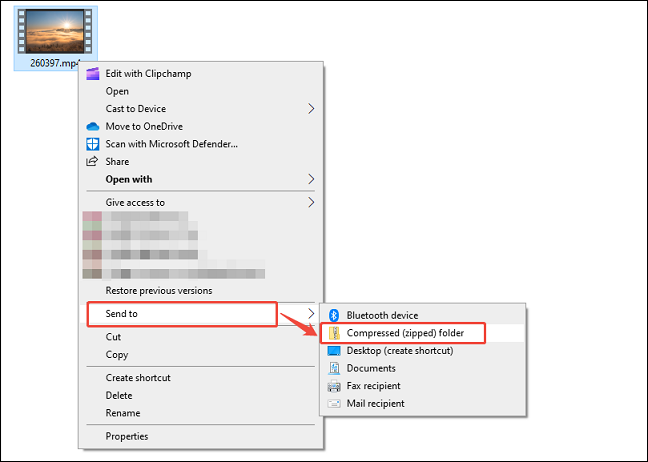
4. A .zip file will be created in the same folder as your original video.
Now, you can email, share, or store the zipped video.
Conclusion
Whether you’re uploading videos to YouTube, storing them on a flash drive, or sharing via cloud platforms, knowing how to compress videos is essential. Can you do this without any quality loss? With this guide, it’s entirely possible to compress video without losing quality. I hope you find this article helpful!
While using MiniTool Video Converter or MiniTool MovieMaker to compress your videos, you can contact us via support@minitool.com at any time if you have any questions or suggestions.
User Comments :