If you’re searching for how to record Amazon Prime Video, you’ve come to the right place. This post provided by MiniTool free video converter provides 6 simple methods.
Can You Record on Amazon Prime Video
Amazon Prime Video, or simply Prime Video, is a popular video streaming and rental service of Amazon. It provides unlimited movies, TV shows, documentaries, anime, and more.
When you watch a movie or TV show on Prime Video, sometimes you want to share the highlights of the video with your friends. How do you get the best parts of the movie? The simplest way is to record it.
However, Prime Video does not have a recording feature, so you need third-party screen recorders. The following parts will show you how to record Amazon Prime Video on Windows and Mac.
How to Record Amazon Prime Video on Windows
First, let’s see how to record Amazon Prime Video on PC.
Way 1: Record Amazon Prime Video with MiniTool Video Converter
As the name implies, MiniTool Video Converter is a video converter that can convert between various video and audio formats. Additionally, this app includes a free screen recorder that allows you to record everything on your PC screen.
MiniTool Video Converter does not have a recording time limit and won’t add a watermark to your video. It allows you to record in MP4, WMV, MKV, AVI, MOV, FLV, and TS formats. Also, it lets you select the recording frame rate (15, 20, 25, and 30FPS), change mouse settings, etc.
Here is how to screen record Amazon Prime Video with MiniTool Video Converter.
Step 1. Click the download button below to get the installer of MiniTool Video Converter, and then install it on your PC.
MiniTool Video ConverterClick to Download100%Clean & Safe
Step 2. Open MiniTool Video Converter, then switch to the Screen Record tab and click the Click to record screen area to activate MiniTool Screen Recorder.
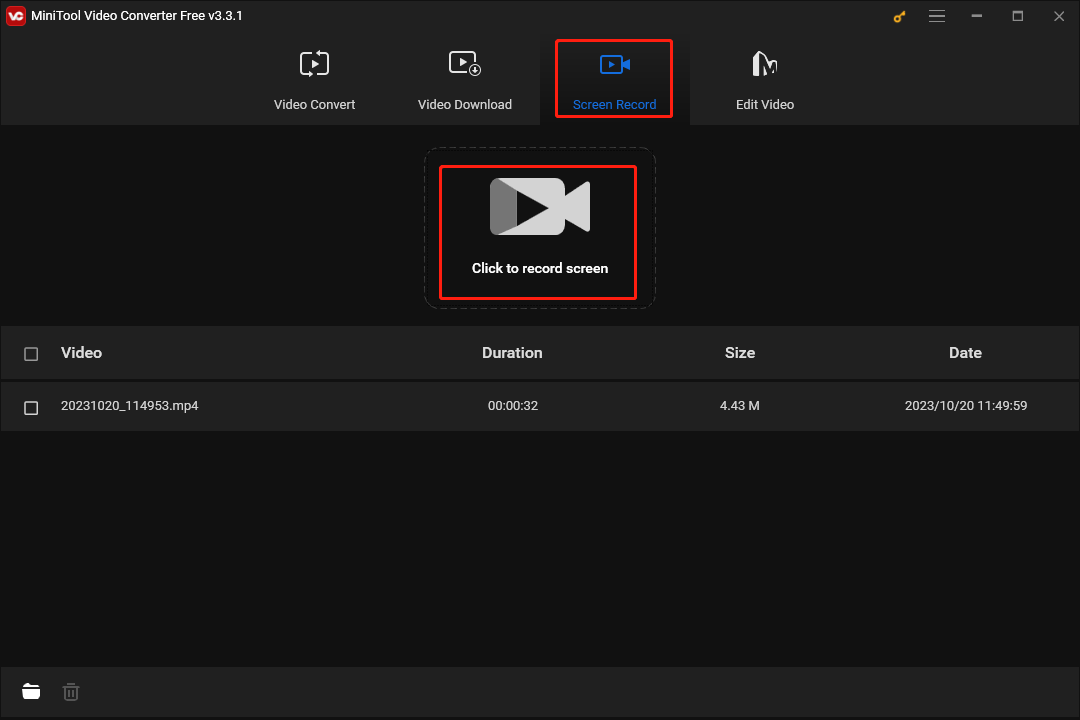
Step 3. By default, MiniTool Screen Recorder captures the whole screen. If you don’t watch a movie in full screen, you can easily customize the recording area. Don’t minimize the Prime Video window.
Click the arrow next to Full screen, click the Select region option, and drag your mouse to choose the recording area.
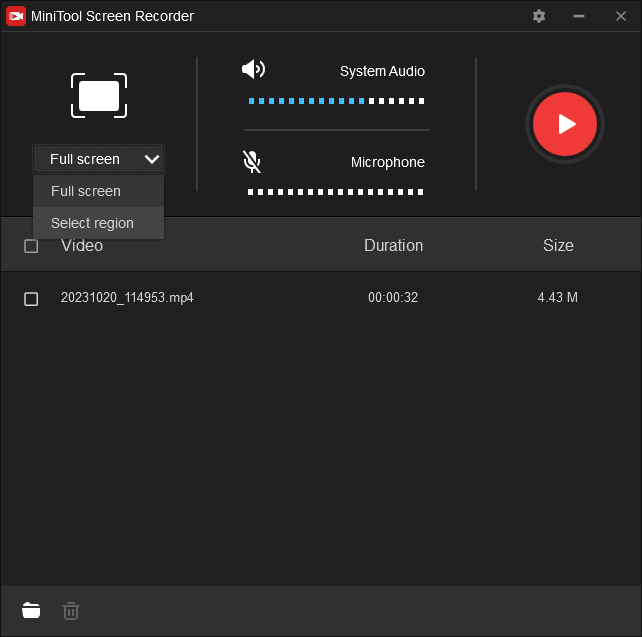
You should turn on the system audio and turn off the microphone to record the audio from your video.
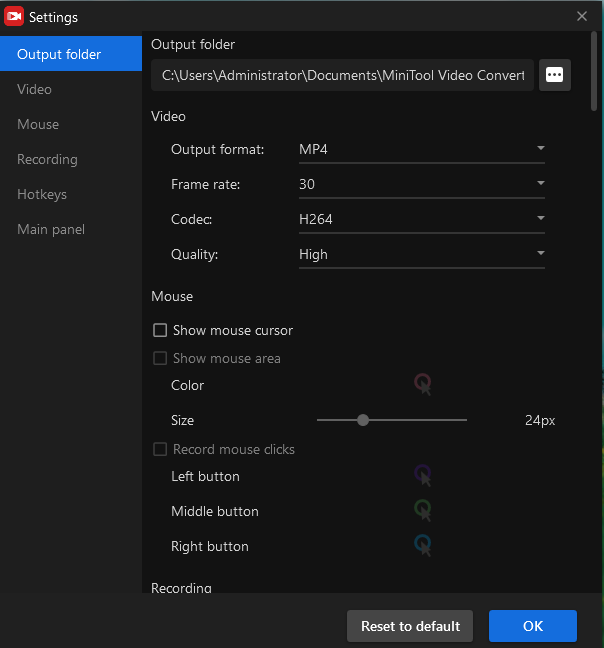
Step 4. Click the Settings button in the upper right corner to open Settings. Then, you can choose the destination folder to save the video, recording format, frame rate, etc. Click OK to save changes.
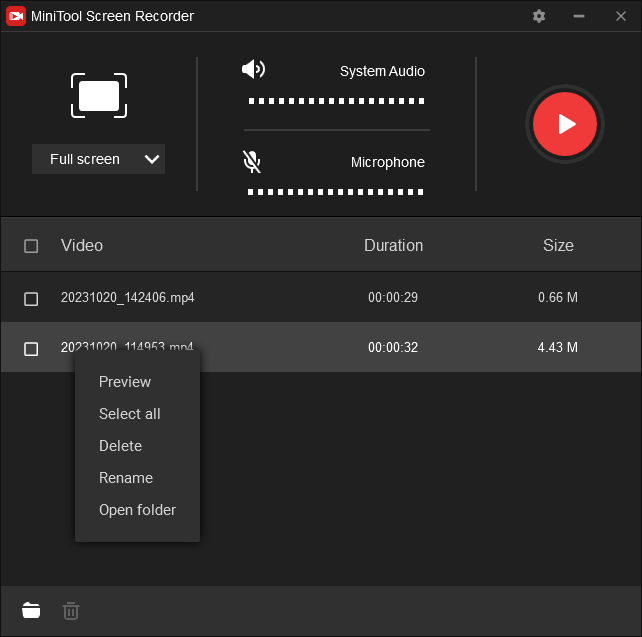
Step 5. Click the red Record button or press F6 to start recording, and press F6 again to stop recording. MiniTool Screen Recorder displays the videos starting with the latest one. Click the video to preview, delete, select, rename or open the location.
Way 2: Record Amazon Prime Video with Bandicam
Bandicam is also a screen recorder for Microsoft Windows to record anything on the screen as a high-quality video. It lets you record the entire screen or a partial area of your display. When recording a video tutorial, you can add arrows, boxes, numbers, and text, or draw lines to help viewers better understand the video.
Besides, Bandicam offers a game recording mode to capture your gameplay and a device recording mode to record external devices like a webcam. Moreover, it supports audio-only recording.
Bandicam offers a free and paid version. The free version is limited to 10 minutes per recording and it will add a watermark to the video.
Follow the steps below to record Amazon Prime Video with Bandicam on PC.
Step 1. Download Bandicam from the official website and install it on your PC.
Step 2. Launch Bandicam, then click the arrow next to the Screen Recording mode, click the Select a recording area, and drag your mouse to customize the recording region.
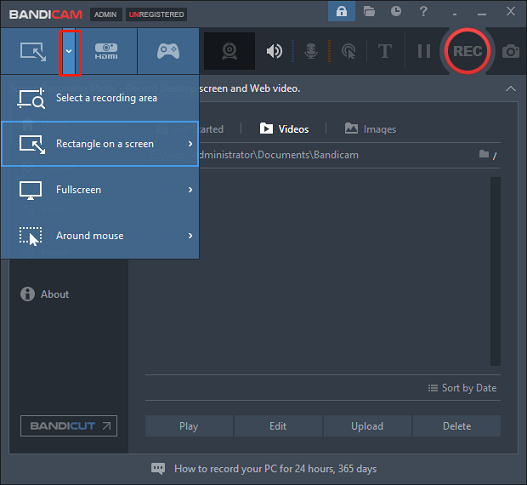
Step 3. Go to Video, click Settings in the Record section, switch to the Sound settings, choose Default Output Device as Speakers to record your computer sound and disable the microphone.
Step 4. Click Video on the left sidebar, then choose Settings in the Format section, and you can change the video format, frame rate, codec, etc. Click OK to save changes.
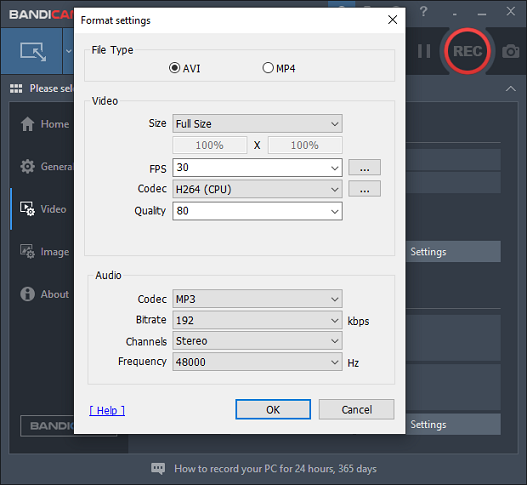
Step 5. Click the REC button to start recording, and click the Stop button or press F12 to stop recording. Then, go to Home > Video to check the recorded video file.
Way 3: Record Amazon Prime Video with Format Factory
Format Factory is a powerful multimedia file conversion tool to convert video files, audio, image, and documents. In addition, it works as a video cropper and a screen recorder. Therefore, you can use Format Factory to record Amazon Prime Video on your PC.
Step 1. Download and install Format Factory.
Step 2. Open Format Factory and click Screen Record in the Video section.
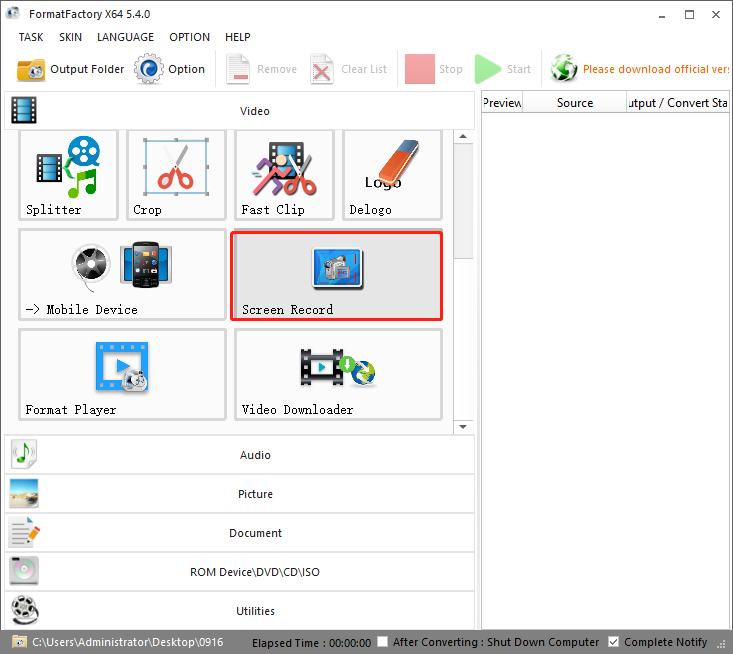
Step 3. Click this button, select Region screen and move your mouse to choose the video window on Prime Video. Click the gear icon to change the output folder, recording frame rate, bitrate, etc. Don’t forget to uncheck the Use microphone option.
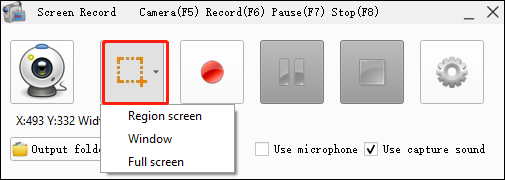
Step 4. Click the red Record button to start the recording and Press F8 to stop it. Then, Format Factory will immediately open the video folder.
How to Record Amazon Prime Video on Mac
How to record Amazon Prime Video on Mac? Let’s go on. Here are 3 methods for you.
Way 1: Record Amazon Prime Video with QuickTime Player
QuickTime Player is an Apple-developed multimedia framework built into macOS for playing, streaming, encoding, and transcoding a variety of digital media formats. Also, it can record your Mac screen. Therefore, you can use it to record Amazon Prime Video on Mac.
Step 1. Open QuickTime Player and select File > New Screen Recording.
Step 2. Click the arrow next to the Record button to change the recording settings as you like.
Step 3. Click the Record button, click and drag the cursor to choose the recording region.
Step 4. Click the Start Recording button to record the video playing in Prime Video. Click the Stop Recording button or press Command + Control + Esc to end the recording. Then, you’ll see a MOV file.
Way 2: Record Amazon Prime Video Using Keyboard Shortcuts
In addition to QuickTime Player, there is another built-in screenshot app that lets you take static images, record the entire Mac screen, and record selected portions. You can also use it to record Amazon Prime Video.
Step 1. Press Command + Shift + 5 to open the screenshot app on Mac. Then, a little pop-up window appears at the bottom of the screen.
Step 2. Click the fifth Record Selected Portion button to choose the video window of Prime Video you want to record.
Step 3. Click Options and choose where you want to save the recorded video file.
Step 4. Click the Record button to start the recording. Click the Stop Recording icon at the top to stop the recording. Then, you can see a preview of the recording in the bottom right corner. Click it to preview the video or trim the video if you need, and click Done and the video file will be saved on the desktop.
Way 3: Record Amazon Prime Video with ScreenFlow
ScreenFlow is a screen recorder and video editor for Mac. It is capable of recording multiple screens, cameras, and microphones simultaneously plus iPhone and iPad and provides some editing tools to enhance the screen recording.
ScreenFlow comes with many preset export settings for the best-quality video. It allows you to export the video in MP4, MOV, GIF, and more, or directly publish it on YouTube, Vimeo, and other video hosting sites.
Here is how to record Amazon Prime Video with ScreenFlow on Mac.
Step 1. Download and install ScreenFlow, and then launch this application.
Step 2. On the Welcome screen, click the New Recording option. Then, a pop-up window appears, and make sure the Record Desktop from and Record Computer Audio options are selected.
Step 3. Click the Partial Screen Record button to the left of the red Record button icon and drag your mouse to choose a portion of the screen to record.
Step 4. Click the red Record button to start the recording.
Step 5. To stop the recording, press Shift + Command + 2 or click the Stop Record button from the menu in the upper right corner of your display. Then, ScreenFlow will open the recording in the ScreenFlow editing window.
How to Edit the Recorded Amazon Prime Video
After recording, you might edit the video. For example, you need to trim the video to cut out unwanted portions at the beginning and end of the video to make it perfect. To do so, you need a video editor.
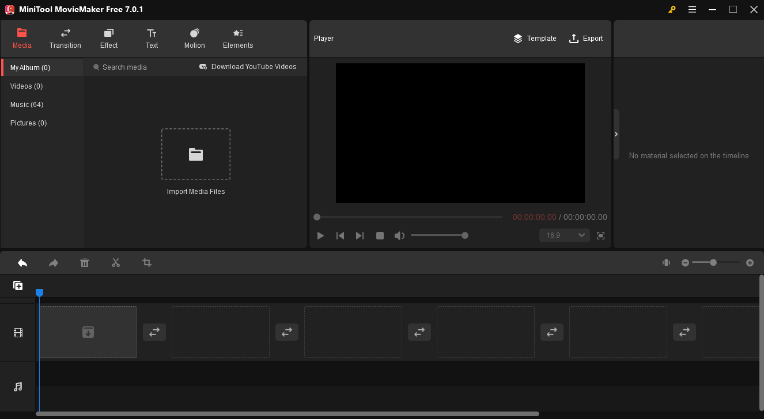
For Windows users, MiniTool MovieMaker is a great choice. It’s an easy-to-use and feature-rich video editor that allows you to split, trim, crop, rotate, and flip videos, add text, add stickers, and more. After editing, it lets you export the video in 1080p for free and without watermarks.
MiniTool MovieMakerClick to Download100%Clean & Safe
For Mac users, they can directly trim a recorded video with QuickTime Player. This application not only lets you play videos and record screens but also edit a clip by trimming, splitting, rotating, etc.
If you use ScreenFlow to record your Mac screen, you also use it to edit the recording, as it’s a powerful video editing and screen recording software application for Mac. It allows you to enhance the recordings with transitions, text, animations, annotations, and more.
If you use a screen recorder without editing tools, you can use other video editors like iMovie to edit the recorded video.
Conclusion
This post offers 6 simple methods to record Amazon Prime Video on Windows and Mac computers. If you want to record a part of your favorite movie on Prime Video, choose one way and follow the steps. Please note that these recorded Prime Video movies should not be used for any profit-making or other inappropriate purposes.
Finally, if you have any questions about MiniTool Video Converter or MovieMaker, please contact us via [email protected] for help.



![How to Fix Amazon Music App Not Working/Playback Error [Solved]](https://images.minitool.com/videoconvert.minitool.com/images/uploads/2023/07/amazon-music-app-not-working-thumbnail.jpg)
User Comments :