QuickTime is a world-famous media player. Do you know QuickTime is also helpful when you want to record your screen with audio? If not, please read this post from the free file converter carefully since it will teach you how to start QuickTime screen recording with audio. Whether you’re a Mac or Windows user, you’ll know how to capture your screen easily.
What Is QuickTime
QuickTime refers to QuickTime Player, which is an extensible multimedia framework designed by Apple Inc. for its macOS. QuickTime Player is used widely and frequently by people around the world. You know that it’s easy and joyful to play videos and audio in QuickTime. But do you know QuickTime can also help you record your screen with audio? Later on this page, I’ll discuss QuickTime screen recording with audio; but before that, I’d like to introduce QuickTime Player in brief.
What To Do If Your Mac Keeps Shutting Down Randomly
There are some tips for using QuickTime Player on your Mac device.
How to Open QuickTime Player on Mac
This is the usual way to open QuickTime:
- Locate the Finder icon in your Dock and click on it.
- Select Applications in the sidebar of the Finder window.
- Look for the QuickTime Player app and double-click on it to open.

How to Open and Play a File in QuickTime Player
There are two common ways:
- Open Finder -> navigate to the file (audio or video) you want to open -> double click on the file.
- Select File -> Open File -> browse your drive to select the target file (audio or video) -> click Open.
You can use the playback controls which will appear when you place the pointer over the screen to play and control your file: it allows you to fast-forward play, reverse play, and change the playback speed.
How to Troubleshoot QuickTime Player Not Opening Videos
Some Mac users said they can’t play videos in QuickTime all of a sudden. What causes this issue and how to fix it?
Possible causes include: incompatible or outdated QuickTime Player, the video file is corrupted somehow, and Mac system issues. (How to fix corrupted MP4 videos?)
- Please try these solutions when QuickTime Player can’t open your video files:
- Update QuickTime Player to the latest version.
- Change the extension of the video files which can’t be played.
- Convert video files to another format that can be supported by QuickTime.
- Quit QuickTime Player using Activity Monitor and then restart.
- Repair corrupted and damaged videos.
- Try to use suggested Mac applications to open videos.
- Try to play the video files on another media player.
Record Your Screen on Mac
Use QuickTime Player to Screen Record Mac with Audio
You may know QuickTime Player as a popular media player, but it can also work as a wonderful screen recorder on Mac. It allows you to record screen Mac with audio. What’s more? There’s also an editing function in QuickTime Player that is designed to help users finish simple video editing tasks.
How to record Mac screen with QuickTime Player? Please adjust the volume slider to monitor the audio during recording.
Step one: make sure your Mac includes QuickTime that works normally. If not, please download QuickTime or update it to the latest version manually.
Step two: open QuickTime on Mac as you usually do. Go to Finder -> Applications -> QuickTime Player.
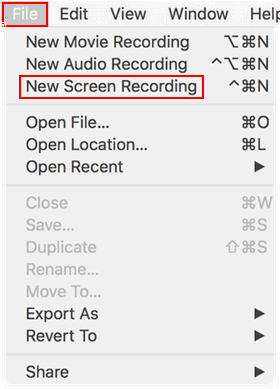
Step three: open the Screen Recording window.
- Click on the File menu located at the top of the app.
- Select New Screen Recording from the drop-down menu of File.
- The Screen Recording small window will show up on your Mac screen.
Step four: configure recording settings. This is necessary for QuickTime screen recording with audio.
- Click the down arrow located on the right side of the red record button.
- Microphone: please select a working microphone (internal and external microphones are acceptable) if you’d like to have your voice recorded (record your voice or other audio).
- Options: you can select Show Mouse Clicks in Recording if you prefer to retain the mouse clicks sound. The cursor will then be emphasized on click with a black circle.

Step five: open the program and navigate to the window you want to record.
Step six: click on the red record button to start capturing your Mac screen.
- If you want to record the entire screen, please click anywhere on your screen.
- If you only want to record a part of your screen, please drag the dotted box to select an area and click Start Recording.
Step seven: stop the recording.
How to stop QuickTime screen recording?
- Please click on the Stop icon in the top menu bar whenever you want to end the recording.
- You can also press Command + Control + Esc to stop directly.
Step eight: save your video. The recorded video will be displayed on your screen, so you can review it and decide whether to save the video.
- Click File from the top menu bar of QuickTime Player.
- Select Save from the drop-down menu.
- Give the video a name, add some tags, or change the location to keep the video according to needs. Then, click Save to confirm.
After that, you may do some basic edits of the video file in the player if you want. That’s all about how to use QuickTime to record screen and audio.
[SOLVED] How To Recover Deleted Files On Mac
New Screen Recording Troubleshooting Tips
What to do with New Screen Recording not working/greyed out?
What if you find the QuickTime Player New Screen Recording is not working or greyed out? You can try to troubleshoot the issue using these solutions.
- Update macOS: click on the Apple menu -> select System Preferences -> choose Software Update -> check for available updates and click Update Now -> wait for the update process to end.
- Check QuickTime settings: open QuickTime Player to check whether the recording settings are configured properly.
What are the common QuickTime screen recording errors and fixes?
#1. QuickTime Player stops working suddenly and displays “QuickTime Player quit unexpectedly”.
- Make sure there’s enough space on your Mac.
- Open Disk Utility -> select your hard drive -> click Repair -> click Repair Disk Permissions.
#2. Users failed to stop screen recording in QuickTime and received the “Cannot Record. Try recording again” error message.
- Try to use another external microphone.
- Change the input audio source as internal microphone.
#3. QuickTime Screen Recording is stuck at “Finishing Recording”.
Open Terminal -> type top -u and press Enter -> find the PID (process ID) and note it -> type sudo kill [PID] and press Enter. Then, find your QuickTime recording video here: $HOME/Library/Containers/com.apple.QuickTimePlayerX/Data/Library/Autosave Information/Unsaved QuickTime Player Document.qtpxcomposition/Screen\ Recording.mov.
#4. QuickTime screen recording freezes.
The most possible cause of this situation is low RAM on Mac. You can do nothing but wait for it; then, do a system update to see whether it works.
#5. “The operation could not be completed” may appear when you start a new recording with QuickTime.
This error message often shows up on iOS 10.3 and macOS 10.12. You should restart, reset, or update iOS/Mac to try to fix it.
How to deal with the audio problems?
- Check recording settings: open QuickTime Player File menu -> go to New Screen Recording -> check whether you’ve selected the correct microphone (if not, change one).
- Check sound input settings: go to System Preferences -> find the Sound icon and click on it -> select the Input tab -> check the sound input settings and make changes if necessary.
- Check sound output settings: go to System Preferences -> Sound -> Output -> check the sound output settings and make changes if necessary.
Pros and Cons of QuickTime Screen Recording
What are the advantages and disadvantages of QuickTime screen recording with sound?
Main advantages:
- QuickTime Player is built in macOS, you don’t need to install it manually.
- It is easy to use and responsive.
- It is compatible with iPad and iPhone.
- It also allows you to perform simple operations to edit a video.
Main disadvantages:
- Users need to configure QuickTime Player before and after finishing the recording process.
- It is not a professional screen recorder, lacking some advanced features users need.
Other Ways to Record Screen on Mac
First way: use the built-in Screenshot toolbar.
Please note: the Screenshot toolbar is only available in macOS Mojave and later versions.
- Press Shift + Command + 5 simultaneously on your keyboard to open the Screenshot toolbar on Mac.
- Decide to record the entire screen, record a selected portion of the screen, or capture a still image of your screen.
- Click on the corresponding icon to start recording your screen and any audio playing.
- Click on the stop icon in the menu bar at the top of the screen whenever you want to end the recording process.
The recorded video will be saved in .mov format and put on your desktop by default.

Second way: use a third-party screen recorder.
There are many screen recorders designed to help people record their Mac screen (with or without audio). You may choose a professional and reliable one to record what you want on macOS.
Best alternatives to QuickTime Screen Recording:
- Monosnap
- Screencast-O-Matic
- VLC
- Snagit
- OBS Studio
- ScreenFlick
- ScreenRec
- ActivePresenter
- TinyTake for Mac
- AnyMP4 Screen Recorder
- Wondershare DemoCreator
- Apowersoft Screen Recorder
- Etc.
Top 5 Snipping Tools For Mac You Should Try
Record Your Screen on Windows
If you’re a Windows user, you may use the following ways to record your computer screen.
QuickTime Screen Recording on Windows
Though QuickTime is designed by Apple Inc. for macOS, it still provides a windows version. You can download QuickTime for Windows as a standalone installation. It’s bundled with Apple’s iTunes before iTunes 10.5. You may download QuickTime Player to your Windows device, install it, and then use the screen recording feature to capture your screen.
However, Apple stops giving official support for it, so you may encounter some security vulnerabilities which can’t be patched. Because of this, QuickTime screen recording with sound is not recommended on Windows.
Screen Recording with Game Bar
Microsoft introduced the new Game Bar feature since Windows 10 to help users capture their screen while playing games or doing other things.
- Configure Game bar on your Windows computer.
- Press Windows + G to open Game bar.
- Select the Capture module.
- Click on the Start recording button to capture your screen.
- Click on the Stop recording button to end the recording process.

How To Disable Xbox Game Bar On Windows 10: 3 Ways
Third-party Screen Recorder for Windows
Another good choice to record your screen on Windows is using a third-party screen recorder. MiniTool Video Converter is used by lots of users to convert video/audio files as well as record screen & download video.
Get to know MiniTool Video Converter screen recording features:
MiniTool Video Converter comes with a free yet useful screen recording feature. This feature allows you to effortlessly capture what’s happening on your PC screen. Whether you want to record a gameplay session, create a tutorial video, or any other on-screen activity, MiniTool Video Converter has got you covered.
The screen recording process is straightforward. With just a few clicks, you can start and stop the recording. It offers flexibility in terms of the area you want to record. You can choose to record the entire screen for a comprehensive view or select a specific region if you only need to focus on a particular part of the screen.
So, if you’re looking for an easy-to-use yet effective screen recording solution for Windows PCs, MiniTool Video Converter is worth considering.
Let’s see how to screen record with MiniTool Video Converter:
Step one: click the button below to download and install MiniTool Video Converter.
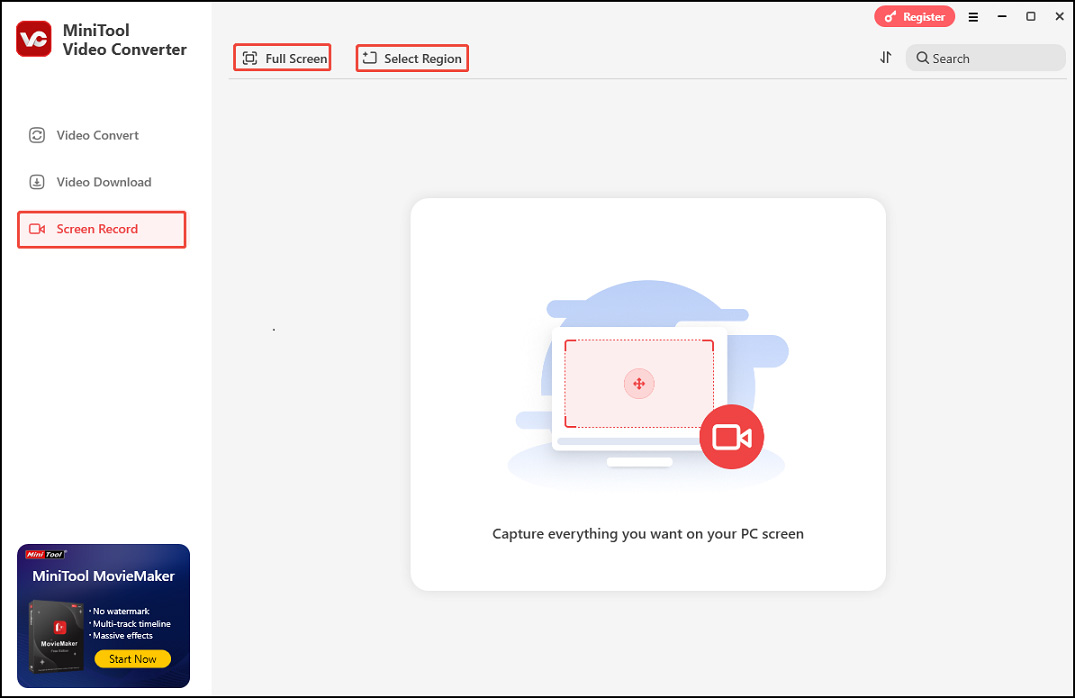
Step two: open this tool. Under the Screen Record panel, click Full Screen to capture the entire screen. You can also click Select Region, left-click your mouse, and then move it to select the recording area.
Step three: In the MiniTool Screen Recorder panel, click the System Audio icon or the Microphone icon to capture the corresponding sound.
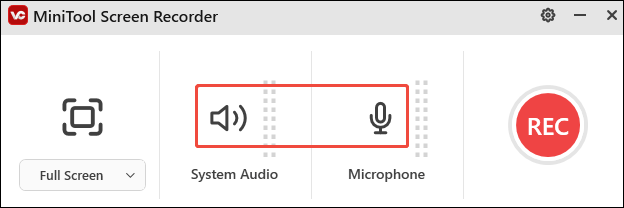
Step four: press the F6 key to start recording. During recording, you can press F9 to pause/resume recording.
Step five: once done, press F6 to stop recording.
Step six: then, the main interface of the MiniTool Video Converter will appear with your recording listed. Click the play icon beside it to watch.
There are many other ways you can use to record the screen on a Windows computer: using a webcam, using other programs that have a screen recording feature, etc. If you want to know more about how to record video on a Windows 10 computer and other third-party screen recorders for Windows, please read this page:
How to Record Video on PC Windows 10 [Solved]
Closing Words
When talking about screen recording on Mac, most users will think of using QuickTime Player (which can be used as both a media player and a screen recorder). This page first introduces QuickTime to you in brief. Then, it teaches you how to finish QuickTime screen recording with audio and offers some Screen Recording troubleshooting tips. After that, it shows other methods for QuickTime screen recording and lists popular third-party screen recorders.
As for screen recording on Windows, you can download QuickTime Player for Windows and start QuickTime screen recording with sound. Besides, they can also use the Game bar feature built into Windows systems or get a third-party screen recorder that’s reliable and professional.
Finally, if you need any help while using MiniTool Video Converter, just contact us via support@minitool.com.
User Comments :