There are many videos on video-sharing sites that are recorded in 4K resolution. If you want to screen record 4K videos with high quality, a 4K screen recorder is essential. In this post, I’ve collected the 6 best 4K recorders for Windows and Mac. (Try MiniTool Video Converter to reduce 4K video size.)
6 Best 4K Screen Recorders for PC
An hour of 4K video uses about 30 GB of storage space. If you only need a particular part of a 4K video, you can use a 4K screen recorder in order to save disk space. Below are the 6 best desktop screen recorders that support 4K recording.
1. OBS Studio
OBS Studio is one of the best free 4K screen recorders for PC. It’s open-source and cross-platform, which works on Windows, macOS, and Linux. This software is not only used for screen recording but also for live streaming.
It can capture desktops, browser tabs, application windows, webcams, and more. It supports recording your 4K screen in different formats like MP4, MKV, MOV, FLV, TS, and M3U8.
OBS Studio has a complicated interface and comes with many options.
If you don’t know how to use OBS, here’s a step-by-step guide on how to record in 4K with OBS.
Step 1. Download and install OBS Studio on your computer. Open the OBS app.
Step 2. In the Sources tab, click the + to add Display Capture and Audio Output Capture/Audio Input Capture sources to the scene.
Step 3. Go to the Controls tab and open the Settings. Click Output and adjust the recording settings.
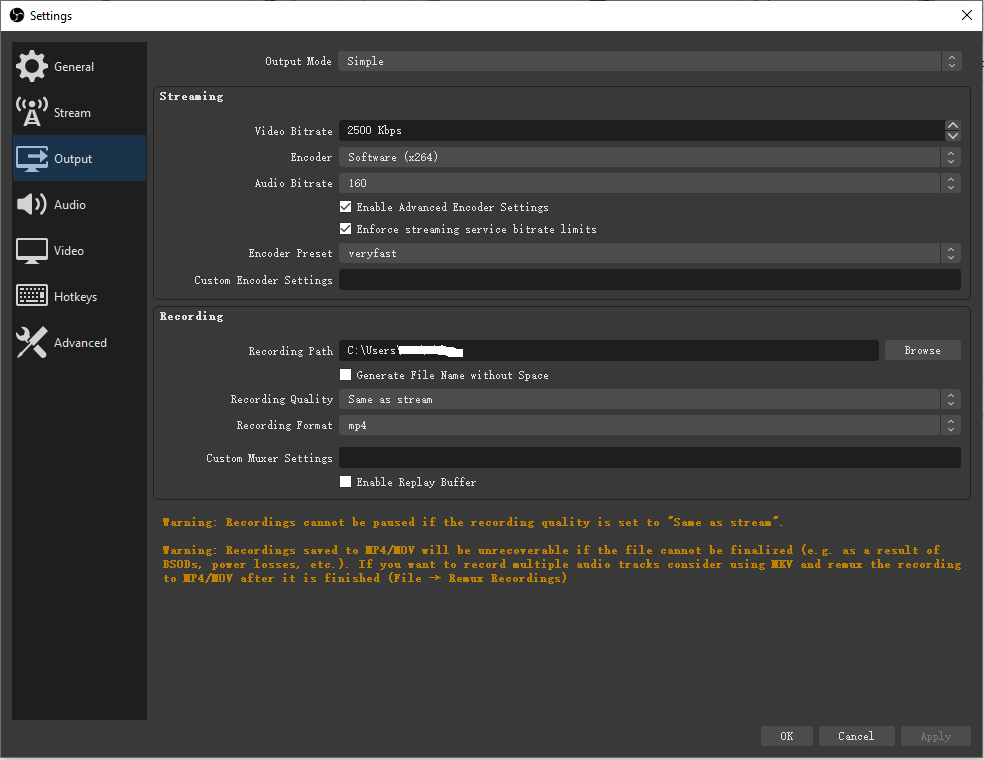
Step 4. Now, click on Video and make sure Base (Canvas) Resolution is 3840×2160. Then set Output (Scaled) Resolution to 3840×2160 and set Common FPS Values to 60. Click Apply > OK.
Step 5. Click the Start Recording button to record your 4K video.
Step 6. When you want to finish recording, click the Stop Recording button.
OBS recordings contain no audio? Read this post to find the answer: 5 Useful Methods to Fix the OBS Not Recording Audio Issue.
2. Bandicam
Bandicam is a simple and powerful 4K screen recorder that can record any activity on your 4K computer screen. It can record videos, gameplays as well as external video devices like webcams, Xbox/PlayStation, IPTV, and so on.
With the real-time drawing function support, you are able to draw, add texts, highlight on the screen while recording.
This 4K screen recorder also allows you to add your logo to recordings and upload them directly to YouTube.
Please note that the unregistered users can only record up to 10 minutes per video and Bandicam will put a watermark on recordings.
Here’s how to record 4K screen with Bandicam.
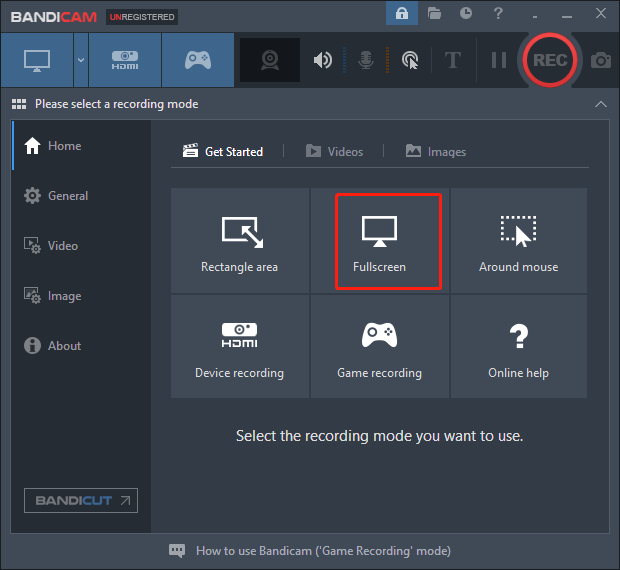
Step 1. After installing Bandicam on your PC, run it.
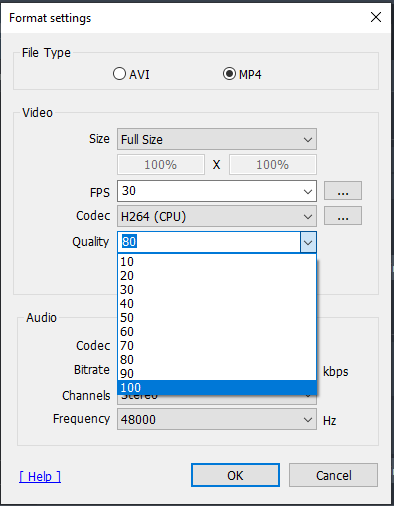
Step 2. Click on Video and tap on Settings under Format.
Step 3. In the Format setting window, set the video size to Full Size and set the Quality to 100. Then change the FPS, codec, bitrate, frequency, channels as you like and click OK.
Step 4. Go to the Home tab and select Fullscreen or other recording modes.
Step 5. Click Start recording. Once done, press the F12 key to stop recording.
Step 6. To find the recordings, click Videos in the Home tab and click the save path to open the destination folder.
3. Snagit
Snagit is another simple to use 4K screen recording software. You can use it to capture videos, images, extract texts from screen captures, and convert recordings into GIFs. It offers various stickers, templates, text styles you can use for screenshots and gives you a trim option so you can cut out unwanted parts of a recording.
It’s compatible with Windows and macOS. Snagit is not free to use and it costs $62.99 (one-lifetime license).
Step 1. Download Snagit from its official website and complete the installation.
Step 2. Open the Snagit app and tap on Video.
Step 3. In the Video tab, you can configure the recording settings.
Step 4. In the end, click the Capture button to start recording.
See also: Top 7 Snagit Alternatives for Windows and Mac
4. Mirillis Action
Action is an outstanding HD screen recorder that supports recording screens in 2K, 3K, 4K, and 8K. It provides excellent gameplay recording performance and displays the current game frame rate during gameplay. Besides that, it lets you record live streams, web videos, music, take screenshots and add webcam to your gameplays.
Action also is a live streaming software that allows you to live stream gameplay to popular streaming services like Twitch, YouTube, Facebook, Livestream, etc. Action works on Windows. It costs $19.77 and offers you a 30-day free trial.
To record 4K gameplays, follow these steps:
Step 1. Download and install Action screen recorder on your computer. Open it.
Step 2. Click on Video Capture and choose the Game recording mode. You can configure the output settings as you want. Select the desired output format, size, and framerate for your recording.
Step 3. Run your game. When you are ready to record the gameplay, press the F9 key to start recording.
Step 4. Press the F9 key again when you want to stop recording.
Step 5. If you’d like to upload your gameplay to YouTube, click on the recording thumbnail and click Upload to YouTube at the bottom of the window.
5. Icecream Screen Recorder
Icecream Screen Recorder is easy to operate with an intuitive interface. You can capture desktops, take screenshots, record gameplays, record online lectures, and much more. You can screen record with your microphone and system audio. This 4K video recorder also allows you to record full screen and choose a specific area you’d like to record.
It has dozens of features. It supports trimming recordings, converting recorded videos, change video speed of recordings, adding mouse effects, etc.
Icecream Screen Recorder Free has a record time limit. To break the limit, you need to purchase Icecream Screen Recorder Pro. The one-time fee is $29.95.
Step 1. Download Icecream Screen Recorder, run the setup.exe, and follow the on-screen wizard to finish the installation.
Step 2. Click the Settings button and change the output format, quality, save path, and more. Click SAVE SETTINGS.
Step 3. In the main window, tap on Capture video and choose to record full screen or customize the recording area.
Step 4. Then you can draw on the screen, add webcam overlay, and enable or disable internal/external audio.
Step 5. Once done, click the Record button to start recording. Click the Stop button to end the process.
6. ShadowPlay
ShadowPlay is a feature of the GeForce Experience software developed by Nvidia. It’s a free 4K screen recorder. You can record 4K gameplays and share your game videos. ShadowPlay also allows you to live stream games to Twitch or YouTube.
It can take screenshots up to 8K resolution and convert your recordings to GIFs.
Step 1. Launch GeForce Experience and click the settings icon. Click on IN-GAME OVERLAY and turn it on.
Step 2. Then go to Privacy control to enable Desktop capture.
Step 3. Run the game you want to record. Press Alt+Z to open the In-Game Overlay.
Step 4. To record your gameplay, click Record and click Start or press Alt+F9.
Step 5. Press Alt+F9 or click Record and choose Stop and Save to finish recording.
Step 6. By default, recordings are saved in C:/users/yourname/Videos.
To learn more about ShadowPlay, see this post: A Complete Review on NVIDIA ShadowPlay Hotkey.
Comparison of 4K Screen Recorders
| Price | Availability | Support Editing | Live stream |
OBS Studio | Free | Windows, macOS, Linux | No | Yes |
Bandicam | Free, paid | Windows | No | No |
Snagit | Paid | Windows, macOS | Yes | No |
Mirillis Action | Paid | Windows | No | Yes |
Icecream Screen Recorder | Free, paid | Windows, macOS, Android | Yes | No |
ShadowPlay | Free | Windows | No | Yes |
How to Reduce 4K Video Size
Recorded videos in 4K resolution are too large. How to reduce the 4K video size? There are two ways. One is to change the video format and the other is to change the video resolution. MiniTool Video Converter is a free video converter with no watermarks. It supports video/audio conversions and video resolution conversions.
It’s powerful with other useful functions like video downloading and screen recording. You can download videos as many as you can and record your screen for free without record time limits.
Here’s how to reduce the 4K video size with MiniTool Video Converter.
Step 1. Download and install MiniTool Video Converter. Open it to get the main window.
MiniTool Video ConverterClick to Download100%Clean & Safe
Step 2. Click Add Files to import the 4K recording file.
Step 3. Click the diagonal cion to open the output window.
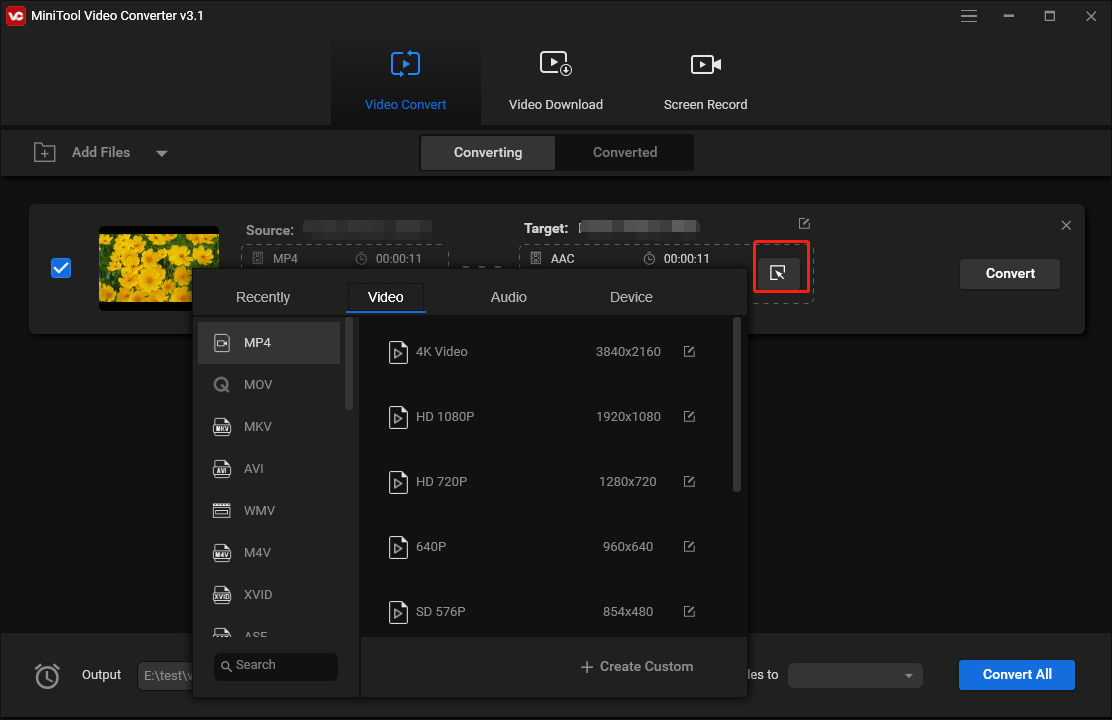
Option 1: Change video format
If the 4K video is MKV or AVI format, you can reduce the 4K video size by converting MKV or AVI to MP4. Select MP4 format and choose the 4K quality.
Option 2. Change video resolution
If you don’t want to change the video format, you can downscale 4K video to 1080P. Choose the output format that is the same as the source format and select HD 1080P.
Step 4. Press the Convert button. Once the process is done, go to Converted and click Show in folder to find the converted video.
How to Edit HD Videos
To edit high-quality videos, you can try MiniTool MovieMaker. It’s a simple video editor that lets you trim, split, merge, rotate, reverse videos, etc. It offers you a variety of effects, animated texts, transitions, cartoon elements, etc.
Besides editing videos, it also has the ability to edit GIFs, photos, and audio files.
See this post to find free stock videos: Top 15 Websites to Download Free Stock Footage with No Watermark.
How to edit HD videos with MiniTool MovieMaker? Follow these steps:
Step 1. Download and install MiniTool MovieMaker. Launch the program and close the pop-up window to access the main interface.
MiniTool MovieMakerClick to Download100%Clean & Safe
Step 2. Tap on Import Media Files to load the HD video from your computer. Then drag and drop it to the timeline.
Step 3. Now you can edit the HD video and click the Playback button to preview the changes.
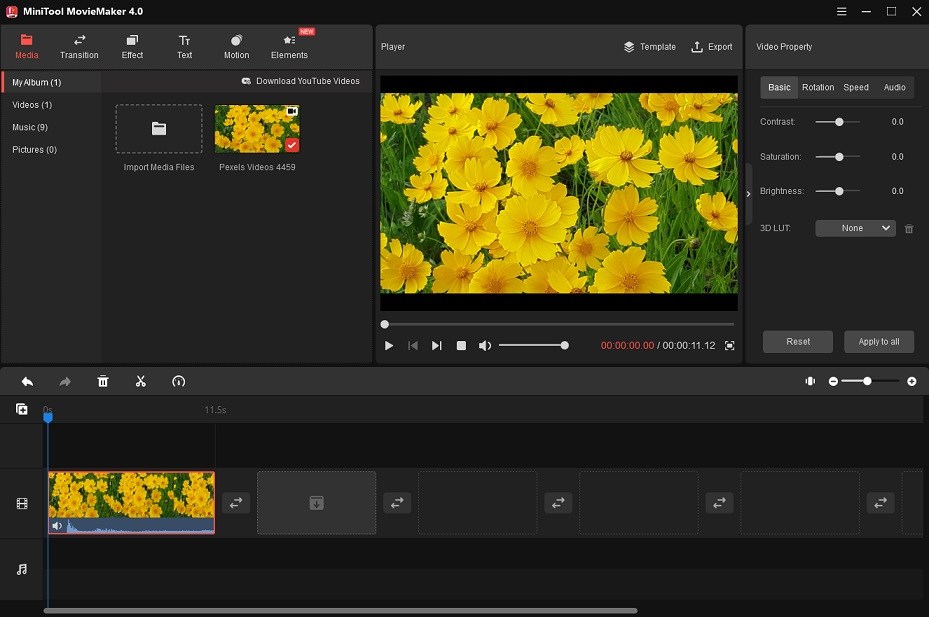
Step 4. When you are done, click Export.
Step 5. In the Export window, change the output format, file name, destination folder, and resolution as needed. Then export the video.
Conclusion
To sum up, OBS Studio and ShadowPlay are better than other 4K screen recorders because the two video recording tools are free to use without record time limits and watermarks. Both of them are perfect for live streaming and screen recording.
If you have any questions or suggestions about MiniTool Video Converter and MiniTool MovieMaker, please contact us via support@minitool.com or post your comments!
User Comments :