Many schools moved classes online during the pandemic. Some students may need to record online lectures in order to review notes after class. How to record online lectures? This post offers 5 ways to record online lectures and classes on your PC for free.
How to record online lectures? Here are the 5 best free lecture recorders.
- MiniTool Video Converter
- OBS
- Bandicam
- QuickTime Player
- Apowersoft Free Online Screen Recorder
Record Online Lectures with MiniTool Video Converter
MiniTool Video Converter is a free and reliable video lecture recording app for Windows. It has a simple and intuitive interface making it easy to use, but this software is powerful with many features including screen recording, video conversion, audio conversion, and video downloading.
This screen recorder has two recording modes. One is Full screen and the other is Select region. You can choose to record full screen or record a certain part of screen. When you record online lectures, you can record with audio from your computer or microphone.
It supports setting recording duration. When you have other things to do, you may need to set the recording time limit in case you forget to stop the recording.
MiniTool Video Converter allows you to record online lectures in MP4, WMV, MKV, AVI, MOV, FLV, and TS. If you want to extract audio from the recorded video lecture, MiniTool Video Converter also meets your needs.
How to record online classes and lectures free with no watermarks? Follow these steps:
Step 1. Open MiniTool Video Converter.
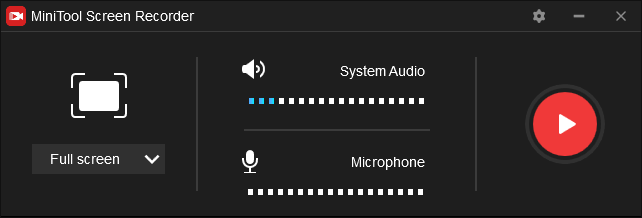
Download and install MiniTool Video Converter. After installing MiniTool Video Converter, run it immediately. In its main interface, click on Screen Record. Click the camera icon in the center of the window to enable the screen recording tool.
MiniTool Video ConverterClick to Download100%Clean & Safe
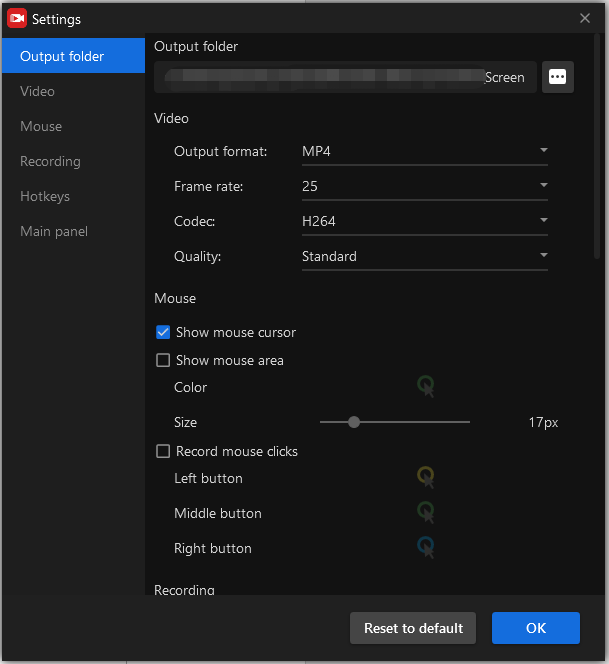
Step 2. Configure the Recording Settings.
Click the gear icon to adjust the output settings. In the Settings window, you can change the output folder, output format, frame rate, codec, and set the recording duration.
Click OK to apply the changes.
Step 3. Record Online Lectures.
Enable the system and the microphone or one of them. Then you need to select a screen recording mode. The Full screen mode is chosen by default. If you want to record a specific area of the lecture, next to Full screen, click the down arrow icon. From the drop-down list, choose the option Select region.
Hit the Record button to start recording and open the online lecture.
Step 4. Save the Recorded Lecture.
When the lecture is finished, press the F6 key to end the recording. Right-click the recorded file and select Open folder to locate it.
Record Online Lectures with OBS
OBS is a free and open-source video lecture recorder. It’s designed for video recording and live streaming and works on Windows, macOS, and Linux. For students, they can save the online lecture for later viewing. For teachers, they can host live streaming classes.
OBS can not only record all activities on your computer but also record your webcam. It supports real-time video and audio capturing. It lets you create scenes from multiple sources such as browser tab, application window, media source, image, desktop, etc.
This software can save the recorded lecture in the following formats: FLV, MP4, MKV, MOV, TS, and M3U8. In addition, you can use it to record gameplay at 60 FPS.
If you don’t know how to use OBS, read this post to learn more about the functions of OBS: How to Use OBS Screen Recorder & OBS Alternative
Let’s see how to record online lectures with OBS.
Step 1. Download OBS and complete the installation. Then open it.
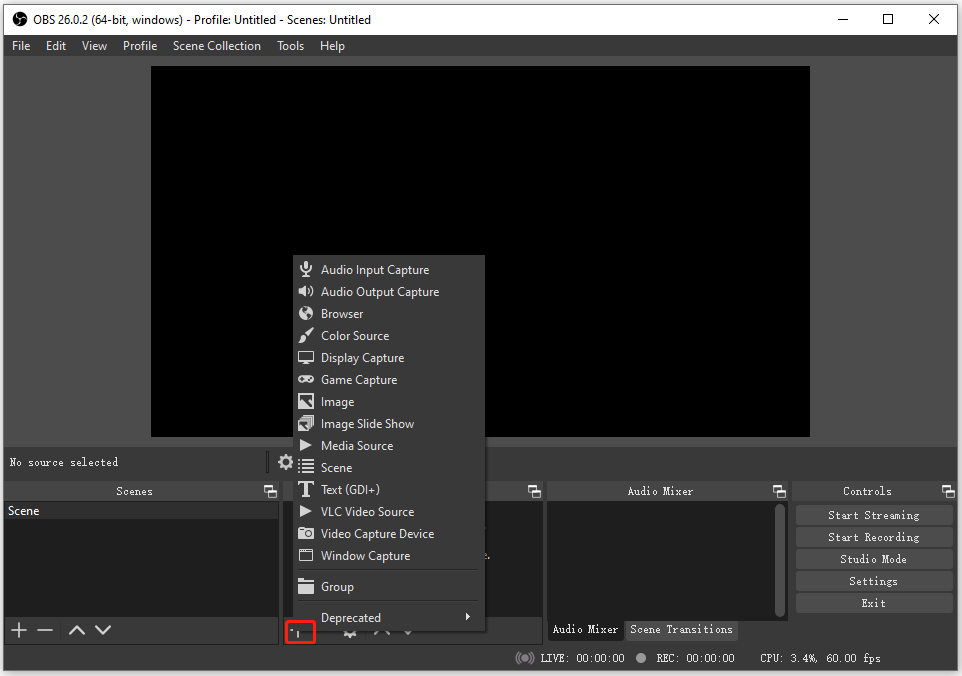
Step 2. First, you need to add a video capture device and an audio capture device. In the Sources tab, click the + button and select Display Capture from the pop-up menu. Click OK to add the source.
Then, add the Audio Output Capture source to capture audio from the computer. If you want to record audio from your microphone, add the Audio Input Capture source.
Step 3. Click the Settings button in the Controls tab. Then you can change the output resolution, recording format, FPS, etc. Click OK to save the changes.
Step 4. Click the Start Recording button to record the online lecture you are watching.
Step 5. Tap on Stop Recording to finish the recording. To find the recorded video lecture, you can click the File in the top left corner and choose Show Recordings.
Record Online Lectures with Bandicam
Bandicam is a great lecture recorder that you can use to record online lectures on Windows. It supports recording up to 4K. The recorded videos are often of high quality and take up less space on your computer. It offers multiple recording modes such as screen recording, game recording, webcam recording, and device recording.
This professional HD screen recorder allows you to record DirectX or OpenGL programs, take a screenshot, upload recording to YouTube or Vimeo, add webcam overlay, draw on screen when recording an online lecture, record external audio, add watermark to recording, and capture mouse movements.
For free users, they can use Bandicam screen recorder to record an online lecture for up to 10 minutes each time. And the recordings will be watermarked. If you want to record your lecturer without being interrupted, you need to purchase a license.
Follow the step-by-step guide on how to record online classes.
Step 1. Download the Bandicam screen recorder from its official website. Install this software on your PC and launch it.
Step 2. Click this icon next to Screen Recording mode. From the drop-down list, choose Fullscreen, Select a recording area, Rectangle on a screen, or Around mouse.
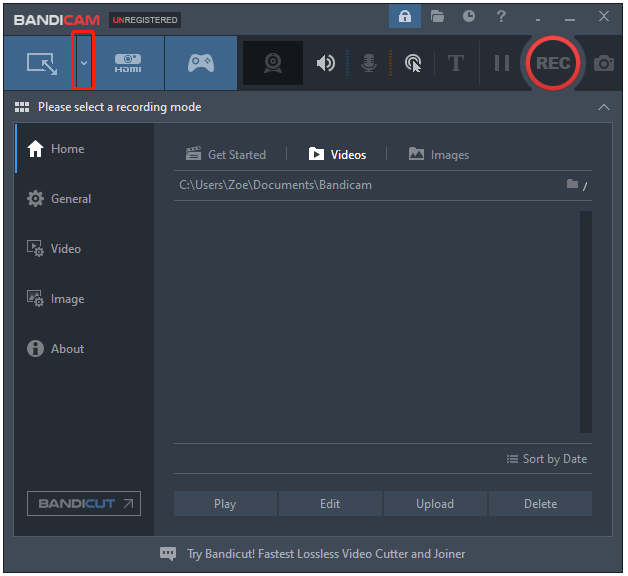
Step 3. Open the video lecture window and start recording by clicking the REC button in the top right corner of the Bandicam recording window.
Step 4. After you finish recording, you can go to Home > Videos. Click the save path to open the output folder and view your recording.
Record Online Lectures with QuickTime Player
If you are using Mac, you can record online lectures with QuickTime Player. QuickTime Player is built into Mac computers used for media playback and screen recording. As a media player, it can play video and audio in most popular formats and lets you view images in BMP, GIF, JPEG, JPEG 2000, PNG, and TIFF.
As for screen recording, QuickTime Player has the ability to record video and audio playing on the computer.
Before recording online lectures with QuickTime Player, you need to install a virtual audio device like BlackHole to help you capture the video sound.
How to set up BlackHole? How to record online lectures on Mac? Here’s how:
Step 1. Go to the BlackHole official website and download it. Open the program and start setting up it.
Step 2. Search for “Audio MIDI Setup” and click to open.
Step 3. Then you will see BlackHole 16ch and click the + to create a new Aggregate Device. Select the Aggregate Device as Input.
Step 4. Click the + icon and choose the option Create Multi-Output Device. Check the Use button next to Built-in Output.
Step 5. Head over to System Preferences > Sound. Go to the Output tab and choose Screen Recording with Audio.
Step 6. Open the QuickTime app. In the top menu bar, click File and select New Screen Recording from the drop-down menu.
Step 7. Click the down arrow next to Options and select the Input option under Microphone.
Step 8. Click the Record button.
Also read: How to Stop QuickTime Screen Recording on Mac
Record Online Lectures with Apowersoft Free Online Screen Recorder
As its name suggests, Apowersoft Free Online Screen Recorder is an online recording tool. When recording a lecture, you can add shapes, texts, colors, etc. This online lecture recorder lets you record videos in a wide range of formats and share recorded videos to social networks or upload videos to RecCloud.
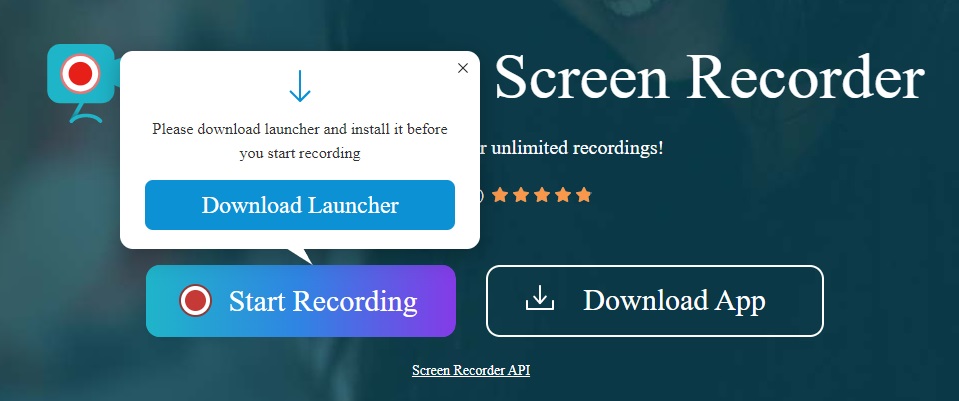
It’s free to use with no time limitations. If you are using it for the first time, you’ll need to install a launcher.
Here’s how to record online lectures with an online screen recorder.
Step 1. Open your web browser and visit the Apowersoft Free Online Screen Recorder website.
Step 2. Click on Start Recording and install the launcher.
Step 3. Then, you can choose to record the full screen or customize the recording area. Click the Speaker icon to adjust the audio settings. To record the internal audio, check the System sound option. To record the external audio, check the Microphone option. To record both of them, you can select System sound and microphone.
Step 4. Tap on REC to record your video lecture.
![Top 6 Best Online Screen Recorders [Free & Paid]](https://images.minitool.com/videoconvert.minitool.com/images/uploads/2021/01/online-screen-recorder-thumbnail.png)
How to Edit Recorded Video Lectures
After recording an online lecture, you may want to edit it such as trimming unwanted parts, combining recorded clips into one, or extracting audio from a recorded file. MiniTool MovieMaker is a video editor with all the needed editing features. No matter you want to create a video mashup, photo slideshow, or GIF, it will satisfy your needs.
Main features:
- Support various input and output formats
- Offer a lot of effects, transitions, animated text templates, and movie templates
- Extract audio from video
- Reverse videos
- Apply effects and transitions to all clips with one-click
- Replace audio in video
Here’s how to edit recorded lectures with MiniTool MovieMaker.
Step 1. Download, install and launch MiniTool MovieMaker.
MiniTool MovieMakerClick to Download100%Clean & Safe
Step 2. Shut down the pop-up window and import the recorded video from your computer.
Step 3. Drag and drop the video to the timeline.
Step 4. Then you can edit the recorded file.
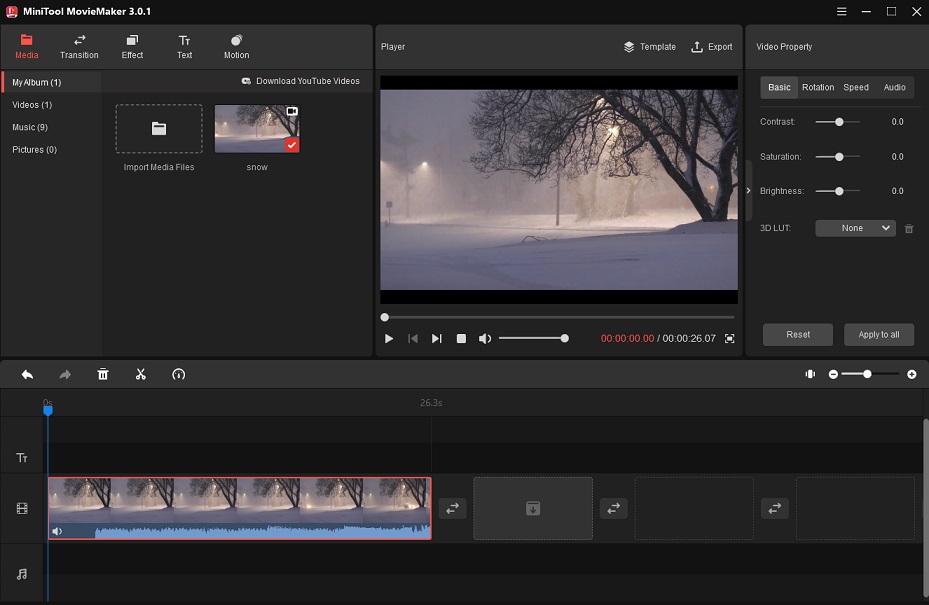
- Trim: Choose the video on the timeline and drag its edge to the center of the video. Then MiniTool will cut the beginning and the end part of the video.
- Split: Move the playhead to the desired place and click the scissor icon on the playhead to split the video into two parts. Choose the unnecessary part and click the trash icon.
- Extract audio from video: Click Export and select MP3 as the output format.
- Add text: Click on Text. In the Text library, add the template you want to use. Then enter the text and adjust the text settings.
Step 5. Now, click Export. Change the output format, folder, and resolution as needed. After that, save the video.
Conclusion
When you record online lectures, make sure that there is enough disk space to store the recorded files. Choose one of them and record your online lectures!
If you encounter problems when using MiniTool Video Converter, please contact us via support@minitool.com or post your comments!
User Comments :