Are you looking for a useful screen recorder that can capture video from website? This article from the free video converter - MiniTool Video Converter will show you 7 website video recorders and tell you how to use them to record a video from a website.
Do you want to capture video from website for watching offline or share with your friends? Do you need to record the online meeting or courses for later review or other reasons? How to capture a video from a website? The following content will recommend several useful screen recorders for different operating systems, you can choose a screen recorder you need and follow the guidance to record a video from a website.
How to Record Video from Website on Windows
If you are a Windows user, you can try the below two good screen recorders to capture a video from a website.
Xbox Game Bar
Xbox Game Bar is an easy-to-use screen recorder that is pre-installed on Windows. It can meet your basic needs for screen recording with audio. But it can only record the whole screen, which means you need to crop the recording if you need to record a selected area of your screen. In this case, you’d better use other screen recorders that support recording selected regions. If you don’t mind that drawback, you can follow the below steps to capture a video from a website.
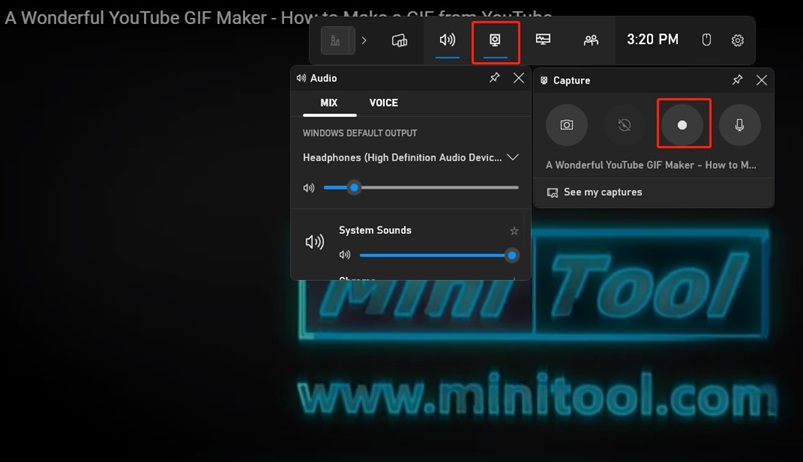
Step 1. Go to the website that has the video you’d like to capture and press the Windows and G keys on the keyboard to activate Xbox Game Bar.
Step 2. Before starting recording, you can click on the Audio icon to adjust the system sound volume and other audio recording parameters.
Step 3. Then you can click on the Capture icon circle in the below screenshot and click the Record icon to begin recording. If you want to end the recording, you just need to click the Stop Recording icon. Later, you can click on See my captures to locate your recorded video.
MiniTool Video Converter
MiniTool Video Converter is a free and -easy-to-use screen recorder that can capture any activities that occur on your computer screen. You can choose to record the whole screen or selected region. Also, it enables you to capture a browser window or an application window easily. What’s more, you can use MiniTool Video Converter to record the system audio and microphone audio simultaneously and separately.
Therefore, it can help you capture the website video easily with audio. More importantly, you can choose to save your recordings in different formats and customize other output parameters. You can follow the below steps to record a video from a website using MiniTool Video Converter.
Step 1. You can click the following download button to download MiniTool Video Converter and then install it on your computer.
MiniTool Video ConverterClick to Download100%Clean & Safe
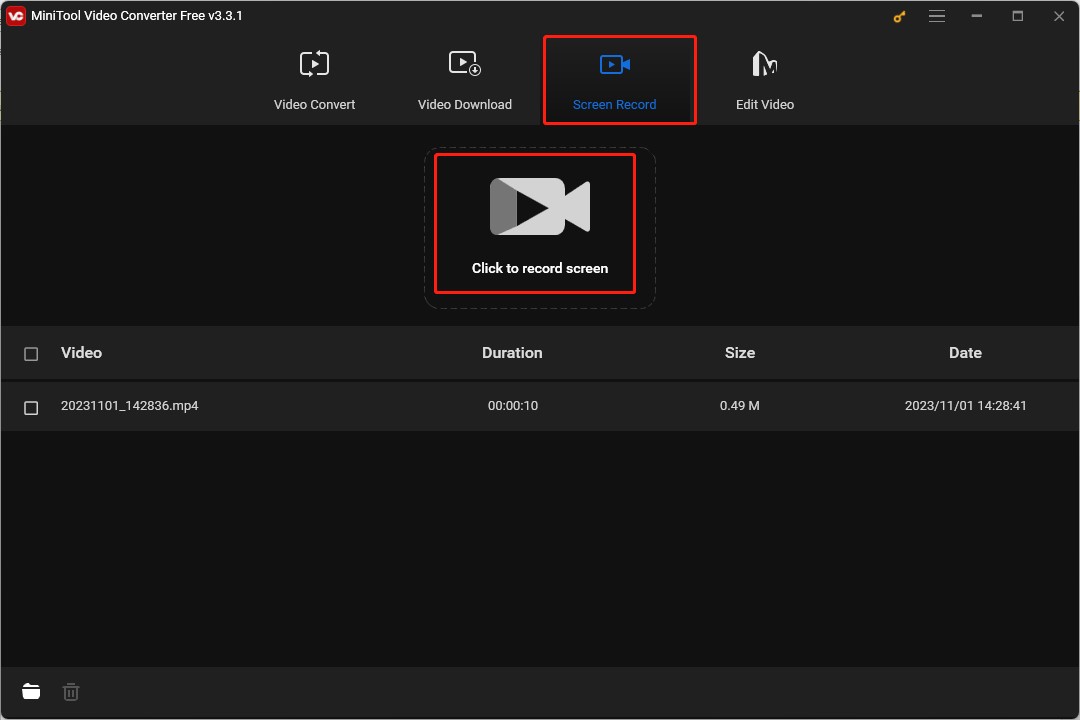
Step 2. Open the website video you want to capture. Enable MiniTool Video Converter, click the Screen Record tab, and click the Click to record screen area.
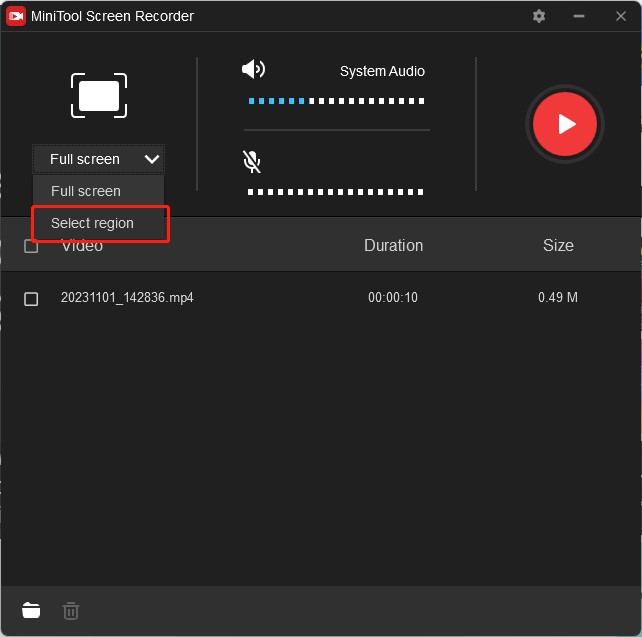
Step 3. If you want to play the website video in full screen, you can leave the default setting of recording full screen. If you don’t want to play it in full screen, you can click the arrow next to Full Screen, choose the Select region option, and drag the mouse to choose the recording area.
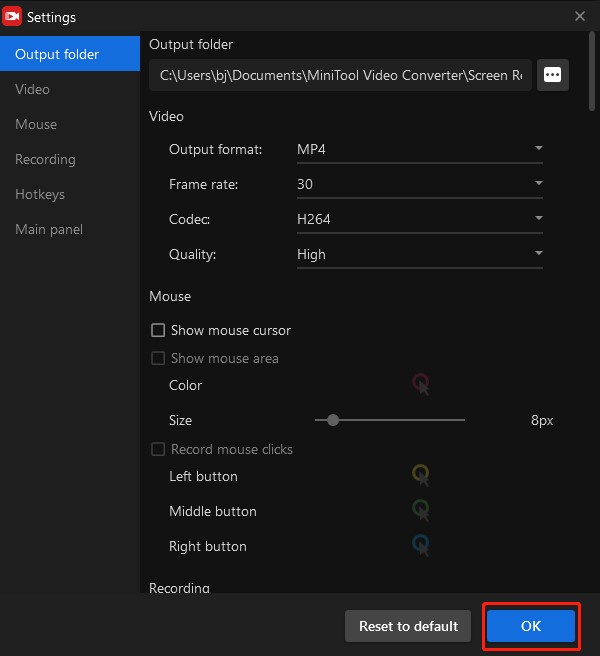
Step 4. Click the gear icon to open the Settings popup, you can choose the final destination for saving your recording, and set its format, quality, and others. Then click OK to save the changes.
Step 5. Click the Record button or press F6 to start recording and press F6 again to finish the recording. Then you can click on your website video recording to preview, delete, rename, or locate it in the folder.
How to Capture Video from Website on Mac
How to record a video from a website on Mac? This part offers two good screen recording tools for Mac including QuickTime Player and OBS Studio and tells you how to use them to record a video from a browser.
QuickTime Player
QuickTime Player is a default application for Mac and a good multimedia player. In addition to playing media, it can also record screens and edit videos. You can use it to record all activities on your screen like website videos and live streams.
After recording, you can use QuickTime Player to make basic editions like trimming, cropping, and rotation. If you don’t want to take time to download other applications, you can try QuickTime Player because it is pre-installed on your Mac computer. Here’s how:
Step 1. Go to the website and open the video you want to record.
Step 2. Open Finder, choose the Applications folder, and double-click on QuickTime Player to open it.
Step 3. Select File, choose New Screen Recording, and the Screen Recording popup will appear.
Step 4. Click the arrow next to the Record icon to personalize the recording settings.
Step 5. Click the Record icon. If you want to record the full screen, you can click anywhere on the screen. Or if you want to record the selected region, you can drag the cursor to choose the region you want to record. Later, click Start Recording.
Step 6. Click the Stop button to stop recording, click on File, and choose Save.
OBS Studio
OBS Studio is a free and open-source video recording software that enables you to capture a video from a website. You can choose to record the video on the specific website and set it as the source scene. Also, it enables you to choose other recording areas like the whole screen, game, webcam, or other scenes. Moreover, you can choose the audio source including the system audio, built-in microphone, or even external mic.
What’s more, OBS Studio is a good streaming tool that supports streaming on YouTube, Twitch, and other social media. Generally, it is a good screen recorder to capture a video from a website. Here’s how:
Step 1. Download and install OBS Studio on your desktop.
Step 2. Open the website video and run OBS. Click on File, choose Settings, and select the Output option. You can click the Browse button to choose the folder for saving the recording and expand the Recording Quality and Recording Format dropdown to choose the quality and format you need. Then click OK to save the changes.
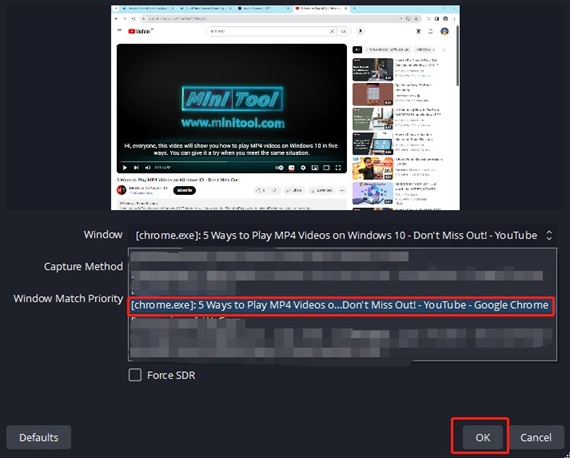
Step 3. You can click the Add Scene button in the Scene section to add a new scene, go to the Source section, and click the Add Source button to choose the Window Capture option. Later, you just need to click on OK to open the Properties for ‘Window Capture’ popup, expand the Window dropdown, choose the window you want to capture, and click OK.
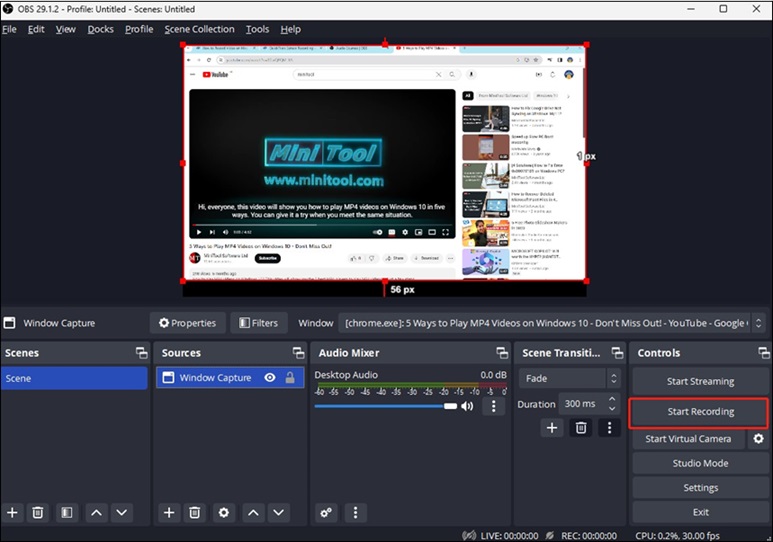
Step 4. Click on the Start Recording button in the Controls section to begin recording the website video. Once finished, you can click the Stop Recording button. You can find your recording by clicking on File and choosing the Show Recordings option.
How to Capture Video from Website on Phone
How to capture a video from a website on your phone? In addition to using their built-in screen recording feature, you can try AZ Screen Recorder which is available for both Android and iPhone. It allows you to adjust the output parameters for recording and supports recording videos in high quality from HD, 2K, to 4K.
More importantly, AZ Screen Recorder enables you to take screenshots and offer various editing features. you can refer to the below guide on how to capture a video from a website on your phone with AZ Screen Recorder.
Step 1. Download and install AZ Screen Recorder on your phone.
Step 2. Go to the website and open the video you’d like to record. Run AZ Screen Recorder on your phone and tap on the gear icon to adjust the recording settings.
Step 3. Tap on the floating button, choose the red record icon to start recording, and hit the stop icon to end the recording.
How to Capture Video from Website Using Online Tools
This part provides you with two online screen recorders. Whether you’re a Windows or Mac user. As long as you have a browser, you can use those two online screen recorders without downloading any software.
Screencastify
Screencastify is an easy-to-use online screen recorder that supports recording the computer screen, webcam, or both. You can choose to record the whole screen or selected window with system audio but it can’t record the selected region. What’s more, it is a screen recorder with drawing tools that enables you to add some stickers or use a pen to highlight some important parts while recording.
After recording, you can use its editing tools like cutting, cropping, zoom in/out effects, and others to make your recording better. Then you can choose to export it to a local file, YouTube, or Google Drive. But if you want to export your recording in MP4 format, you need to pay for an upgrade. Its free version only allows recording videos for no more than 30 minutes. You can also follow the below steps to record a website video if you don’t care about those problems.
Step 1. You need to go to the Chrome Web Store, enter Screencastify in the search box, click the Add to Chrome button, and choose the Add extension option. Later, you can click the Extensions icon at the higher-right corner of your browser and click the Pin icon next to Screencastify.
Step 2. Open the website video you want to capture and enable Screencastify by clicking on the Screencastify icon in your browser’s extension bar.
Step 3. You can choose the option Browser Tab or Desktop. If you choose the Desktop option, you can switch to Window, choose the video website as the recording source, and click on Share.
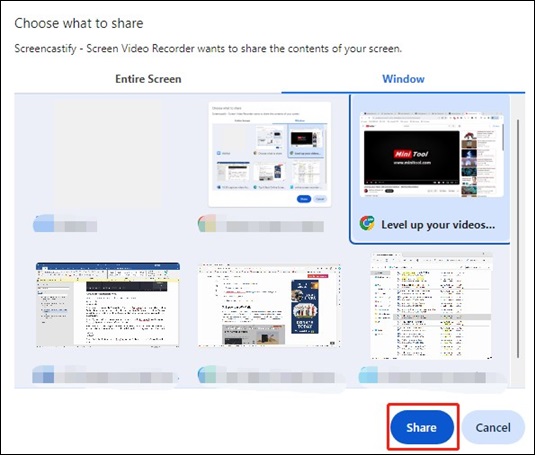
Step 4. After the website video is finished, you can click on the End recording icon or press Alt + Shift + R to finish the screen recording. Finally, you can expand the Export Video dropdown to download your recording.
FlexClip
FlexClip is a versatile online tool that can edit videos, make slideshows, convert videos, and record screens. As a screen recorder, it can record your screen, webcam, or both. Also, it supports recording the system audio and microphone audio simultaneously or separately. You can choose to record the full screen, application windows, or browser tabs. With FlexClip, you can capture a video from a website easily. You can refer to the following steps.
Step 1. Open the website video, go to the official website of FlexClip, move to Tools, and choose the Screen Recorder option.
Step 2. Click the Start Recording button, choose the Screen Only option, and click on Next to enter the Recording Settings page.
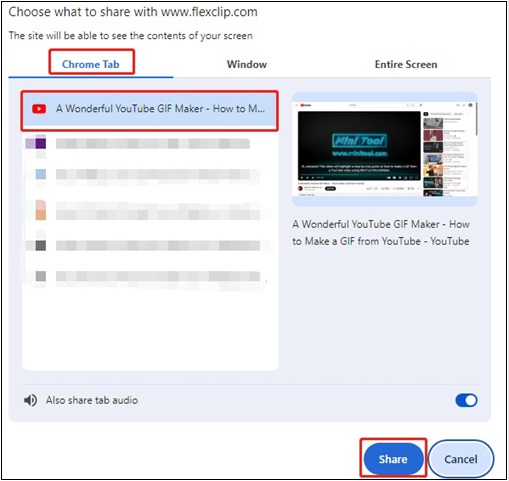
Step 3. Select the System audio option, click on Start Recording, choose the website video under the Chrome Tab, and click on the Share button to begin recording. Later, you can back to the FlexClip website, click the Stop icon to end the recording, and click the Download and Edit button to save your recording.
Bonus Tips
After getting the recorded video, you may need to cut off the unwanted parts, adjust the audio volume, add some background music, or make other editions. In this case, you need a useful video editor with various editing features. If you are a Windows user, MiniTool MovieMaker is the best choice! MiniTool MovieMaker is a free video editor with several tools for editing. You can use it to fine-tune your recordings easily with its intuitive interface and useful tools.
MiniTool MovieMakerClick to Download100%Clean & Safe
You may also like:
- XRecorder for PC: What Is XRecorder & 2 Best Alternatives
- How to Edit Webex Recording on PC [Step-by-Step Guidance]
Conclusion
The above has shown you how to capture video from website. No matter whether you are a Windows, Mac, or phone user, you can find the solution to record a video on a website. You can choose a screen recorder you like and follow the above guidance to capture a website video. Hope this post is helpful to you!
If you have any questions or comments about MiniTool Video Converter, please don’t hesitate to email us at [email protected].


![How to Record on Canva & Record a Presentation on Canva [PC/Phone]](https://images.minitool.com/videoconvert.minitool.com/images/uploads/2024/09/how-to-record-on-canva-thumbnail.jpg)
![How to Record Bigo Live Easily in 3 Ways [PC/iPhone/Android]](https://images.minitool.com/videoconvert.minitool.com/images/uploads/2024/08/record-bigo-live-thumbnail.jpg)
User Comments :