How to enhance video quality? This article covers two effective methods: using the AI video enhancer in MiniTool Video Converter or adjusting basic visual settings with Adobe Express. It also includes helpful tips to prevent videos from turning out low quality.
Video quality is typically judged by whether the video is clear and fluid. The decisive factors determining video clarity are resolution and bitrate, while video fluidity is determined by the frame rate. Therefore, the higher the resolution, bitrate, and frame rate of a video, the higher its overall quality. Such high-quality videos typically require more storage space and network bandwidth.
What Causes Poor Video Quality
If the video quality on a streaming platform is poor, it may be due to a slow internet connection. A poor network connection can cause the platform to automatically lower the resolution. This issue can be resolved by connecting to a more stable network and selecting a higher resolution manually.
Furthermore, improper camera settings can lead to poor video quality. For instance, insufficient lighting can cause graininess, noise, and blurriness. Setting the resolution too low will result in a loss of detail. Unsteady hands during handheld shooting can also cause blurry video.
In addition, low video quality can also be caused by excessive compression during the upload process. For example, YouTube compresses videos that creators upload, resulting in blurry images.
Increasing resolution, bitrate, and frame rate can improve poor video quality. Both AI tools and traditional upscaling methods can achieve this.
How to Enhance Video Quality
Here are two simple methods I've used to make videos look better. The next sections explain the tools used and show the step-by-step process.
Method 1: Using AI Video Enhancer (Recommended)
The simplest and most effective way to enhance video quality is to use an AI-powered video quality increaser. After comparing various options, I ultimately chose MiniTool Video Converter.
# Overview of MiniTool Video Converter
To enhance video quality free, MiniTool Video Converter offers a simple and effective solution! It uses AI-based technology to improve video clarity by increasing resolution, reducing noise, and sharpening blurry details. This makes it especially useful for restoring old footage or improving low-quality clips recorded on older devices.
MiniTool Video Converter supports upscaling video resolution to 2x or 4x the original size, while using intelligent pixel processing technology to ensure image clarity and maintain a smooth, natural appearance.
What’s more, MiniTool Video Converter supports a wide range of formats, including MP4, MKV, MOV, AVI, WMV, FLV, and more. This flexibility allows different types of videos to be imported and improved without worrying about compatibility issues. After processing, videos are automatically saved in MP4 format, which ensures easy playback on most devices and platforms.
Another advantage is that MiniTool Video Converter keeps things user-friendly. There are no watermarks added to the final video, and there are no restrictions on file size or how many videos can be enhanced. This makes it a reliable choice for anyone looking to improve video quality without cost or limitations.
# How to Enhance Video Quality with MiniTool Video Converter
Below is a step-by-step guide on using MiniTool Video Converter for video enhancement.
Step 1: Download and Install MiniTool Video Converter
Download and install MiniTool Video Converter by following the instructions shown on the screen, then open the program.
MiniTool Video ConverterClick to Download100%Clean & Safe
Step 2: Import the Target Video
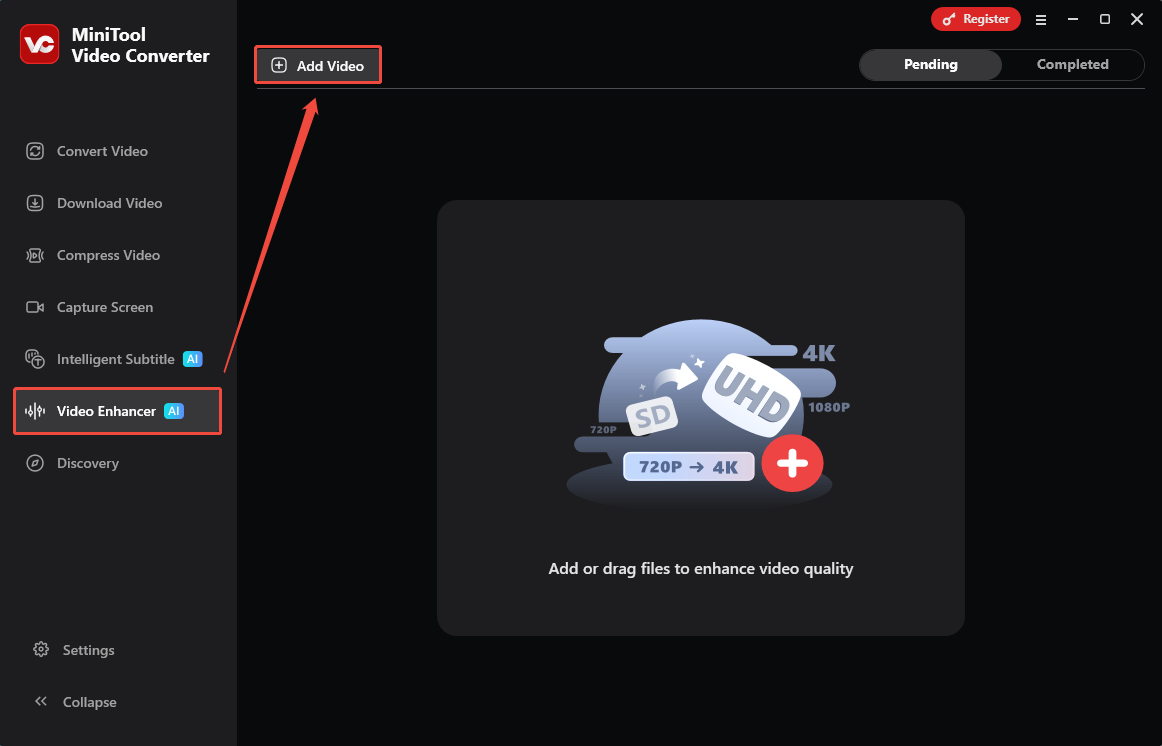
Choose the Video Enhancer option from the menu on the left side. Then, click Add Video to upload the video that needs to be enhanced.
Step 3: Choose the Enhance Mode
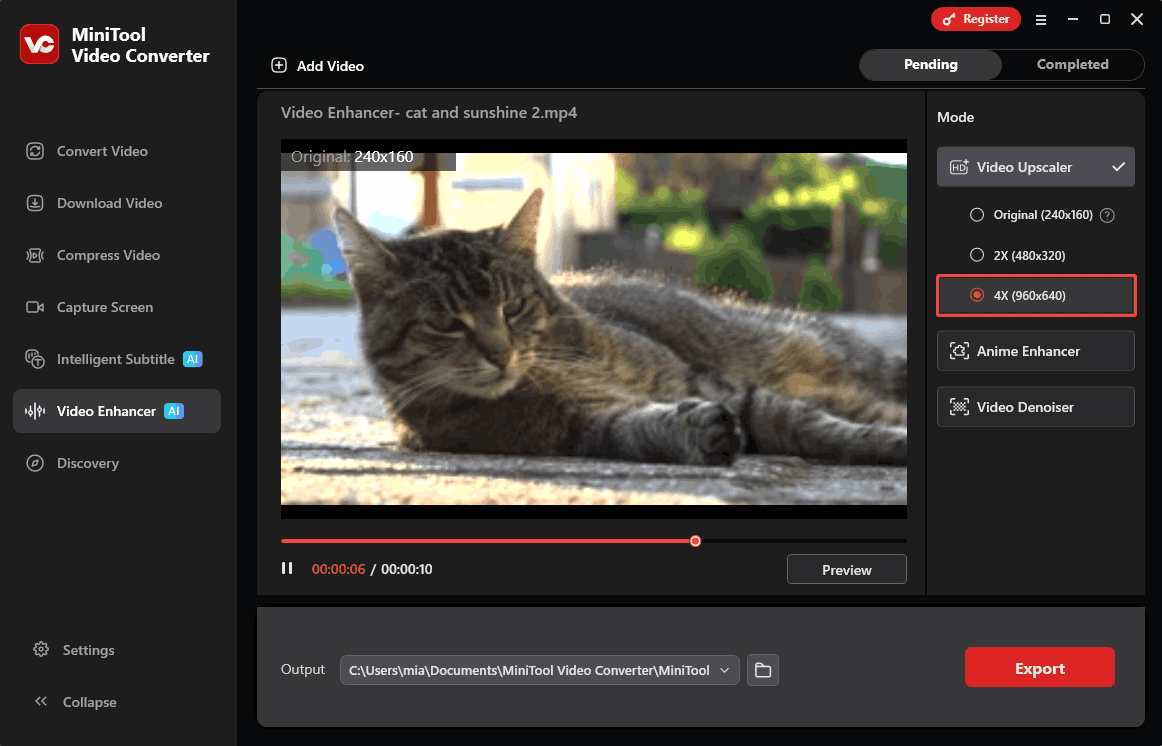
After importing the video, the enhancement options appear in the panel on the right. Based on specific needs, different modes such as Video Upscaler, Anime Enhancer, or Video Denoiser can be selected. In the example shown, the imported video mainly needed upscaling, so I selected the Video Upscaler and set the size to 4x the original resolution.
Step 4: Preview to Check the Effect
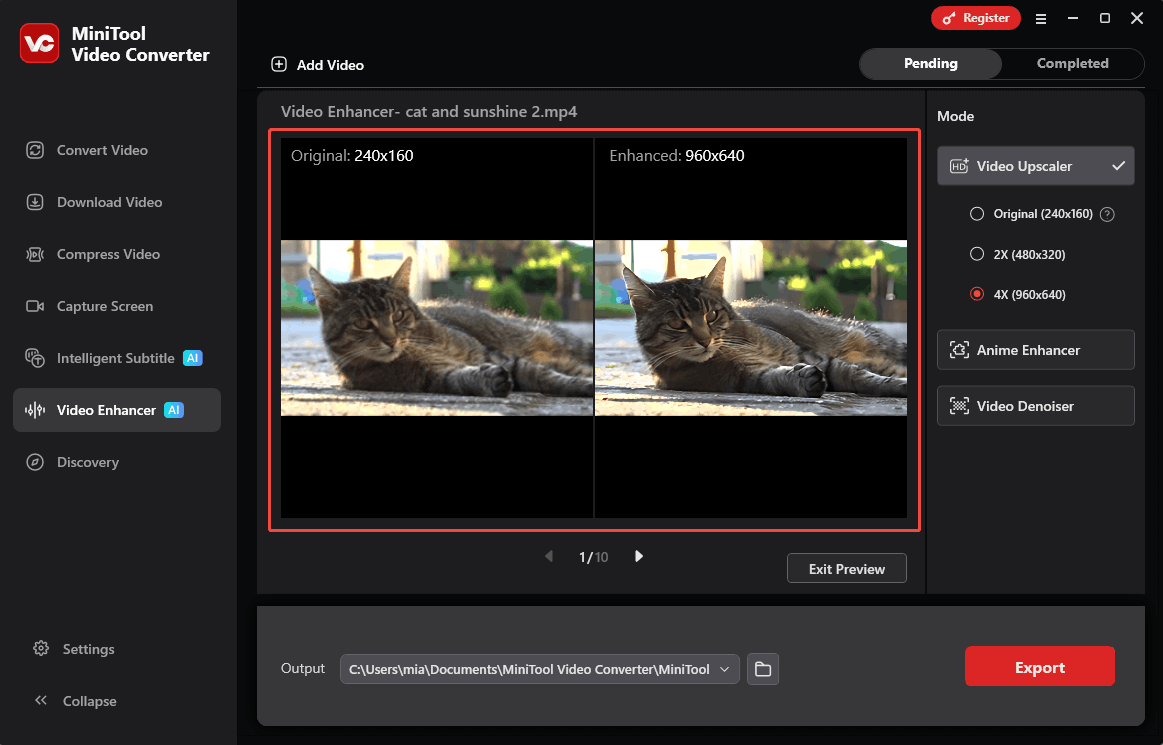
After selecting an enhancement mode, click Preview to view the improved video. The software then generates a preview and displays both the original and enhanced versions side by side in the center of the interface. This layout makes it easier to compare the differences in clarity, sharpness, and overall quality before saving the final result.
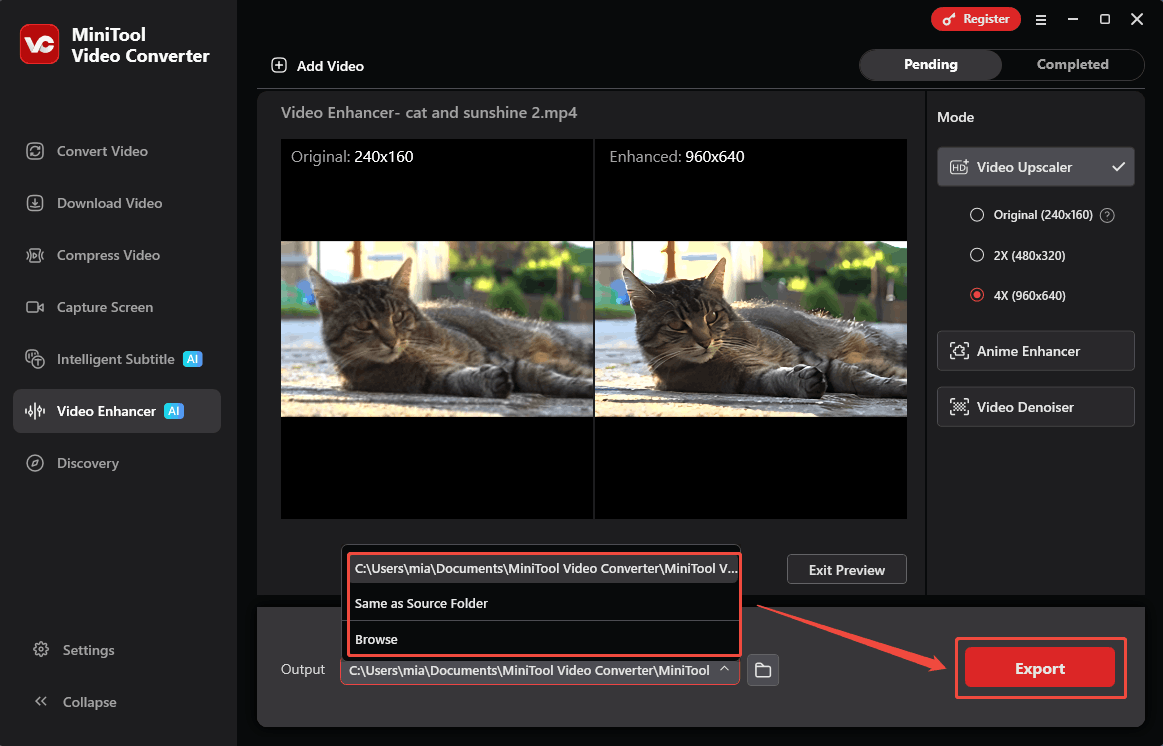
Step 5: Select Output Folder and Export the Video
At the bottom of the interface, open the Output section and choose a folder to save the enhanced video file. Then click the Export button in the lower-right corner to start processing. Once the export finishes, the final enhanced video is saved to the selected location
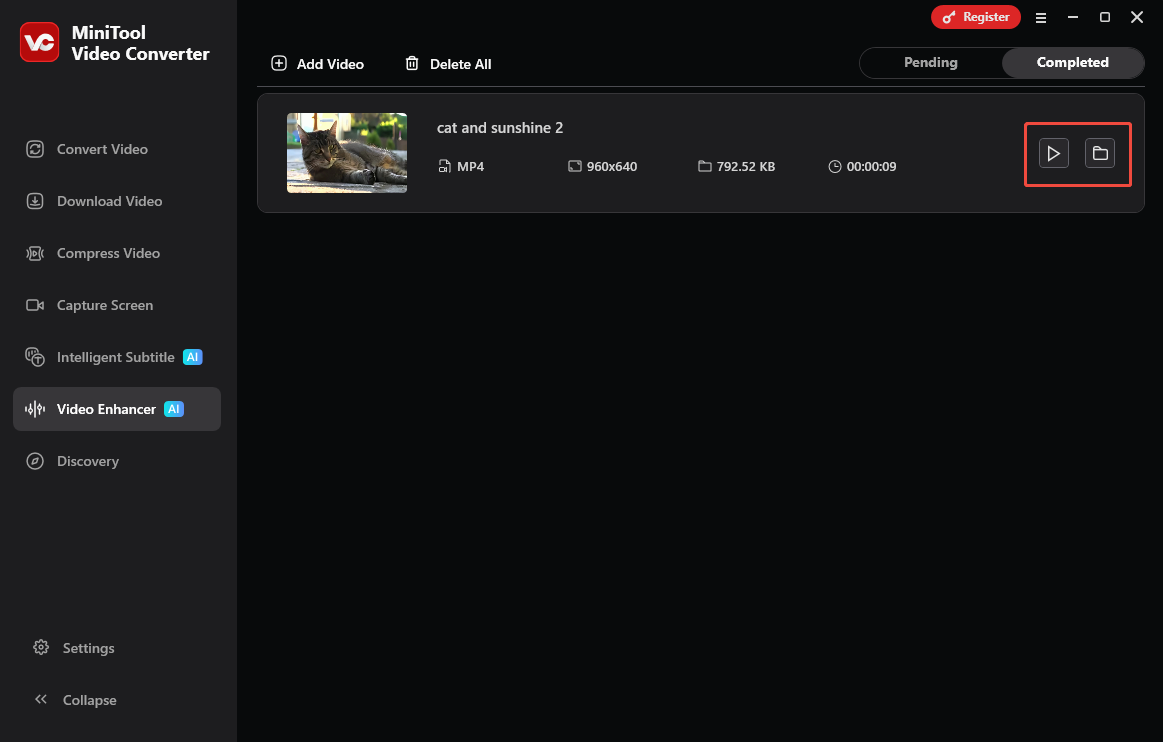
Step 6: Find the Exported Video
After the export finishes, the interface automatically switches to the Completed tab, where all finished tasks appear. Click the play icon to watch a preview of the enhanced video, or select the folder icon to open the save location and access the file.
MiniTool Video Converter offers a user-friendly experience with stable performance during use. Beyond video enhancement, it also provides several useful features, including video compression to reduce file size, format conversion for better compatibility across devices, and audio or video transcription to turn video or audio into text. These features make it a practical all-in-one solution for managing media files efficiently!
Method 2: Manual Enhancement with Video Editing Tools
Another method for enhancing video quality is to adjust the video's fundamental visual properties. The vast majority of video editing tools support this feature. Since I did not want to download any video editing software, I decided to try Adobe Express. It is an online tool designed for rapid content creation, allowing users to produce videos, social media posts, PDFs, promotional posters, and more.
Although Adobe Express isn't strictly a dedicated video quality enhancer, I can use its video editing features to improve video quality by making the following adjustments:
- Increase sharpness: Boost the video's sharpness to make edges look clearer and more defined.
- Increase contrast: Raise contrast to make dark areas darker and bright areas brighter, which helps the subject stand out from the background.
- Increase brightness: Brighten dark scenes by increasing brightness, but avoid setting it too high to prevent the video from looking overexposed.
- Adjust highlights and shadows: Reduce highlights to bring back details in very bright areas, and increase shadows to reveal details in darker parts of the video.
Here is a guide on how to enhance video quality with Adobe Express:
Step 1: Go to the Adobe Express Homepage
Visit https://new.express.adobe.com/.
Step 2: Upload Target Video
Click the Upload option and import the video from the computer.
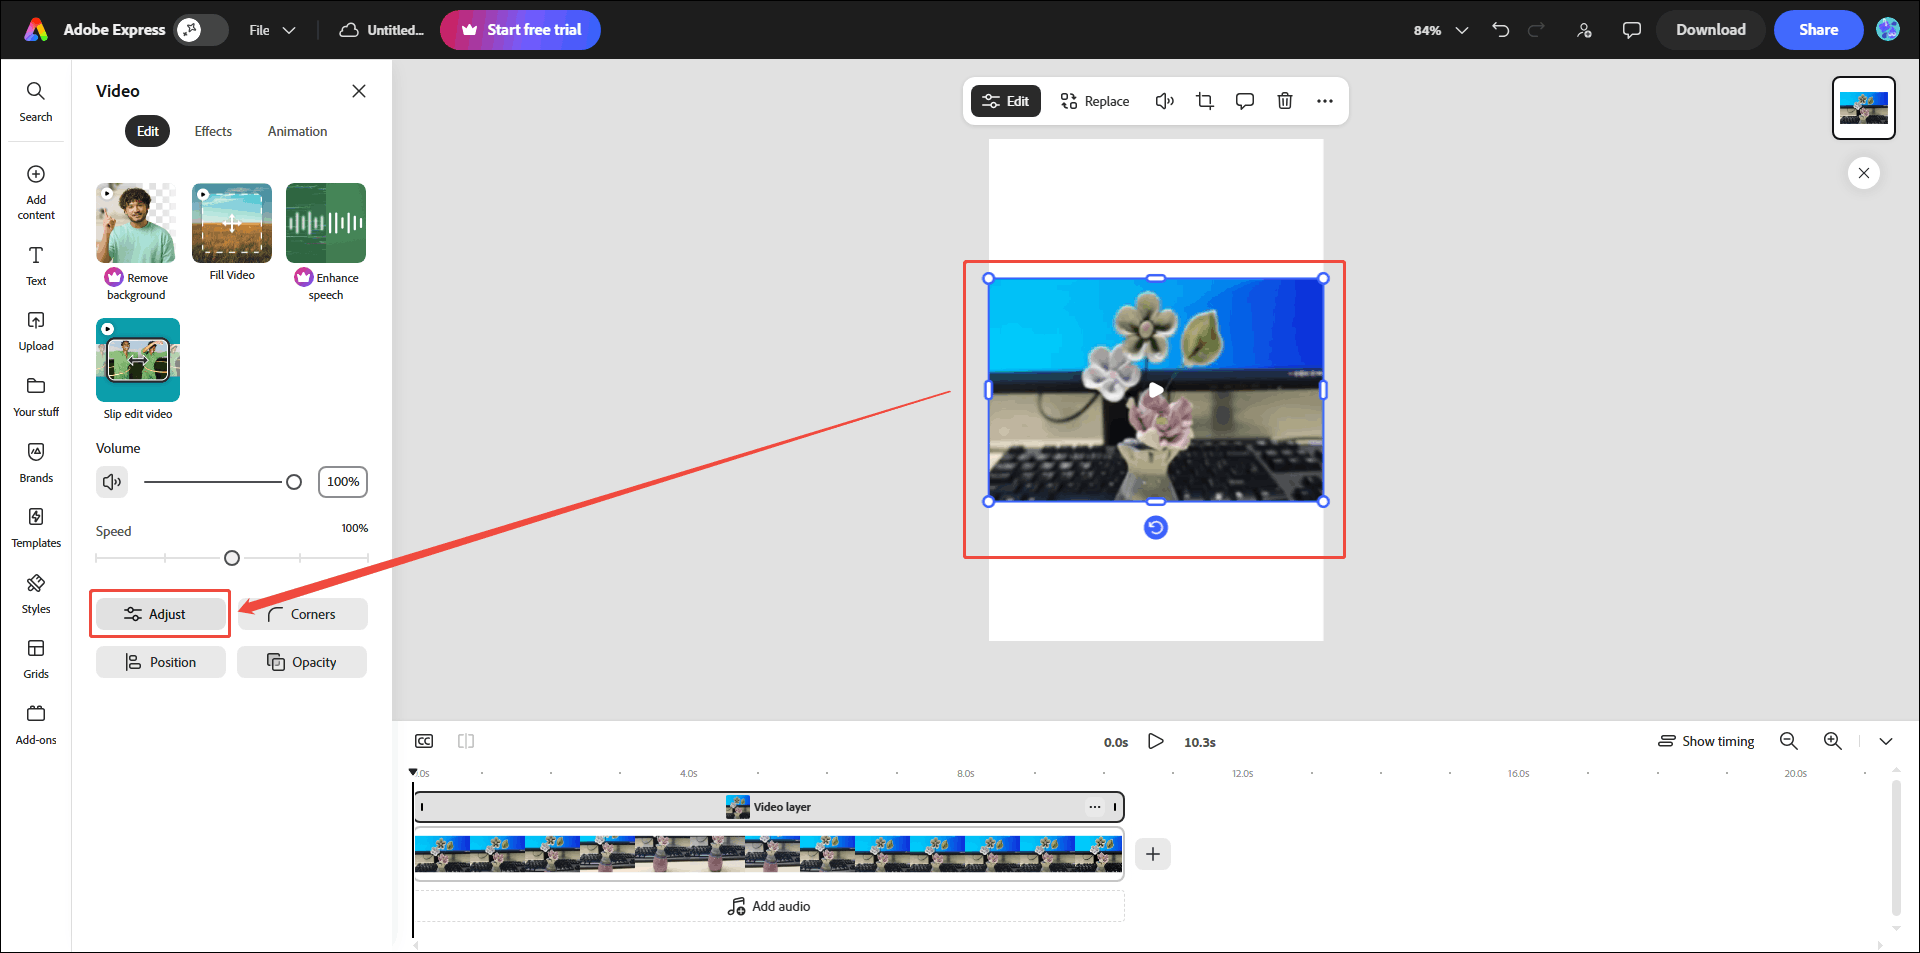
Step 3: Adjust Video
Click the video in the workspace. Then, choose the Adjust option on the left menu.
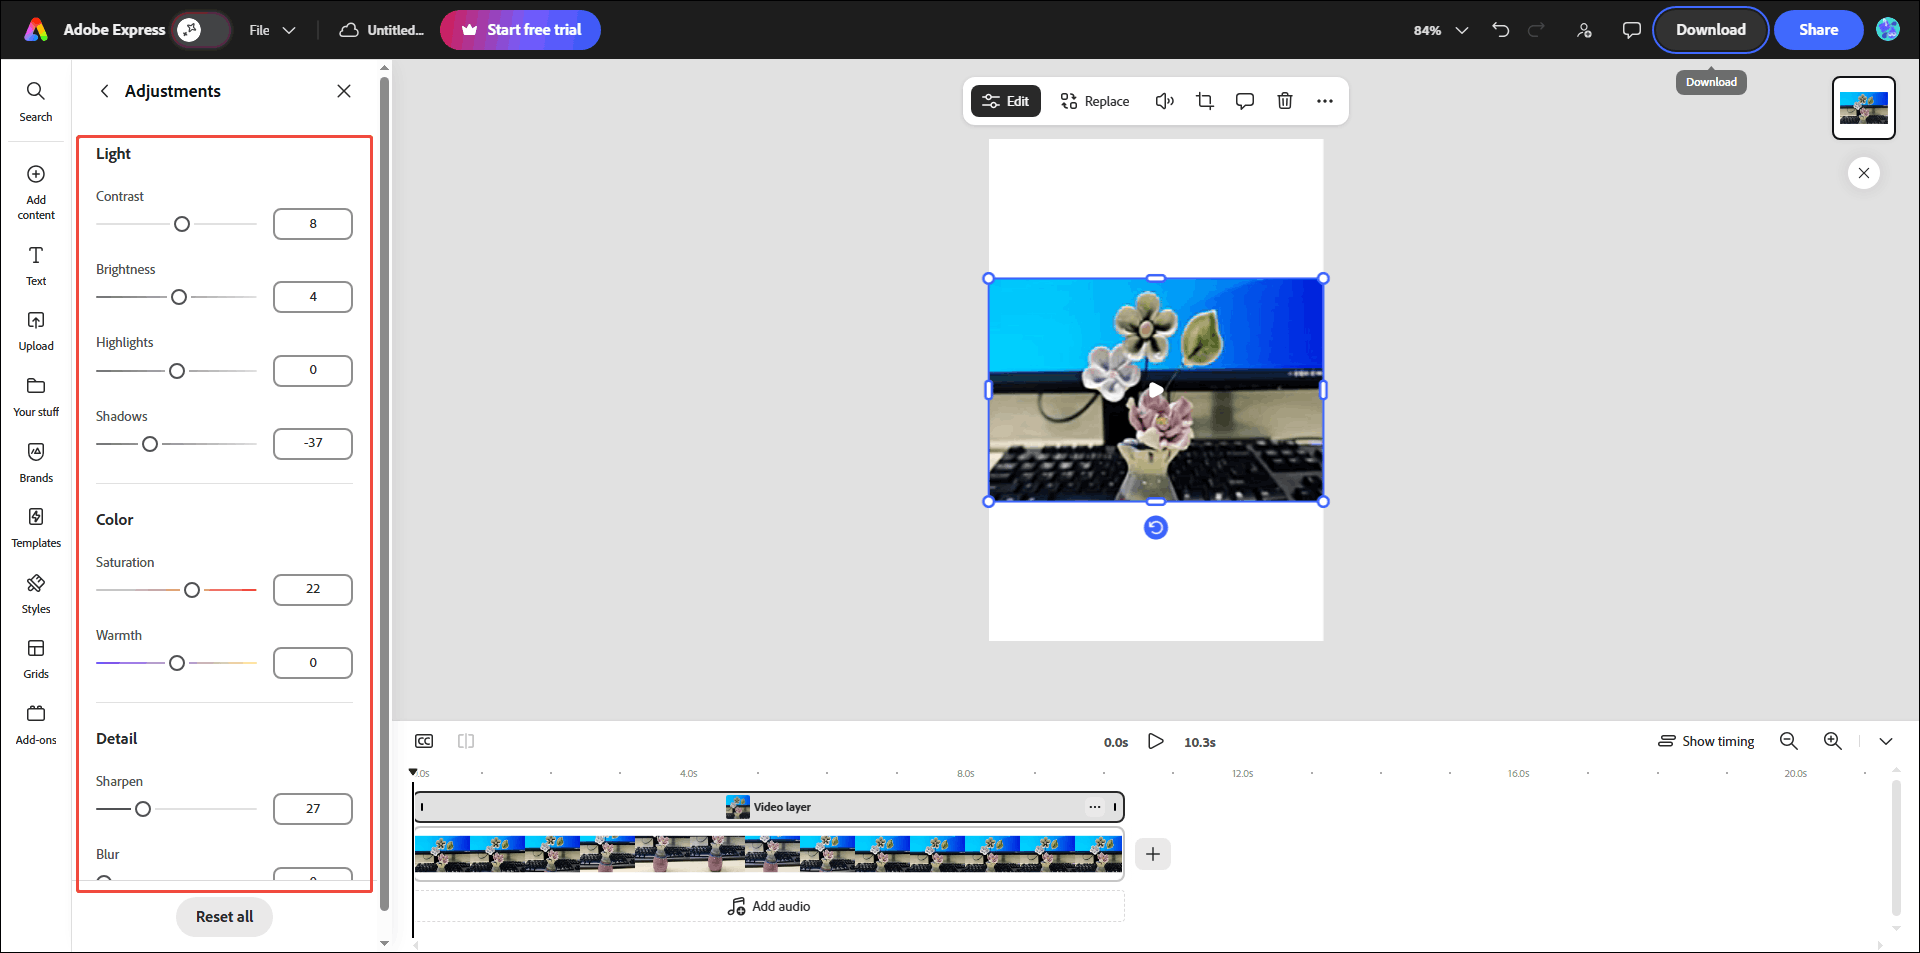
In the Adjustments area, adjust the light, color, and detail of the video. Generally, I would increase the contrast, brightness, saturation, and sharpness of the video. This makes the colors appear more vibrant, the edges sharper, and visually enhances the video quality.
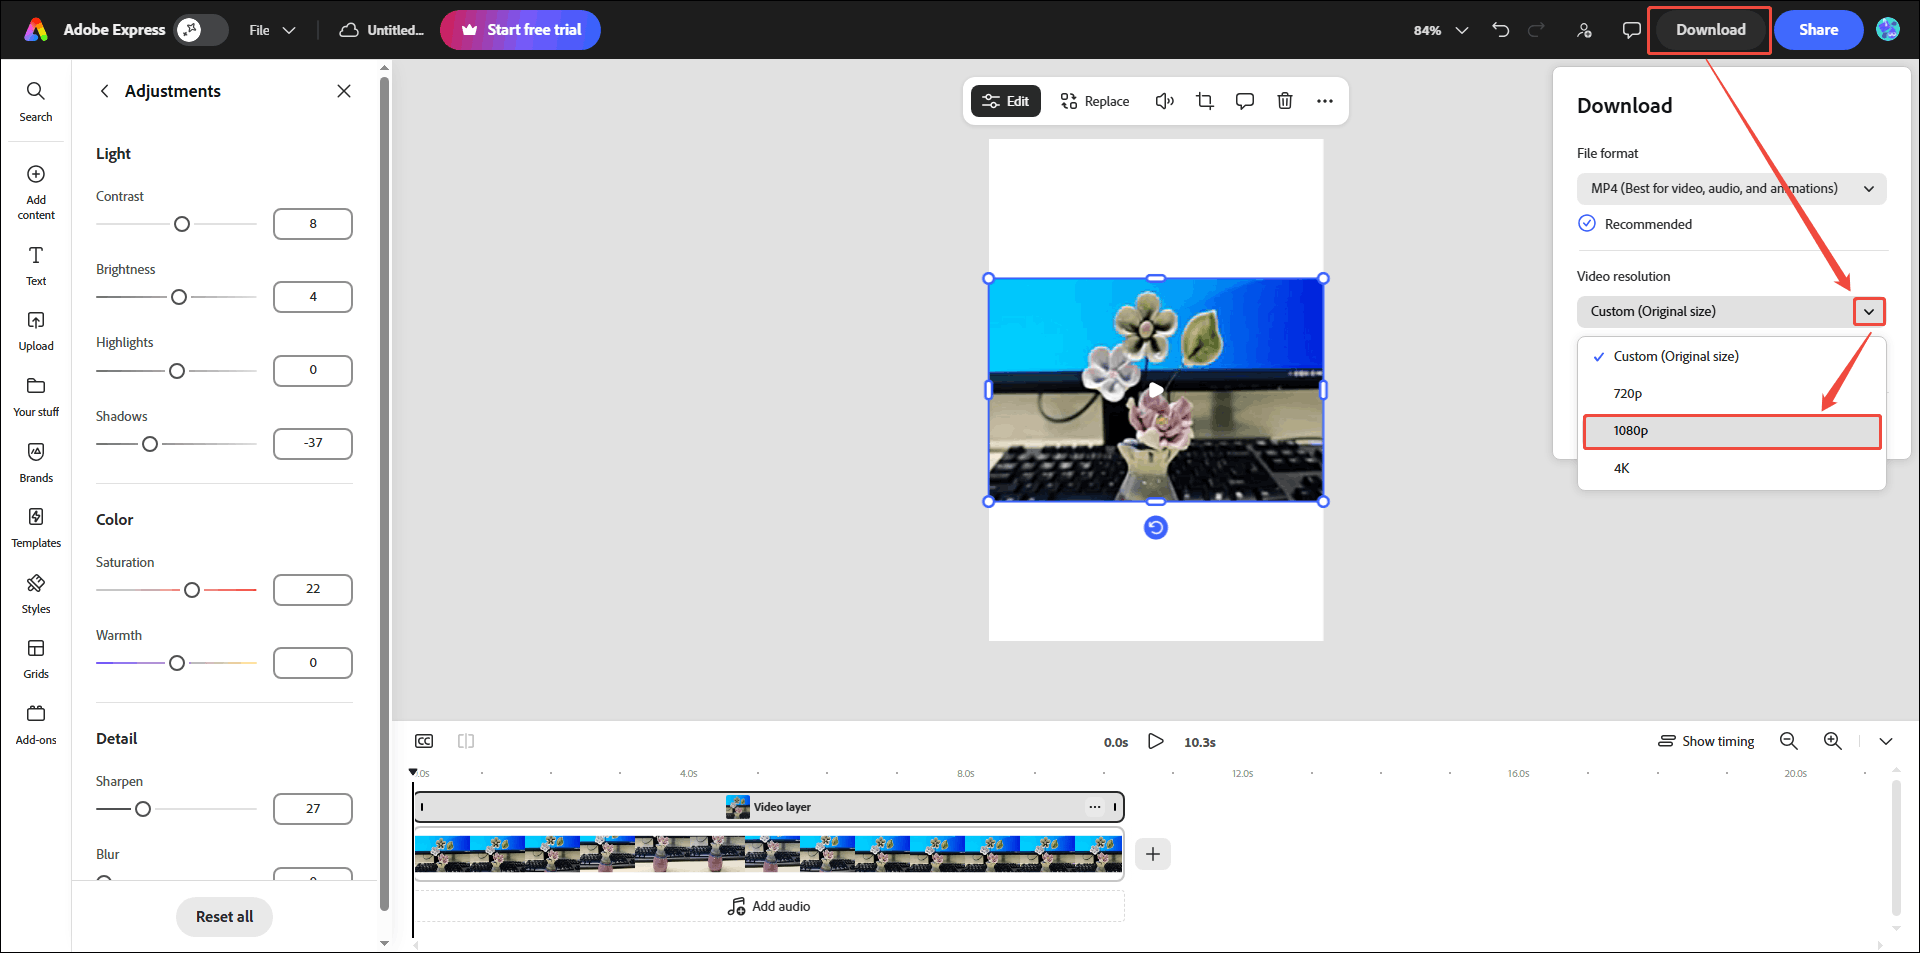
Step 4: Upscale the Video
Click the Download option in the top-right corner. Then, expand the Video resolution option, and select a resolution higher than the original. Here I select 1080p.
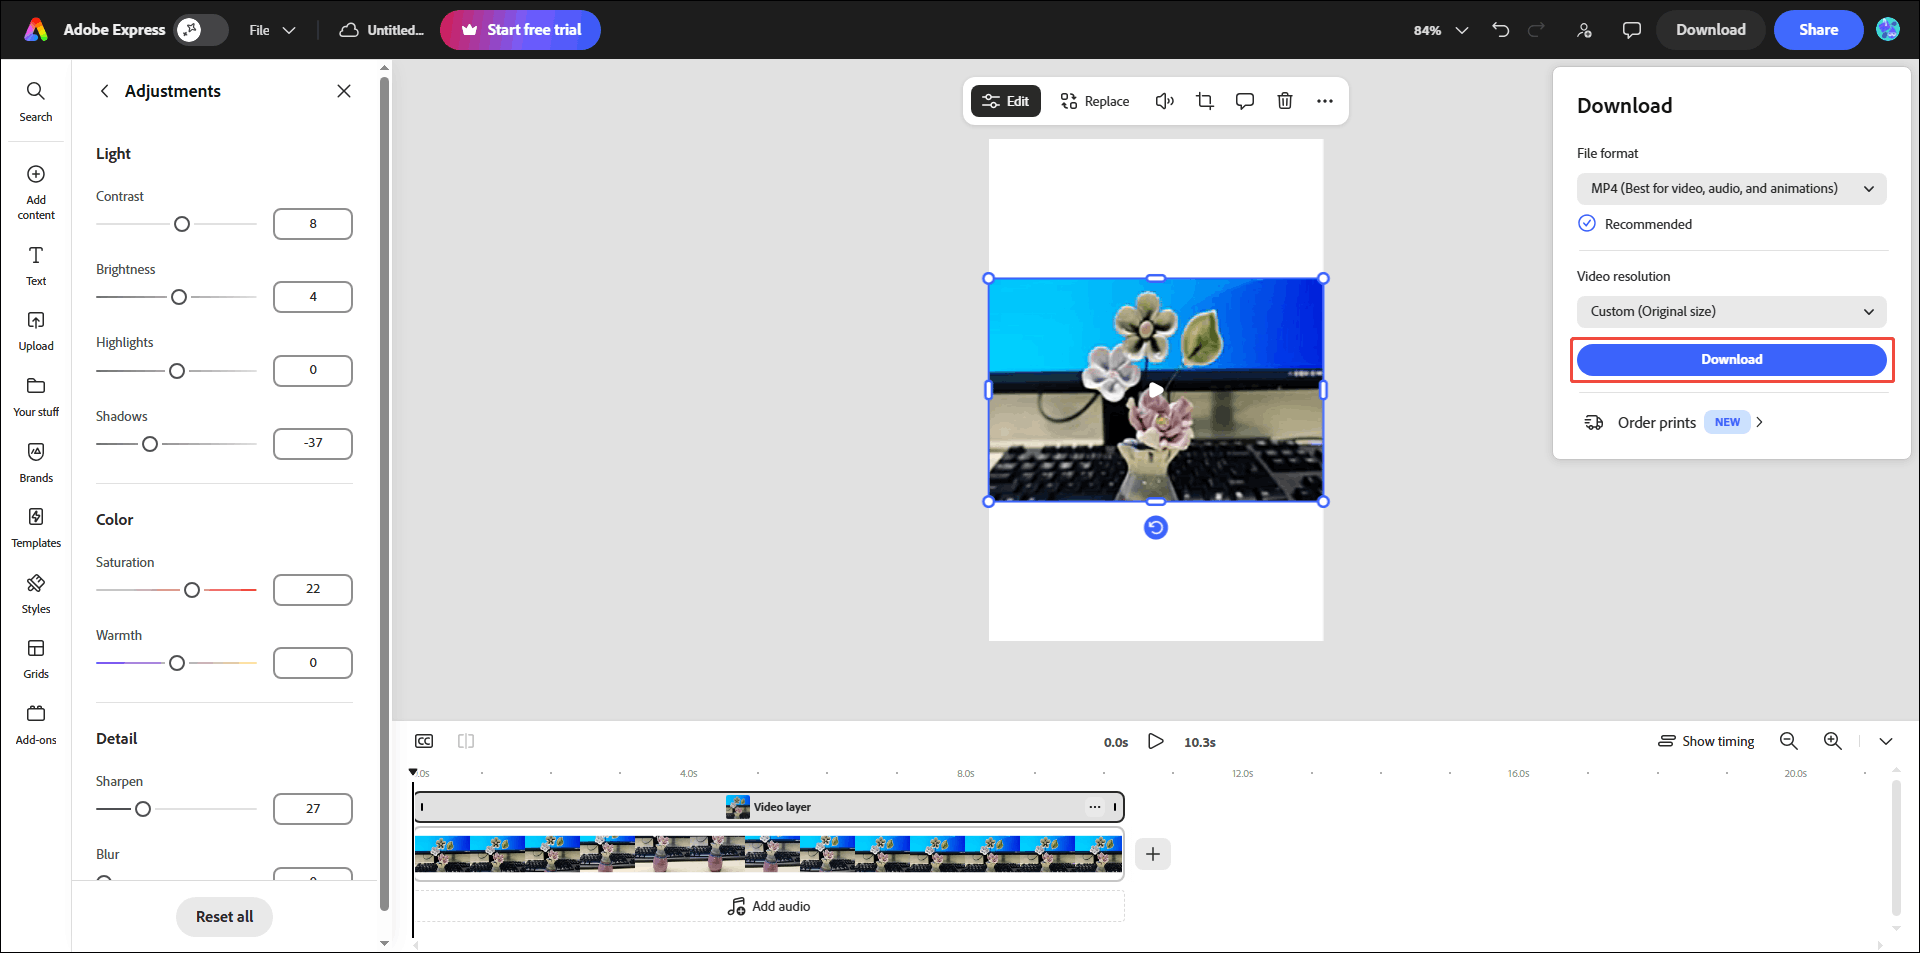
Step 5: Download the Edited Video
Click on Download to save the video.
For comparison, I placed the original video next to the exported version. The differences are clear: the enhanced video shows sharper edges and more vivid colors. Adobe Express is highly effective at enhancing the visual quality of videos. However, it cannot fix severe blurriness or pixelation caused by extremely low resolution.

Which Video Enhancing Method Should You Choose
Both of the above methods can improve video quality to a certain extent. Which of these two methods is better? I think it depends on the user's needs. Below, I will analyze these two methods from the perspective of speed, final video quality, customization, and use case.
1. Speed
From the perspective of processing speed, the AI video enhancer is better. These tools often use advanced AI models. Therefore, they have strong computational and analytical capabilities. Compared with adjusting video visual properties on video editing software, the operation of the AI video enhancer is not complex, and the processing speed is very fast. Some AI video enhancement tools can also batch process videos, which saves my time.

2. Quality of Results
After carefully comparing the videos enhanced by the above two methods, I found that colors adjusted using a video editor, such as Adobe Express, are more vivid. However, without AI technology, the video will not increase pixels after upscaling, so the picture will be a bit blurry.
An AI video enhancer can also increase the color brightness of the picture to a certain extent, but it is not as effective as a video editor. However, it can calculate and generate relevant pixel blocks based on the existing pixels of the video, making the final video high-resolution and clear.
3. Customization
Some AI-powered video enhancers, such as MiniTool Video Converter, offer multiple enhancement modes. I can choose upscaling, denoising, or sharpening video based on my needs. However, I've also found that it doesn't allow for flexible adjustment of specific enhancement levels. Video editors like Adobe Express, on the other hand, allow adjustment of parameters such as contrast, brightness, highlights, shadows, and saturation.
4. Use Case
For quickly upscaling low-resolution videos, AI video enhancers are the best choice. MiniTool Video Converter processes old footage efficiently, saving significant time and effort. Manual enhancement with a video editor suits projects requiring precise color grading, such as achieving a specific cinematic look for short films.
Why Enhance Video Quality
Personally, I enhance video quality to restore old videos and bring them back to life. By using advanced AI technology, I can effectively remove noise, reduce blur, and sharpen details in aged footage. This process also allows me to upscale resolution, improve clarity, and make old videos look more vivid and visually appealing.
For creators, better video quality helps attract more viewers. Clear, high-definition videos are more enjoyable to watch, so people tend to stay longer. Good-quality videos also make the channel look more professional. When viewers have a good impression, they’re more likely to subscribe and keep coming back.
Furthermore, I have noticed that playing low-resolution videos on a high-resolution screen results in a blurry image. This is because the video is stretched to fit the screen, which causes the overall picture to appear soft, blurred, and pixelated. Using an AI video enhancer to increase the resolution to 1080p or 4K helps keep the video sharp and clear on larger screens.
Essential Tips to Enhance Video Quality
To enhance the quality of your videos, pay attention to the following aspects both when shooting and when uploading:
# When Shooting:
- Prioritize Lighting: Make sure there is enough light when recording, or the video may look grainy. Avoid very strong direct light, as it can make the image too bright.
- Prevent Camera Shake: Camera shake causes video blurriness. It is best to use a tripod or a stabilizer to prevent camera shake. When holding the camera, keep elbows close to the body for better control.
- Set High Resolution: Select the highest resolution supported by the device to capture more details.
- Manual Focus: Set the focus point and white balance manually to ensure color consistency throughout the footage.
# When Uploading:
- Export as MP4: It is best to save videos in MP4 format so they work well on most platforms and keep good quality during upload.
- Choose good codecs: When uploading videos, it is advisable to use H.264 or HEVC encoders to strike the best balance between video quality and file size.
- Turn on HD uploads: When uploading videos to platforms like YouTube, Instagram, or TikTok, make sure the “Upload at Highest Quality” or HD option is turned on.
Conclusion
This article explains two ways to enhance video quality: using the Video Enhancer in MiniTool Video Converter and adjusting visual details with Adobe Express. For turning low-resolution footage into clear, high-resolution video, the first method works best. By the way, learn the tips for enhancing video quality at the end of this article.
If any difficulties arise when using MiniTool Video Converter, contact support@minitool.com.
User Comments :