H.265 delivers better compression and quality than H.264, but requires more processing power and has narrower device support. Convert H.264 to H.265 for a smaller file size with three H.265/H.264 converters, including MiniTool Video Converter, FreeFileConvert, and HandBrake.
What Is H.264
H.264, also known as MPEG-4 Part 10 or AVC (Advanced Video Coding), is one of the most widely used video codecs. It is supported by many container formats, including MP4, MKV, MOV, AVI, FLV, and TS.
It supports resolutions from low-resolution mobile videos to HD and some 4K content, making it ideal for online streaming, Blu-ray discs, and mobile playback.

What Is H.265
H.265, also known as HEVC (High Efficiency Video Coding), is the successor to H.264 and is designed for high-resolution video. It supports resolutions up to 8192×4320, including 8K UHD. Streaming platforms increasingly use H.265 for 4K and 8K content, offering smaller file sizes and less buffering.
H.264 VS H.265: What’s the Difference
Compare H.264 and H.265 side-by-side to find the best fit for your needs.
| H.264 | H.265 | |
| Compression Efficiency | Low | High |
| File Size | Large | Small |
| Visual Quality | Good | Better |
| Hardware/Software Support | Wide | Limit |
| Encoding | Fast | Slow |
1. Compression Efficiency
H.265 offers higher compression efficiency than H.264. At the same video quality level, it can compress data 25% to 50% better, allowing videos to maintain similar quality with less data.
2. File Size
With H.265 encoding, video files can be reduced to nearly half the size of H.264-encoded videos while maintaining the same visual quality. Smaller file sizes also make video storage and streaming more efficient, especially with slower network connections.
3. Visual Quality
H.265 generally delivers better visual quality than H.264, especially at lower bitrates.
At higher bitrates, the difference may not be very noticeable. However, H.265 produces cleaner and more detailed images at lower bitrates due to its advanced encoding techniques. It supports larger coding blocks up to 64 × 64 pixels, while H.264 supports macroblocks up to 16 × 16 pixels, improving coding efficiency across different resolutions.
4. Hardware and Software Support
H.264 has wider hardware and software support than H.265. It works on most devices, including older smartphones, tablets, smart TVs, and media players. Although H.265 support is growing, some older devices may not support native playback.
5. Encoding Complexity
H.264 is easier and faster to encode than H.265. H.265 encoding requires more powerful hardware, such as high-end CPUs or dedicated GPUs, due to its higher complexity. It may take longer and consume more resources during encoding, which can be challenging on devices with limited processing power.
H.265 vs H.264: Which One to Choose?
It’s really up to your needs. Both codecs have their own advantages and disadvantages. H.264 has a solid foundation and broad support, making it a reliable choice for many applications, including old devices.
On the other hand, H.265 offers better compression efficiency. It can achieve the same quality with a smaller file size, offer better visual quality at low bitrates, and support higher resolutions. It’s the codec for the future of video. However, it has poor compatibility with old devices and needs more powerful hardware to function.

How to Convert H.264 to H.265 and Vice Versa
Converting H.264 to H.265 can reduce video file size while maintaining similar visual quality. Here are 3 ways to convert
Fast steps:
- Open a converter (MiniTool Video Converter, FreeFileConvert, or Handbrake)
- Import the H.264 file.
- Choose the output folder.
- Set the output format.
- Start conversion.
Best HEVC converter/H264 converter
- MiniTool Video Converter
- FreeFileConvert
- Handbrake
Option 1. MiniTool Video Converter
MiniTool Video Converter supports a wide range of codecs and formats, including H.264 and H.265, allowing users to easily convert videos between them. It also offers fast conversion with hardware acceleration, batch conversion for up to 5 files, and customizable output settings.
Here is a guide on how to use it to convert H.264 to H.265:
1. Open MiniTool Video Converter.
Download and install MiniTool Video Converter on the PC. Then, launch it.
MiniTool Video ConverterClick to Download100%Clean & Safe
2. Add the H.264 file.
Under the Convert Video tab, select Add Files to add the H.264 file you want to convert.
3. Open the output format window.
Click the gear icon to open the output format. Go to the Video tab and choose MP4. Then you will see multiple presets with different resolutions.

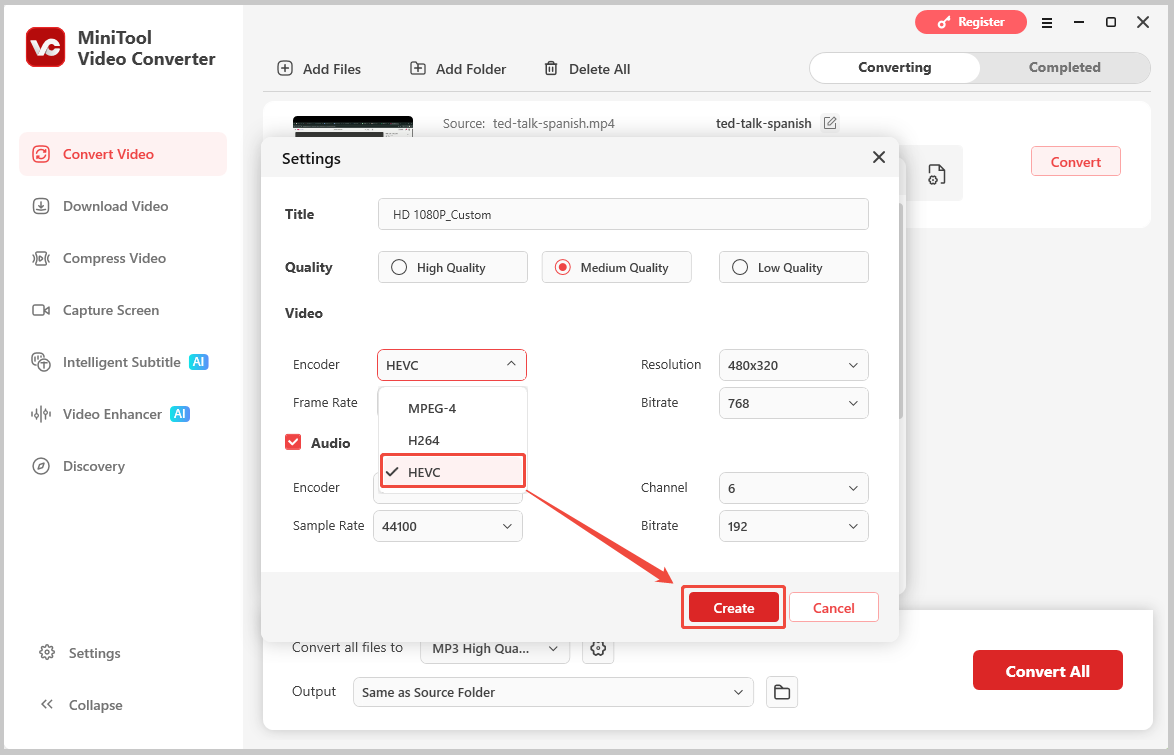
4. Choose HEVC as the video codec.
Hover your mouse over the preset you like and click the pen icon. In the advanced settings window, expand the Encoder option in the Video section and choose HEVC from the list. Then, click Create and then choose the newly created preset.
5. Set the save location.
Open the Output drop-down menu and select a folder to save the converted file.
6. Convert and check the file.
Click Convert to begin the conversion. Then, click the folder icon to check the converted file.
Option 2. FreeFileConvert
FreeFileConvert is a free online tool that lets you easily convert H.264 to H.265. Here is how to use it.
1. Visit the official website.
Go to https://freefileconvert.com/.
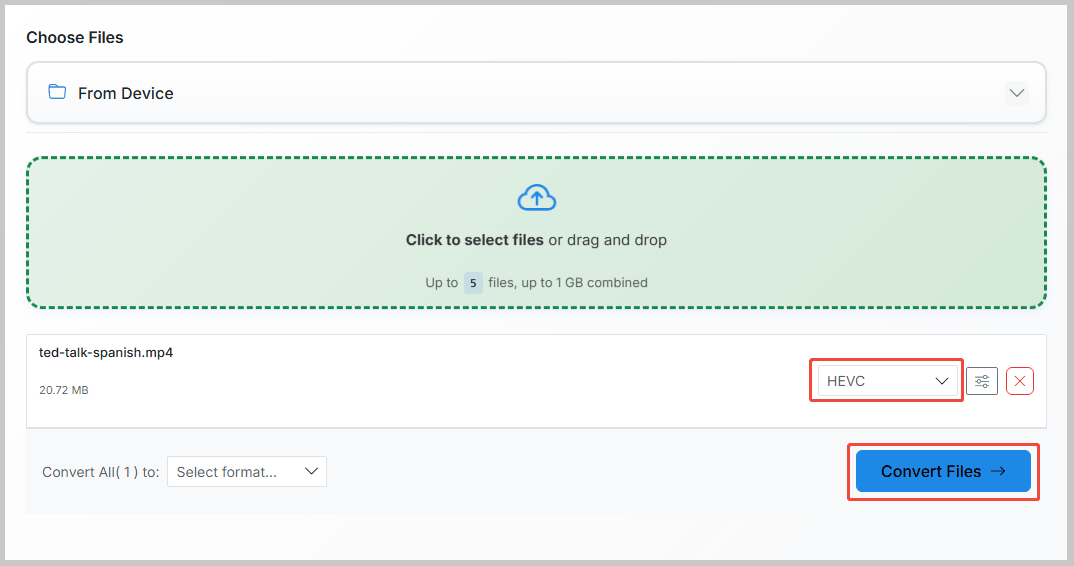
2. Upload the H.264 file.
Click the Choose File button to choose the source H.264 file to upload.
3. Choose the output format.
Then open the output format dropdown and select HEVC (H.265).
4. Start conversion.
Click the Convert Files option to convert H.264 to H.265. After the conversion, you can either download the converted file or delete it from the Download page.
To convert H.265 to H.264, choose MP4 in the output format menu.
Option 3. Handbrake
Handbrake is a free H.264 file converter that runs Linux, macOS and Windows. It supports a variety of input formats and can convert any popular video to MP4, M4V, MKV, and WebM. Besides, this H264 converter is capable of adding SRT subtitle files to videos.
Here’s how to convert H264 to MP4.
1. Install HandBrake.
Open the Handbrake website and download the Handbrake app. Then complete the installation on the computer.
2. Import the H.264 file.
Launch Handbrake and click on File to import the H264 video file.
3. Set destination.
From the Save As box, click on Browse to change the destination folder.
4. Change file extension.
Then change the file extension .m4v to .mp4.
5. Start conversion.
Press on Start Encoder to convert H264 to MP4.

The 3 converters above also support converting H.265 to H.264 to improve compatibility with more devices, media players, and platforms.
Conclusion
H.264 vs H.265, the former works well for wider support, the latter delivers better compression. Using the right converter makes switching between these codecs easier.
If you need any help while using MiniTool Video Converter, feel free to contact the MiniTool team via support@minitool.com.
User Comments :