What Is Topaz Video Enhance AI?
Topaz Video AI, formerly known as Topaz Video Enhance AI, is a video enhancement tool developed by Topaz Labs. It uses advanced AI models to perform upscaling, noise reduction, and sharpening of videos. Topaz Video AI can convert low-resolution videos to 4K or 8K resolution. It doesn't just resize the video, it also increases the pixel count to make the enlarged video clearer.
Many people use Topaz Video AI to restore old videos. It also fixes shaky or soft footage in professional projects. In addition, it sharpens screen recordings that have low bitrates or strong compression.
Topaz Video AI is a paid software. However, it offers a free trial version for users to experience its features. The Topaz Video AI trial version can only export videos with watermarks. To experience the full features and export complete videos, a license is required, typically starting at around $199.
Why Topaz Video Enhance AI Not Using GPU
Many users have noticed that Topaz Video Enhance AI does not utilize the GPU while running. This issue can be caused by a variety of causes. Here are some common reasons:
Reason 1. Topaz Video Enhance AI automatically selects a different graphics card.
By default, Topaz employs the automatic selection feature. Therefore, it may sometimes fail to correctly identify the dedicated graphics card (GPU), thereby reverting to using the CPU or integrated graphics for processing.
Reason 2. GPU memory usage limit set too low.
If the GPU memory usage limit is set too low in Preferences, Topaz Video Enhance AI may offload certain processing tasks to the CPU, rather than the GPU, in an effort to prevent system crashes.
Reason 3. Outdated drivers.
Outdated drivers may be unable to interface with the latest AI models utilized by Topaz Video Enhance AI. This will also cause the software not to use the GPU.
Reason 4. Corrupted software configuration.
After a Windows update, Topaz Video AI may behave abnormally. This occurs because major system updates can disrupt the connection between the software and the graphics card drivers.
Now that we have identified the potential reasons why Topaz Video AI might not be utilizing the GPU, I will provide the corresponding solutions in the next section.
How to Fix Topaz Video Enhance AI Not Using GPU
If Topaz Video AI is unable to utilize the GPU, the following 6 methods may help resolve the issue.
Fix 1: Set Processor to GPU in Preferences
If I do not specify a graphics card in the Topaz Video settings beforehand, the software will automatically select one. This means that Topaz Video may use the CPU or integrated graphics for processing rather than the dedicated GPU.
To avoid this, simply designate a specific NVIDIA or AMD graphics card in the AI Processor settings in Topaz Video. This forces the software to bypass its automatic detection mechanism and use the selected hardware resources. Here’s how:
Step 1: Open Topaz Video AI.
Launch the Topaz Video AI application on the computer.
Step 2: Navigate to Preferences.
Click on the File tab and choose the Preferences option. Then, the settings panel will pop up for configuring processing and hardware options.
Step 3: Go to the Processing tab.
Select the Processing tab within Preferences. This section controls how the software utilizes your system’s hardware resources for AI-driven video enhancement.
Step 4: Select the dedicated graphics card.
Under AI Processor, choose the dedicated GPU instead of leaving it on Auto or CPU. This forces Topaz Video to use the more powerful graphics card rather than defaulting to integrated graphics or processor-based rendering.
Fix 2: Increase VRAM Usage
VRAM (Video Random Access Memory) is a type of high-speed memory dedicated to GPUs. It is primarily used to store image data, textures, and frame buffers, thereby ensuring that graphics are rendered smoothly on the display. Upscaling videos, particularly high-resolution videos, using Topaz Video AI consumes a significant amount of VRAM.
If the VRAM usage limit is set too low within the Preferences menu, Topaz Video AI may offload certain processing tasks to the CPU to prevent system crashes. Therefore, if Topaz is not using the GPU, manually configure the software to fully utilize your GPU's VRAM.
How to fix Topaz Video Enhance AI not using GPU? Follow the steps below to set the GPU memory usage:
Step 1: Access Preferences.
Open Topaz Video AI, click the File option, and choose Preferences from the top menu bar.
Step 2: Navigate to the Processing tab.
Select the Processing tab to access hardware and memory configuration options.
Step 3: Go to GPU memory settings.
Find the Maximum Memory Usage or VRAM Usage option under the AI Processor section.
Step 4: Adjust the memory allocation.
Set the memory usage to High or increase the percentage value to maximize GPU utilization. It is important to note that if the allocated memory exceeds the machine's resource capacity, it may trigger errors. Therefore, the optimal allocation range is between 80% and 90% of the available memory. Reserving 10% to 20% of the memory helps prevent system instability or crashes.
Step 5: Save and restart.
Click OK to save the changes. Then, restart Topaz Video AI to ensure the new memory settings take full effect.
If the methods above do not resolve the issue of Topaz Video Enhance AI not using GPU, try the other methods below.
Fix 3: Update Drivers
Outdated graphics drivers prevent Topaz Video AI from using the GPU. This is because this software relies on modern GPU acceleration technologies (such as CUDA from NVIDIA) to operate, and these technologies require the latest API support to function correctly. Therefore, try to install the latest Studio Drivers (NVIDIA) or Adrenalin Drivers (AMD) to ensure compatibility. Here’s how:
#1 Install NVIDIA Studio Drivers
Step 1: Go to the official NVIDIA driver page.
Visit the official NVIDIA driver website: https://www.nvidia.com/en-us/drivers/.
Step 2: Choose the GPU.
In the Manual Driver Search area, choose the Product Category, Product Series, Product, Operating System, and language. Then, click Find.
Step 3: Download the GPU.
Click View and choose Download. Then, run the installer and choose Express (Recommended) installation. After that, restart the computer when prompted.
Step 4: Verify the installation.
Right-click on the desktop and go to NVIDIA Control Panel. Then, check the driver version in the bottom-left corner.
#2 Install AMD Adrenalin Drivers
Step 1: Download the driver.
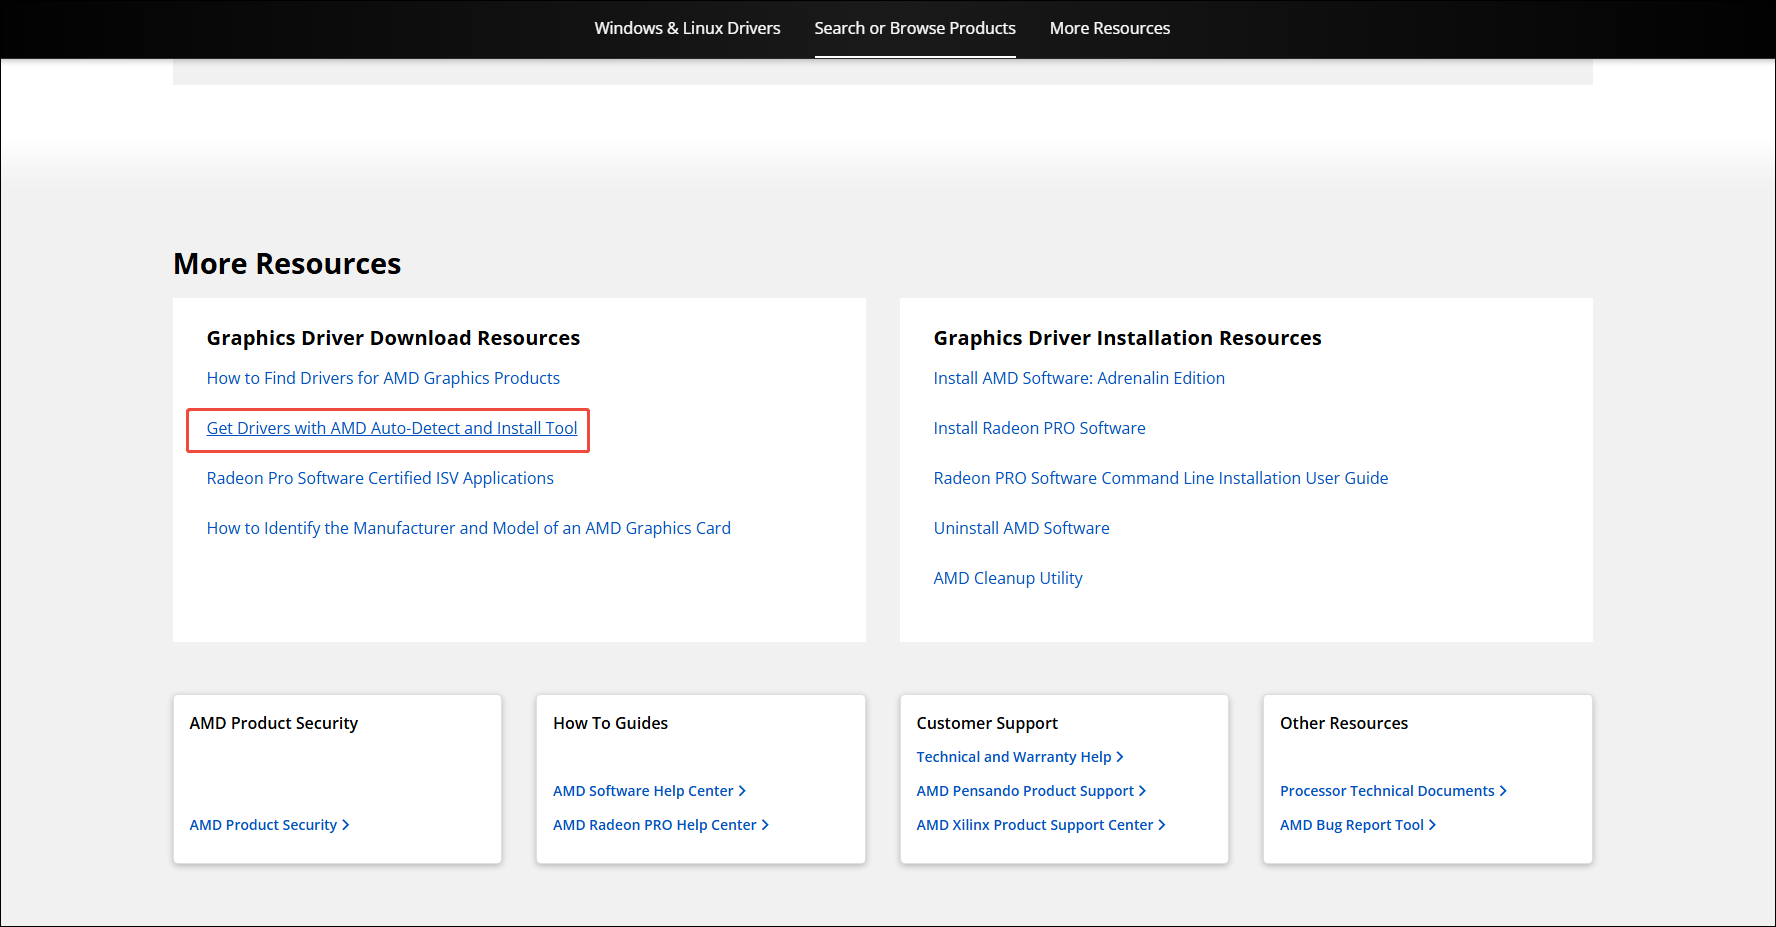
Visit the AMD Drivers and Support page. Then, scroll down to find the More Resources section, and click the Get Drivers with AMD Auto-Detect and Install Tool option. This is the recommended method to get the correct driver.
Step 2: Run the installer.
Open the downloaded file and then click Install to unpack it.
Step 3: Select installation type.
When the installer launches, choose Full Install to get the Adrenalin interface, which allows for in-app updates.
Step 4: Perform a factory reset.
In the installer, expand the advanced options and select Factory Reset to remove the previous drivers before the new installation begins fully.
Step 5: Complete and restart.
Follow the on-screen prompts and restart the computer to finalize the installation.
Fix 4: Using a Topaz Video AI Alternative
MiniTool Video Converter is a professional video enhancer. It uses a smart AI technology to improve video quality by upscaling, denoising, and sharpening. MiniTool Video Converter supports expanding video resolution to 2x or 4x the original. Furthermore, it uses intelligent pixel filling to maintain video clarity while enlarging the video.
MiniTool Video Converter handles a wide range of formats, including MP4, MKV, MOV, WebM, AVI, WMV, 3GP, FLV, and more. Enhanced videos are saved as MP4 files, enabling easy sharing and playback across devices. No watermarks or product logos are added after enhancement. Additionally, there are no limits on imported file sizes or the number of enhancements that can be performed.
Below is how I use MiniTool Video Converter to enhance video quality.
Step 1: Download and Install MiniTool Video Converter
Download and install MiniTool Video Converter following the on-screen prompts, then launch the application.
MiniTool Video ConverterClick to Download100%Clean & Safe
Step 2: Import the Target Video
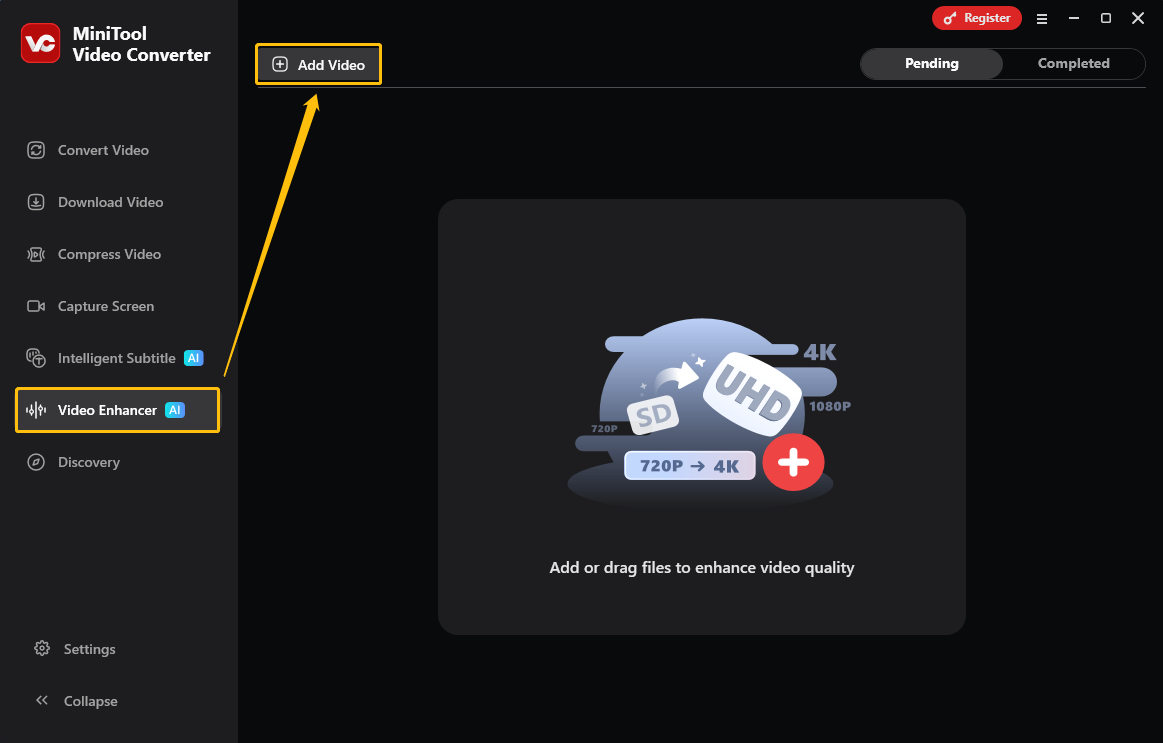
Select the Video Enhancer tab from the left menu, then click Add Video to import the desired video.
Step 3: Choose the Enhance Mode
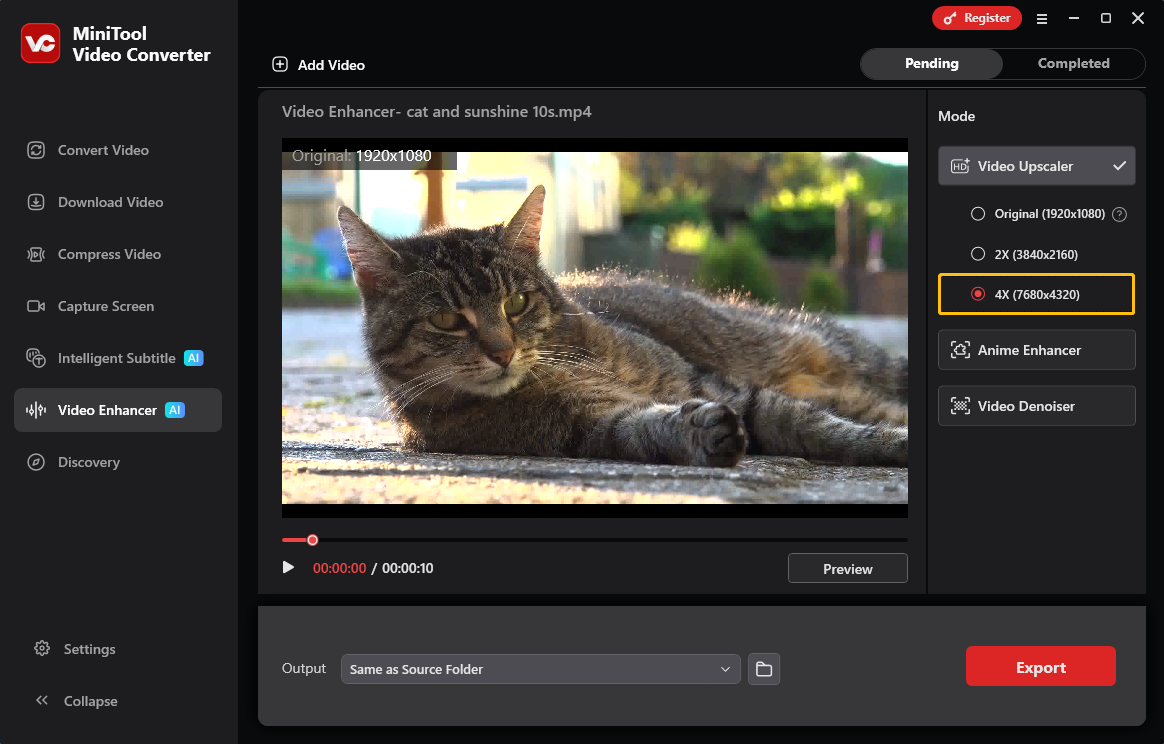
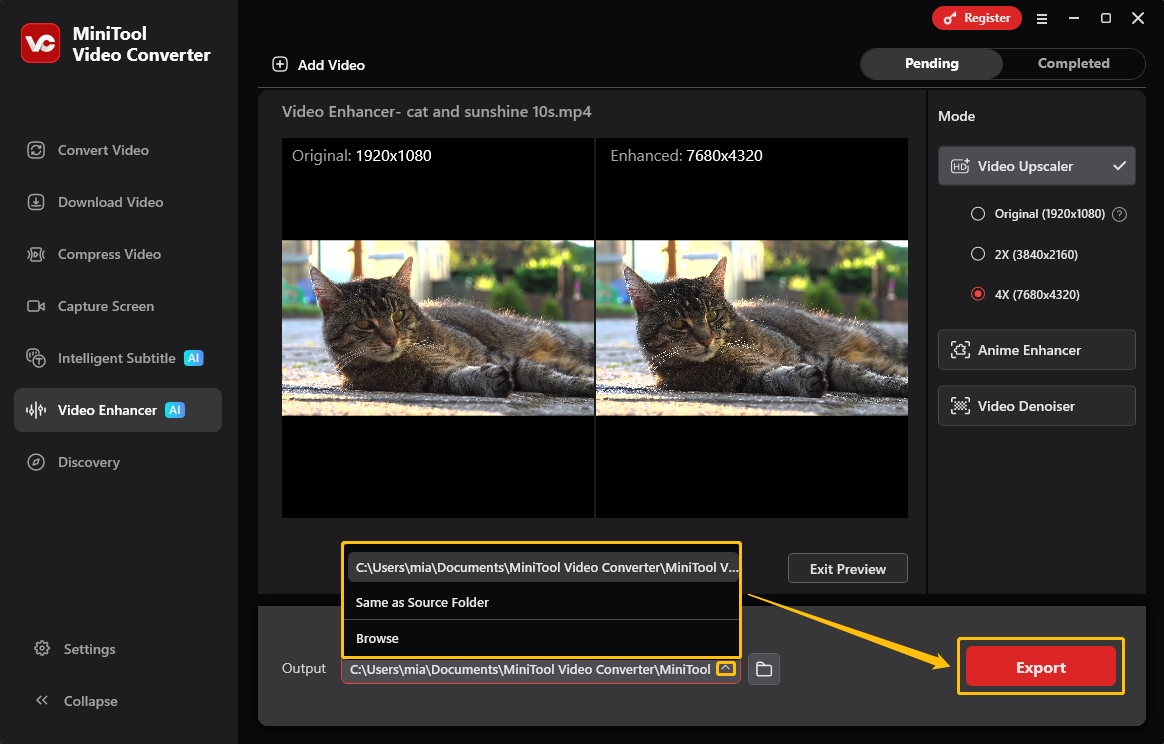
Once the video is imported, enhancement options appear in the panel on the right. Then, choose Video Upscaler, Anime Enhancer, or Video Denoiser as needed. Here, I select the Video Upscaler mode and choose 4X.
Step 4: Preview to Check the Effect
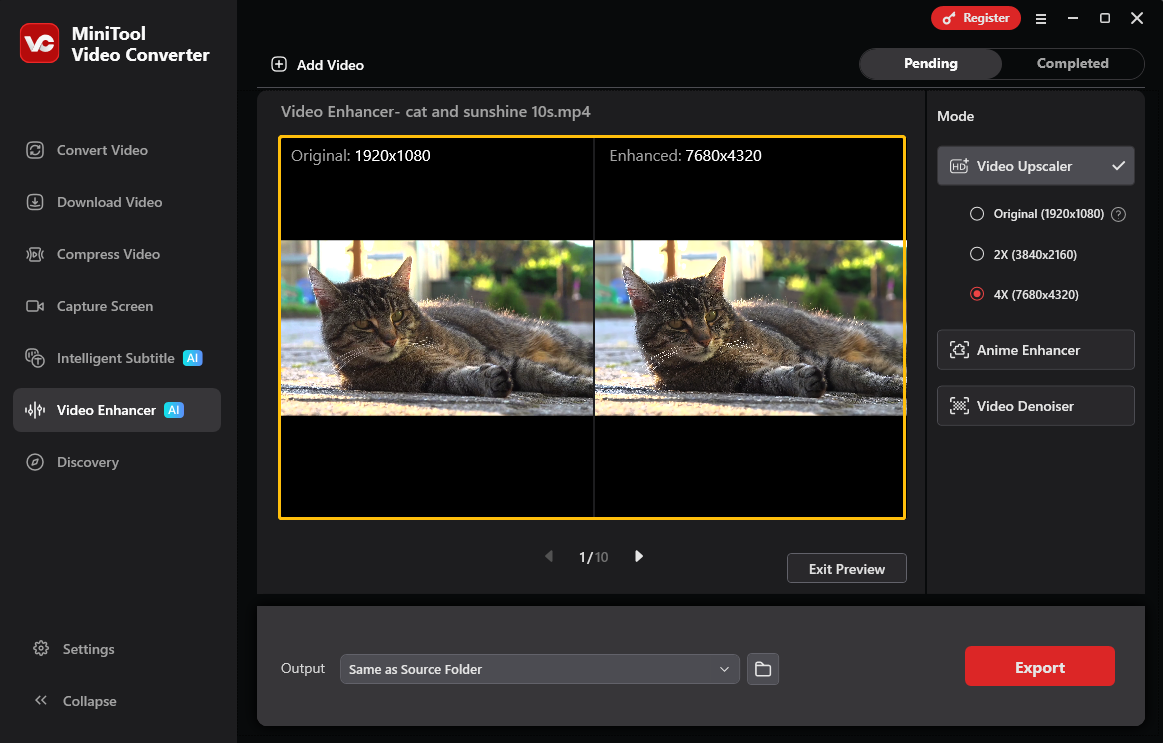
Once enhancement mode is selected, press Preview to check the results. The software extracts representative frames to build the preview, displaying the original and enhanced versions in a split-screen view for easy comparison.
Step 5: Choose the Output Folder and Export the Video
At the bottom of the interface, expand the Output section to designate a folder for the enhanced file. After that, click Export in the bottom-right corner to complete the process and save the finished video.
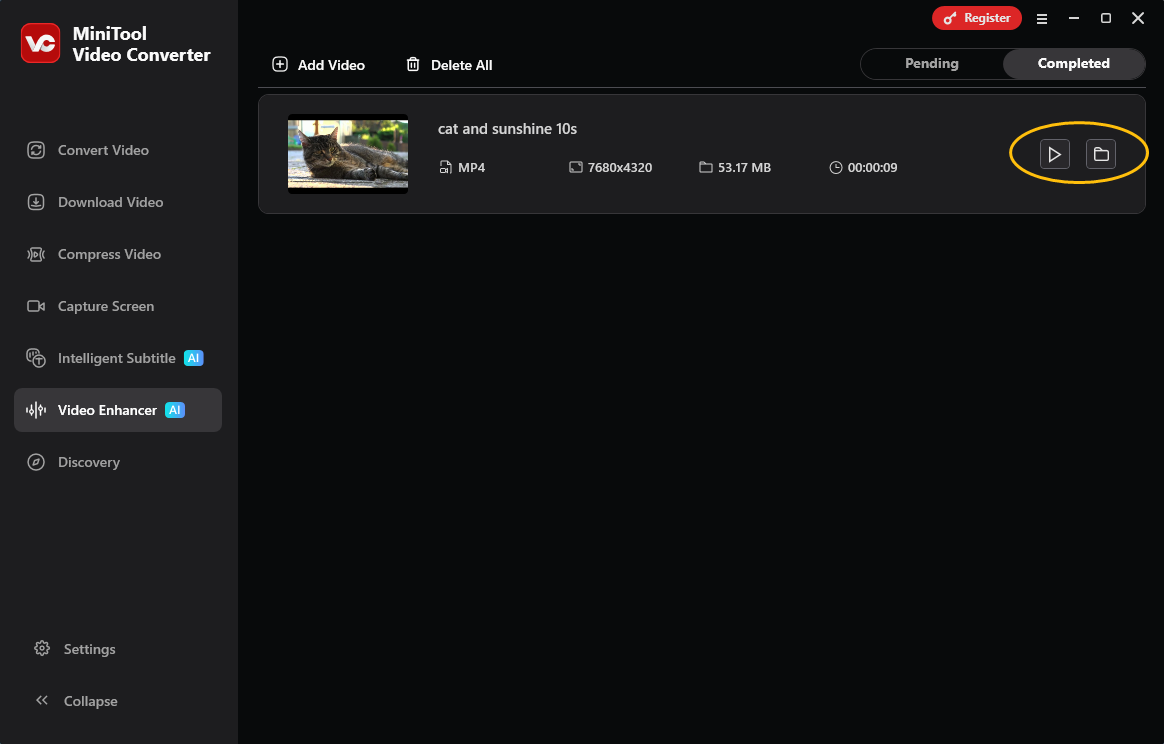
Step 6: Locate the Output Video
When the export process ends, the interface automatically shifts to the Completed tab to show all finished tasks. Click the play icon to preview the enhanced video, or click the folder icon to open the directory where the file is saved.
MiniTool Video Converter is very easy to use and runs smoothly. It can be used as an alternative if Topaz Video AI cannot utilize the GPU. MiniTool Video Converter also has additional capabilities such as video compression, file conversion, and audio/video transcription.
Fix 5: Set Windows Graphics
Windows may default to using the integrated graphics card or incorrectly display 0% GPU usage, resulting in the Topaz Video AI not using GPU error. This issue can be resolved by selecting a high-performance driver and optimizing application settings.
Here is how to fix Topaz Video Enhance AI not using GPU by setting Windows graphics to high performance:
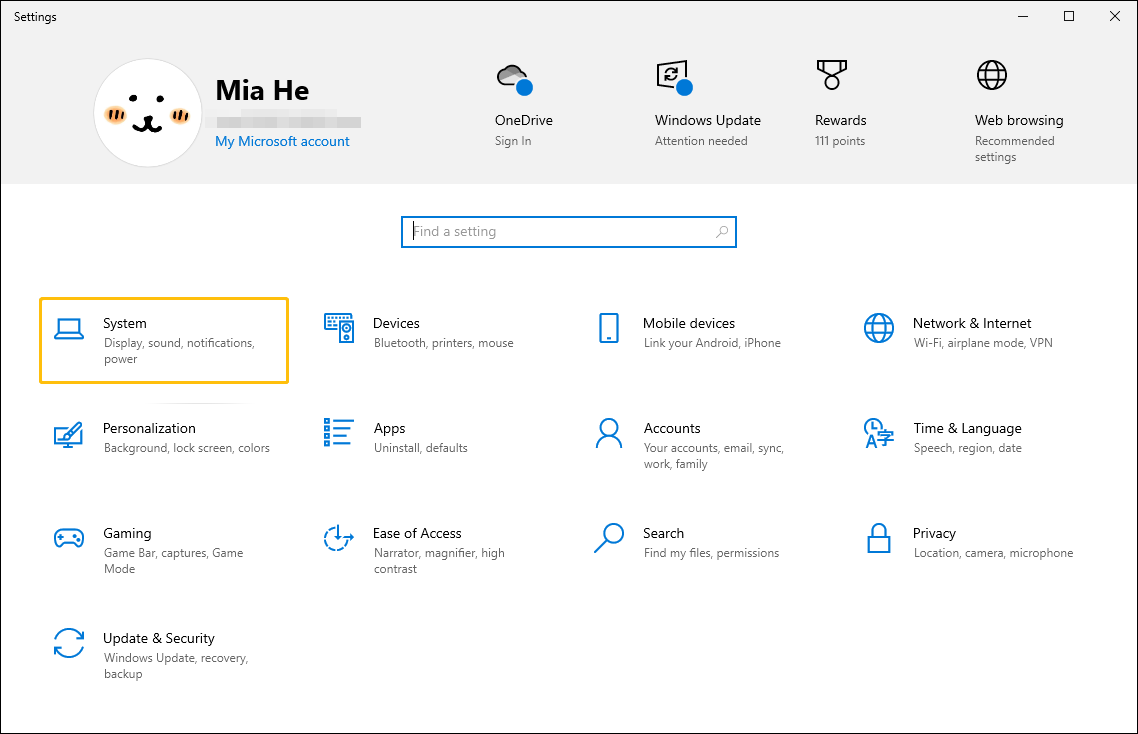
Step 1: Open the Windows Settings window.
Press Windows + I to open the Settings window. Then, select the System option.
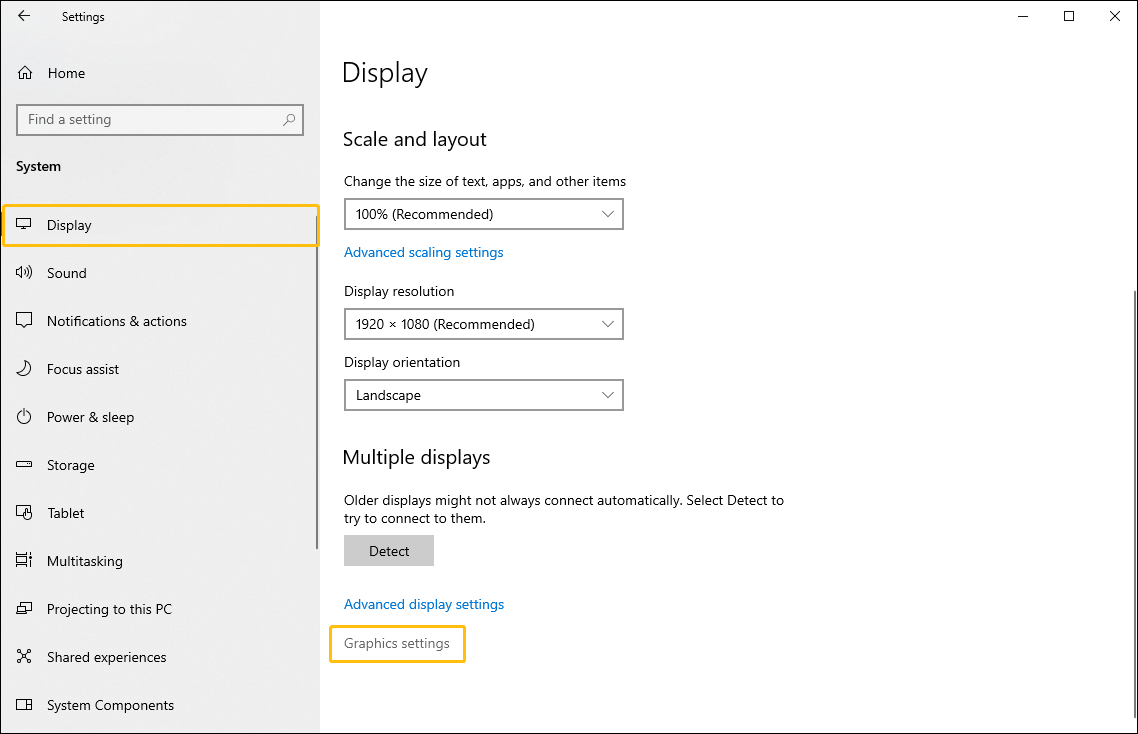
Step 2: Go to Windows Graphics settings.
In the Display tab, click the Graphics settings option.
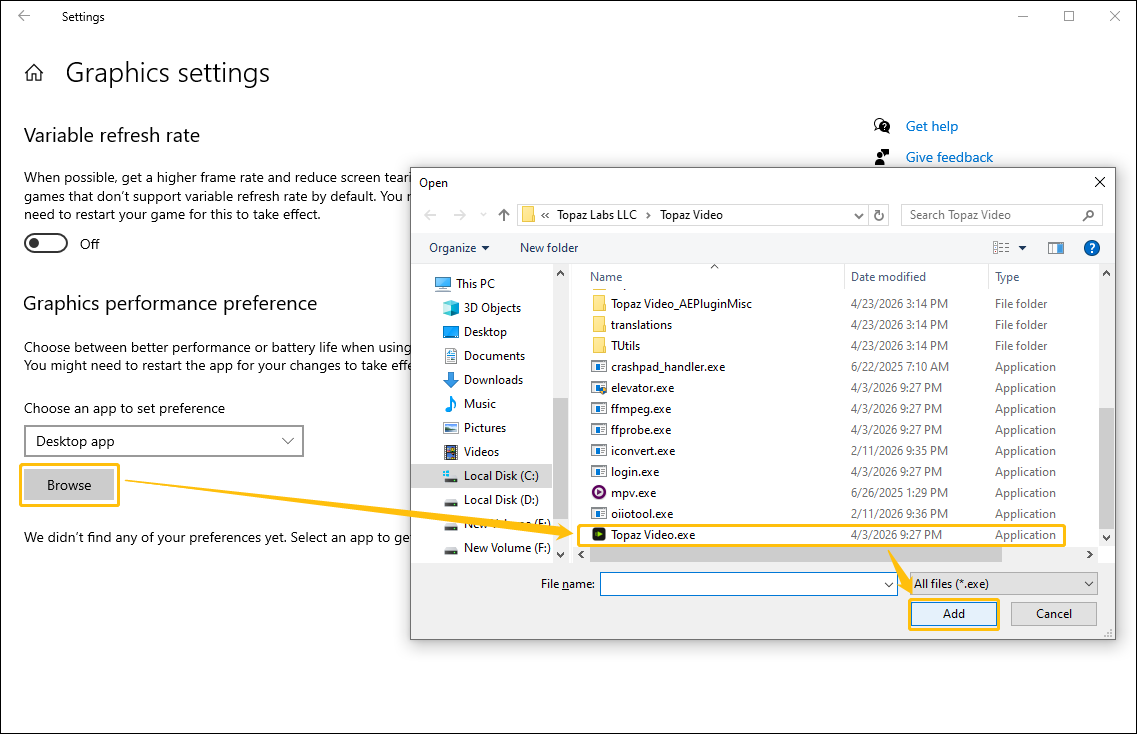
Step 3: Choose the Topaz Video AI app.
In the Graphics settings window, choose the Browser option, select the Topaz Video.exe file, and click Add.
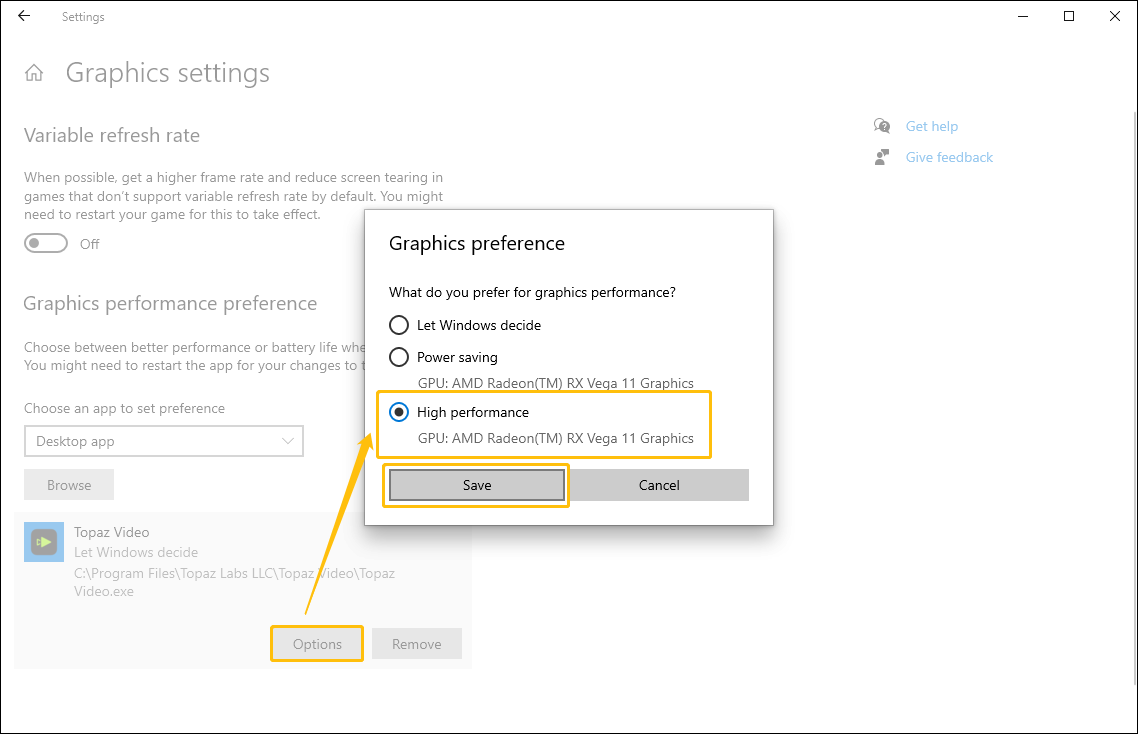
Step 4: Set High performance.
Click Options, select High performance in the Graphics preference window, and click on Save.
Many users have successfully resolved the Topaz Video Enhance AI not using GPU issue using the methods described above. The steps are also quite simple.
Fix 6: Reinstall Software
If the above methods fail to resolve the issue, uninstalling and reinstalling Topaz Video AI is recommended. Corruption in the software's installation files or AI model can also prevent it from using the GPU. Furthermore, sometimes, after updating graphics drivers or adding new hardware, Topaz Video AI fails to detect the GPU in the AI Processor preferences.
Reinstalling Topaz Video AI can repair corrupted application files, reset misconfigured AI processor settings, and refresh driver communication between the software and the graphics card. Additionally, reinstallation usually forces a re-detection of available hardware, enabling it to correctly recognize and use the GPU after driver updates or hardware changes.
Conclusion
This article explains why Topaz Video Enhance AI not using GPU. Based on user feedback, I’ve compiled six of the most effective methods. Using other free video enhancers, such as MiniTool Video Converter, is the most convenient approach. Additionally, setting Topaz Video AI to high performance in Windows Graphics Settings is also effective.
If any difficulties arise when using MiniTool Video Converter, contact support@minitool.com.
User Comments :