Buffer supports video uploads up to 100 MB on Instagram, 10 GB on YouTube Shorts, and 1 GB on TikTok and other supported social media platforms. How to break Buffer video size limit? This post will recommend 4 tools to help you compress video for Buffer, including MiniTool Video Converter and MiniTool MovieMaker.
What Is Buffer?
Buffer is a social media management platform. It can help you manage multiple social media accounts at the same time and improve your work efficiency. Here are some key features supported by Buffer:
#1. Analyze Your Social Media Posts
Buffer includes an analytics tool that can help you measure the performance of your posts. With this tool, you can better understand your audience’s needs. In addition, it provides some suggestions on how to increase engagement on your social media accounts.
#2. Schedule Your Posts or Videos
Buffer allows you to schedule posts or videos on different social media platforms in advance. This will greatly improve your working efficiency and save your time. You can also post the same content to multiple social media platforms to ensure consistency.
#3. Manage Facebook and Instagram Comments
Buffer allows you to reply to and organize Facebook and Instagram comments directly from its dashboard. You can see unanswered comments and some comments that require urgent response.
#4. Support Multiple Social Media Platforms
Currently, Buffer supports content scheduling, publishing, and analysis for multiple popular platforms, including Facebook, Instagram, TikTok, LinkedIn, X (formerly Twitter), Pinterest, Google Business Profile, Threads, Bluesky, and Mastodon.
What’s the Buffer Video Size Limit?
As we mentioned above that Buffer supports uploading videos to multiple social media platforms. But did you know that Buffer has a size limit for uploading videos? When you use Buffer to send videos to various social platforms, you need to pay attention to the size of the video.
Buffer has a limit on the size of uploaded videos. However, the limit is different for each social platform. For example, the size of Instagram videos cannot exceed 100MB, while the size of YouTube Shorts videos can be up to 10GB.
The specific Buffer video size limits for uploading to various social media are as follows:
- Instagram: Up to 100MB for both posts and reels.
- YouTube Shorts: Up to 10GB.
- Mastodon: Up to 40MB.
- TikTok, Facebook, X (Twitter), LinkedIn, Pinterest, and Threads: Up to 1GB.
If the video you want to upload exceeds Buffer’s video size limit, it’s best to reduce its size before uploading. Also, pay attention to the video formats Buffer supports:
- X (Twitter), Facebook, LinkedIn, and Pinterest: MP4, MOV, AVI, and M4V.
- TikTok: MOV, MP4, and WebM.
- Instagram and Threads: MP4 and MOV.
- YouTube Shorts: MOV, MP4, MPG, MPEG, AVI, and WebM.
How to Bypass Buffer Video Size Limit?
If you want to use Buffer to upload videos to social media platforms, you must ensure that the video size is within Buffer’s video size limit. The best way to do this is to use a video compressor to compress video for Buffer, which allows you to reduce the file size without losing quality.
Of course, you can also reduce the video size by shortening the video length, reducing the video resolution, frame rate, and bitrate. In the following sections, I will introduce you to 4 tools that can compress videos for free.
Method 1: Use MiniTool Video Converter (Offline)
If the video you want to upload exceeds the Buffer size limit, you can use a dedicated video compressor to reduce your video file size. MiniTool Video Converter is a free video compressor that supports compressing your video files without losing quality.
Actually, MiniTool Video Converter is a multi-functional application for Windows. Video compression is one of its features. It supports importing multiple video formats, including MP4, MOV, MKV, AVI, WMV, M4V, MPEG, VOB, etc.
In addition, you can import multiple video files at once for batch compression. MiniTool Video Converter allows you to compress up to 5 files at the same time. This can save time and get the compressed video quickly!
Another feature of MiniTool Video Converter that attracts me is that it has no watermark. The videos compressed with it will not have annoying watermarks added. Moreover, it does not limit the length and number of videos that you can import.
MiniTool Video Converter can be a perfect Buffer video compressor. How to use this application to compress video size for Buffer? So easy, just follow the steps below:
Step 1. Install and Launch MiniTool Video Converter
Click the button below to install MiniTool Video Converter on your computer. Then, launch it.
MiniTool Video ConverterClick to Download100%Clean & Safe
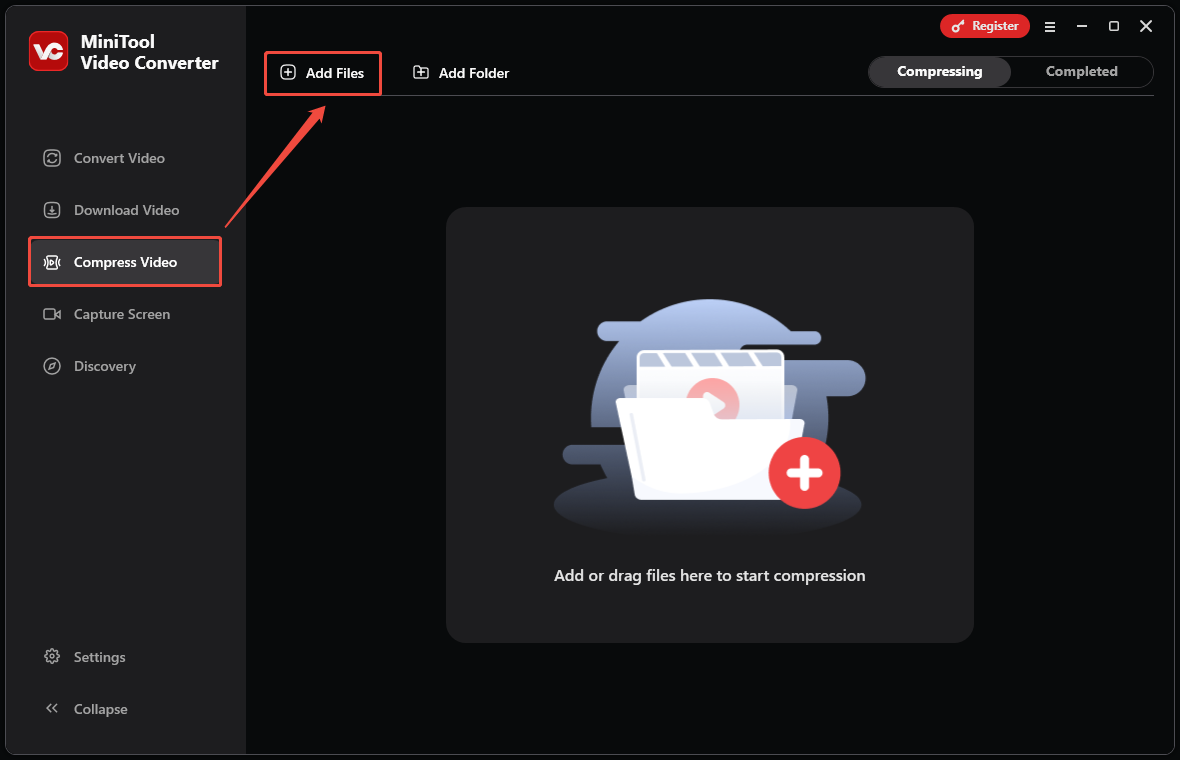
Step 2. Import Your Video Files
Choose the Compress Video tab on the left menu. Then, click Add Files to import the video you want to compress.
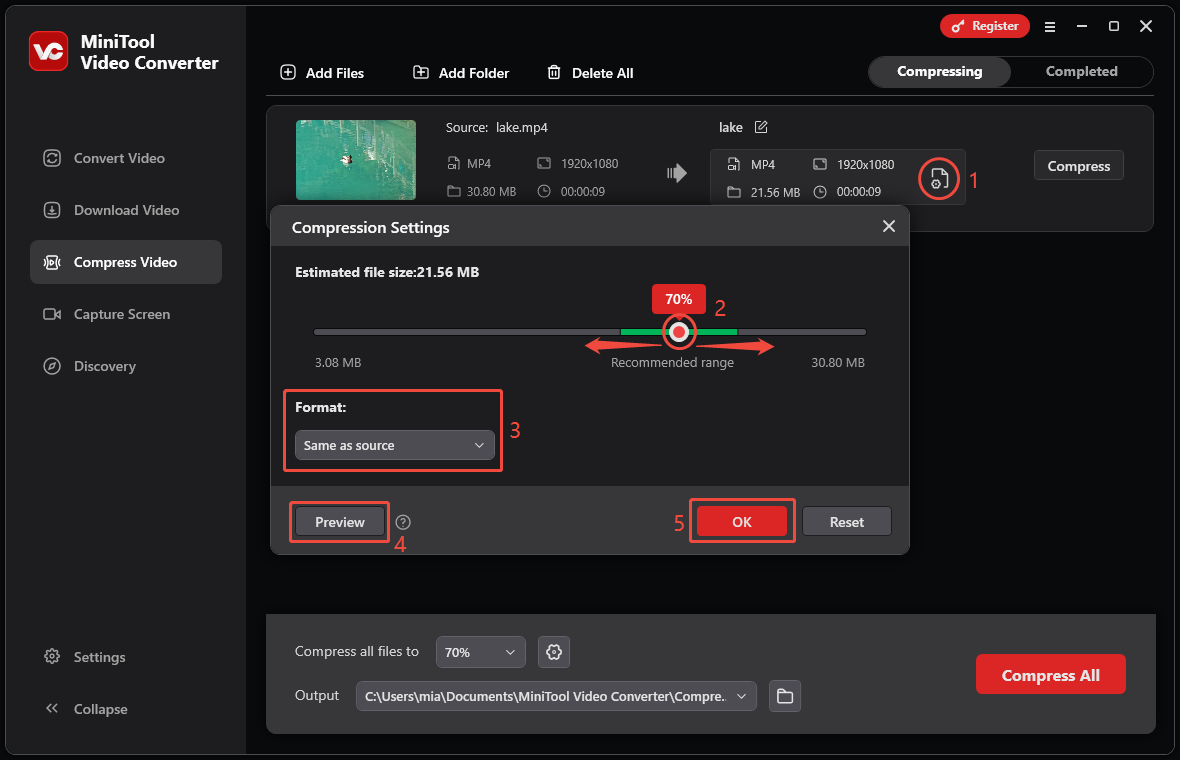
Step 3. Adjust the Compression Settings
Once your video is uploaded, click on the gear icon to open the Compression Settings window. Then, you can move the red dot on the slider to set the compression level. After that, choose the output format you want (MP4, WebM, or MKV).
If you want to preview the compressed video, just click the Preview button to check its quality. Then, click OK to save all the changes.
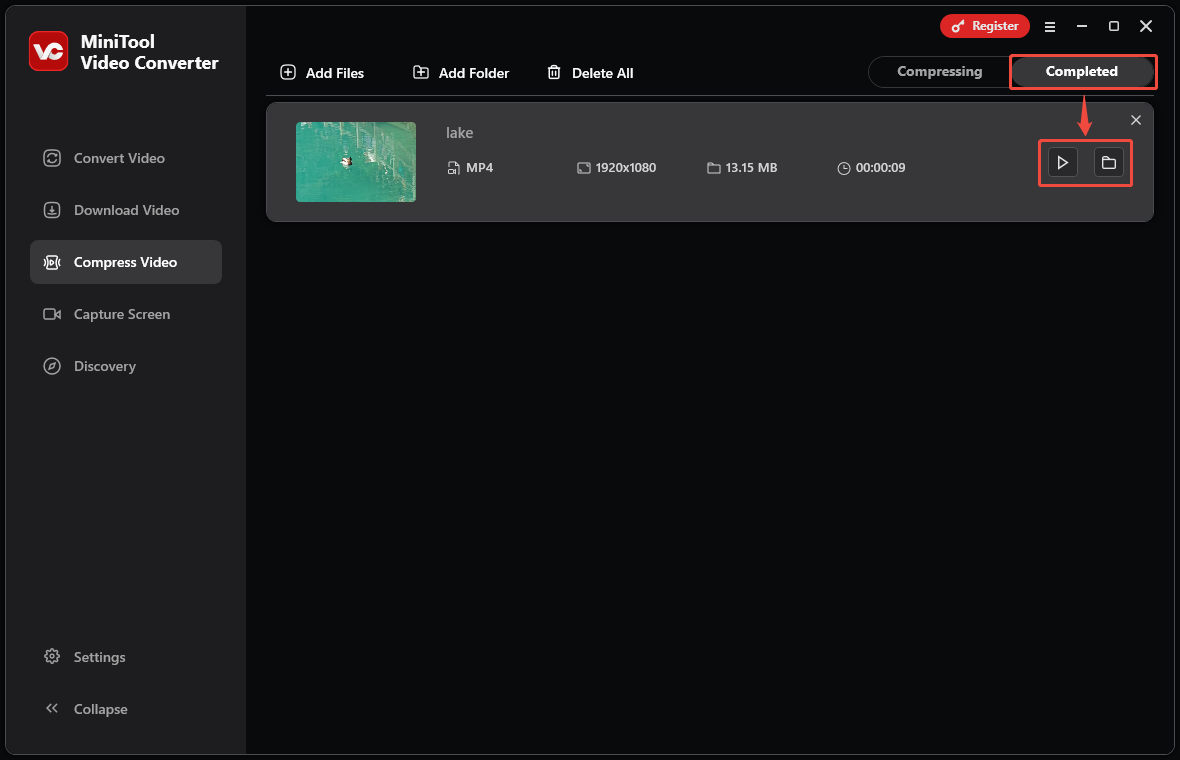
Step 4. Compress the Video and Check the Completed Task
Click Compress to start compressing. After the video is compressed, it will automatically jump to the Completed interface. Here, you can see the completed compression tasks. Then, click the play icon to play the compressed video directly. You can also click the folder icon to locate the location where the compressed file is saved.
Method 2: Use Clideo (Online)
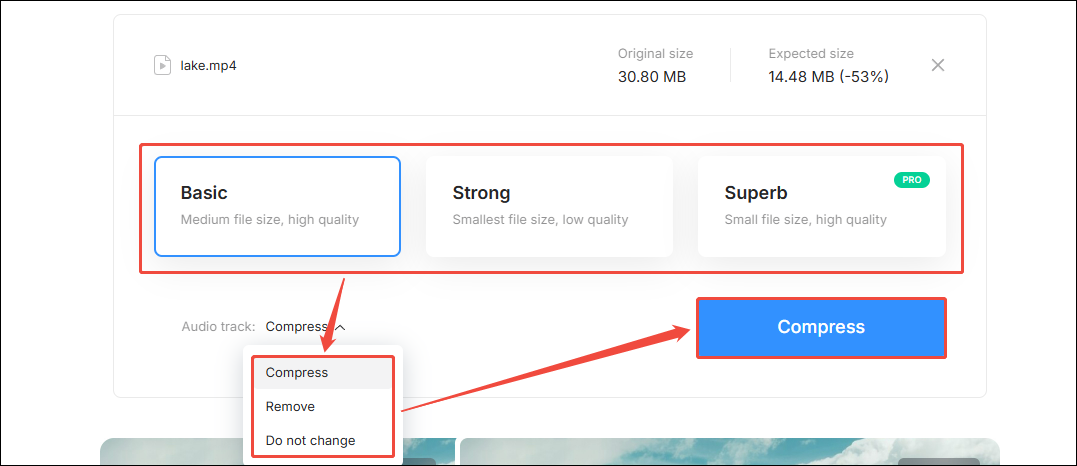
Clideo is a website that offers many online video tools. The video compressor is one of the useful tools. It can provide you with 3 compression strengths. Also, it allows you to view the compressed video file size. Additionally, you can compress the audio in the video or remove it to further reduce the video file size.
Here is a guide on how to use Clideo video compressor to shrink video size for Buffer:
Step 1. Navigate to Clideo’s Video Compressor Page
Visit https://clideo.com/compress-video on your computer.
Step 2. Add the Video File You Want to Compress
Click the Choose file button to add the video you want to compress.
Step 3. Choose the Compression Level and Start Compressing
Once the video is uploaded, you can choose the compression level (Basic, Strong, and Superb). Then, you can choose to compress the audio of the video, remove the audio of the video, or do nothing. Finally, click the Compress button.
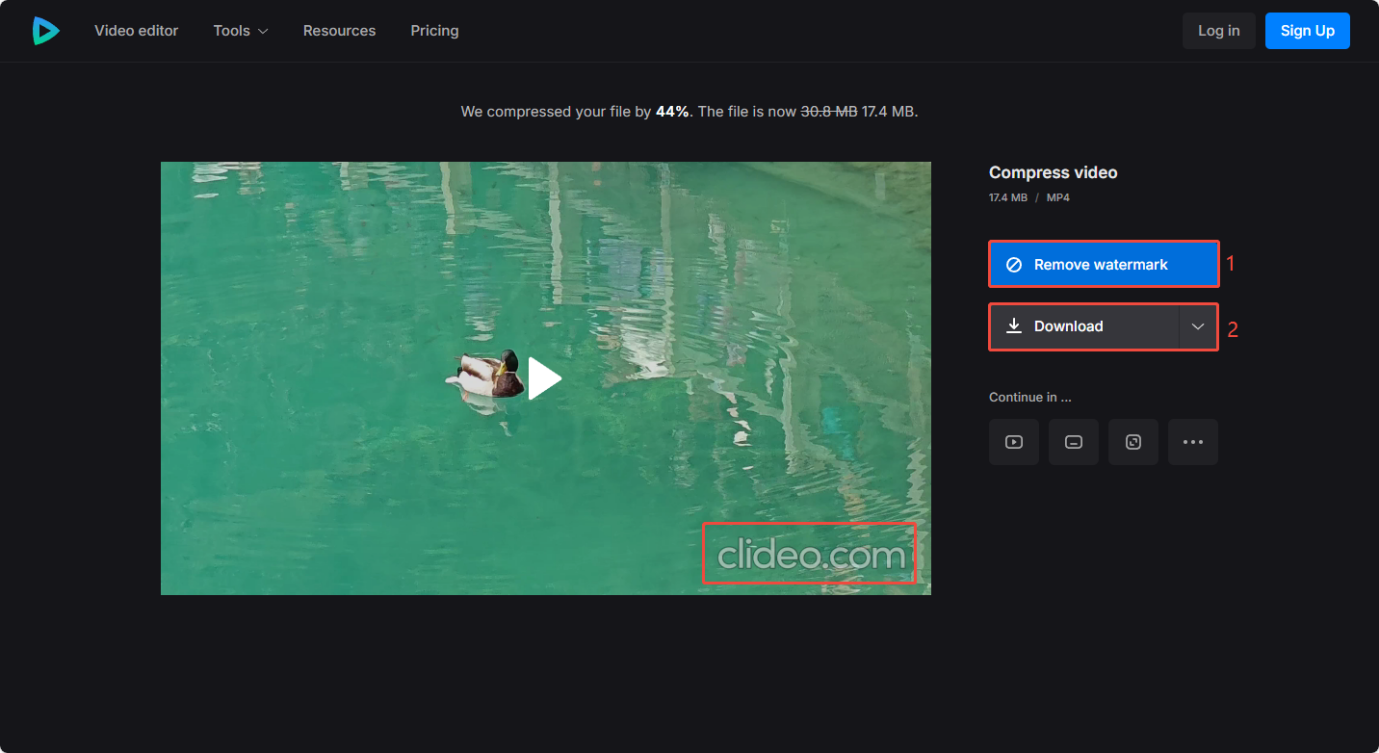
Step 4. Remove the Watermark and Download
After the video is compressed, you can see the watermark in the lower-right corner of the video. You can choose the Remove watermark button to pay to remove the watermark. You can also click the Download button to directly download the video with the watermark.
Using desktop or online video compressors is the fastest way to reduce file size. You can also use a video editor to delete unwanted sections of your video before uploading it to Buffer. In this way, you can not only reduce the video file size, but also present the most important information to your audience.
Method 3: Use MiniTool MovieMaker
As we all know, video duration and video parameters affect the size of video files. So, we can reduce the video size by reducing the duration, resolution, bitrate, and frame rate of the video. MiniTool MovieMaker is an easy-to-use video editor that allows you to trim your videos and adjust video speed to shorten the video duration. In addition, it also supports adjusting video parameters. You can use this free application to reduce video size for Buffer.
Now, let’s see how to shrink video size with MiniTool MovieMaker:
Step 1. Install MiniTool MovieMaker
You can click the button below to get the latest version of MiniTool MovieMaker.
MiniTool MovieMakerClick to Download100%Clean & Safe
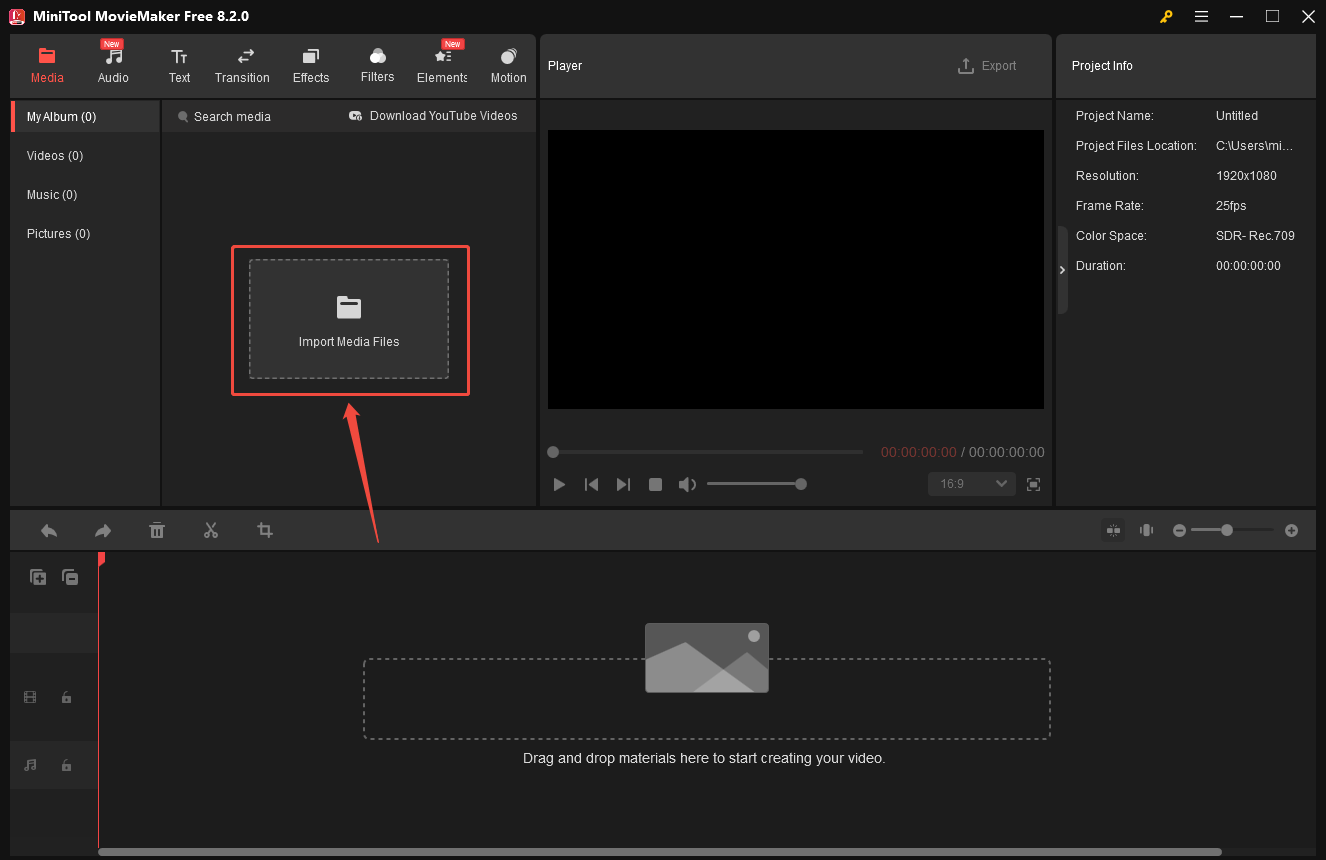
Step 2. Import the Video
Launch MiniTool MovieMaker on your computer. Then, close the promotion window. In the main MiniTool MovieMaker interface, click Import Media Files to add the video. Then, drag and drop the video onto the video track.
Step 3. Shorten the Duration of Your Video
To shorten the video, you can choose to delete unwanted video clips:
- Click the video on the track.
- Move the playhead to the beginning of the clip that you want to delete and click the scissors icon.
- Move the playhead to the end of the clip that you want to delete and click the scissors icon again.
- Right-click on the split clip and select Delete.

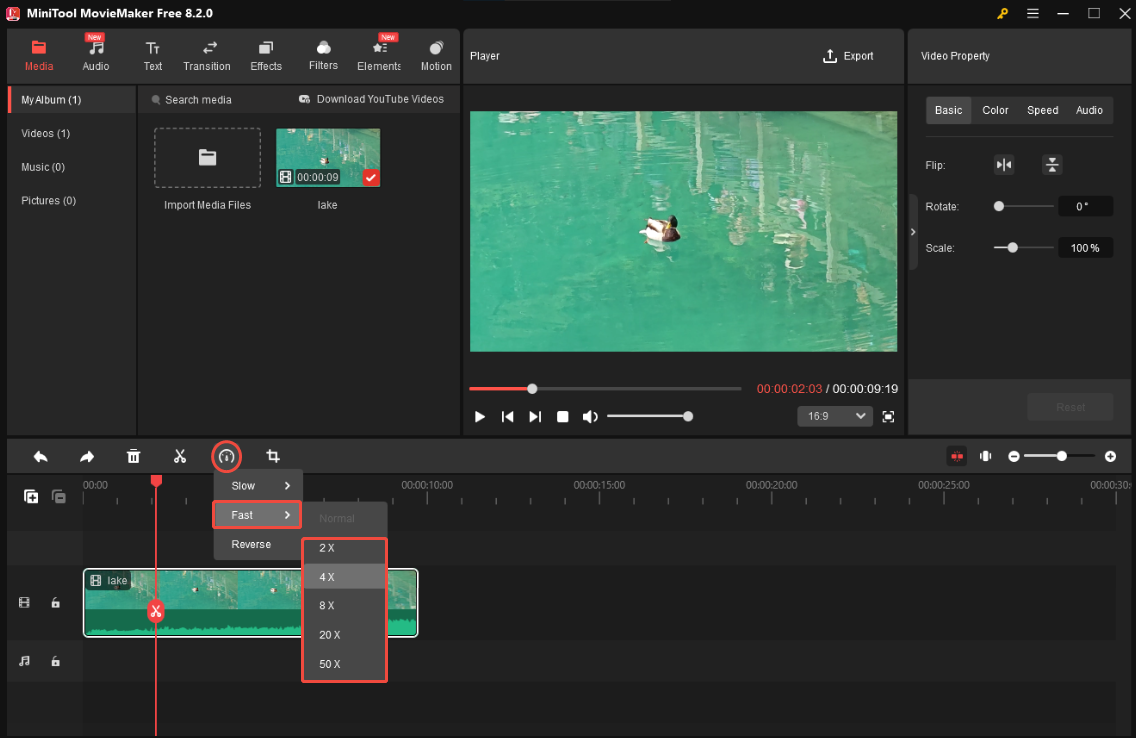
In addition, you can also speed up the video to shorten its length:
- Choose the video clip you want to speed up on the track.
- Click on the speed icon and choose Fast.
- Select a suitable playback speed.
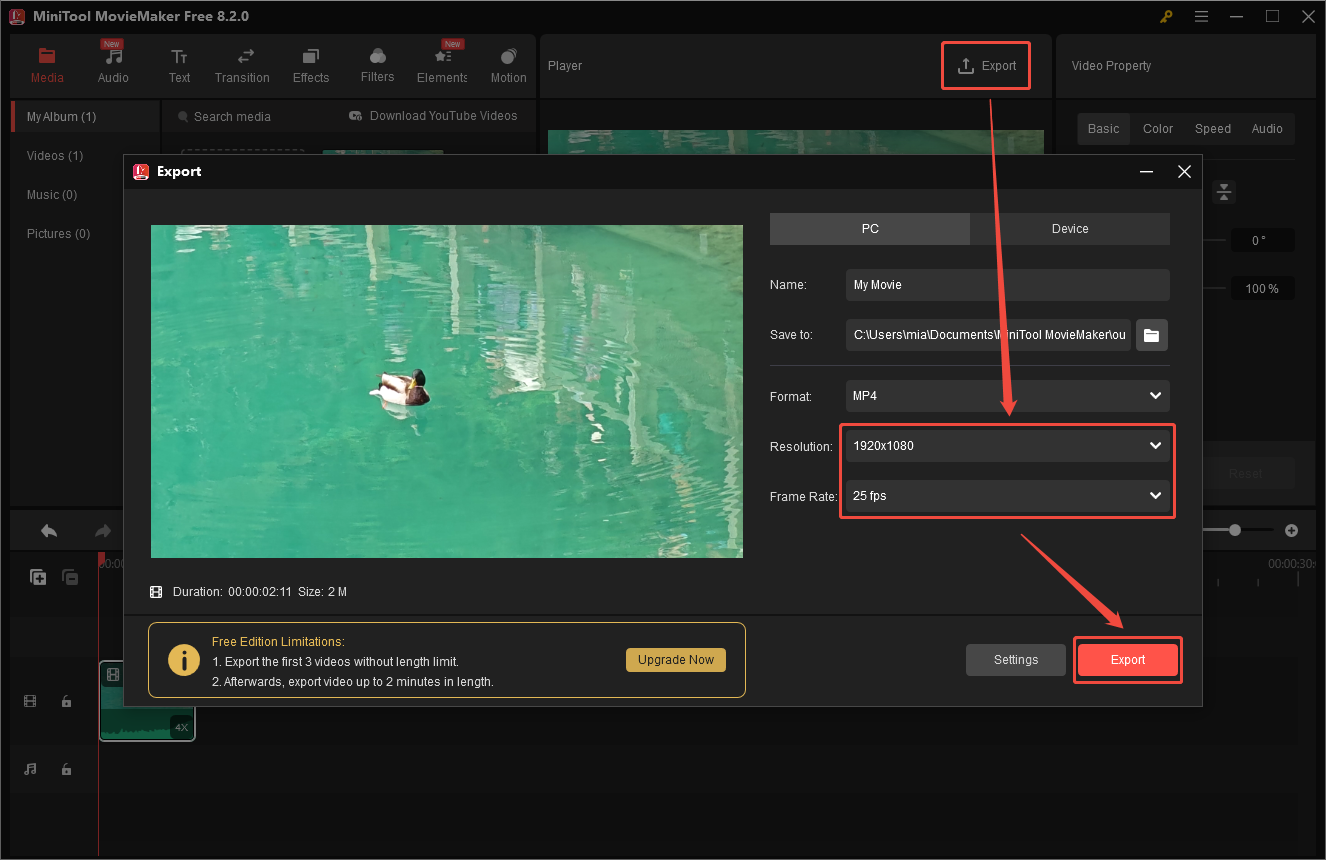
Step 4. Export the Video and Customize Its Parameters
Click the Export option in the top-right corner of the Player window. In the next pop-up window, choose a lower resolution and frame rate. Then, click Export.
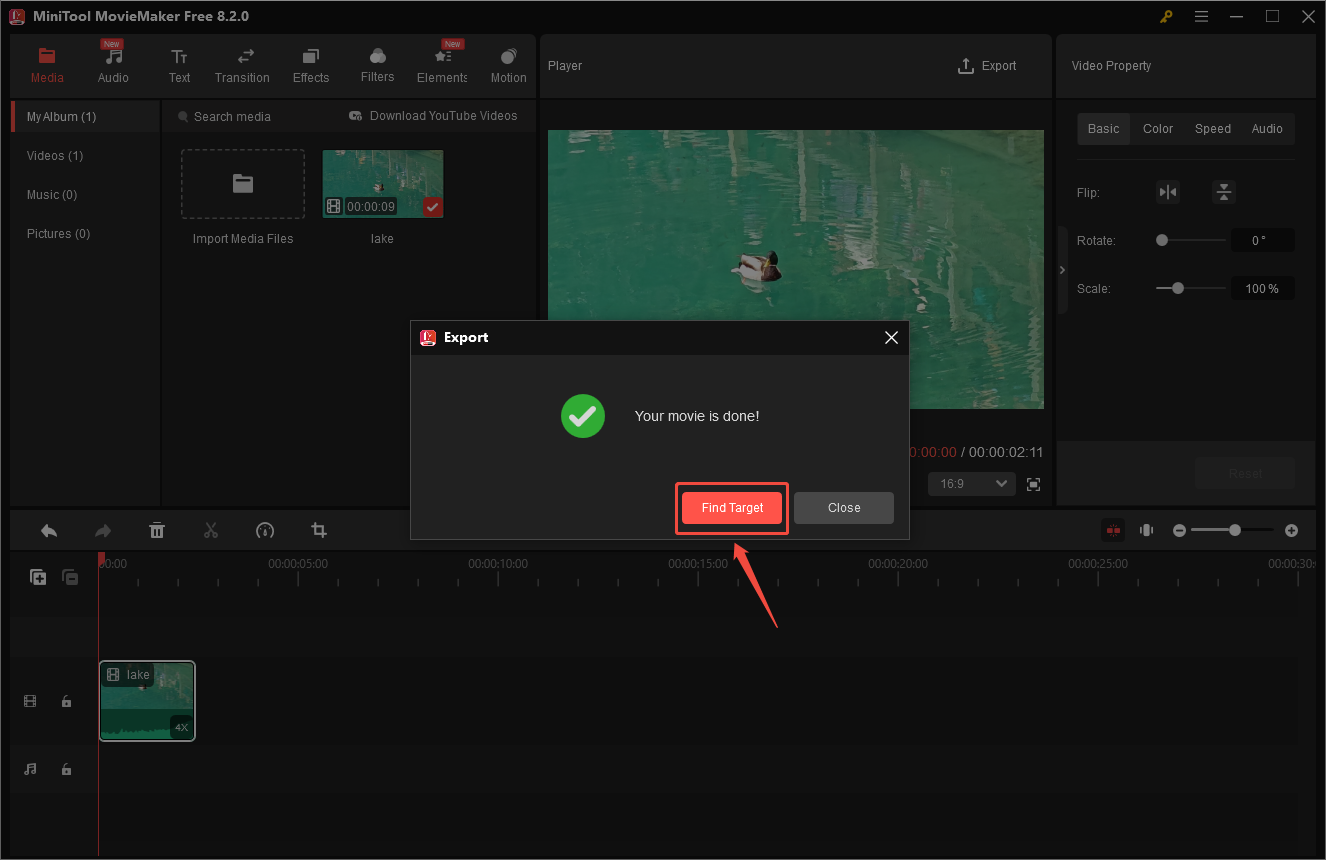
Step 5. Locate the Exported Video
When the message box pops up reminding you that your movie is done, click Find Target to navigate to the address where the video is saved.
With MiniTool MovieMaker, you can delete unwanted clips, speed up videos, and modify video parameters. These features can effectively reduce file size. When it comes to modifying video parameters, you can also import your videos into VLC Media Player to adjust the resolution, frame rate, and bitrate.
Method 4: Use VLC Media Player
VLC Media Player is a free multimedia player. It is mainly used to play a wide range of audio and video formats. However, you may not know that it also supports modifying video resolution, bitrate, and other parameters. Therefore, we can use VLC Media Player to shrink video size for Buffer.
VLC Media Player supports mainstream operating systems such as Windows, macOS, and Linux. So, you can use it to compress videos on a variety of devices. Below, we take Windows as an example to show you how to use VLC Media Player to reduce video size:
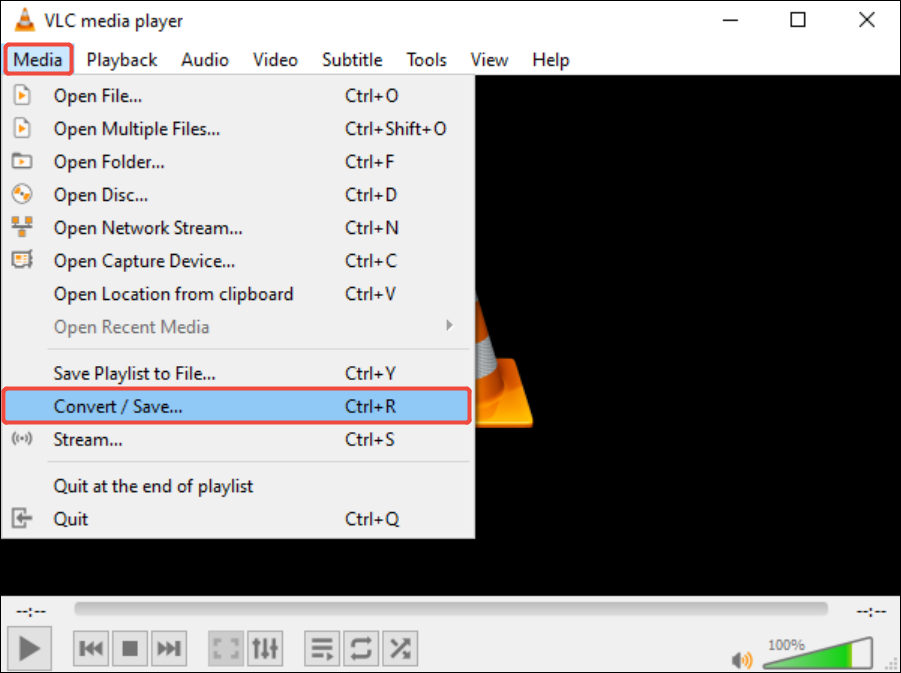
Step 1. Launch VLC Media Player and Add Your Video
Run VLC Media Player, click the Media tab on the far left of the top row, and select the Convert/Save option.
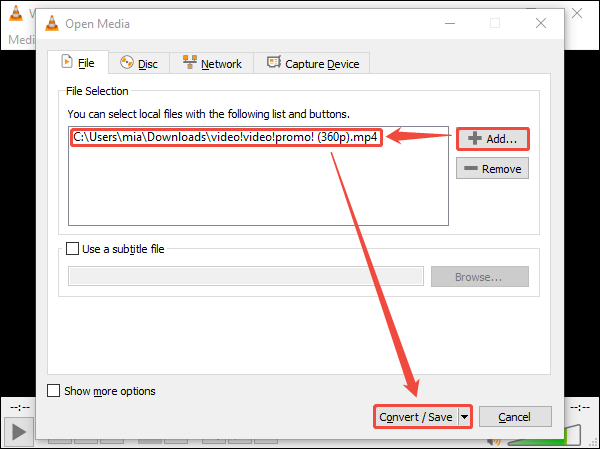
In the pop-up window, click the + Add button to select the video you want to compress. After the video is added, you can see the address of the added video in the box below File Selection. Then, click the Convert/Save button.
Step 2. Customize the Video’s Parameters
In the Convert window, expand the Profile option and choose a suitable option from the drop-down menu. Next, click the wrench icon.
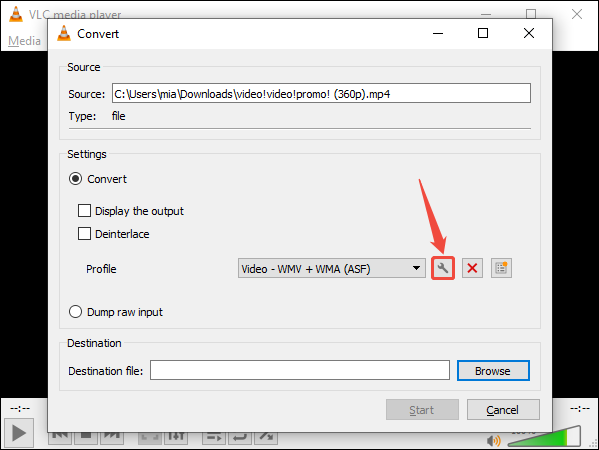
Then, you will see the Profile edition window. Select the Video codec option and choose the Encoding parameters tab. Then, you can choose a lower bitrate and frame rate.
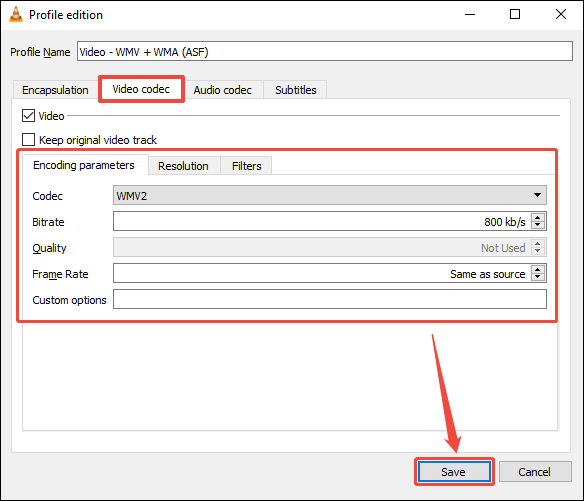
After that, switch to the Resolution tab to adjust the video resolution. Finally, click the Save button to save your changes.
Step 3. Select the Save Location and Start Compression
Find the Destination section, click the Browse button to select the file save location. Then, you can rename the video file you want to compress. Finally, click the Start button to start the compression process.
Conclusion
This post gives you 4 tools to break the Buffer video size limit: MiniTool Video Converter, MiniTool MovieMaker, Clideo, and VLC Media Player.
I tried these tools one by one and found that MiniTool Video Converter is the best Buffer video compressor. It’s free, and the compressed videos have no watermarks. If you want to delete some unnecessary parts of the video, MiniTool MovieMaker is also a good choice. If you have any questions or suggestions while using MiniTool Video Converter or MiniTool MovieMaker, please feel free to contact us at support@minitool.com.
User Comments :