Compressing videos can save storage space, increase upload and download speeds, and improve playback performance. In this article, I will teach you how to compress video files on PCs and mobile phones using different methods, including an excellent video compressor: MiniTool Video Converter.
What Is Video Compression?
Video compression refers to reducing the size of video files while maintaining the basic visual quality of the video. This technology can achieve efficient storage, transmission, and playback on various devices and streaming platforms.
Why You Need to Compress Videos?
Video compression reduces file size, making videos easier to store, share, and stream. Here are some situations where you might want to compress your video:
- Sharing video files: There are limits on the size of files that can be shared via email or some instant messaging apps. Compressing videos makes it easier to share files.
- Storing files: By reducing video size, you can save storage space on your computer, phone, or cloud storage like Google Drive.
- Streaming videos: Compressing videos makes them easier to share on streaming platforms and reduces buffering. Without compression, some online platforms and devices cannot handle large video files.
- Editing videos: Editing high-resolution videos can be resource-intensive. Compressing videos can make the editing process smoother.
Factors that Affect Video Size
Many factors affect the size of video files, among which the most influential are video length, frame rate, resolution, and bitrate. In addition, the audio bitrate also affects the size of the video. Below, I will explain these factors one by one:
- Resolution: A video’s resolution determines the number of pixels in each frame. A higher resolution results in a larger file size.
- Frame Rate: Frames represent the number of individual static images displayed on the screen per second. The higher the frame rate, the smoother the video and the larger the file size.
- Bitrate: Bitrate refers to the amount of data used to encode the video per unit time. A higher bitrate results in better video quality and a larger file size.
- Length: The longer the video, the more data it contains and the larger the file size.
- Audio Bitrate: The audio bitrate indicates the amount of data contained in one second of audio. A higher audio bitrate means better sound quality, but a larger video file size.
How to Compress a Video on PC
Can you compress a video file? Yes! There are many methods to compress videos on a PC. In this part, we will give you the most effective methods to compress your video files.
Method 1: Use a Desktop Video Compressor
The easiest way to compress a video on a PC is to use a video compressor. Which video compressor should you choose? A good video compressor needs to strike a balance between file size and video quality. MiniTool Video Converter can satisfy this need!
MiniTool Video Converter is an all-in-one video toolbox for Windows. It includes an excellent video compressor that can help you compress videos to the size you want. Moreover, this free video compressor has no limit on the length and number of videos. You can use MiniTool Video Converter to compress movies that are up to several hours long.
Want to compress multiple video files at the same time? MiniTool Video Converter can satisfy your needs! It supports batch compression of up to 5 video files, improving your efficiency. Moreover, you don’t have to worry about the format incompatibility issue. This video compressor supports importing multiple mainstream video formats, such as MP4, MKV, MOV, AVI, etc. In addition, the compressed videos will not have watermarks.
If you want to condense a video file size, just follow the steps below to compress video for free with MiniTool Video Converter:
Step 1: Install the latest version of MiniTool Video Converter on your desktop. You can click the download button below and follow the on-screen instructions to install it quickly. Then, launch this application.
MiniTool Video ConverterClick to Download100%Clean & Safe
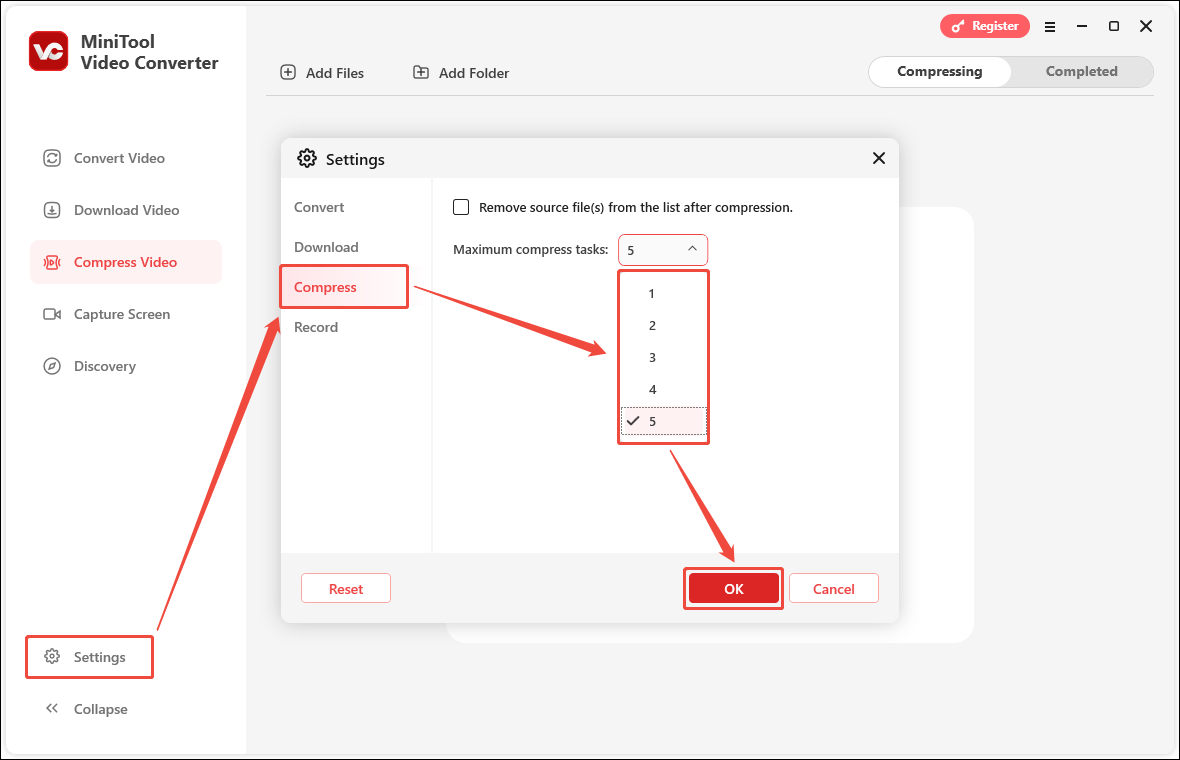
Step 2: If you want to batch compress video files, please follow the steps below to set the number of batch compression tasks. If you don’t need batch compression, you can skip these steps:
- Click the Settings tab on the left column.
- In the pop-up window, switch to the Compress tab.
- Click the Maximum compress tasks option and choose a number from the drop-down.
- Select OK to save all changes.
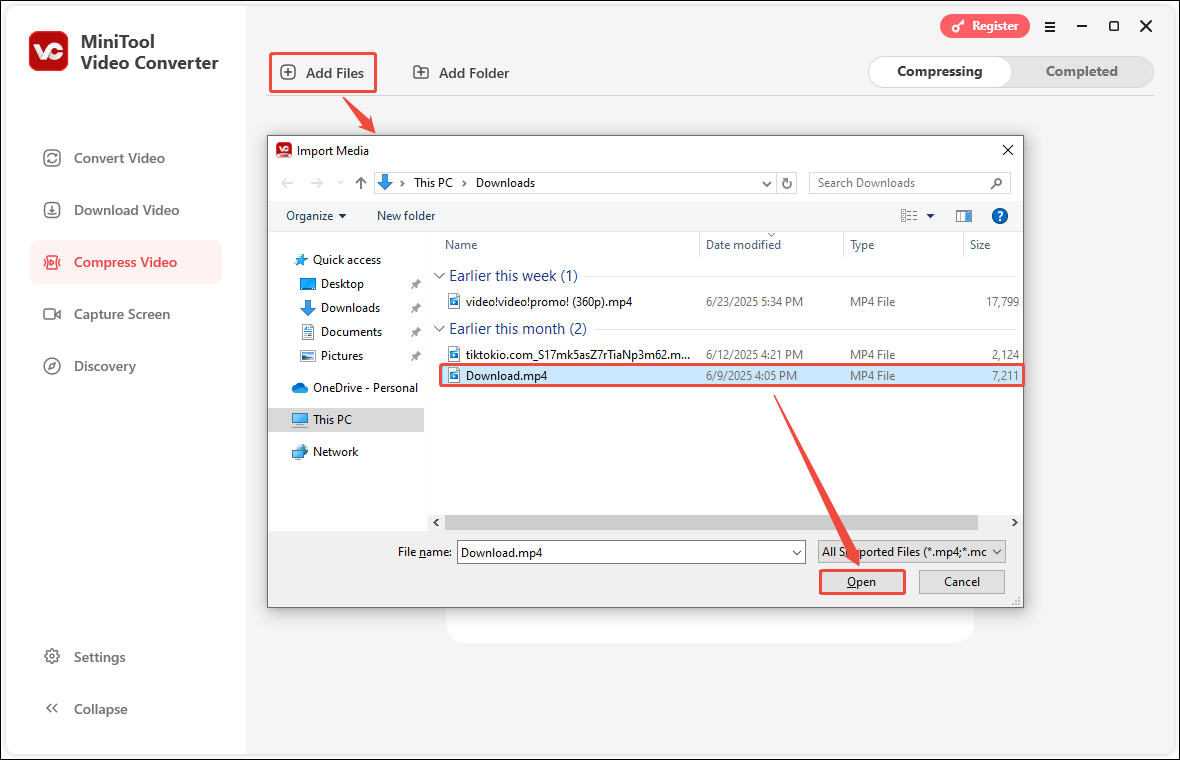
Step 3: Select the Compress Video tab on the left menu. Then, click Add Files, select one or more files you want to compress in the Import Media window, and click Open.
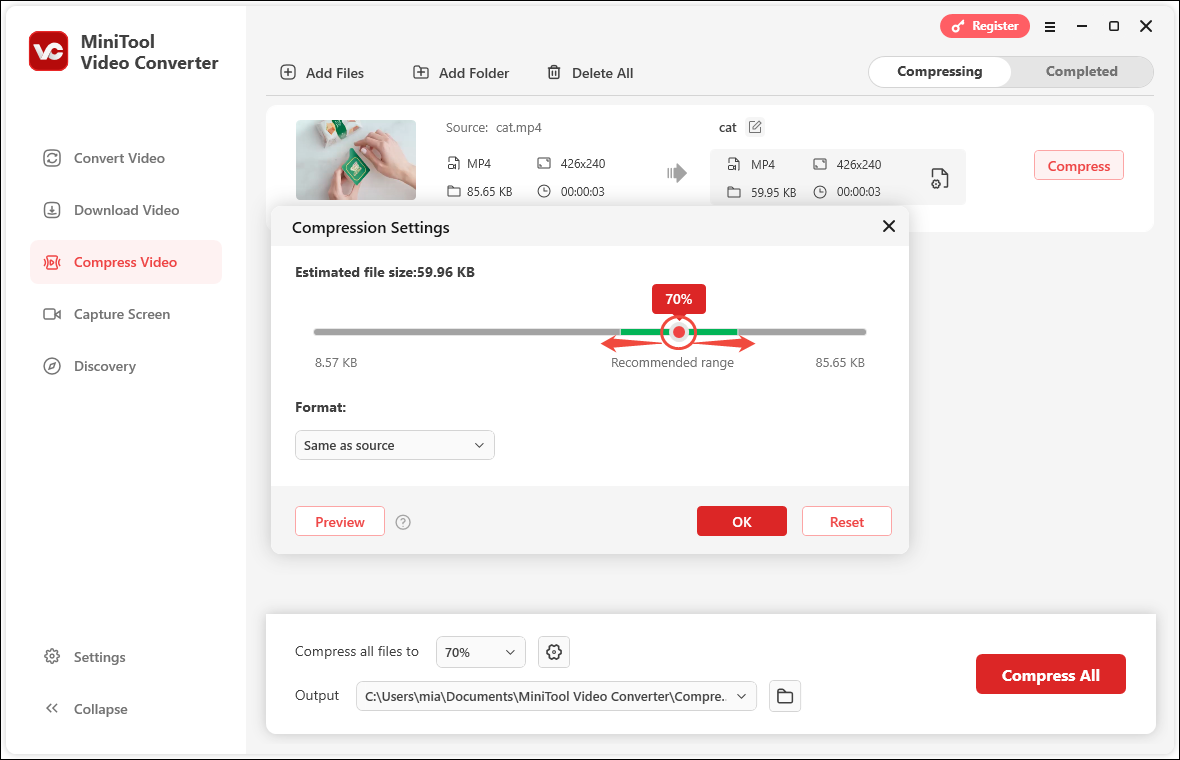
Step 4: Click the gear icon on a video file to open the Compression Settings window. Then, drag the red dot on the slider to adjust the video compression percentage. If you have a specific size you want to compress, you can adjust the compression percentage based on the Estimated file size above the slider.
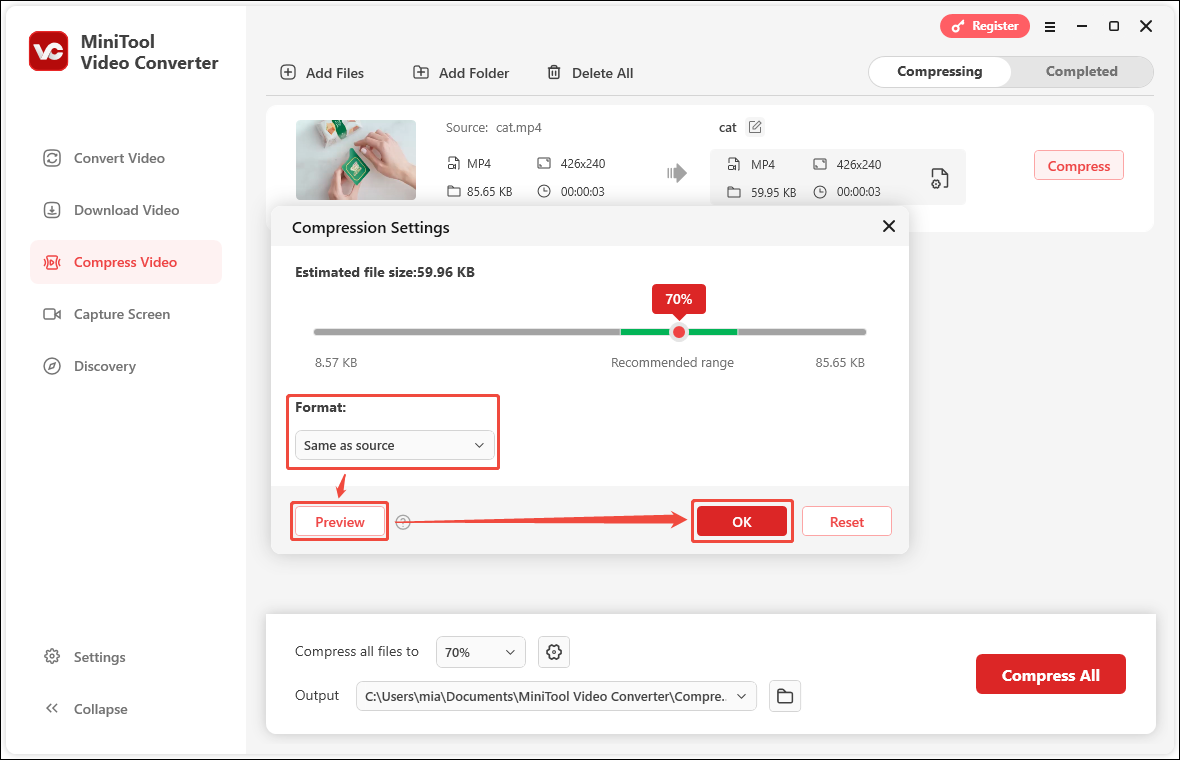
Step 5: After adjusting the video compression percentage, expand the Format option to select an export format (MP4, WEBM, or MKV). Then, you can click the Preview button to view 10 seconds of the compressed video and check the quality. Finally, click the OK button to save your changes.
Step 6: Click the Compress button to start compressing the video.
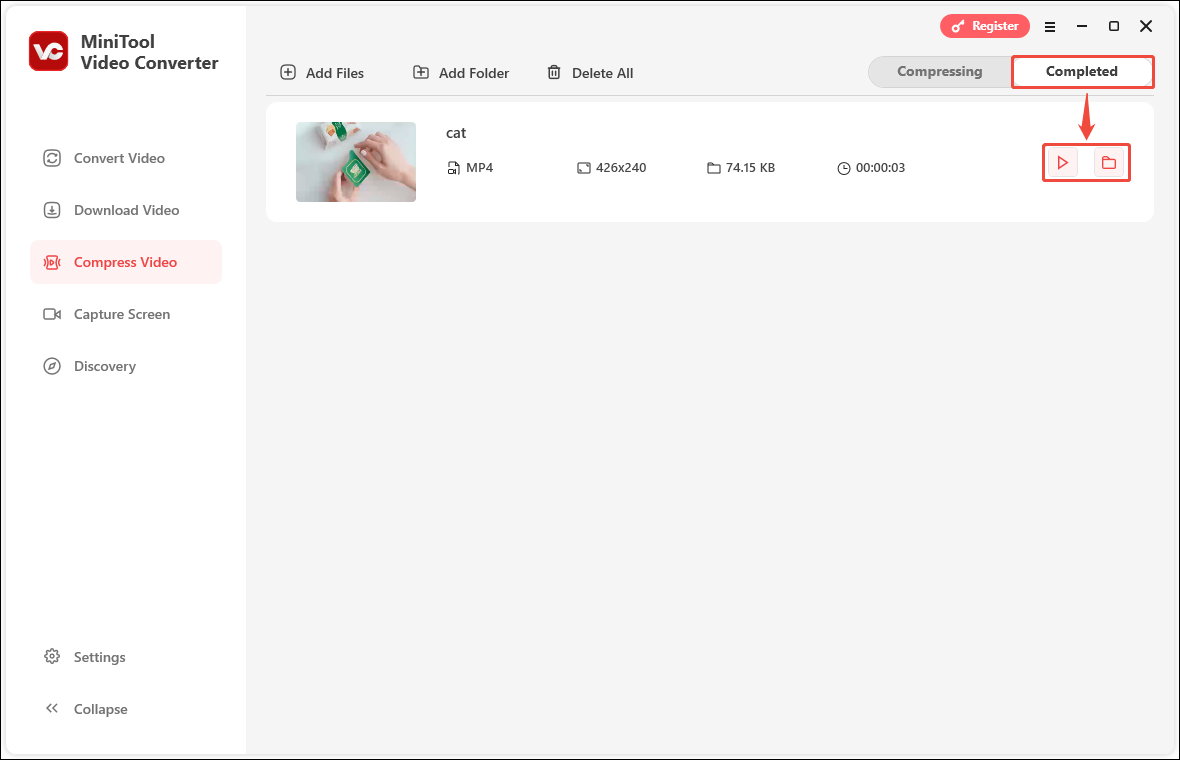
Step 7: After the video is compressed, the interface will automatically jump to the Completed tab. You can click the play icon to play the compressed video directly. You can also click the folder icon to navigate to the location where the compressed video is saved.
MiniTool Video Converter can be a great video compressor. At the same time, it is also an audio and video format converter, a video downloader, and a screen recorder. It supports converting multiple audio and video formats, downloading videos from platforms such as YouTube, TikTok, Twitter, Facebook, and recording high-definition computer screens.
Method 2: Use an Online Video Compressor
The advantage of online video compressors is that you can compress videos directly without installing any software or logging into an account. YouCompress is such an online compression tool.
YouCompress is an online video compressor that supports compressing MP4, MOV, and MP3 files online for free. This online tool has no limit on the number of compressed files. You can compress as many files as you want. Moreover, the compressed video will not have a watermark. You just need to select the file and upload it, and YouCompress will use the best parameters to reduce the file size.
All uploaded and compressed files will be automatically deleted from YouCompress’s servers after a few hours. So, you must download the compressed file in time, otherwise the compressed video will disappear.
Now, you can follow these steps to compress video for free with YouCompress:
Step 1: Choose any browser on your computer and visit www.youcompress.com.
Step 2: Without logging in, just click the Select file button to upload the file you want to compress. When the title of the video appears in the blank text box, click the Upload File & Compress button to start compressing.

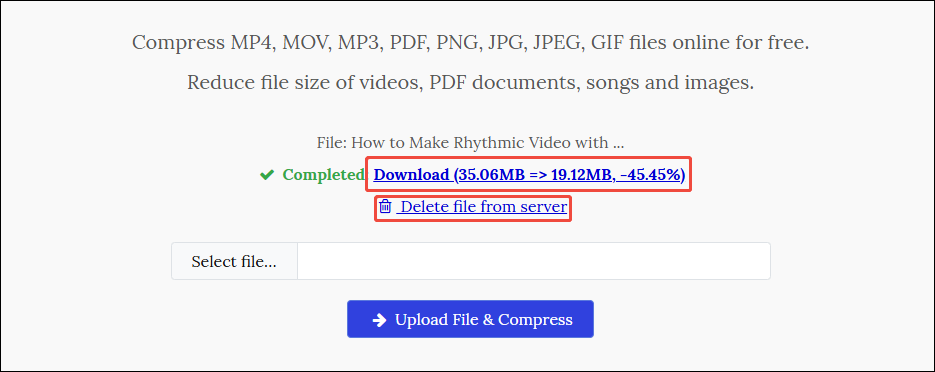
Step 3: After the video is compressed, a link will show the size comparison of the file before and after compression. Click the link to download the compressed video to your computer. Although YouCompress will automatically delete the uploaded and compressed files after a few hours, you can also click Delete file from server to delete it immediately.
Method 3: Use a Video Converter with Parameter Adjustment
As mentioned above, the factors that affect the size of a video include resolution, bitrate, frame rate, and video length. Therefore, you can also minimize video size by using some tools that can adjust video parameters.
MiniTool Video Converter can compress videos by adjusting video resolution, bitrate, and frame rate. Moreover, you can also export videos to various video formats, such as MP4, MKV, AVI, MOV, WMV, M4V, Xvid, MPEG, VOB, etc.
Now, let’s see how MiniTool Video Converter can reduce the video size by adjusting the parameters:
Step 1: Install MiniTool Video Converter on your computer and launch it.
MiniTool Video ConverterClick to Download100%Clean & Safe
Step 2: Select the Convert Video tab, click Add Files to import the video you want to compress.
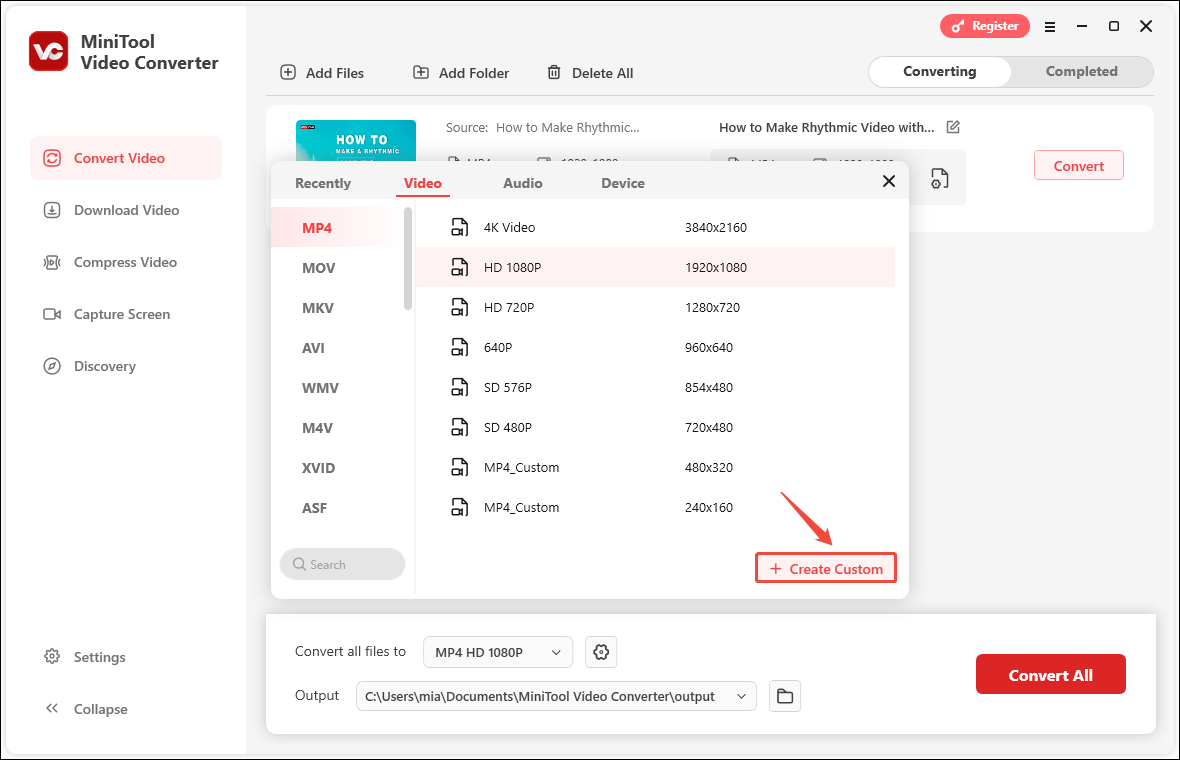
Step 3: Click the output settings icon. Then, in the pop-up window, select the same format as the original video. Next, click the + Create Custom button.
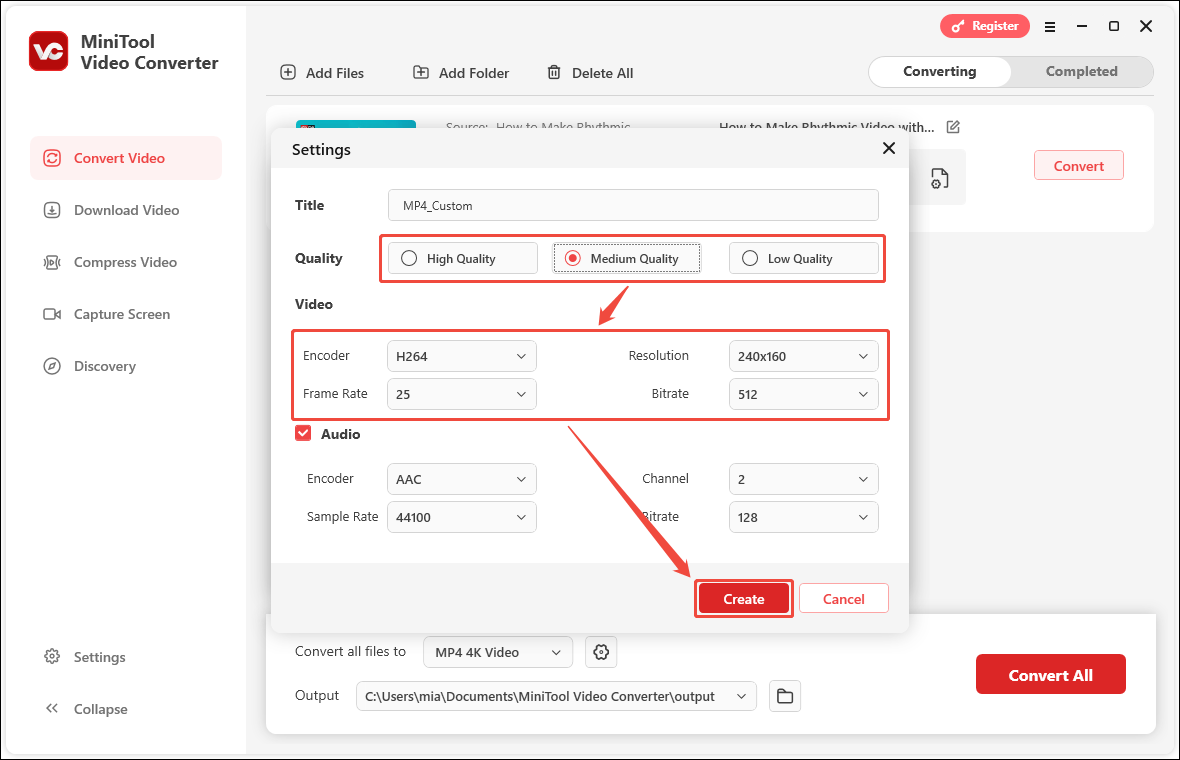
Step 4: In the Settings window, select a lower video quality, resolution, frame rate, bitrate, etc. Then click Create to save the customized video parameters.
Step 5: Select the video quality options you just customized and click Convert to start converting your video.
Step 6: After the video is converted, you can click the folder icon to locate the video’s save address.
Compared with the original video, it can be seen that the video file is smaller after reducing the video frame rate, resolution, bitrate, and other parameters.

Method 4: Adjust Video Parameters with MiniTool MovieMaker
In addition to video compressors, some video editors can also reduce video size. We know that video length, frame rate, bitrate, and resolution affect the size of video files. Therefore, we can delete the unnecessary parts of a video to shorten the video length.
MiniTool MovieMaker is a user-friendly and easy-to-use video editor. It allows you to trim videos to remove unwanted clips. Additionally, you can adjust the frame rate, resolution, and bitrate when exporting videos to further reduce their size.
If you want to reduce video size with MiniTool MovieMaker, follow the steps below:
Step1. Download and install the latest version of MiniTool MovieMaker on your desktop.
MiniTool MovieMakerClick to Download100%Clean & Safe
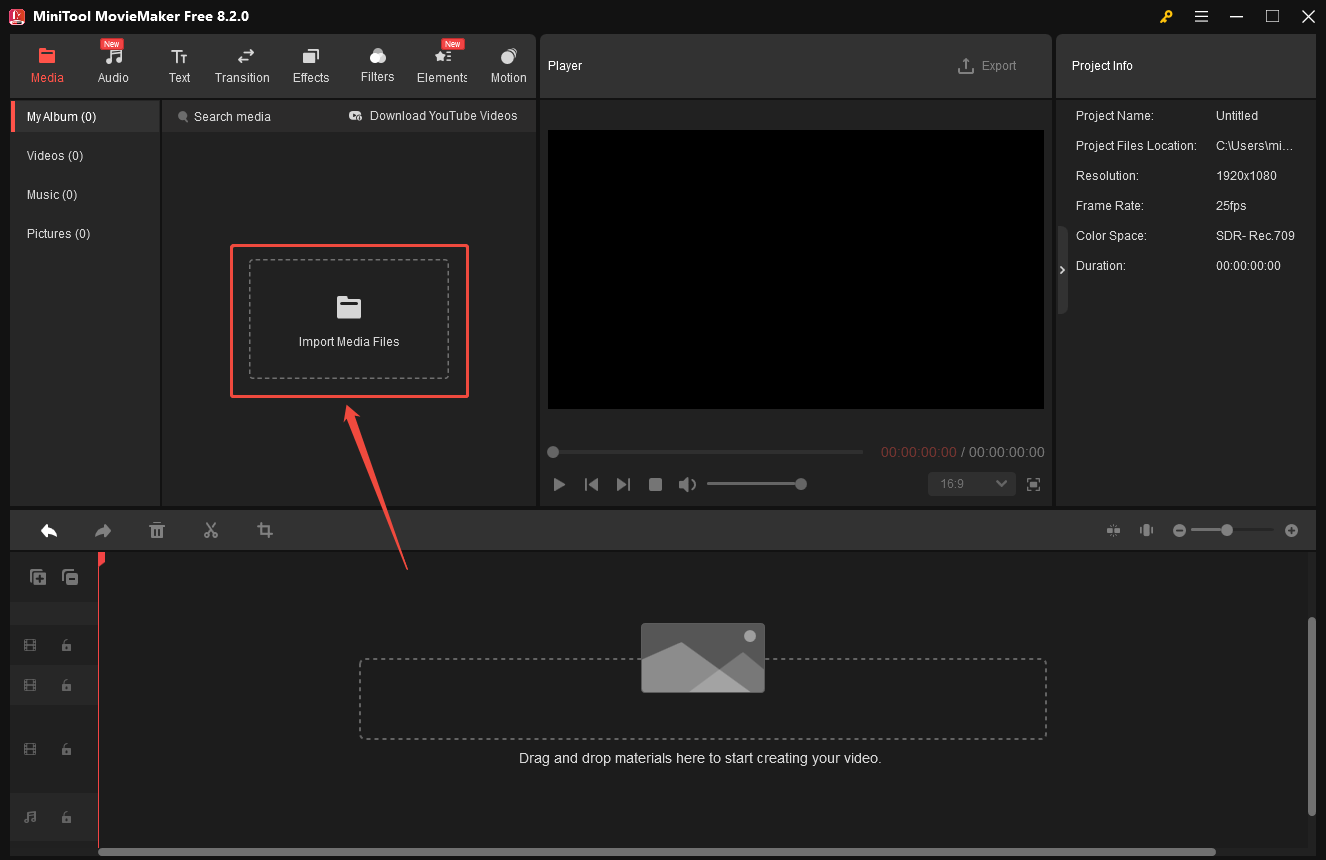
Step 2. Run this application and click Import Media Files to add a video you want to compress.
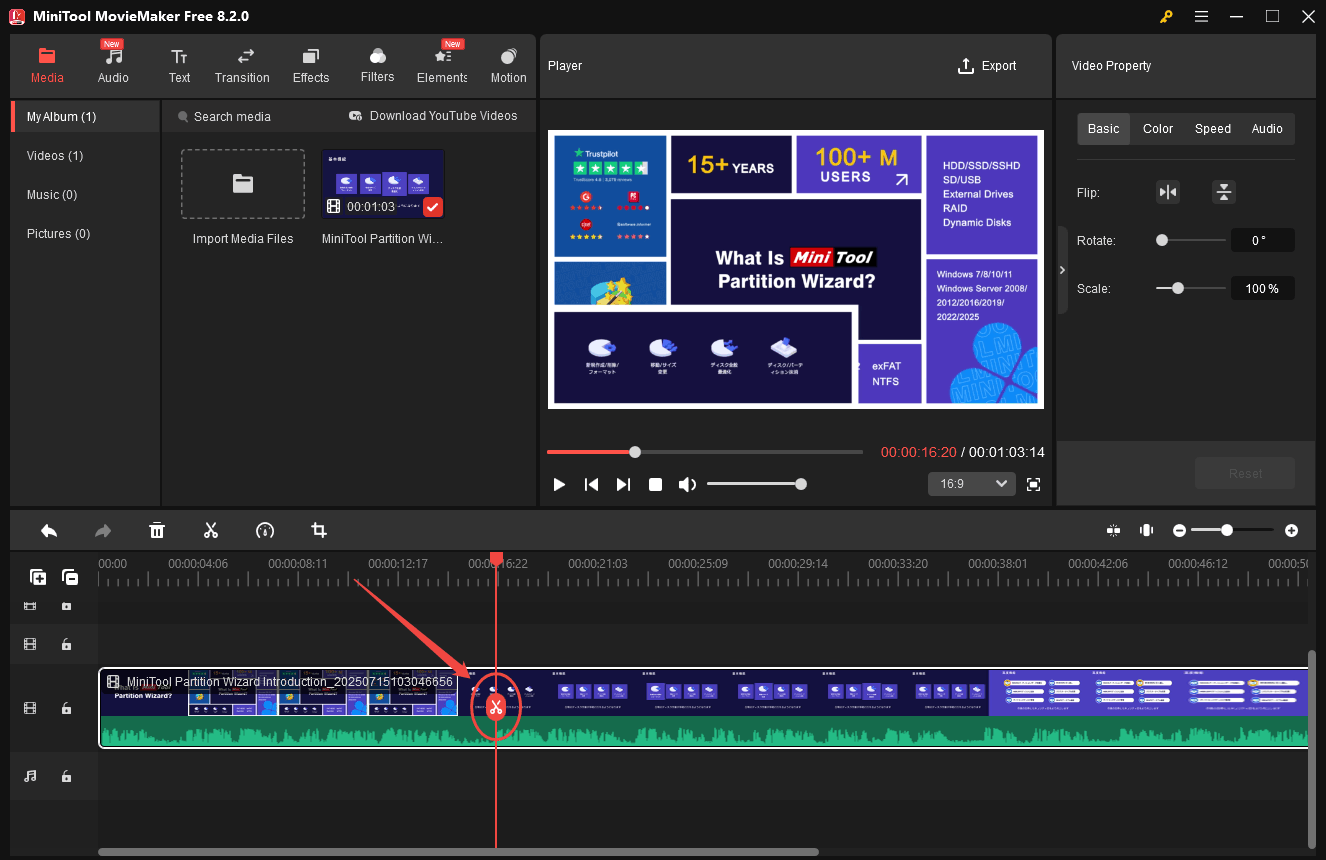
Step 3. Drag the added video to the track at the bottom of the interface. Then, you can click the scissors icon to split the video and remove unwanted video clips. You can also trim off the beginning or end of the video to shorten the video length.
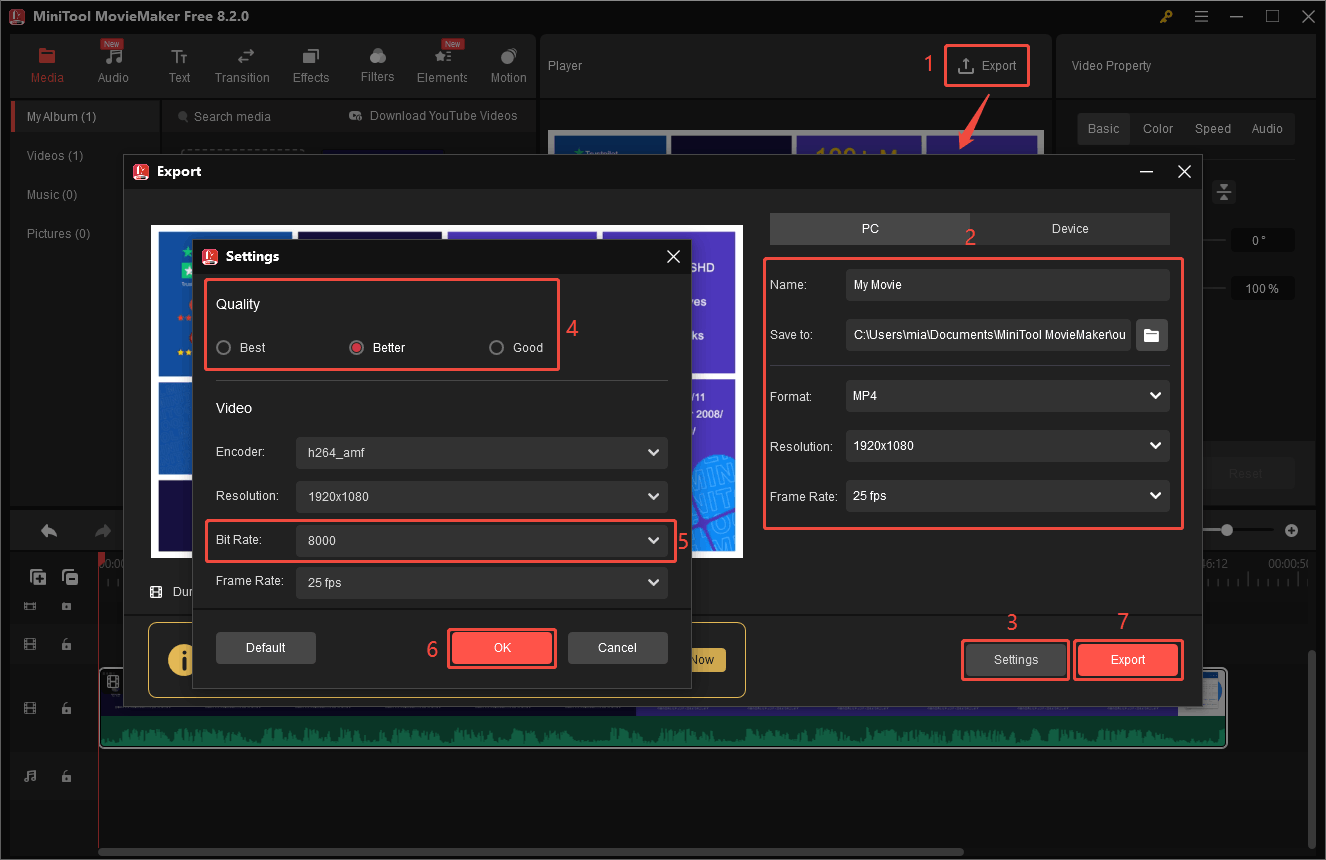
Step 4. Click the Export button in the top right corner of the player section. When the Export window pops up, you can edit the name of the exported video, set the save location, choose the output format, and select a lower resolution and frame rate.
Step 5. After that, click the Settings button to open the Settings window. Then, you can select a lower video quality and bitrate in this new window. Click OK to save your changes. Lastly, click Export to save the video.
Step 6. When you see the pop-up window that says “Your movie is done,” click Find Target to locate the exported video. You will find that the exported video is smaller than the original.

Final Words
After compressing a video, the file size becomes smaller and easier to store and share. This article provides you with methods to compress video files on computers. You can use some online compression tools, as well as some desktop video compressors and video compression apps.
If you like to adjust the compression percentage yourself and want to export compressed videos in multiple formats, I recommend you to use video compression software, such as MiniTool Video Converter. If you have any questions or encounter any problems while using MiniTool Video Converter, please email us at support@minitool.com. We look forward to answering your questions!
User Comments :