Have you ever heard of OneNote? It’s an amazing digital notebook created by Microsoft. It can gather all sorts of things – your notes, those cool drawings you make, screen clippings you find interesting, and even audio commentaries. And you can easily share all these with other OneNote users, either over the Internet or through a network. Here’s a question: How to record on OneNote? Well, don’t worry! This post from the free video converter is going to take you through the process of recording on OneNote, using its built-in feature and some third-party software.
Imagine this – you’re at a really important lecture, a lively Q&A session, or an intense interview. You can tell that there is so much valuable information. But here’s the thing: you know you simply won’t be able to type fast enough to capture every single detail. That’s when OneNote’s recording feature comes to the rescue! It’s seriously a game-changer. With it, you won’t miss a single word of what’s going on. So, are you ready? Let’s dive right in and start learning how to record on OneNote!
How to Record in OneNote Using Its Built-in Feature
Let’s start with how to record in OneNote with its built-in feature. Before we jump into recording, let’s make sure everything’s in place. First off, your device needs to have a working microphone. If you’re using a laptop or desktop, and the built-in mic doesn’t seem to cut it, don’t worry! You can always grab an external microphone for much better sound. Mobile devices usually come with decent built-in mics that are great for everyday recordings. And of course, make sure you’ve got the OneNote app installed.
How to Record Audio in OneNote
Step 1. Open the OneNote app on your device. Then, find the notebook, section, and page where you want to store your audio recording.
Step 2. On the desktop version, click the Insert tab, go to Audio, and select Record Audio to begin the audio recording. On mobile devices, just tap the plus icon and pick Audio from the list.
Step 3. While you’re recording, if you need a little breather, just click the Pause button. The timer will stop, and your recording will be on hold. When you’re ready to keep going, just hit the Resume button.
Step 4. When you’re all done, click the Stop button. OneNote will automatically save the recording on the page you’re working on.
Step 5. After recording, you can click the audio icon that shows up on the page to open the playback bar. Here, you can play, pause, rewind, and fast-forward the recording. On mobile devices, tap on the audio file, and you’ll get a similar playback interface.
If you’d like to shift that audio recording to a different page or notebook, here’s what you do. Just right-click the audio icon and pick Cut. But if you want to keep a copy in the original spot, select Copy instead. After that, head over to the place where you want to move the recording, right-click the new page, and choose Paste.
How to Record Video in OneNote
For video recording on OneNote, your device needs a working camera. Most laptops, tablets, and smartphones these days come with both front-facing and rear-facing cameras. Before you start, make sure the camera app on your device is working okay. And don’t forget to check if you have enough storage space.
The steps for recording videos on OneNote are the same as those for capturing audio, with only one difference. You need to Choose Record Video after clicking Insert.

How to Record on OneNote Using Third-Party Software
The built-in recording tool in OneNote is super useful. With it, you can record a lecture, interview, or meeting. But if you want to capture what’s happening within the OneNote app, I highly recommend trying out the following 3 methods to screen record the activities on this app. Those tools are not only incredibly easy to do, but they’re also completely free! So go ahead and give them a shot!
Method 1. MiniTool Video Converter
If you were to come to me and ask for just one recorder specifically for Windows users, I’d recommend MiniTool Video Converter. This tool has no charges, watermarks, bundles, or ads. It’s user-friendly and feature-rich.
Screen recording features of MiniTool Video Converter:
MiniTool Video Converter can record any activities happening on your screen without time limits. It’s made in a way that both beginners and experienced ones can use it easily and have a great time. The interface is just so clean and easy to understand. Even if you’ve never recorded a video before, you’ll find it a piece of cake to use it to record on OneNote. It also offers some advanced features to satisfy your needs if you are a professional. For example, you can customize the recording frame rate. As a high-quality screen recorder, MiniTool Video Converter can record your 4K screen at high, original, and standard quality.
But that’s not stop. MiniTool Video Converter gives you the flexibility to record the full screen or a specific area. You can even decide whether to record with the system audio, the microphone, or both.
Other cool things that MiniTool Video Converter can do:
- Convert videos to and from videos or audio.
- Convert a wide range of video and audio formats, including MP4, AVI, MKV, XVID, MOV, MP3, WMV, WAV, AAC, etc.
- Enable you to export video formats compatible with YouTube, Instagram, Facebook, and Vimeo.
- Allow you to convert files to iPhone, iPad, Huawei, Samsung, and Android.
- Specify the target video encoder, resolution, frame rate, and bitrate, as well as the target audio encoder, channel, sample rate, and bitrate.
- Compress the sizes of video and audio files.
- Batch convert up to 5 media files.
- Download YouTube videos, music, subtitles, and lyrics.
How to screen record on OneNote using MiniTool Video Converter? You can:
Step 1. Hit the button below to get the installation package of MiniTool Video Converter and follow the on-screen instructions to install this software on your device.
MiniTool Video ConverterClick to Download100%Clean & Safe
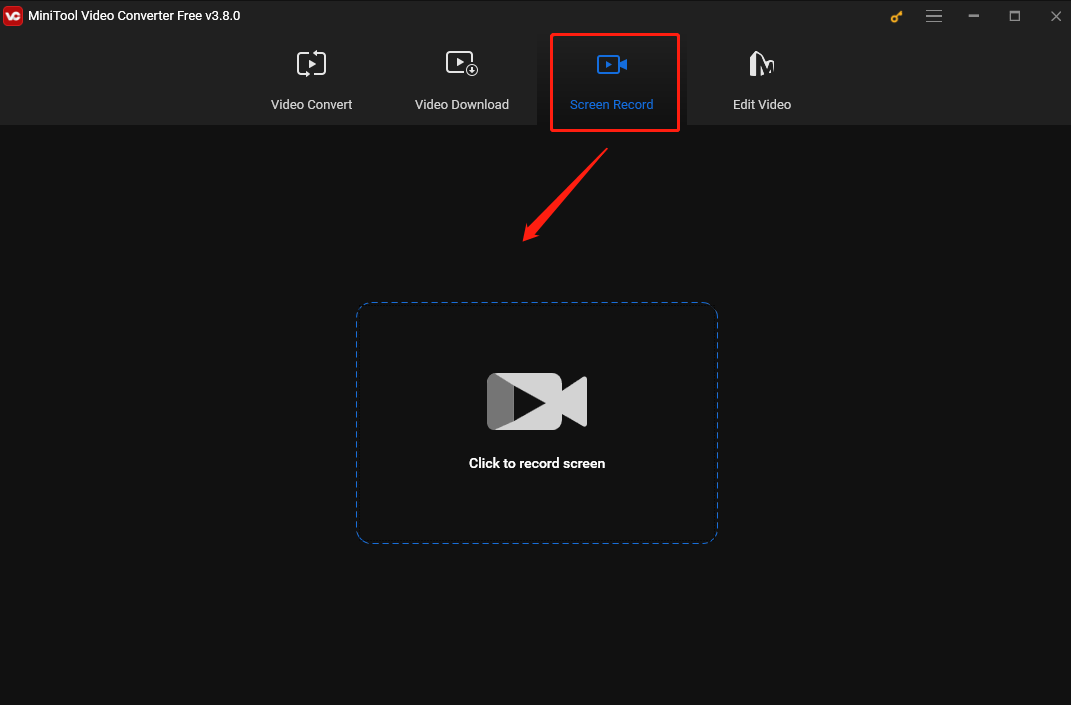
Step 2. Open this free recorder. Under the default Video Convert tab, choose the Screen Record option and hit the Click to record screen region to access MiniTool Screen Recorder.
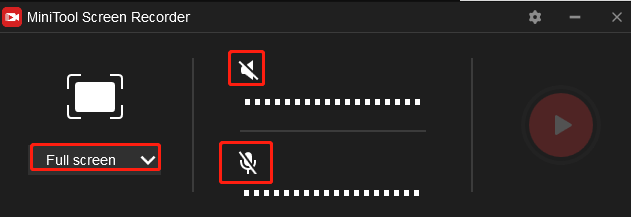
Step 3. By default, MiniTool Video Converter records your entire screen. To record the OneNote window only, you can click Full screen in the MiniTool Screen Record panel, choose the Select region from the dropdown, and move your cursor to set the recording area.
To record the external and internal sounds, just click the System Audio and Microphone icons.
Step 4. To start recording, press the default F6 key on your keyboard or click the Record button in the MiniTool Screen Record panel.
Step 5. During recording, if there are some interruptions, you can press F9 to hold on to the process.
Step 6. To stop the process, press F6 again. Then the MiniTool Screen Recorder panel will show up again. Right-click the recording on the panel to preview, rename, delete, or locate it.
Method 2. QuickTime Player
If you use a Mac, you must know QuickTime Player. QuickTime Player is a media player developed by Apple. As its name suggests, the main duty of QuickTime Player is to play media files. It can play a wide variety of audio and video file formats, like MP4, MOV, etc. It also allows for basic video editing functions. You can trim videos, combine clips, and adjust some basic parameters such as volume and playback speed.
What else can QuickTime Player do? It can record your Mac screen! Its recording tool supports recording the whole screen or a specific area. It can also record your screen with audio, but only for the microphone input. If you want to capture the internal sound, you need a third-party tool like Soundflower.
Here are the steps.
Step 1. Launch QuickTime Player, click File, and select the New Movie Recording option.
Step 2. Click the inverted arrow next to the Record icon to customize your camera and microphone settings.
Step 3. Click the Record icon and click anywhere on the screen to record the whole screen. You can also drag the cursor to choose the recording area and then click Start Recording.
Step 4. To stop the recording process, click the Stop icon or press Command + Control + Esc keys. After that, click File, choose Save, and decide a folder to save the recording.

Method 3. AZ Recorder
Screen recording on Android is super easy with its built-in tool. But today, I’m going to introduce you to another wonderful Android recorder - AZ Recorder. It can capture all on-screen activities. For example, it can record gameplay, streaming videos, online meetings, and video calls. Want to capture your face while recording? This tool also has you covered. One of the coolest things about this tool is that it allows you to create GIFS out of recorded videos. It also offers a drawing tool that can allow you to easily annotate the video in numerous ways. This drawing tool can even be deployed while you are recording the video.
Follow the steps below to record on OneNote AZ Recorder.
Step 1. Go to the Google Play Store to download and install AZ Screen Recorder on your device.
Step 2. Open this tool. Tap the gear icon to customize the recording settings. Here, you can adjust the target video resolution, frame rate, and bitrate.
Step 3. Now go to OneNote and tap the Record button to begin recording.
Step 4. When you want to stop the recording process, swipe down from the top of the screen to open the notification section and click the Stop button. The recording will automatically be saved in your device’s gallery.
Bonus: How to Polish the Recording
After recording, you can use MiniTool MovieMaker to edit the recorded video.
MiniTool MovieMaker is a user-friendly Windows-based video editing tool. It is easy to use yet offers some advanced features to satisfy your needs if you are a professional.
Here’s another amazing thing. The software has multiple Hollywood-vide built-in templates. If you’re planning a wedding vlog, a festival video, or even a birthday video to surprise your beloved, there’s a template for that! Using them saves you so much time, and yet your videos will still look really professional.
When it comes to actual editing, MiniTool MovieMaker has got you covered. You can do all the basic stuff like trimming and cutting videos. And then there are the transitions between clips and so many cool transition effects! FadeBlack, Swape, Fold... you name it. These effects make your video flow so smoothly and look visually appealing. You can also put captions, cool titles, or descriptions on your videos. There are heaps of font styles, sizes, and colors to choose from. So, you can make the text look exactly how you want it to, depending on the mood of your video.
MiniTool MovieMakerClick to Download100%Clean & Safe
Conclusion
OneNote is a great feature that can level up your note-taking. Knowing how to record on OneNote can be super handy for school, work, or daily life. Whether it’s audio or video, OneNote makes it easy to capture. You can also use third-party software like MiniTool Video Converter to capture the activities happening on your OneNote. By following the detailed instructions I’ve shared in this post, you can make high-quality recordings in no time with ease. Now go ahead to choose your desired recording method and start recording. I hope you have fun with it!
Finally, if you run into any problems while using MiniTool Video Converter and MiniTool MovieMaker, don’t hesitate to reach out to me on Twitter.
You may also be interested in:
User Comments :