Dead by Daylight, developed and published by Canadian studio Behaviour Interactive, is an online asymmetric multiplayer survival horror video game. In this one-versus-four game, one player is the Killer who hunts Survivors, while the four Survivors cannot fight the killer but can use obstacles and items in the maps to evade him. How to record Dead by Daylight gameplay? In this post offered by the free video converter, I will offer 3 best recorders to help you capture your glory moments during gameplay.
How to Record Dead by Daylight Gameplay with MiniTool Video Converter
MiniTool Video Converter is the most recommended screen recorder for Windows users. It’s free and flexible. It offers you the option to record the full screen or a special area. You can also record your screen with the system audio and microphone simultaneously and separately. With MiniTool Video Converter, you can record any activities on your screen, including gameplay, presentations, streaming videos, video calls, etc.
Let’s see how to record Dead by Daylight gameplay with MiniTool Video Converter.
Step 1. Download, install, and open MiniTool Video Converter.
MiniTool Video ConverterClick to Download100%Clean & Safe
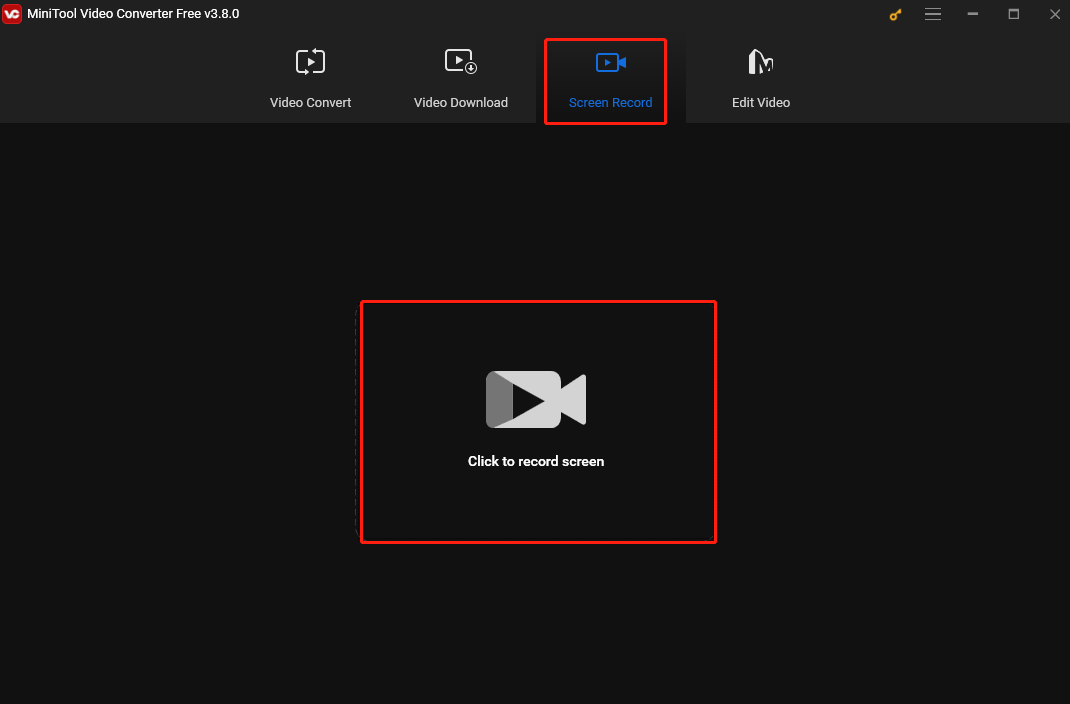
Step 2. Choose the Screen Record option and hit the Click to record screen region to access MiniTool Screen Recorder.

Step 3. After that, the MiniTool Screen Record panel will pop up. Here you can adjust the recording settings.
- To choose the recording area, click Full screen, choose the Select region option from the dropdown, and then click and drag the cursor to choose the recording area.
- Click the System Audio and Microphone icons to turn on/off the system audio and microphone.
- Click the gear icon. In the following Settings window, you can adjust the recording output folder, quality, frame rate, etc.
Step 4. To start recording, press the default F6 key on the keyboard. You can also press F9 to pause and resume the process.
Step 5. To stop the process, press F6 again. Right-click the recording on the MiniTool Screen Recorder panel to preview, rename, delete, or locate it.
How to Record Dead by Daylight Gameplay with FBX
FBX is an easy-to-use tool for screen recording and live streaming. It’s smooth and can record in the background without lagging the game.
Follow the steps below to record Dead by Daylight with FBX.
Step 1. Download, install, and launch FBX.
Step 2. Go to the Capture section of the Settings tab and choose the Game capture mode.2.
Step 3. After that, the FBX’s overlay will appear in the top left corner of the screen.
Step 4. Open your game. Press the Ctrl + F12 keys to start recording.
Step 5. Press the Ctrl + F12 keys again to stop the process. The recording will appear in the Recordings tab.
How to Record Dead by Daylight Gameplay with Joyoshare VidiKit
Joyoshare VidiKit is also a reliable recorder to record Dead by Daylight available on Windows and Mac. It has a clear interface and can record any activities on your computer screen, including Dead by Daylight, Clash of Clans, CSGO, PUBG, etc.
Here are the steps.
Step 1. Download and install Joyoshare VidiKit. Then open it.
Step 2. Open Screen Recorder in Joyoshare VidiKit and choose the Record video and audio mode to capture gameplay. To record the system audio and your voice, click the system audio and microphone audio icons.
Step 3. Under the Capture Area section, click + and drag your mouse cursor to select the recording area. You can also choose the preset size from the drop-down menu.
Step 4. Play the game and click the REC button to start recording.
Step 5. Click Stop to end the process. This recording will be saved in the History window.
Conclusion
Dead by Daylight is an exciting survival video game. This post offers detailed instructions to help you record important moments during gameplay with 3 easy methods. Pick one that suits your needs and let the fun begin.


![How to Screen Record on LG Smart TV [Expert Guide]](https://images.minitool.com/videoconvert.minitool.com/images/uploads/2024/12/how-to-screen-record-on-lg-smart-tv-thumbnail.jpg)


User Comments :