Does Dropbox compress videos? No, but it will compress preview videos so that they play smoothly. However, videos uploaded to Dropbox are not compressed. If you need to upload compressed videos, this article recommends three methods, including using third-party video compressors.
Introduction of Dropbox
Dropbox is a cloud storage service that allows users to manage, store, and share various files. Its main features are as follows:
- Cloud storage files: Dropbox provides a certain amount of storage space for users to upload various types of files.
- Shared files: Users can share files and folders with others by creating shareable links. Even if the other party does not have a Dropbox account, they can access the shared files.
- Teamwork: Dropbox supports multi-person folder management. You can add multiple people to manage files, improving efficiency.
- Sync: Dropbox can automatically synchronize files between the cloud and devices. Modify your files on any device, and the changes will be synchronized on other devices. You can access the latest version of files and folders on any device.
- Security: Dropbox supports password protection. If you accidentally delete a file, you can also restore it with one click. Additionally, it supports remote device wiping to protect your data.
The file types supported by Dropbox include documents, images, videos, audio files, etc. The following are some formats of these file types that are supported for uploading:
- Documents: DOCX, DOC, PDF, RTF, TXT, and XML.
- Images: JPG, PNG, GIF, SVG, TIFF, and PSD.
- Videos: AVI, MKV, MP4, MPG, MOV, WMV, OGV, and 3GP.
- Audio: MP3, WAV, AAC, and FLAC.
- Compressed Files: ZIP, TGZ, TBZ2, etc.
Overall, Dropbox is a versatile tool that can back up your videos, audio, and documents while keeping your data safe.
Does Dropbox Compress Videos?
Many people upload videos to Dropbox for storage, but does Dropbox reduce video quality? This section will tell you the answer.
Why Do Some Platforms Compress Videos?
First, you need to understand why some platforms compress video files. Many streaming platforms, such as YouTube, TikTok, and Twitter, compress videos to reduce file size, thereby speeding up upload and download speeds.
Additionally, compressing video files can make playback smoother. Furthermore, compressing video files reduces storage space and bandwidth usage, thereby lowering the operating costs of online platforms.
Does Dropbox Reduce Video Quality?
Does Dropbox compress videos? Dropbox only automatically compresses videos so you can smoothly preview them on the platform. In other words, Dropbox does not actually compress the video file, and you can download the original, full-quality video.
No one wants their videos to be compressed after uploading them to a cloud storage service. With Dropbox, you don’t have to worry about the quality drop of your videos. Also, when you share videos with others on Dropbox, they receive the videos without compression. Whether you upload videos to Dropbox, download videos from Dropbox, or share videos with others, Dropbox will retain the original quality and size of your videos.
How to Compress a Video in Dropbox?
Dropbox will not compress your video files directly. This lets you keep your videos in their original quality. However, Dropbox offers very limited storage space, especially on the free plan. It only provides 2 GB of storage space. If you upload large videos to Dropbox, it will use up a lot of space. So, it’s best to compress the larger video files before uploading them to Dropbox.
Since you cannot compress videos in Dropbox, we will show you some methods to compress videos for Dropbox.
Method 1: Use Video Compressors
You can use some third-party video compressors to compress videos. Below, I will recommend 2 Dropbox video compressors, including a desktop compressor and an online compression tool.
1. MiniTool Video Converter
MiniTool Video Converter can be used as an efficient video compressor. It can easily compress large video files without losing quality. This free application supports up to 8K video compression, and has no restrictions on video length and quantity, allowing you to completely get rid of the problem of large video files!
MiniTool Video Converter supports importing multiple mainstream video formats, such as MP4, MKV, MOV, AVI, etc. You can compress the video and output it as MP4, WebM, or MKV file. Most importantly, the compressed video will not have a watermark! What’s more, it also supports batch compression. You can compress up to 5 videos at the same time, which doubles your efficiency!
In addition, MiniTool Video Converter can provide a recommended compression range to find the perfect balance between saving space and maintaining image quality. Of course, you can also adjust the compression percentage from 10% to 100%. When adjusting the compression percentage, you can also preview the file size changes in real time.
How to compress a video with MiniTool Video Converter? Follow these steps:
Step 1: Install MiniTool Video Converter by clicking the download button below. Then, launch this free application.
MiniTool Video ConverterClick to Download100%Clean & Safe
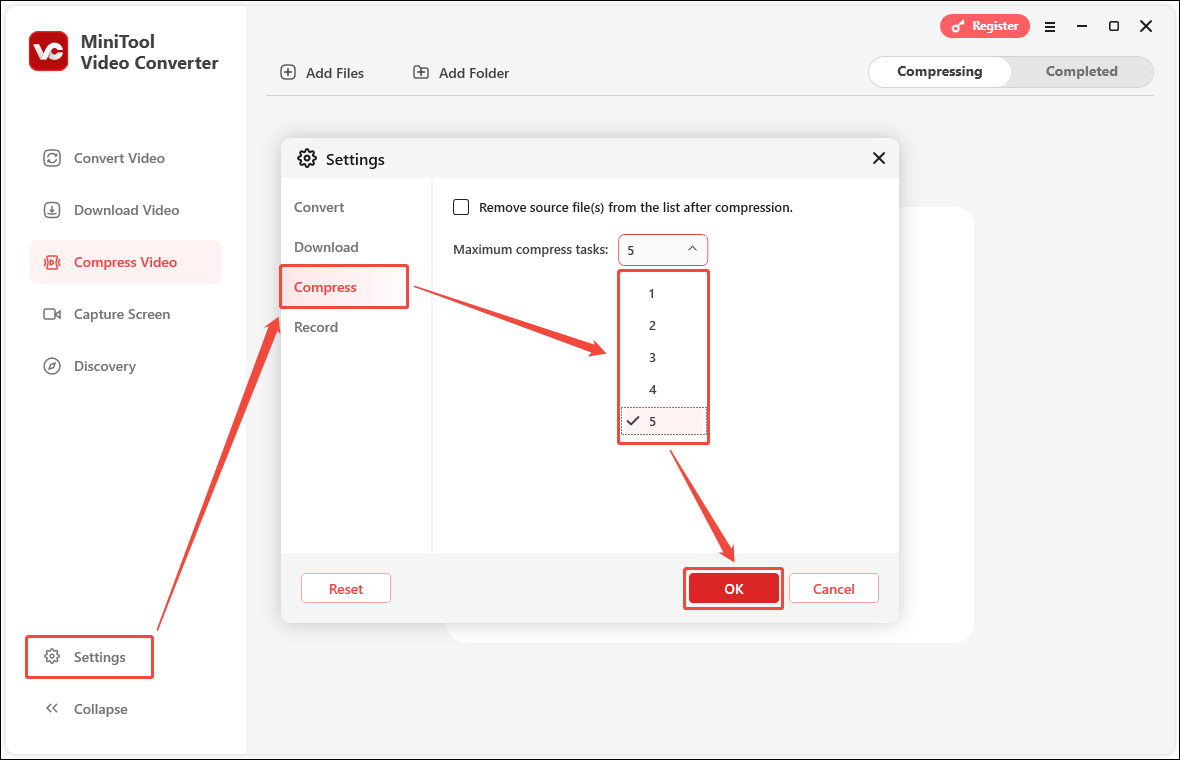
Step 2: (Optional) If you want to compress multiple videos at the same time, you can modify the maximum number of compression tasks in Settings in advance:
- Click the Settings option on the left menu.
- Choose the Compress tab.
- Expand the Maximum compress tasks option and choose a number.
- Click OK to save your changes.
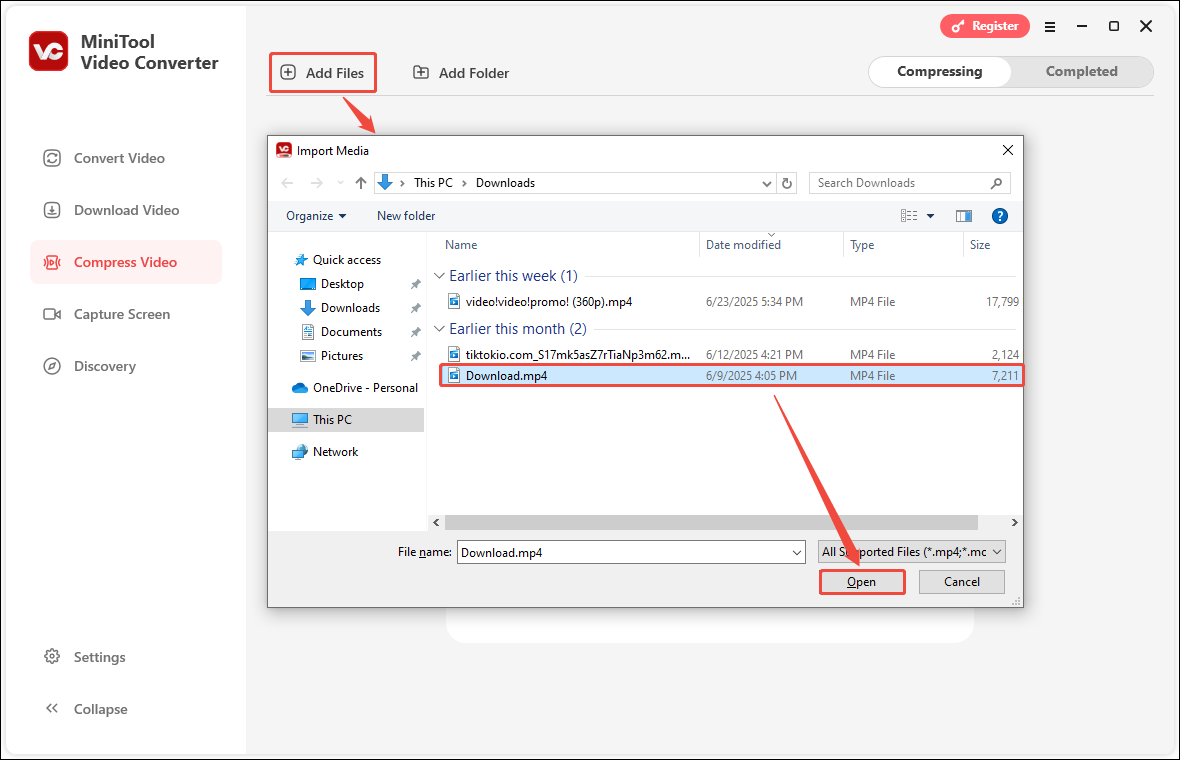
Step 3: Choose the Compress Video tab on the left column, click Add Files, select the video you want to compress, and click Open.
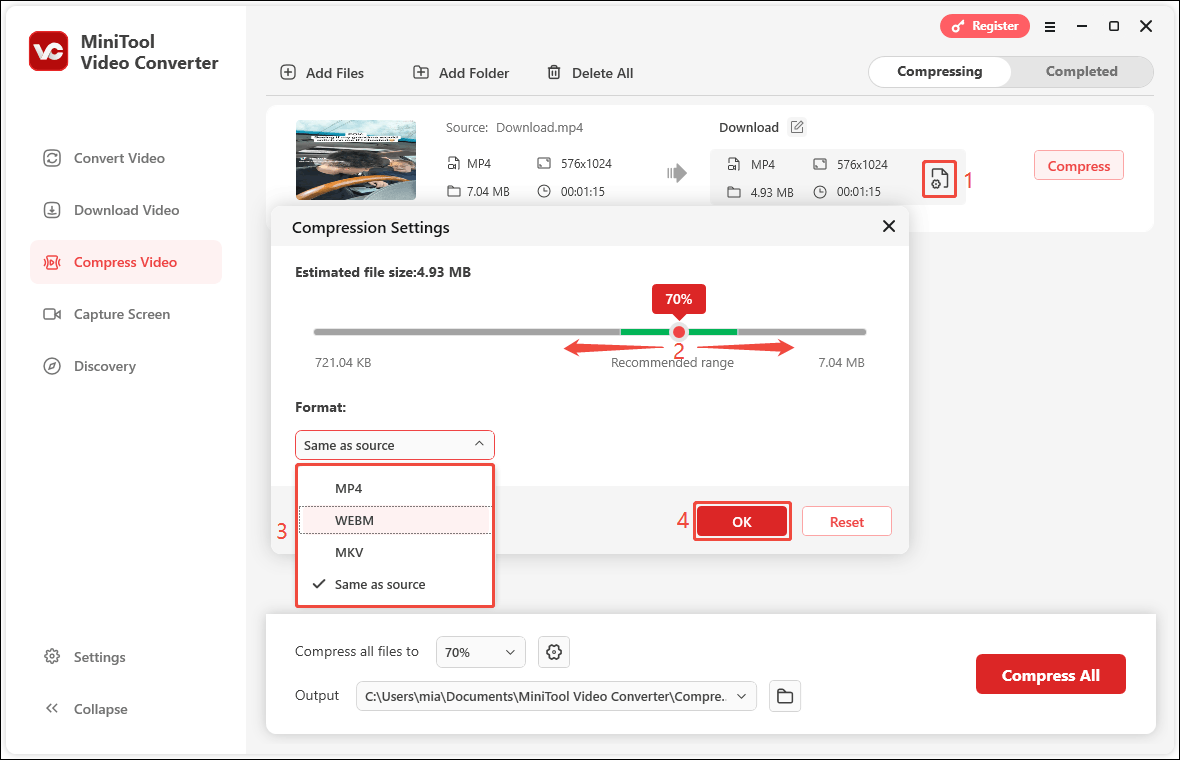
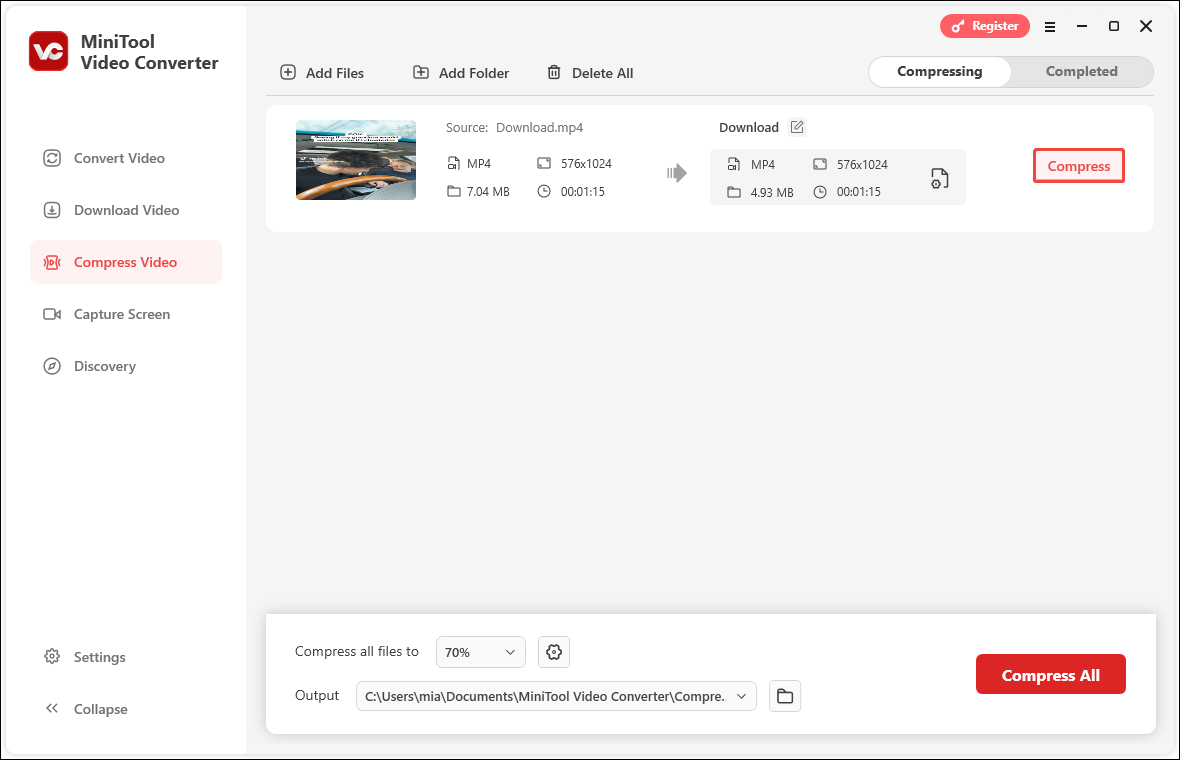
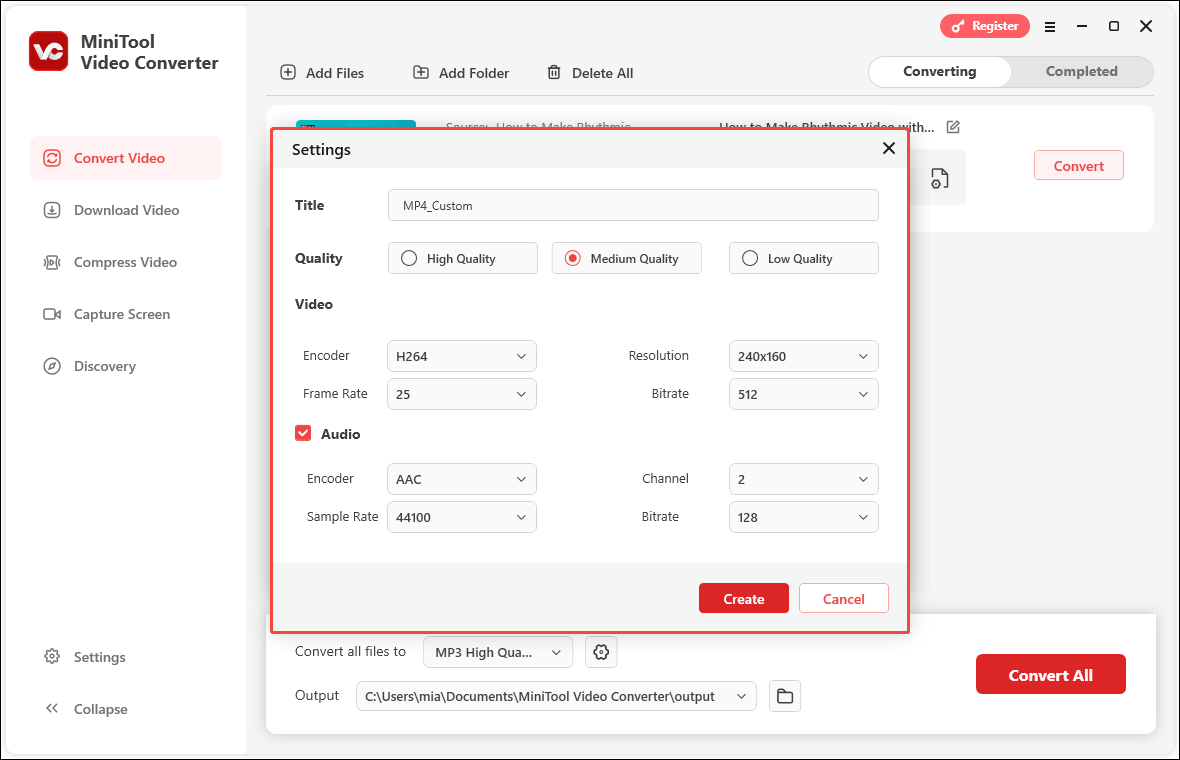
Step 4: Click the output settings icon to open the Compression Settings window. After that, drag the red dot on the slider to select a compression percentage you want. You can also view the estimated file size above the slider. Then, expand the Format option and select a format you want to export. Finally, click OK to save all the changes.
Step 5: Click the Compress button to start compression.
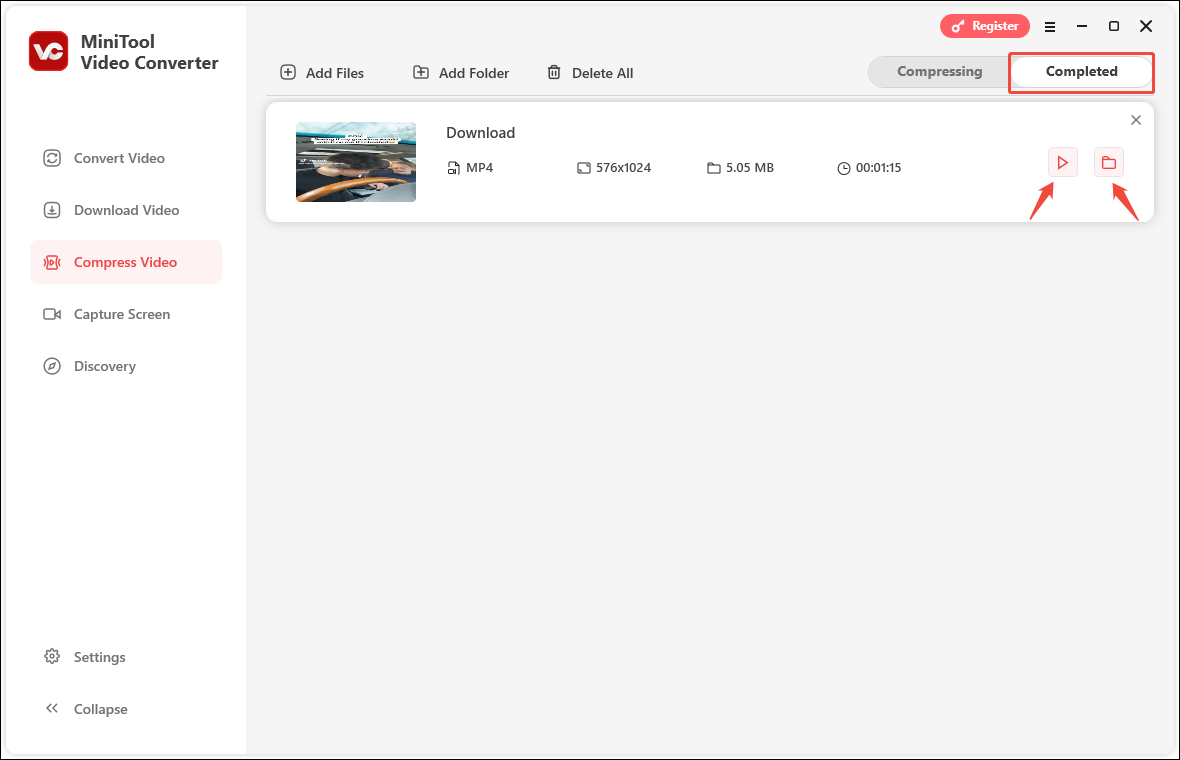
Step 6: Once the video is compressed, it will automatically switch to the Completed tab. Click the play icon to play the compressed video directly. You can also click the folder icon to locate the file’s save address.
By the way, MiniTool Video Converter also supports converting audio and video formats, recording screen/audio, and downloading videos from YouTube and multiple platforms. More surprises are waiting for you to explore!
2. Video Candy
Video Candy is an efficient and powerful online video processing tool. It includes a fast video compressor that can reduce the size of the video while maintaining the original quality as much as possible. The tool has strong compatibility. It supports a variety of mainstream video formats, including MP4, AVI, WMV, and WebM.
Video Candy does not need to be downloaded and installed. You can access it directly through browsers such as Chrome, Edge, and Safari. If you want to compress a video, Video Candy is a good choice. It will provide you with a convenient experience.
However, since the various functions of Video Candy are performed through web pages, the processing speed may be affected by the network speed. Especially when uploading some large video files, the speed may be slow. In addition, the video compressed with Video Candy will have a watermark. If you want to remove the watermark from the video, you need to purchase their plan.
Here are the steps to compress a video using Video Candy:
Step 1: Go to videocandy.com and select the Compress video option.
Step 2: Click the + ADD FILE button to upload the video you want to compress.
Step 3: After uploading the video, Video Candy will automatically start compressing the video. The compressed video will have the videocandy.com logo. You can select the REMOVE WATERMARK button and pay to remove the watermark before downloading. If you don’t mind the watermark of the video, you can directly click the DOWNLOAD FILE button to download the compressed video.

Video Candy does not support setting the compression percentage in advance. If you think the compressed video file size is still too large, you can use Video Candy video compressor to compress it again.
Method 2: Use a Video Conversion Tool
You can use a video converter to adjust the resolution, bitrate, and format of the video to reduce the video size before uploading to Dropbox.
VLC Media Player is a multimedia player. It is renowned for its strong compatibility and cross-platform support. VLC Media Player is not only completely free, but also allows users to use and modify it freely. As a cross-platform player, VLC supports popular operating systems, including Windows, macOS, Linux, Android, and iOS. This ensures users get a consistent playback experience on different devices.
Additionally, VLC supports various media formats, including audio and video files, DVDs, audio CDs, and VCDs. It can even play damaged or incomplete files smoothly. Plus, it can be used as a video compressor. Just upload a video from your computer to the player and modify parameters such as resolution and bitrate to compress the video.
Here is a step-by-step tutorial on how to use VLC Media Player to compress a video:
Step 1: Launch VLC Media Player, choose the Media tab on the top left, and select the Convert/Save option.

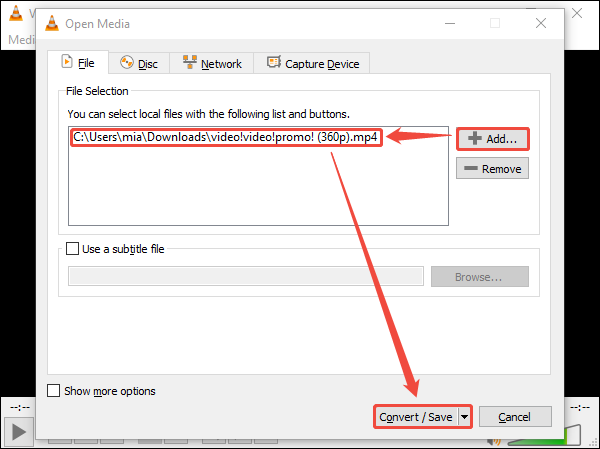
Step 2: Click the + Add button and select the video file you want to compress. When you see the video address displayed in the File Selection box, it means the video has been added successfully. After that, click the Convert/Save button.
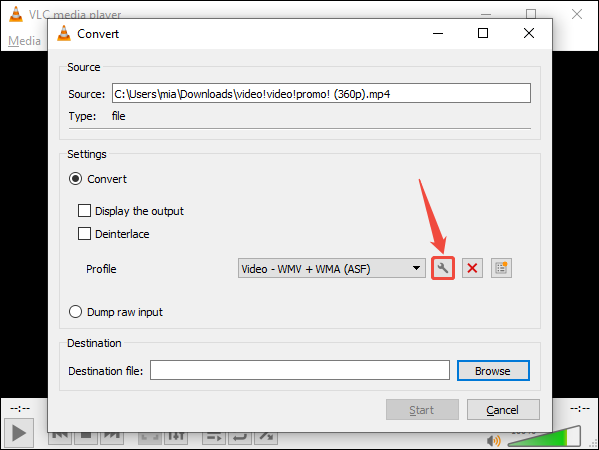
Step 3: When the Convert window pops up, expand the Profile option and select a suitable option from the drop-down menu.
Step 4: Click the wrench icon to customize settings.
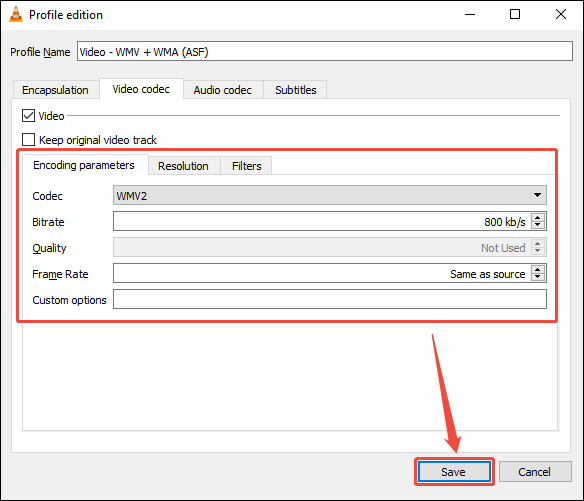
Step 5: In the Profile edition window, select the Video codec option. Then, adjust the bitrate and frame rate under the Encoding parameters tab. Then switch to the Resolution tab to adjust the video resolution. After that, click on Save to save your changes.
Step 6: In the Destination section, click the Browse button, select the file save location, and rename your compressed video file.
Step 7: Click the Start button to start the compression process.
After the video compression is completed, you can find the compressed video in the destination folder you selected.
MiniTool Video ConverterClick to Download100%Clean & Safe
Method 3: Zip the Video Before Uploading
If you don’t want to install software on your computer, you can use the built-in compression tools on Windows or Mac to compress the video. Although the built-in compression tool on your computer is not specifically designed for video compression, you can also compress video files by creating a ZIP archive. This method can reduce the size of the video, especially for high-bitrate or high-resolution videos.
Here are the methods for creating a compressed archive using Windows and Mac respectively:
# Windows:
Step 1: Find the video file you want to zip.
Step 2: Right-click the video file, select Send to, and then choose Compressed (zipped) folder.
Step 3: A new compressed folder with the same name will be created in the same location.
# Mac:
Step 1: Select the video file.
Step 2: Choose File and click Compress.
Step 3: You will create a ZIP archive containing your video.
To Wrap Things Up
Does Dropbox compress videos? This article tells you that it doesn’t. If you want to compress videos and upload them to Dropbox, you can choose one of the three methods recommended in this article. Among them, MiniTool Video Converter is my most recommended Dropbox video compressor. It is not only free, but also can export compressed videos without watermarks. You can also use it to batch compress videos.
If you have any problems using MiniTool Video Converter, please contact us at support@minitool.com for assistance. You can also send your problem to me on X.
User Comments :