Black Screen Records
Now, many smart devices can perform screen recording, such as desktop computers, laptops, and mobile phones. However, you may encounter the “black screen records” issue for some reasons when taking screen records. The following are the main reasons:
# No right for taking screenshots: From the system, software to the target recording content, you may be prohibited from taking screenshots. Most likely, piracy protection or DRM is very important.
Also see: Can’t Take Screenshot Due to Security Policy? Here Are Fixes!
# Screen recorder error: The same reason as the previous one, any screen recorder application may sneak away due to its internal mechanism or recording settings, and cause performance errors.
# Inappropriate recording environment: Due to the heavy burden on your computer, your recording happens to turn black. In addition, when your screen recorder cannot work on the same GPU as the recording application, the screen will also turn black.
# System bug: A small, unknown bug in the machine system, especially the Android system, may cause you to be involved in this black error. Of course, this may be an occasional problem that you can get rid of by yourself, or it may be a serious error that requires further system updates.
# Outdated GPU driver: The old graphics driver may have display abnormalities, of course, including the display during projection.
Next, we will introduce how to fix black screen records on Windows 11.

Fix 1: Restart Your Devices/Software
First, you should try to restart your screen recorder. Besides, restarting a computer can always fix some issues on the device. Thus, you should restart devices, including your computer or phone.
Fix 2: Update the Software, System, and Drivers to the Latest
Make sure that the software, system, and drivers (PC only) are up to date. If any one of them has not been upgraded to the latest version, especially the graphics driver of the PC, you may encounter black screen records on Windows 10.
Fix 3: Check the Limitation
If the target application or streaming media content has restrictions on screen recording, a black screen will appear. This is why many people find that they only experience black screen issues when recording certain applications or saving videos from Amazon Prime, Netflix, and similar platforms.
In addition, your antivirus application can also protect you from unwanted screen captures, so please make sure your screen recorder application is on the whitelist. Or, you can choose to disable the antivirus, refer to this post – How to Disable Antivirus on Windows 10 Temporarily/Permanently.
Fix 4: Change Recording Settings
It is recommended that you change the in-app recording settings, such as resolution, frame rate, quality, etc. You should change the capture settings of the application according to the actual situation to see if it helps. For example, if your PC is low-end, please lower the quality level and parameter values; disable GPU hardware acceleration for video processing.
Fix 5: Try Other Screen Recorders
If the above methods are not working, you can try other screen recorders to do the recording task. Here are some great screen recorders.
Screen Recorders for Windows Users
If you are a Windows user, you can try MiniTool Video Converter and Xbox Game Bar.
#MiniTool Video Converter
The first Windows screen recorder I want to recommend is MiniTool Video Converter. It is a free screen recorder that enables you to record the 4K screen at different frame rate options (50 FPS, 30 FPS, 25 FPS, 20 FPS, and 15 FPS). It supports recording the full screen and customizing the recording area.
With MiniTool Video Converter, you can record any activities happening on the screen with the option to capture system audio and microphone sounds separately or simultaneously. For instance, you can record video conferences, video games, online lectures, streaming videos, video chats, and other video content.
In addition, MiniTool Video Converter enables you to convert audio and video files in a wide range of formats as well as download videos from YouTube.
How to Record the Screen with MiniTool Video Converter
Step 1. Click the button below to download and install MiniTool Video Converter.
MiniTool Video ConverterClick to Download100%Clean & Safe
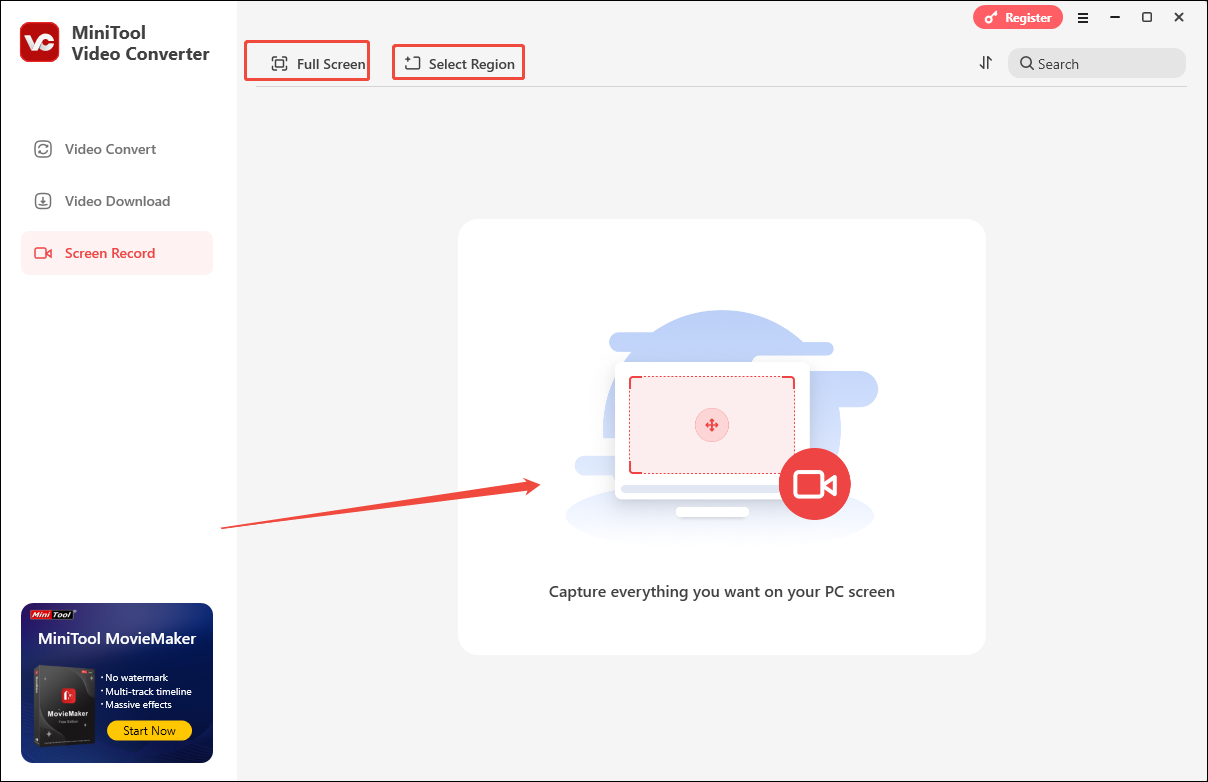
Step 2. Run this free screen recorder and click the Screen Record tab.
Step 3. On this page, you can directly choose the Full Screen option or the Select Region option, and then you will be guided to the MiniTool Screen Recorder panel. Alternatively, you can directly click the Capture everything you want on your PC screen area to access the MiniTool Screen Recorder panel.
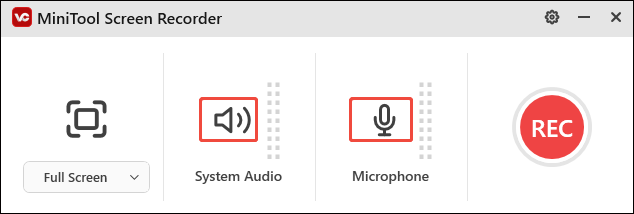
Step 4. On the MiniTool Screen Recorder panel, you can choose whether to record audio from the system and microphone. Simply click on the System Audio and Microphone icons to turn them on or off.
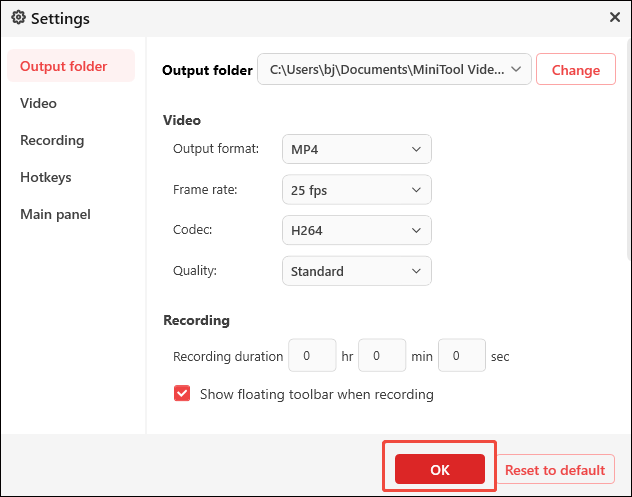
Step 5. Furthermore, click the Settings icon (a gear icon) at the top right to adjust other recording settings, like the recording frame rate, quality, and others. Then don’t forget to click OK to confirm the changes.
Step 6. Click the Record icon or press the default F6 key to start recording. In the recording process, you can press F9 to pause and continue recording. When you want to end the recording, press F6 again.
#Xbox Game Bar
For Windows users, there is a built-in free screen recording tool named Game Bar. And this lets you record the screen on Windows 11/10 for free. You can turn on the Game Bar feature by following the instructions.
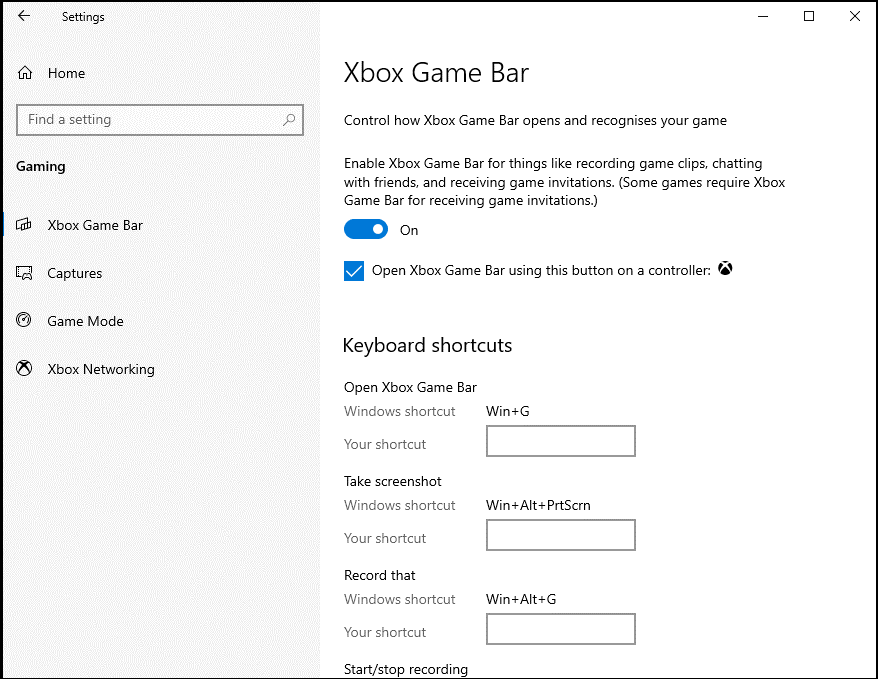
Step 1. Press Windows + I to open the Settings window of your Windows PC. Click Gaming > Game Bar. You can find the Game Bar tool and its settings now.
Step 2. To enable Game Bar, you can turn on the Record game clips, screenshots, and broadcast using Game bar option.
After turning on the Game Bar feature, you can use it to record the screen now.
Step 1. Open the screen you’d like to record.
Step 2. Press Windows + G keyboard shortcut to evoke Game Bar. Click Yes, this is a game, and then you can press the Win + Alt + R keyboard shortcut to start recording the video.
Step 3. To stop the recording, you can press the Win + Alt + R keyboard shortcut again.
Step 4. Then you can go to C: UsersAdministratorVideosCaptures to find the recorded file.
Screen Recorders for Mac Users
QuickTime Player and OBS Studio are two good screen recorders for Mac.
#QuickTime Player
The easiest way to record video on your Mac is using the built-in QuickTime Player. Now let’ get into the specific steps.
Step 1. Open QuickTime Player on your Mac.
Step 2. Click the File option to open the drop-down menu and choose New Movie Recording.
Step 3. The FaceTime webcam will activate and show on the screen. Click the red record button to start recording your video.
Step 4. When finished recording, click the Stop button to end it. Go to the File menu and choose Save or Export.
Step 6. Give the recorded video a name and save the recorded movie to the location of your choice.
MiniTool Video ConverterClick to Download100%Clean & Safe
#OBS Studio
You can use another Mac video recorder – OBS Studio. It’s a free and open-source screen recorder and live streaming software available for macOS, Windows, and Linux. It can record screens in different qualities and formats, including MP4, FLV, MKV, etc.
Here’s how to record the screen on a Mac computer with OBS Studio.
Step 1. Launch OBS Studio after installing it on your Mac computer.
Step 2. Click the + in the Sources section to select the Display Capture option. Click OK and follow the on-screen prompt to complete the recording information.
Step 3. In the Controls section, choose Settings to change the output settings.
Step 4. After you save the changes, click on Start Recording in the Controls section.
Step 5. Then it will start recording your screen. To end the recording, open the OBS window and click the Stop Recording button.

Screen Recorders for Phone Users
If you want to screen record on an Android phone, you can try Mobizen Screen Recorder. It allows you to record the screen as well as capture and edit recordings for free. The editing features include video trimming and splitting, adding background music or Intro/Outro videos, etc. And it’s a screen recorder without watermarks.
Step 1. Download and install Mobizen from the Google Play Store, and open this screen recorder.
Step 2. Select the Record button from the recording widget.
Step 3. A dialog saying “Mobizen will start capturing video” appears, and click the Start now option.
Step 4. After a three-second countdown, the recording starts.
Step 5. When you want to finish the recording, tap the Mobizen icon and tap the Stop button.
Step 6. Click the WATCH VIDEO button to view the recording.
If you want to capture your iPhone screen, there is no need to download a third-party application from the App Store. Apple offers a free tool for iOS 11 or later that you can add to your iPhone’s Control Center to screen record with sound. Next, we will show you how to screen record on iPhone.
Step 1. Go to Settings > Control Center and tap on More Controls (or Customize Controls if you’re using iOS 13 or earlier).
Step 2: Then, click the green + button next to Screen Recording, which will move it from the MORE CONTROLS section to the INCLUDE section.
Step 3. Swipe down from the right side of your screen to open Control Center on your iPhone.
Step 4. Press and hold the gray Record icon. If you want to record your voiceover, just click Microphone. Hit Start Recording.
Step 5. After a three-second countdown, it will record everything you do.
Step 6. To stop the recording, open Control Center again and tap on the red Record icon. Or tap on the red status bar at the top left of your screen and select Stop.
Step 8. Go to the Photos app and check your screen recording.
Conclusion
After reading this post, you must know how to fix the “black screen records” issue. Just try the 5 workable solutions mentioned above. Besides, you can choose a screen recorder for your device. If you have questions about this post or encounter problems when using MiniTool Video Converter, please feel free to contact us via support@minitool.com.
About The Author

Position: Columnist
Olivia is always full of enthusiasm for life and loves to record. She often records beautiful and memorable moments of life with her camera and then uses some editing tools to put the photos, videos and audio together. She also has a passion for writing and offers suggestions to readers on images, audio, videos and news. To provide more professional articles and solve problems for readers, she is continuing to learn multimedia as well.
User Comments :