LinkedIn allows you to upload videos. However, the maximum single video size that LinkedIn supports is 5 GB. To bypass LinkedIn video size limit, you can use video compressors like MiniTool Video Converter, MiniTool MovieMaker, and VEED.IO to reduce your video file size.
What’s the LinkedIn Video Size Limit and More
LinkedIn is the world’s largest professional social platform. You can find jobs or professionals in your field, improve your skills, and more.
Posting videos on LinkedIn can help increase your brand awareness and thought leadership. Moreover, videos can tap into potential customers in professional fields better than static posts. Before uploading a video, you need to understand the following points about LinkedIn videos.
#1. LinkedIn Video Formats
LinkedIn supports multiple video formats to accommodate different types of content, such as MP4, MOV, ASF, FLV, MKV, WebM, and more. The supported audio formats are AAC or MPEG4, and the sampling rate needs to be less than 64KHz.
The most recommended video format for LinkedIn is MP4. MP4 is compatible with regular posts and LinkedIn ads. If your video is not in MP4 format, it is best to convert it to MP4 format before uploading it to LinkedIn for the best results.
#2. LinkedIn Video Duration
LinkedIn desktop supports uploading videos up to 15 minutes long. At the same time, the LinkedIn mobile app supports uploading videos up to 10 minutes long. In addition, the maximum duration of video ads on LinkedIn is 30 minutes.
Generally speaking, shorter videos are more likely to attract attention more quickly. Therefore, we recommend that the videos you upload on LinkedIn are preferably between 30 seconds and 5 minutes long. In particular, videos around 30 seconds can effectively increase brand awareness and user attention, and explore topics in depth.
#3. LinkedIn Video Aspect Ratio
LinkedIn allows you to upload videos with different aspect ratios, including 16:9, 1:1, 4:5, and 9:16. While videos in these aspect ratios can be uploaded, you should still choose the appropriate ratio based on the device and content.
If you want to show your video to mobile users, 4:5 or 1:1 is best to maximize the video’s display on mobile screens. However, for content such as presentations, corporate videos, webinars, etc., a 16:9 aspect ratio is more suitable. Although LinkedIn supports a 9:16 aspect ratio, videos may be cropped or padded when displayed on desktop devices.
#4. LinkedIn Video Resolution
LinkedIn supports video resolutions ranging from 256x144 to 4096x2304 pixels. The appropriate resolution varies depending on the video’s aspect ratio. The following table shows the recommended minimum and maximum resolutions for videos with different aspect ratios:
| Video Aspect Ratio | Recommended Minimum Resolution | Recommended Maximum Resolution |
| 16:9 | 640 x 360 pixels | 1920 x 1080 pixels |
| 1:1 | 360 x 360 pixels | 1920 x 1920 pixels |
| 4:5 | 360 x 450 pixels | 1080 x 1350 pixels |
| 9:16 | 360 x 640 pixels | 1080 x 1920 pixels |
#5. LinkedIn Video File Size Limit
The LinkedIn max video size is 5 GB. However, the minimum LinkedIn post video size cannot be less than 75 KB. Some sponsored video ads can have video file sizes up to 500 MB.
What is the best video size for LinkedIn? Although you can upload videos up to 5 GB to LinkedIn, to make the video upload faster and play more smoothly, we recommend that you restrict the file size between 75 KB and 200 MB. File sizes in this range will play better and reduce data consumption.
How to Bypass LinkedIn Video Size Limit
We already know that LinkedIn max video size is 5 GB. If your video is larger than 5 GB, you will not be able to upload it to LinkedIn successfully. Therefore, you need to compress the video and make it smaller. How to compress your video? Here are 3 practical tools for your reference!
#1. MiniTool Video Converter
Want to compress your videos losslessly? MiniTool Video Converter can help you! It is an excellent video compression tool that can balance the size of video files with the quality of the video.
MiniTool Video Converter has excellent built-in compression functions. It supports compressing videos to the ideal size, and it is completely free, with no video length or quantity restrictions! Even long movies of several hours can be easily processed. What’s more surprising is that it supports batch compression (up to 5 files), which greatly improves your work efficiency.
Moreover, MiniTool Video Converter is compatible with multiple mainstream formats such as MP4, MKV, MOV, AVI, etc., which perfectly solves the format compatibility problem. Plus, the videos compressed with it have no watermarks and perfectly retain the original quality. It supports previewing the compressed file size. In this way, you can compress the video to less than 5 GB to meet LinkedIn’s video size limit.
If you want to compress a video for LinkedIn, you can follow the steps below to compress a video for free with MiniTool Video Converter:
Step 1: Install and Launch MiniTool Video Converter
Click the download button below to quickly install MiniTool Video Converter. Then, open this application.
MiniTool Video ConverterClick to Download100%Clean & Safe
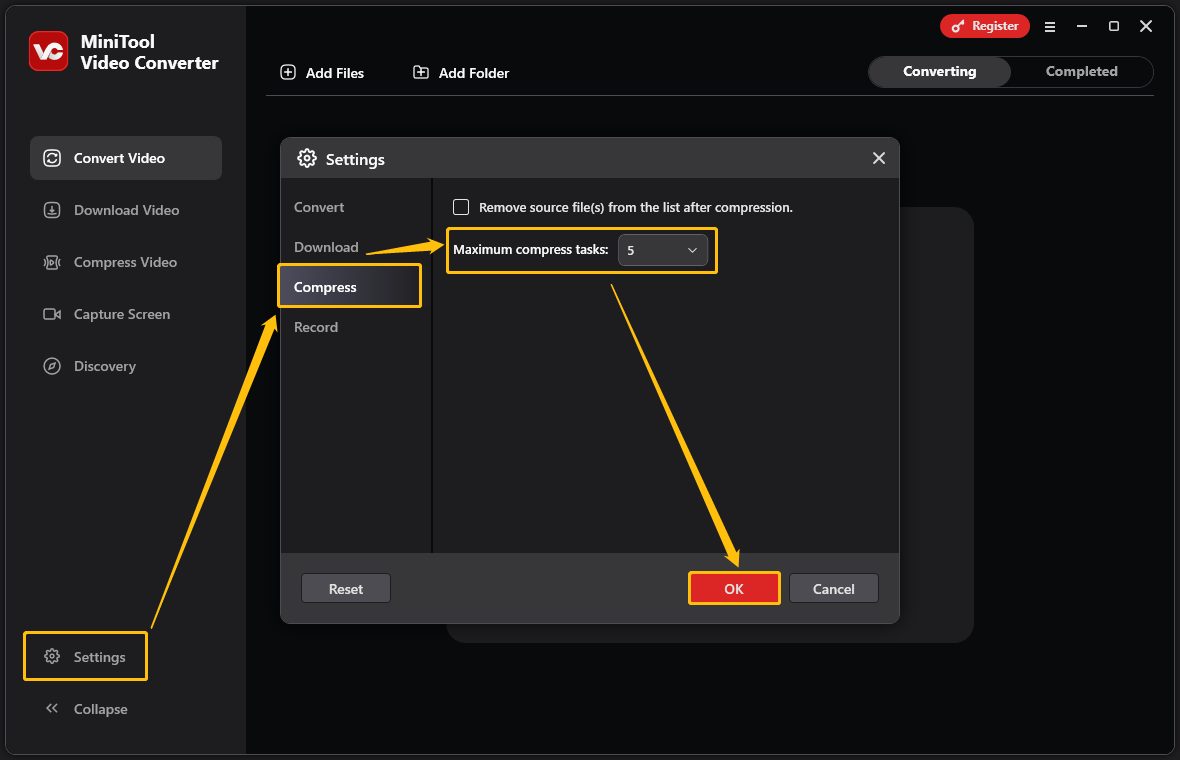
Step 2: Configure Batch Compression (Optional)
If you have multiple video files that you want to compress, you can first set the number of videos to be compressed simultaneously to improve compression efficiency:
- Navigate to the Settings tab on the left panel.
- Choose the Compress tab.
- Set the Maximum compress tasks (1 to 5).
- Click OK to save your preferences.
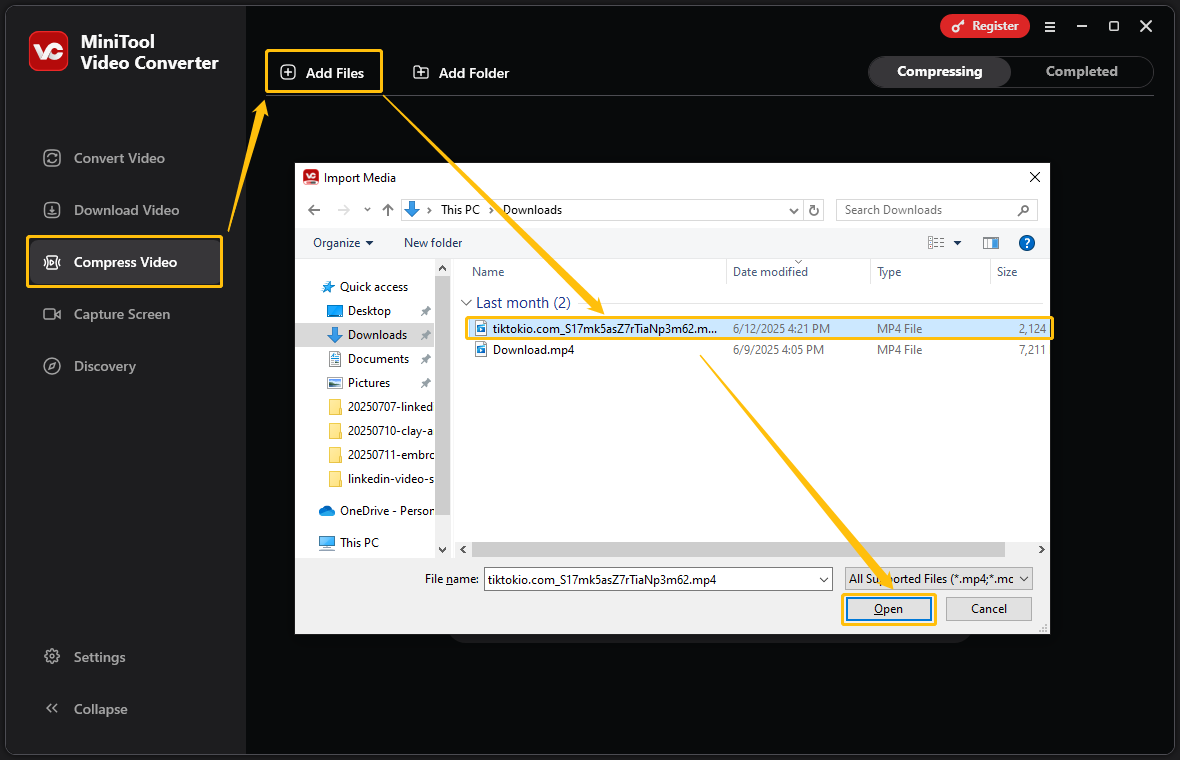
Step 3: Add Video Files
Select the Compress Video tab from the left menu. Then, click the Add Files option. In the pop-up window, select a video file you want to compress, and click Open.
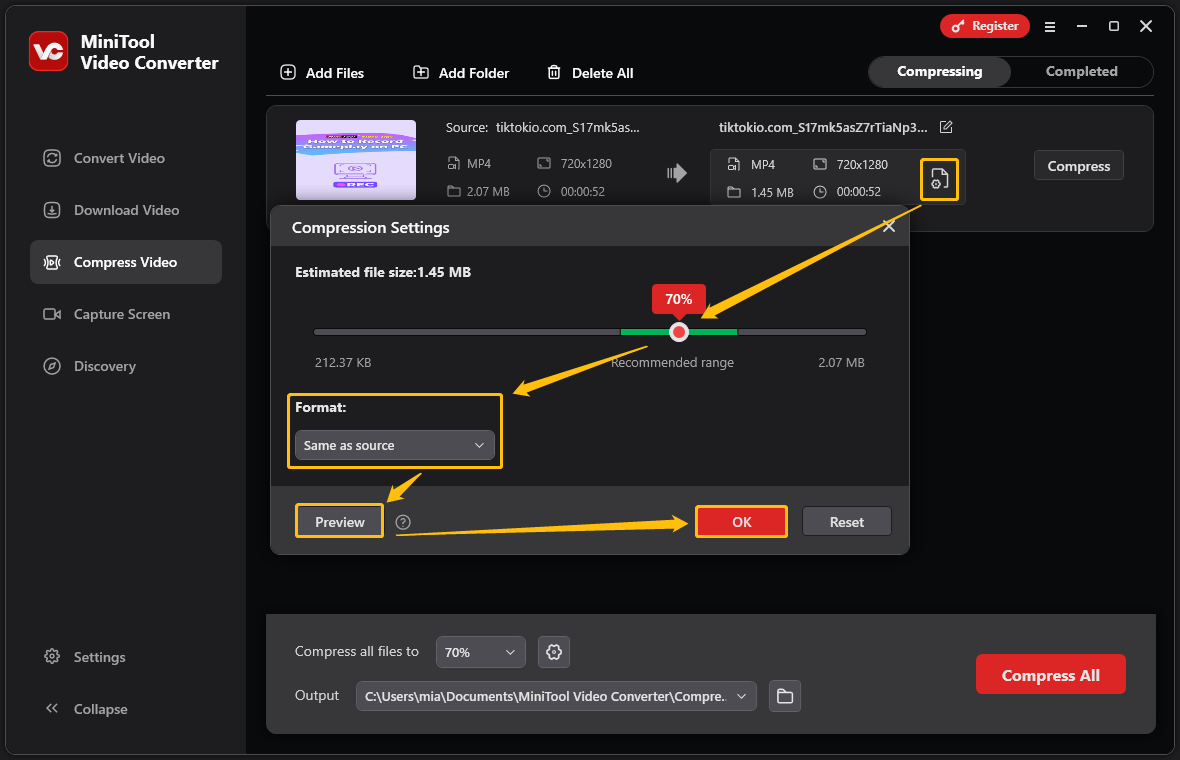
Step 4: Adjust Compression Settings
Click the gear icon. Once the Compression Settings window pops up, drag the slider to set the compression level. As you adjust the compression level, watch the estimated file size above the slider. The estimated file size should be between 75 KB and 5 GB.
Next, select an export format (MP4, WebM, or MKV). You can also click the Preview button to watch a 10-second compressed video to check the video quality. If you think the video quality is low, increase the compression percentage. Lastly, click OK to save all your changes.
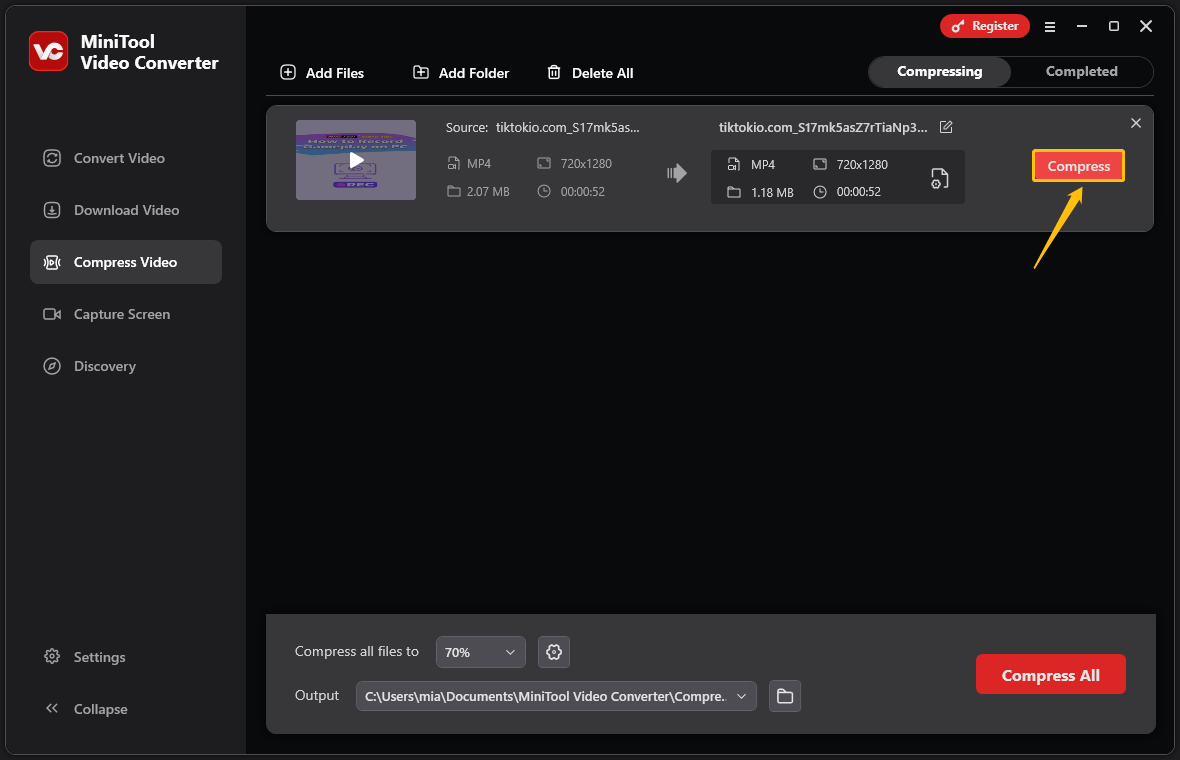
Step 5: Compress the Video
Click the Compress button to start compressing the video.
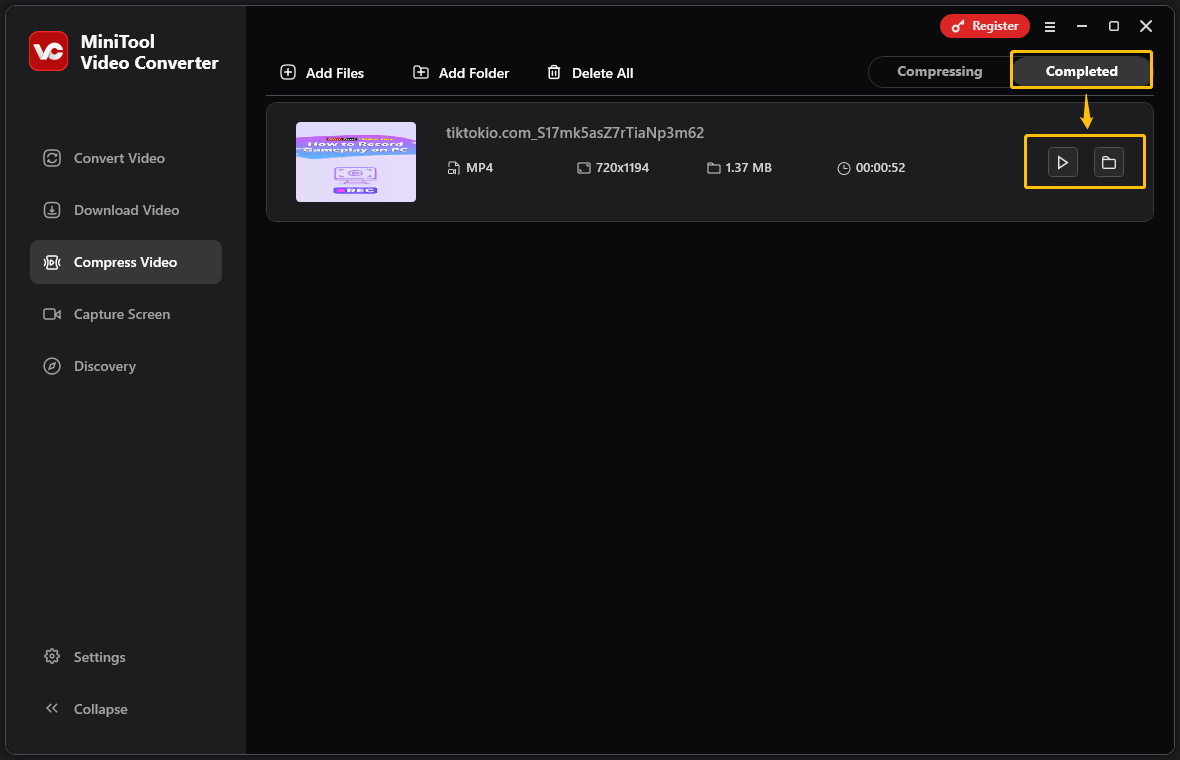
Step 6: Locate the Compressed Video File
After the video is compressed, view compressed videos under the Completed tab. You can click the play icon to play the video directly or click the folder icon to locate saved videos.
MiniTool Video Converter is a powerful multimedia processing tool. In addition to compressing videos, it is also a free video converter that supports conversion between multiple audio and video formats.
What’s more, MiniTool Video Converter also has a built-in video download function, which can easily obtain video content from mainstream platforms such as YouTube, TikTok, Twitter, Facebook, and Instagram. Additionally, this software also has a high-definition computer screen recording function.
#2. MiniTool MovieMaker
In addition to using a video compressor, you can also reduce the size of the video by lowering its resolution, frame rate, and bit rate. MiniTool MovieMaker is a video editor, not a dedicated video compressor. However, it allows you to adjust its resolution, frame rate, and bitrate when exporting the video.
MiniTool MovieMaker supports exporting to multiple formats, including MP4, MOV, and MKV, which LinkedIn supports. In addition, the exported video will not have a watermark. Next, I will tell you how to use MiniTool MovieMaker to compress a video for free:
Step1. Download and Install MiniTool MovieMaker
Download and install MiniTool MovieMaker on your desktop by clicking the button below.
MiniTool MovieMakerClick to Download100%Clean & Safe
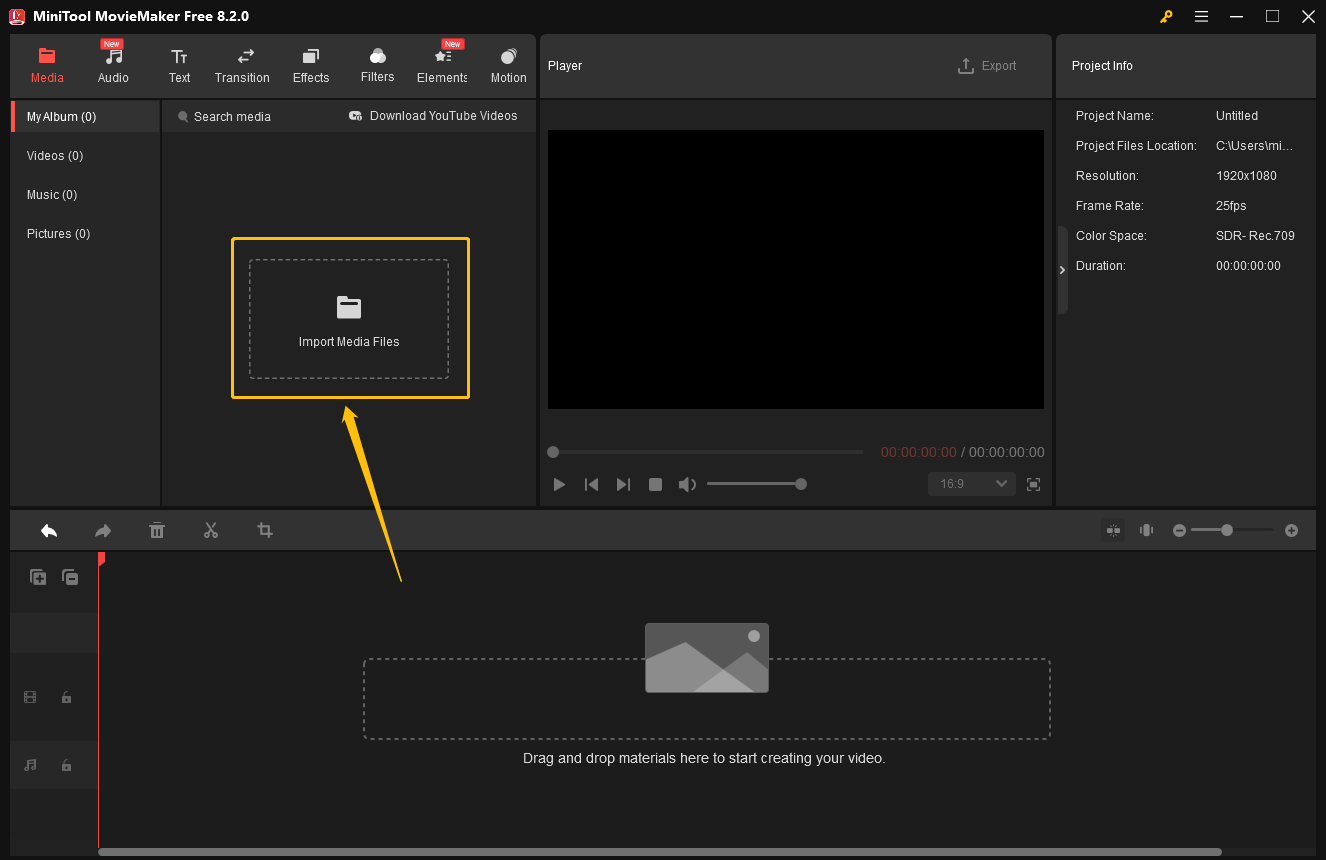
Step 2. Launch and Import Your Video Files
Launch this application and click Import Media Files to upload the video you want to compress.
Step 3. Trim the Video to Reduce the File Size
Drag the imported video to the timeline. You can then trim this video or speed it up to shorten its duration and reduce its file size.
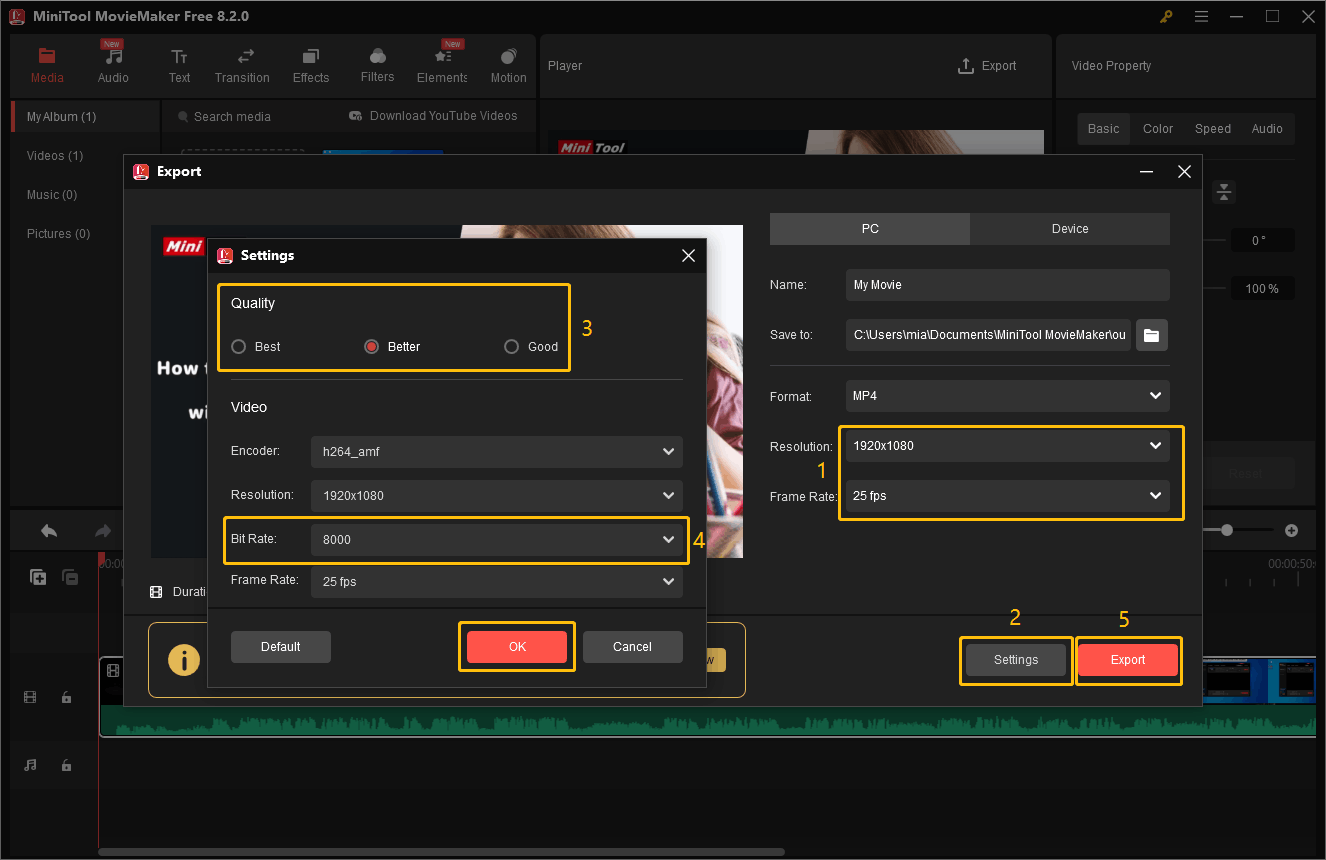
Step 4. Select a Lower Resolution and Frame Rate
Click on the Export button on the top right of the player. Once the Export window has opened, expand the Resolution and Frame Rate options, and then select a lower resolution and frame rate.
Step 5. Choose a Lower Video Quality and Bitrate
To adjust the video bitrate and video quality, click the Settings button, select a lower video quality and bitrate, and then click OK to save changes.
Step 6. Export the Video
Click on Export to save the video.
MiniTool MovieMaker can reduce file size by trimming videos and lowering their resolution, frame rate, and bitrate. Moreover, as a video editor, it can also add various wonderful transitions, effects, filters, and motion to your videos. Even if you are a novice in video editing, you can easily make great videos!
#3. VEED.IO
VEED.IO is a powerful AI online tool platform. It contains various interesting features to help you process videos better, such as adding memes to videos, converting audio to text, increasing the video volume, etc.
Most importantly, VEED.IO includes an online video compression tool that allows you to quickly compress videos. Because of the LinkedIn video upload size limit, you can first use VEED.IO to compress videos that exceed the size specified by LinkedIn. Here’s how:
Step 1: Find the Video Compressor on VEED.IO
Go to VEED.IO (www.veed.io), click the Product option, choose More Tools, and click on Video Compressor.
Step 2: Upload the Video You Want to Compress
Click the Compress a video button, choose Upload a File, and select the file you want to compress.
Step 3: Reduce the Video Quality, Resolution, and Frame Rate
Click the Quality and Resolution options to select a smaller video quality and resolution. Then, click the Advanced option to lower the frame rate of the video. Finally, select the Compress Video button to start compressing the video.
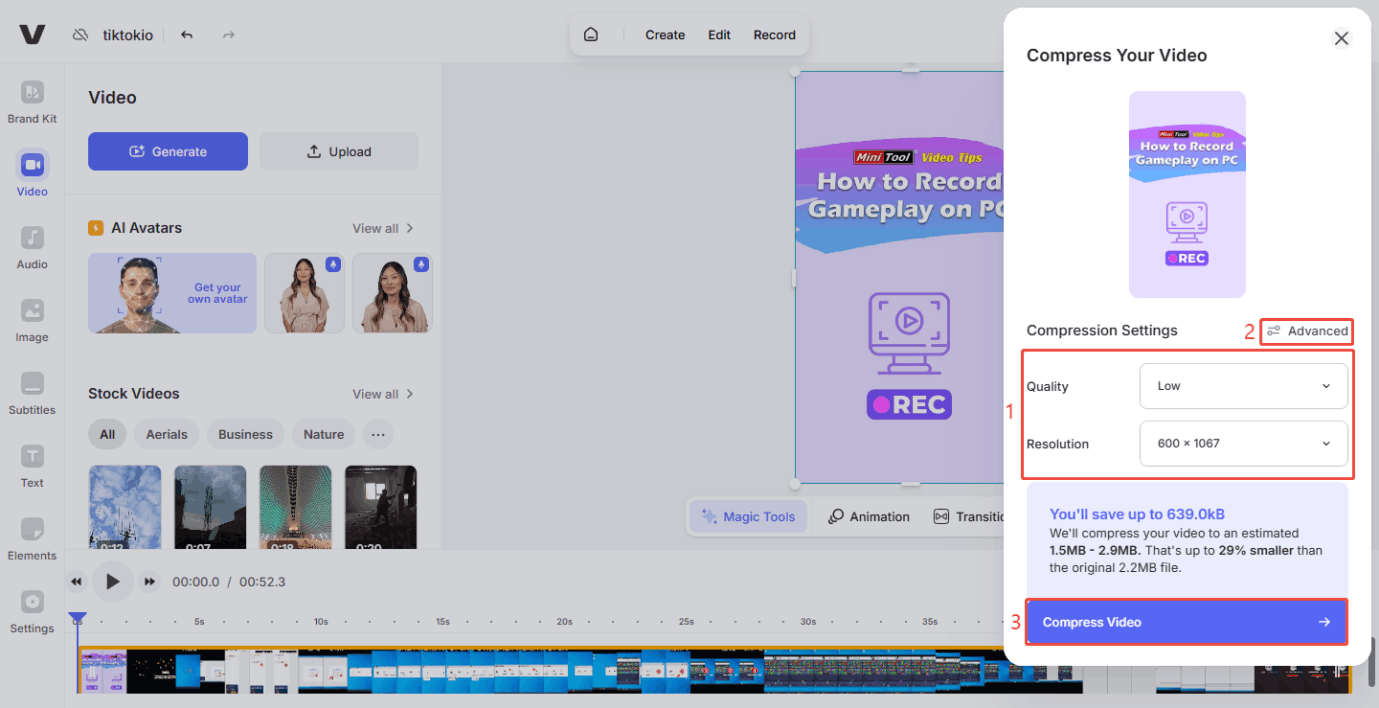
Step 4: Download the Compressed Video
After the video is compressed, a window will pop up in the upper right corner of the interface. Click the video in the window to view the quality of the compressed video. Click Download file to download the compressed video.
How to Post a Video on LinkedIn
Once you’ve compressed your video using the above method, you can start uploading your video to LinkedIn. You can upload LinkedIn videos on both desktop and mobile. Below, I will take the desktop version as an example to show you how to upload a compressed video to LinkedIn:
Step 1: Open LinkedIn and navigate to your homepage.
Step 2: Click on the Video icon located at the top of your feed.
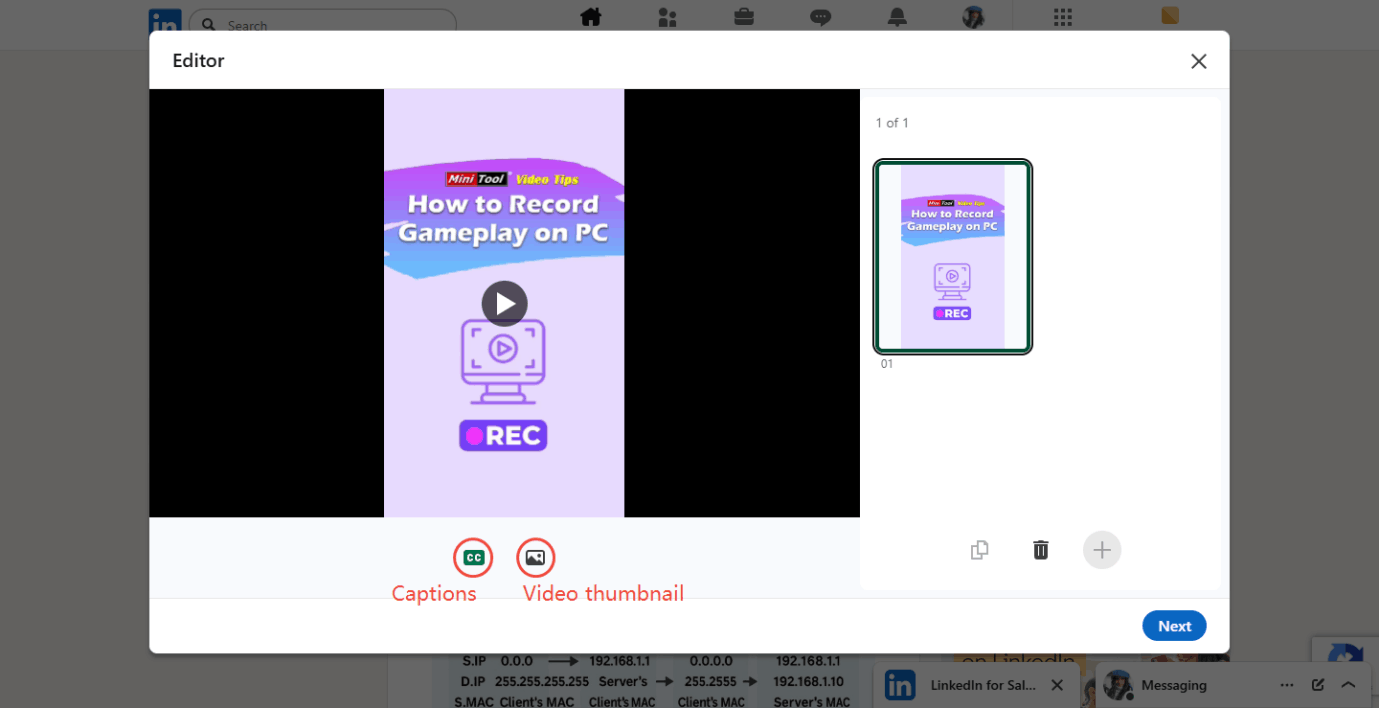
Step 3: Next, in the pop-up Editor window, click Upload from computer to upload your video. You can also drag and drop the video file directly into the window.
Step 4: After uploading, you can:
- Select the Captions option to add auto-generated captions or upload a video caption file.
- Choose the Video thumbnail icon to upload a thumbnail for your video.
Step 5: Enter your post’s message, add hashtags, and click Post to publish your video.
Conclusion
Because of LinkedIn video size limit, videos larger than 5 GB cannot be uploaded. MiniTool Video Converter, MiniTool MovieMaker, and VEED.IO can effectively reduce your video file size.
For me, MiniTool Video Converter is my favorite video compressor because it not only allows you to customize the compression level, but also allows you to preview the quality of the compressed video. Most importantly, the compressed video will not have a watermark.
If you encounter any problems while using MiniTool Video Converter, please contact us via support@minitool.com for help.
User Comments :