Microsoft PowerPoint is a popular presentation program. How to record a PowerPoint presentation with audio? In this article, we’ll show you how to use PowerPoint’s built-in recording tool and many other excellent screen recorders, such as MiniTool Video Converter, to get the task done.
For some reason, many people want to record their PowerPoint presentation, but most of them don’t know how to do it. On this page, we will detail several useful methods on how to record a PowerPoint with audio on your computer.How to Record a PowerPoint Presentation with the Built-in Tool?
PowerPoint comes with a recording tool that lets you record your presentation with narration. It provides you with several basic recording options, such as Pause, Stop, and Replay.Besides, it enables you to the laser pointer, eraser, pen, and highlighter tools while recording. Follow the steps below to record your presentation with audio.Step 1. Open your PowerPoint presentation on your Windows.Step 2. Click Slide Show, followed by Record Slide Show.Step 3. Here are 2 options – Record from Current Slide and Record from Beginning. Just choose the one you need.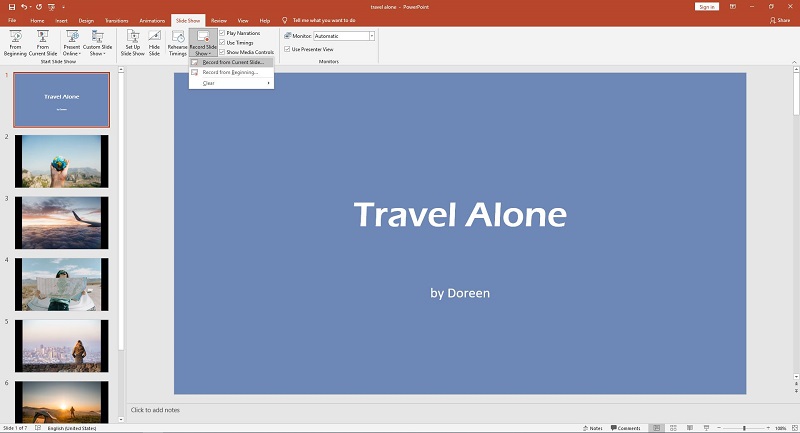 Step 4. Go to SETTINGS to select the microphone and camera for recording.Step 5. Toggle on or off the microphone, camera, and camera preview at the lower-right corner of the window.Step 6. Then hit the RECORD icon.
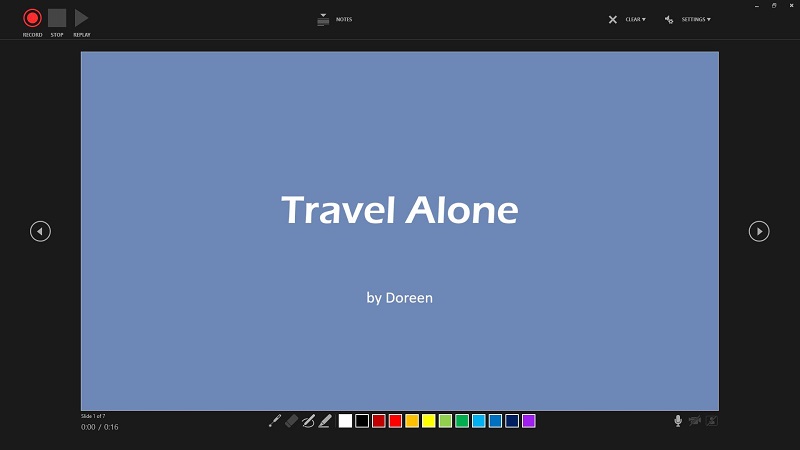 Step 7. When recording, you can use the laser pointer, eraser, pen, and highlighter tools to decorate the slide show.Step 8. To end your recording, tap on the square Stop button.Step 9. Close the recording window and then what you just recorded is embedded in each slide.Step 10. Head to Slide Show, select From Beginning or From Current Slide to preview the recorded slide show.Step 11. Lastly, save your presentation as a PowerPoint file or export it as an MP4 video.
How to Record a PowerPoint Presentation with Third-Party Software?
In addition to PowerPoint’s built-in recording function, there are many powerful screen recorders that can be used to record PowerPoint with audio. Let’s check them out!MiniTool Video Converter
The first program for capturing PowerPoint with audio is MiniTool Video Converter. Designed for Windows users, it is a free, intuitive, and full-featured screen recorder that has no limitations on the length and number of recordings.The freeware enables you to specify the recording area, capture your computer screen with audio, and export it in MP4, MOV, MKV, WMV, AVI, FLV, or TS format. Besides, it allows you to highlight the mouse cursor to display it on the screen and set hotkeys for almost all actions.Step 1. Click the button below to download and install MiniTool Video Converter on your Windows.MiniTool Video ConverterClick to Download100%Clean & Safe
Step 2. Once installed, launch the program and click the Screen Record tab to access the recording interface.Step 3. Click anywhere within the Click to record screen dotted box to get started.Step 4. The program is set to capture the full screen. To specify the area to be captured, click the dropdown to choose Select region.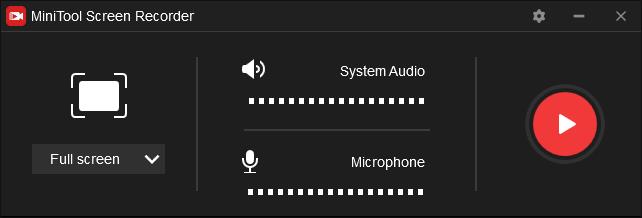 Step 5. To record a PowerPoint presentation with your narration, turn on the microphone.Step 6. Click the gear icon to change the recording parameters. Tap on OK to save your changes.Step 7. Hit the Record button and then play your PowerPoint presentation.Step 8. When it is over, press F6 to stop. Then the recorded file will appear on the screen.Features:
- No watermark
- Specify recording area
- Custom hotkeys
- Support multiple export formats
- Modify video frame rate, codec, and quality
- Unlimited number or length of recordings
Windows 10 Game Bar
As we all know, Windows 10 is pre-installed with the free screen recorder Xbox Game Bar, which is used to record game clips, screenshots, and broadcasts. If your computer is running Windows 10, then you can record PowerPoint presentation with audio without installation.It should be noted that the game bar is a non-desktop screen recorder, so you can only use the default shortcut to launch it. And it only allows you to capture the entire computer screen. To make matters worse, you cannot change any record configuration, except for shortcuts.Step 1. Click the Start menu on your Windows and choose Settings.Step 2. Select the Gaming option and then toggle on Record game clips, screenshots, and broadcast using Game bar.Step 3. Press the Windows + G keys simultaneously to run Xbox Game bar.Step 4. Click the gear icon to set up the shortcuts if needed.Step 5. Select Capture > Start recording, and then start playing your PowerPoint presentation.Step 6. When the presentation is over, click the Stop Recording button.Step 7. Then a notification will pop up, informing you that the recorded video is saved on your computer.Step 8. Tap on Game Clip Recorded to view the recorded video.Features:- No download and installation
- Record game clips
- Take screenshots
- Customizable shortcuts
QuickTime Player
The next solution to record PowerPoint presentation with audio is to use QuickTime Player. As its name suggests, it is an extensible multimedia framework, capable of handling various formats of digital video, picture, audio, etc.QuickTime Player lets you perform common movie edits like trim, split, and rotate. Besides, it allows create a recording of your entire screen or select just a portion of it, and then save the recorded file on your PC or share it on YouTube.Step 1. If you’re using a Mac computer, just launch QuickTime Player. If not, download it from the official site first.Step 2. Go to File > New Screen Recording to open the Screen Recording window.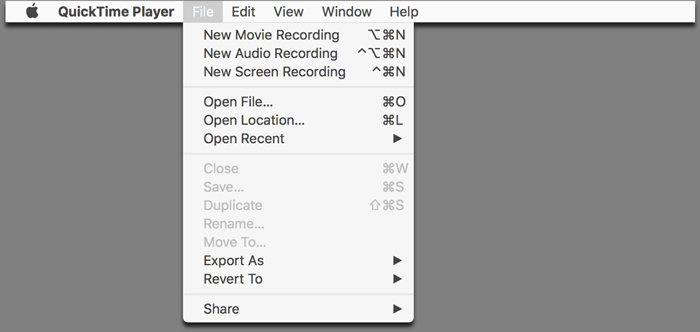 Step 3. Click Options to set the location where you’d like to save your screen recording.Step 4. If you prefer to record your narration, click the dropdown to select your desired microphone.Step 5. When you are ready, hit the Record button. Then a pop-up window will appear.Step 6. To capture the whole screen, click anywhere on the screen. If you only want to record a part of the screen, drag the dotted frame to cover the area to be recorded, and then click Start Recording.Step 7. Start your PowerPoint presentation.Step 8. When finished, click the Stop icon.Step 9. Go to File > Save to export the recorded video.Features:
- Edit movies
- Specify the recording area
- Record audio only
- No time limit
Camtasia
Another powerful software for recording PowerPoint presentation with audio is Camtasia. It is an all-in-one screen recorder and video editor for creating video tutorials and presentations directly via screencast, or via a direct recording plug-in to Microsoft PowerPoint.You can record any activity on your computer screen, such as websites, software, video calls, or PowerPoint presentations, and customize the capture area. Besides, the program allows you to trim your recording, add transitions and captions, and it provides you with many royalty-free music and sound effects.Step 1. Download Camtasia from the official site and then get it installed on your PC.Step 2. Launch it to enter the main interface, and click the Record button at the top.Step 3. The program is set to record the full screen by default. You can click the dropdown and select the standard recording dimension. Alternatively, you can select the Select area to record option (Windows) or the Choose Region option (Mac).Step 4. Select other inputs to record along with the PowerPoint presentation, including webcam, microphone audio, and system audio.Step 5. Play your PowerPoint presentation.Step 6. Click the rec icon (Windows) or the Start Recording button (Mac) to start the recording. You can also press the F9 key (Windows), or Command+Shift+2 (Mac).Step 7. When you are finished, hit the square Stop button (Windows) or click the Camtasia icon in the menu bar, and select Stop Recording (Mac). Alternatively, you can press the F10 key (Windows), or Option+Command+2 (Mac).Step 8. The recording file will be added to the Media Bin in Camtasia Editor. You can either edit the according or save it on your computer.Features:- Record anything on your computer screen
- Multiple screen recording options
- Built-in a simple drag-and-drop editor
- Pre-built video templates
- PowerPoint integration
Apowersoft Free Online Screen Recorder
Unlike the above 4 screen recorders, Apowersoft Free Online Screen Recorder is a free web-based screen recorder. Just open it on your web browser, you can easily record PowerPoint presentation with audio. You can capture the entire screen or customize the recording area.The highlight of this web-based screen recorder is that it does not limit what or how long you record, and it enables you to export the recordings to MP4, FLV, WMV, AVI, MPEG, VOB, ASF, and GIF. However, you will be asked to install a launcher if this is your first use.Step 1. Visit Apowersoft Free Online Screen Recorder on your browser.Step 2. Tap on the Start Recording button in the middle of the interface.Step 3. Hit Download Launcher to download a launcher and install it on your PC if prompted.Step 4. Click Full screen, or click Region to select the area to be recorded.Step 5. Enable the Microphone option to capture your narration.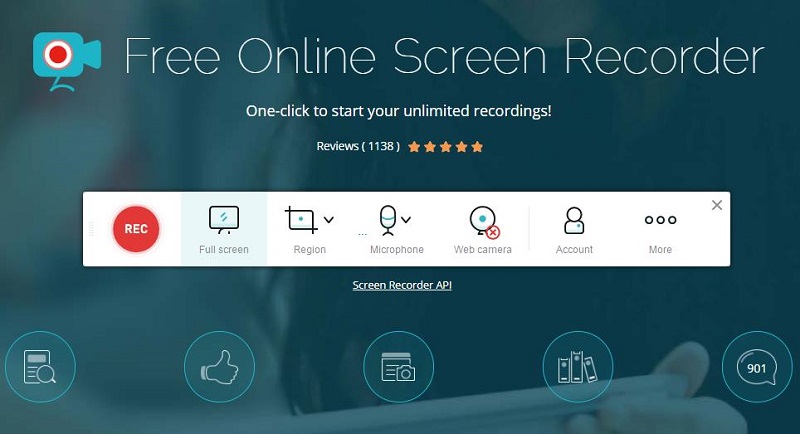 Step 6. Go to More > Settings to modify the recording parameters.Step 7. Hit the REC button and then play your PowerPoint presentation.Step 8. Click the red square icon to stop recording, and then click Save video > Save as Video File.Features:
- No download required
- Multiple output formats
- Customizable recording area
- Overlay webcam while recording
Bottom Line
Have you mastered how to record a PowerPoint presentation after reviewing this guide? If you find this post useful, share it with more people in need. Besides, if you have any questions or suggestions about MiniTool software, please let us know via support@minitool.com or share them in the comments section below.How to Record a PowerPoint Presentation FAQ?
How to record audio on PowerPoint?
- Select any slide.
- Go to Insert > Audio > Record Audio.
- Give a name for the recording.
- Click the red dot to start recording.
- Once finished, hit the blue square.
- Click OK to insert it into your presentation.
How do you record a video on PowerPoint?
- Locate any slide.
- Go to Insert > Screen Recording.
- Click Select Area to specify the area to be recorded.
- Hit the Record button.
- When you are done, click the blue square.
- The recording will appear on your slide.
How to save a PowerPoint as a video?
- Go to File > Export > Create a video.
- Select your desired video quality.
- Adjust the duration of each slide.
- Click Create Video.
- Specify where to save the video, rename the file, and choose the output format.
- Tap on Save.
How can I find my PowerPoint recordings?
- Open your PowerPoint presentation.
- Go to File > Options.
- Choose Customize Ribbon from the left panel.
- Tick the Recording option and click OK.
- You will have a new Recording tab in the Ribbon.
User Comments :