Figma has become a go-to tool for designers and teams to collaborate on UI designs, prototypes, and even presentations that incorporate videos. However, it has 100MB video size constraints, which can hinder the creative process. This post takes a video compressor– MiniTool Video Converter to show you how to break the Figma video size limit.
What’s the Figma Video Size Limit?
According to the latest updates, Figma imposes a maximum file size of 100MB for individual video files uploaded to the platform. This limit applies whether you’re adding videos to frames in a design file or using them in presentations. Beyond this 100MB threshold, Figma will either reject the upload or fail to process the video correctly, leading to errors or missing content in your project.
Apart from the video size limit for Figma, you also need to know the format limit. It supports uploading MP4, MOV, and WebM video formats.
After having a clear understanding of Figma, how to break the video size limit for Figma? Fortunately, there are several effective ways to overcome and keep your projects on track without compromising quality. Let’s see the actionable methods:
How to Break Figma Video Size Limit?
Here are three methods you can pick up to break 100MB Figma video size limit.
Method 1: Use MiniTool Video Converter
The most straightforward approach to break the video size limit for Figma is to compress the video file. MiniTool Video Converter is a free Figma video compressor with no limit, with a simple-to-use interface. Once you enter its main interface, you will notice that it contains four features: video conversion, video downloading, video compression, and screen capture.
When it comes to video compression, MiniTool Video Converter supports compressing videos for WhatsApp, Email, websites, QuickTime, Google Drive, etc., to your desired size. Almost any format can be compressed by MiniTool Video Converter and exported in MP4, MKV, or WebM formats. You can drag the slider from 100% to 10% and see the estimated file size. Plus, batch compression allows you to compress up to 5 videos at the same time.
Here’s how to compress video for Figma uploading with the free video converter.
Step 1. Download and install MiniTool Video Converter
Click on the button below to download MiniTool Video Converter and follow the prompts to install it on your PC.
MiniTool Video ConverterClick to Download100%Clean & Safe
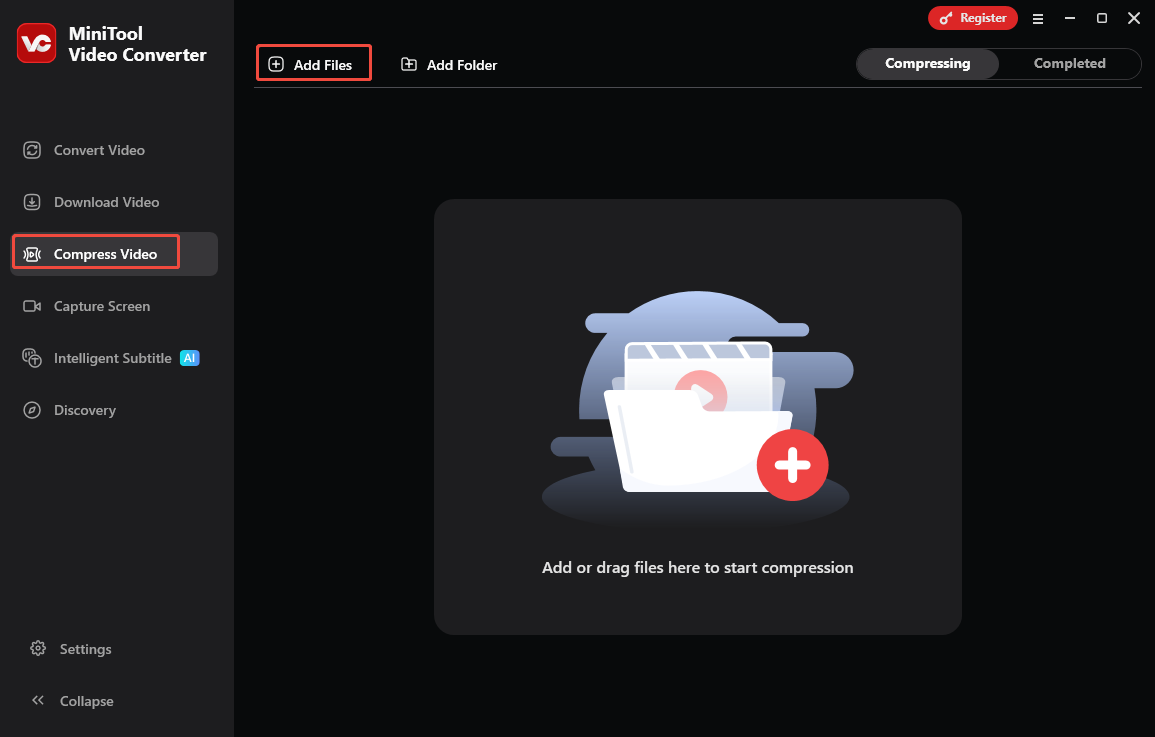
Step 2. Open the application and import the video
- Open this application and switch to the Compress Video tab.
- Click on the upper-left Add Files button to import your video files to compress.
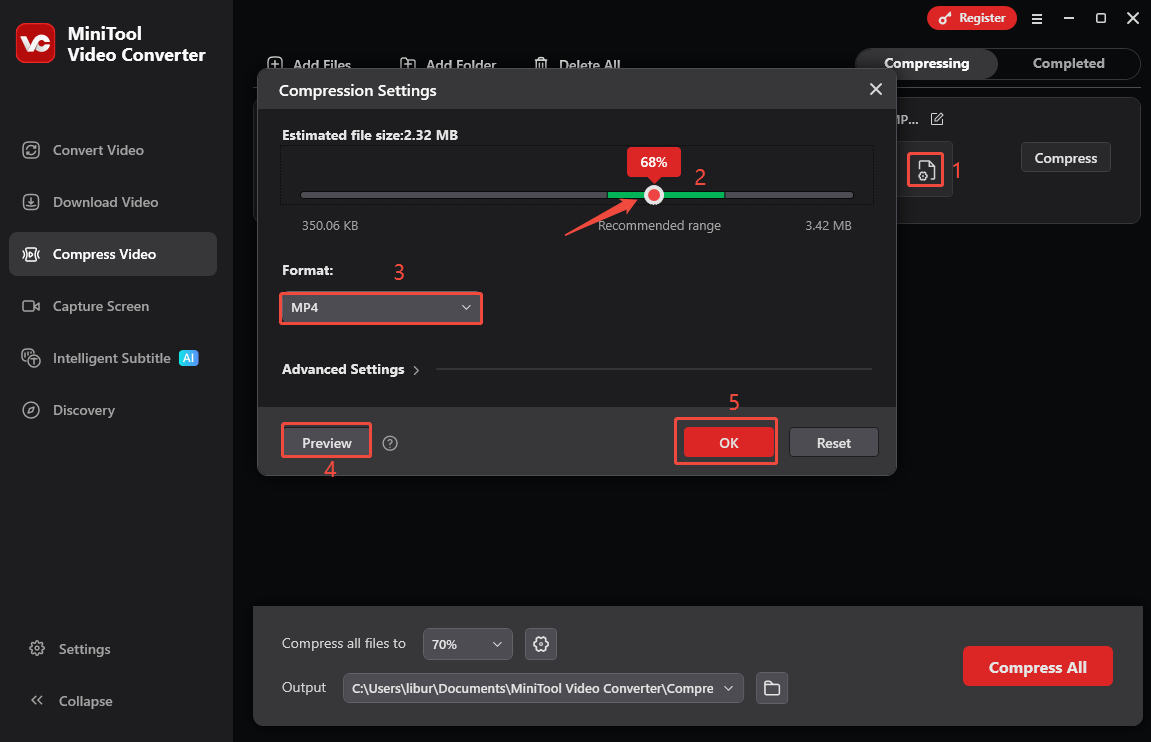
Step 3. Customize the compression settings
- Click on the Settings icon to open the Settings window.
- Drag and move the slider to your desired compression level.
- Choose a Figma-supported input format as your output format, like MP4 and WebM.
- Click on Preview to view the compressed video in advance.
- Click on OK to save the changes.
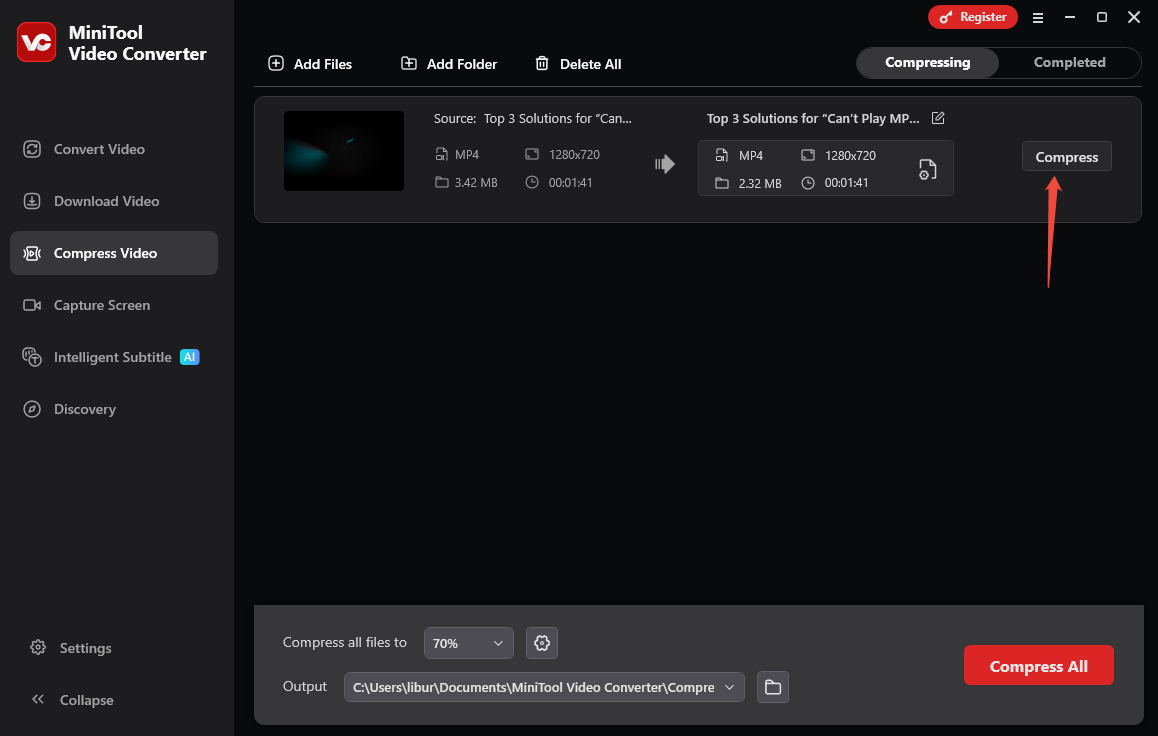
Step 4. Compress the video
Click on Compress to start compressing.
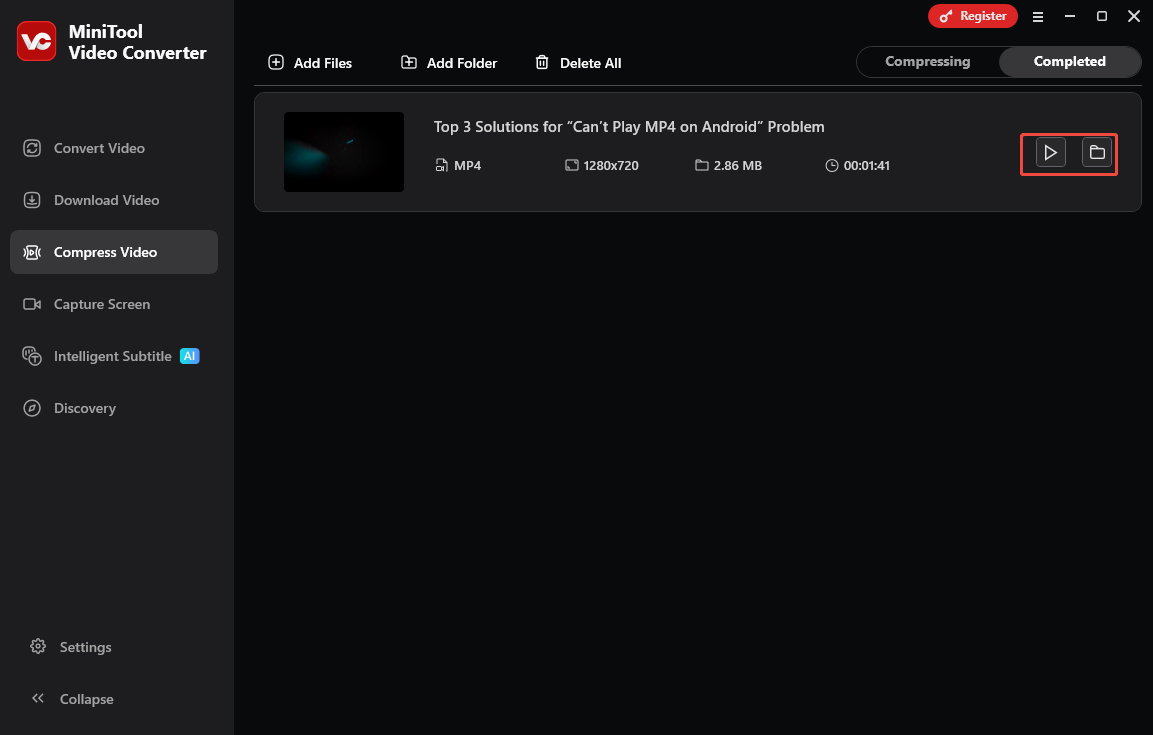
Step 5. Play and locate the compressed video
Once the compression completes, click on the play icon to watch the compressed video in advance or click on the folder icon to locate it.
![Best 8 Video Compressors No Watermark [Ultimate Guide]](https://images.minitool.com/videoconvert.minitool.com/images/uploads/2025/06/video-compressor-no-watermark-thumbnail.jpg)
Method 2. Use MiniTool MovieMaker
Another tactic for video compression for Figma is to trim the video to essential segments. Trimming not only reduces file size but also improves usability: shorter videos load faster in prototypes and keep viewers focused. Here, MiniTool MovieMaker can easily trim videos without compromising the core content.
Here’s how to compress a video for Figma with MiniTool MovieMaker.
Step 1. Download and install MiniTool MovieMaker
Download this free Figma video compressor by clicking on the button below.
MiniTool MovieMakerClick to Download100%Clean & Safe
Step 2. Import the video
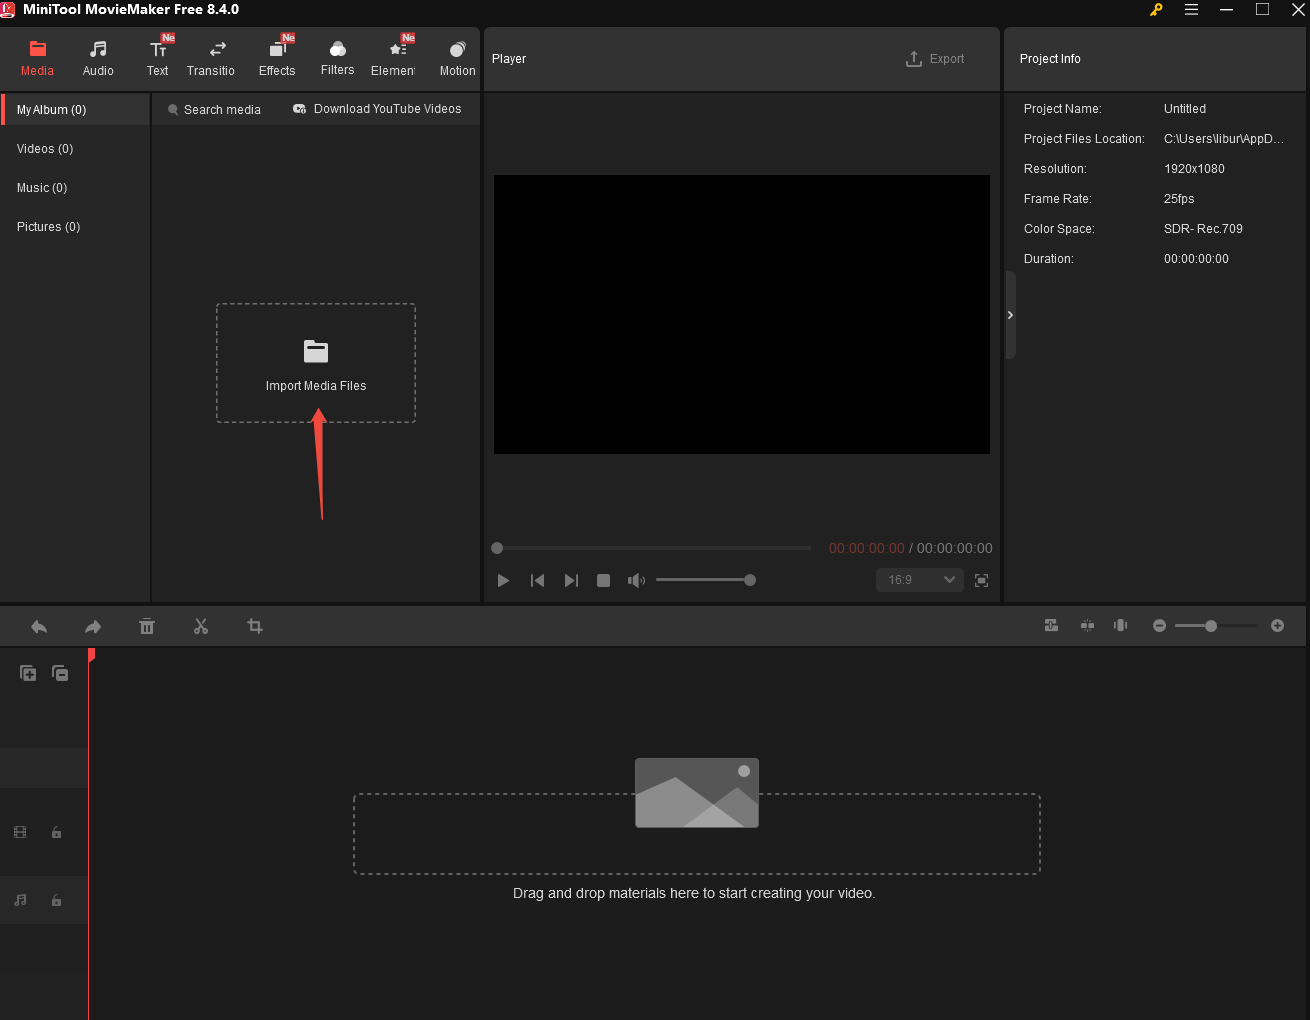
- Open this application and close the pop-up window to enter the main interface.
- Click on Import Media Files to import the video.
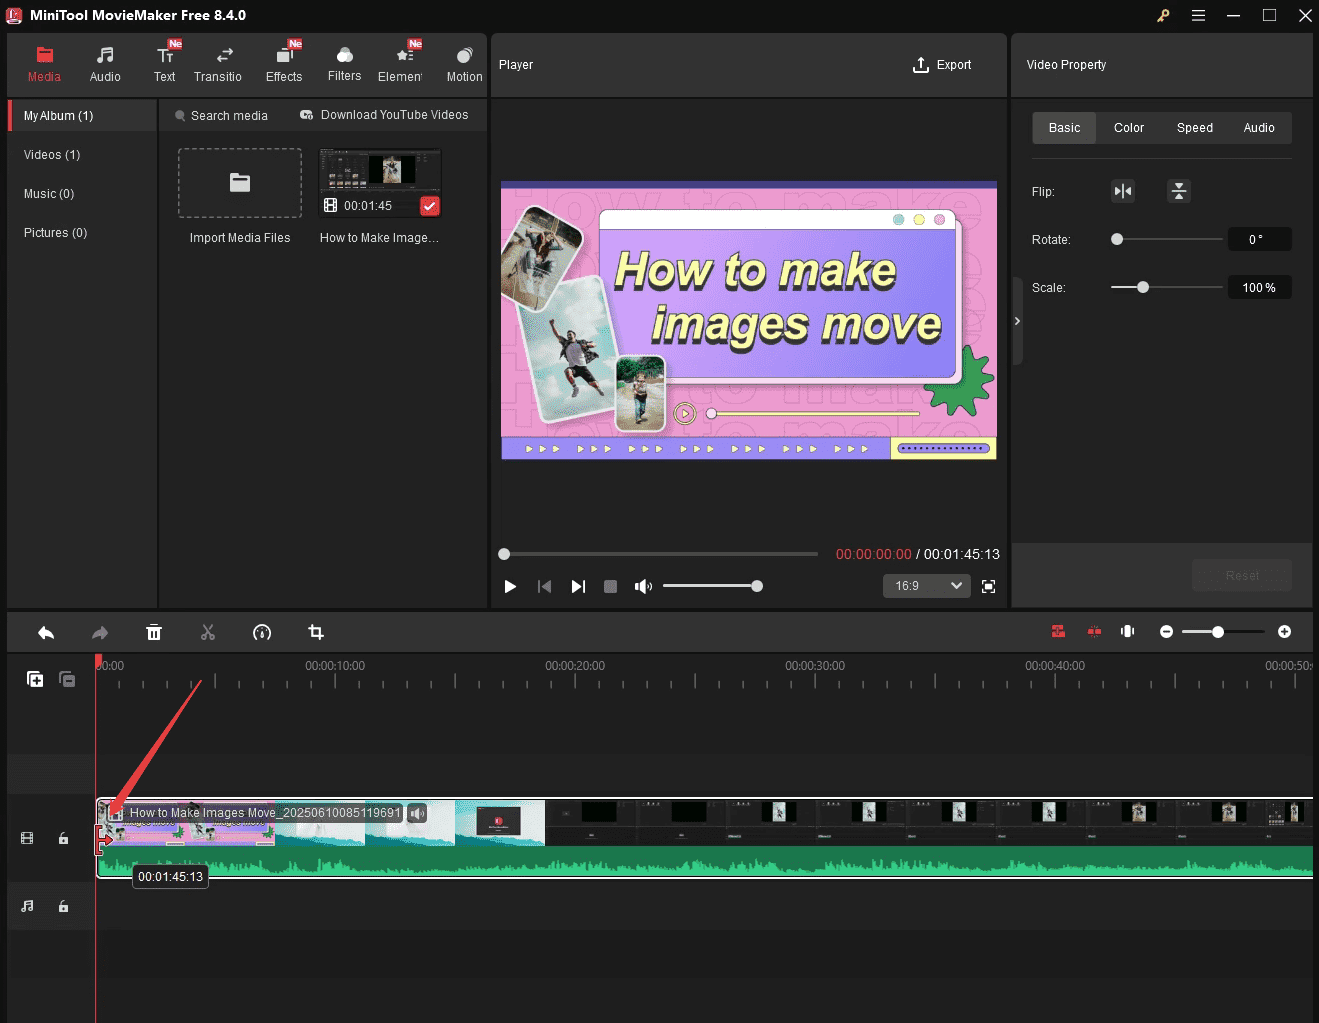
Step 3. Add the video to the timeline and trim the video
- Click on the + icon or drag and drop the video into the timeline.
- Put the mouse at the start or end of the video, and an arrow will appear.
- Drag the arrow to the right or left to shorten the unwanted parts.
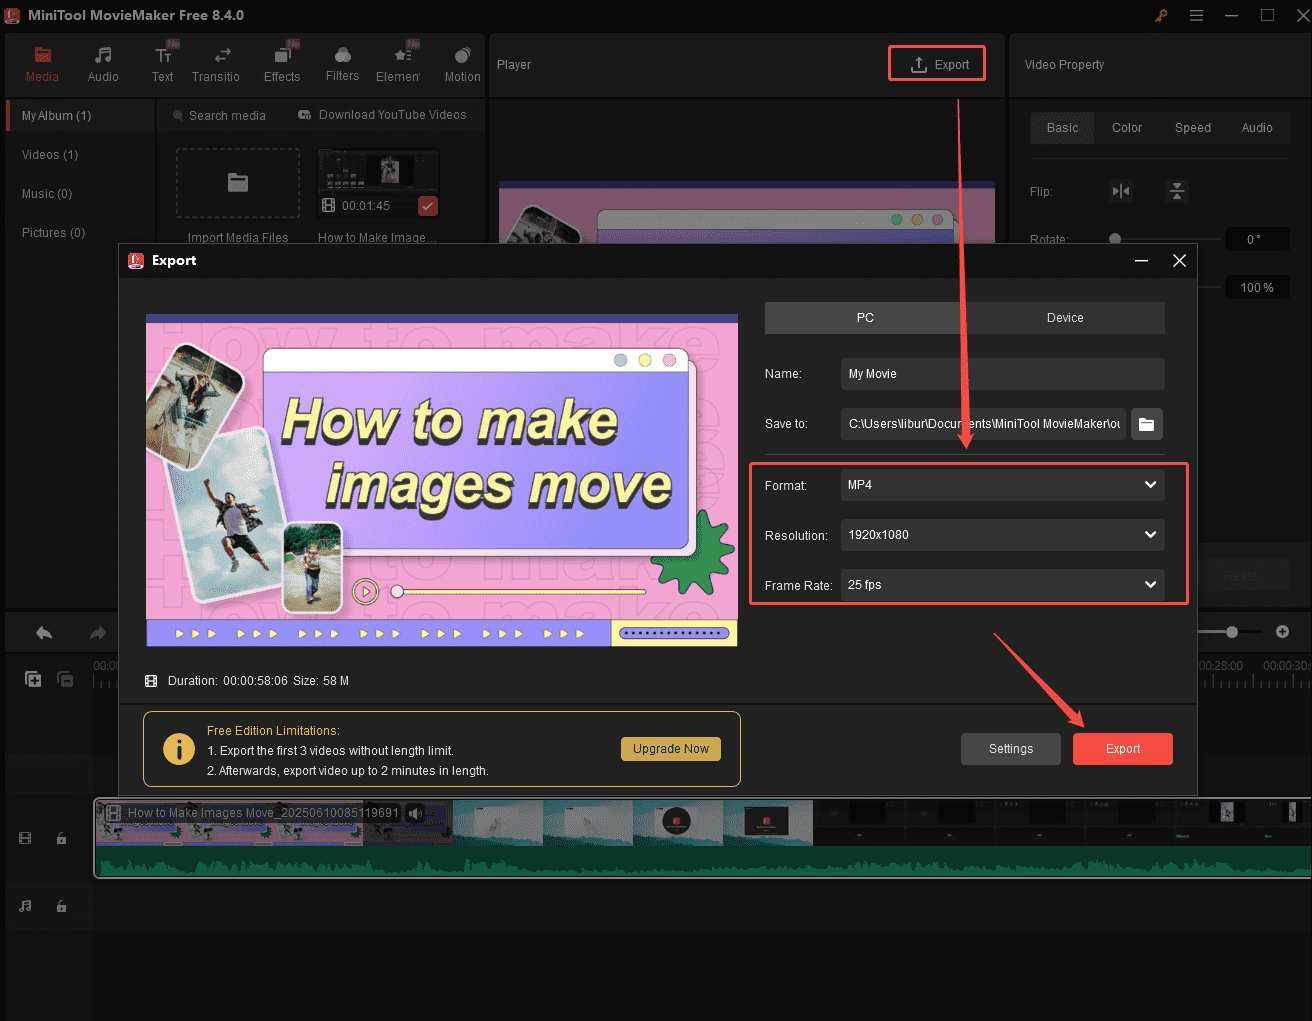
Step 4. Export the compressed video
- Click on Export in the upper-right corner of the Player window.
- Choose a Figma-supported format, select a resolution, and frame rate.
- Click on the red Export button to export the video to your computer.
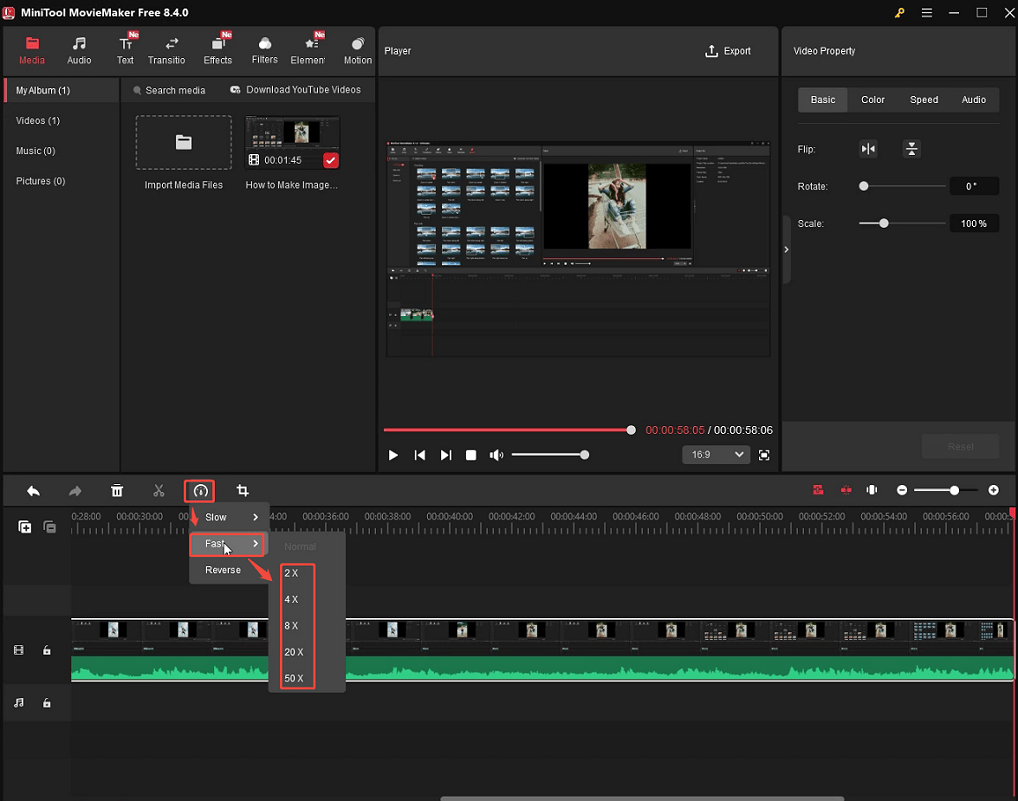
Apart from trimming the video to reduce video size with MiniTool MovieMaker, speeding up the video is also a great choice.
- Click on the video on the timeline and click on the Speed icon.
- Expand the Fast option and choose a suitable playback speed.
Method 3. Embed Link into Figma
For longer videos that can’t be compressed or trimmed enough, hosting the video externally and embedding it in Figma is also worth trying. This method is ideal for longer content, such as full product tutorials, as long as you don’t mind relying on an external host. While the video itself isn’t stored in Figma, it will play directly within the design file when clicked, and it won’t count against the 100MB limit.
Platforms like YouTube and Vimeo let you upload large videos without strict size limits. Once uploaded, you can copy the video’s embed link and paste it into Figma. In addition, if you don’t want to upload your video to a social media platform to let people view, using a cloud storage service is a safer way to get the shareable video link.
Here, we take Google Drive as an example to get the shareable video link and break the Figma video size limit.
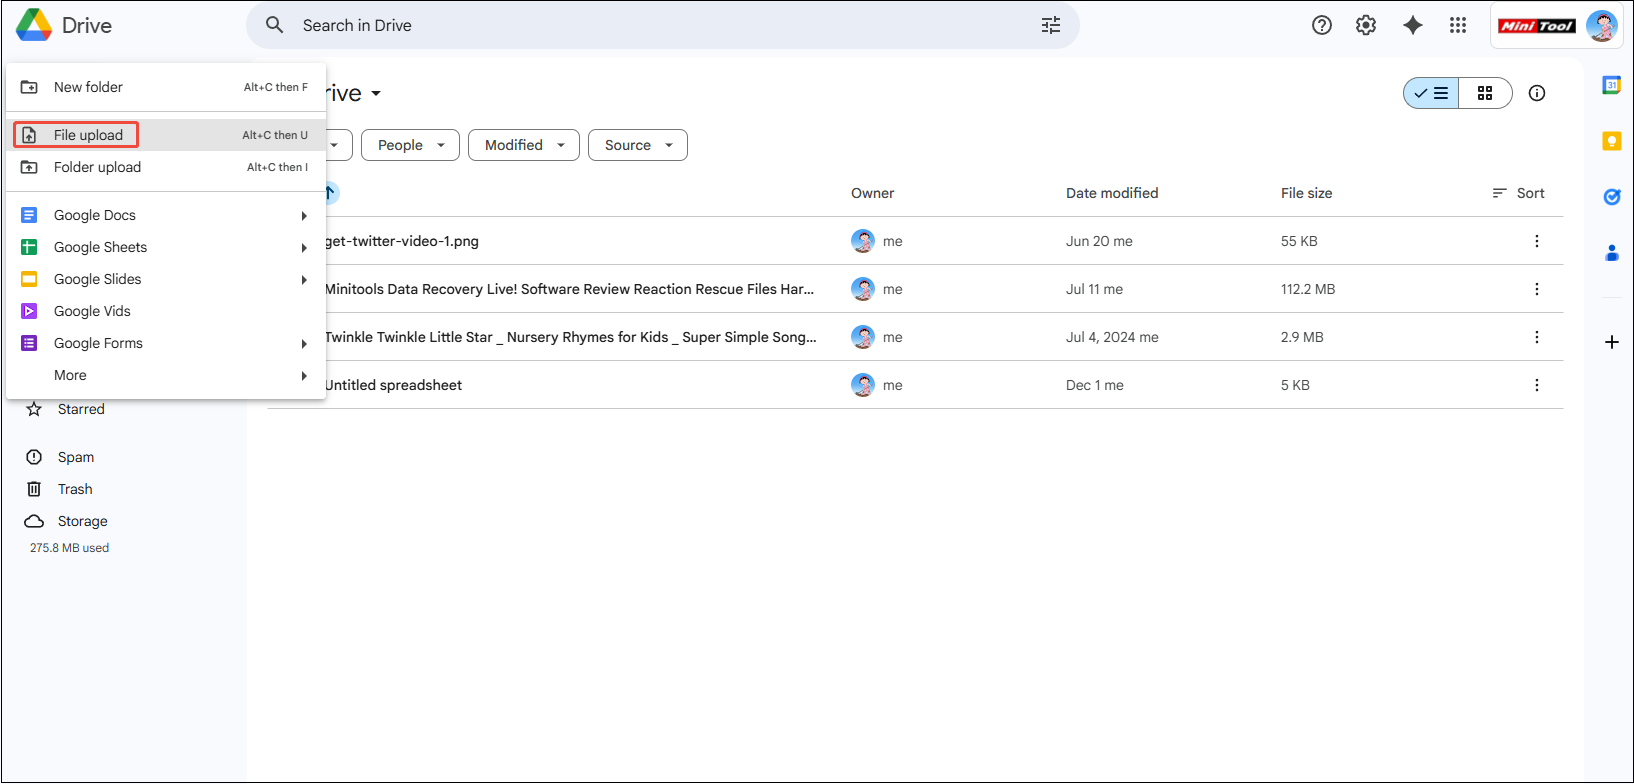
Step 1. Upload the Video to Google Drive
Visit Google Drive with your browser, click on + New > File upload to upload the video.
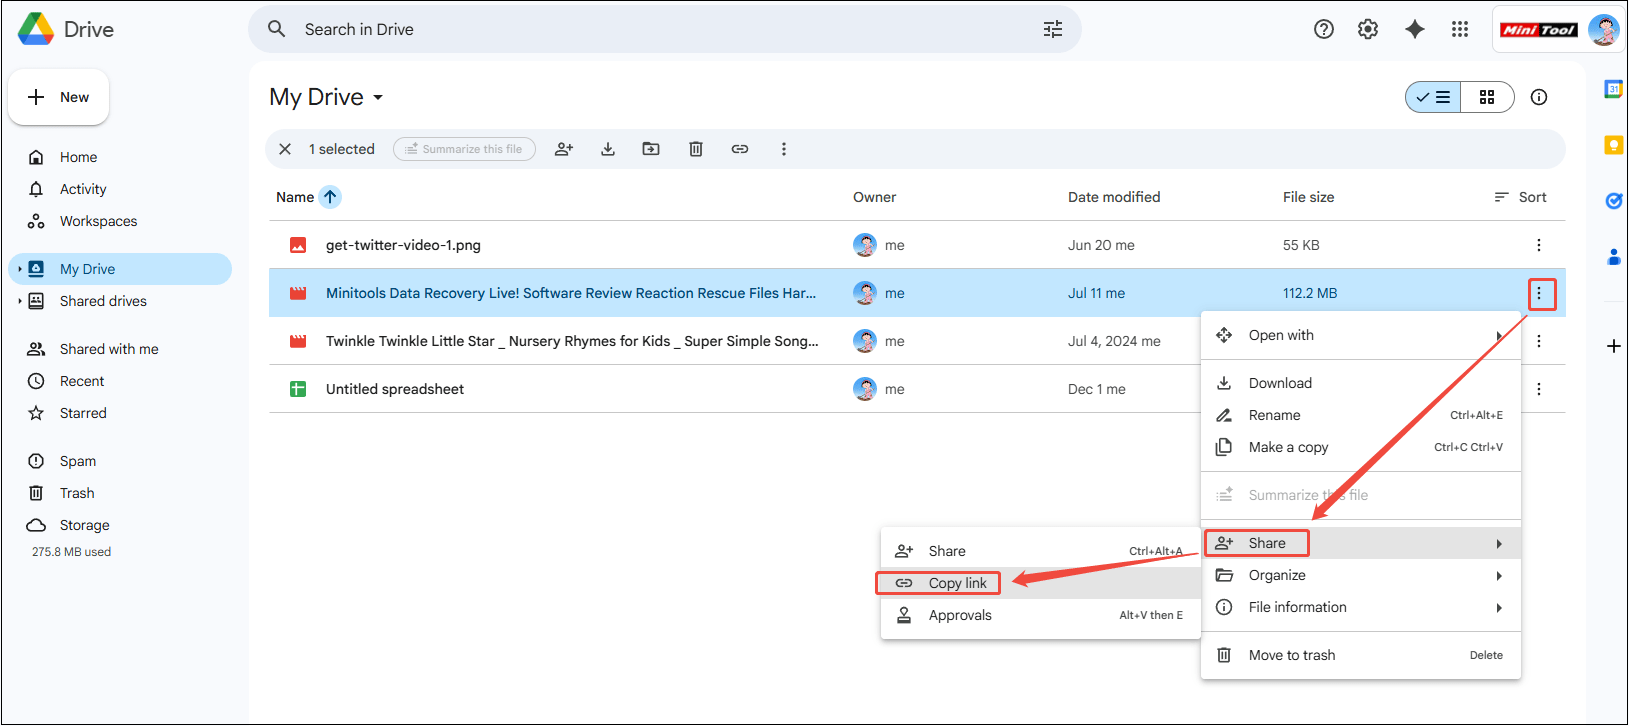
Step 2. Get the video shared link
- Click on the more icon next to the uploaded video.
- Choose Share > Copy link.
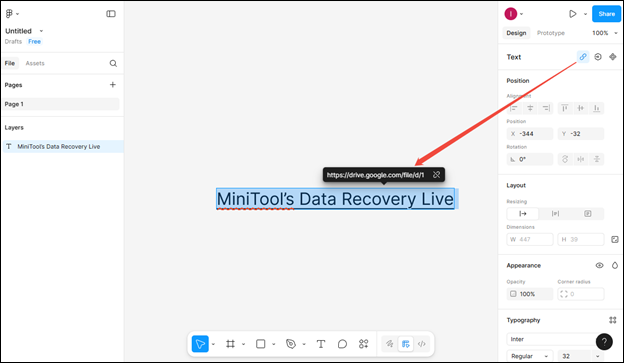
Step 3. Upload to Figma and open without limit
- Visit Figma, log in to your account, and open your project.
- Select the text or object you want to link and click on the Create link button in the toolbar.
- Paste the link into the box and press Enter to apply the link to the selected text or object.
- Now, click on the text, and the video will be opened without a size limit.

Bottom Line
Now, you know the specific Figma video size limit from this post. By compressing files, trimming videos, adjusting the playback speed, and using external hosting, you can easily work around the 100MB limit. These methods ensure your videos integrate seamlessly into Figma designs and prototypes, keeping your creative process uninterrupted.
If you have any questions or suggestions while using MiniTool Video Converter or MiniTool MovieMaker, please feel free to get in touch with us via support@minitool.com or contact me directly on X.
User Comments :