What is the Blogger video upload size limit? This platform has a 100 MB limit for direct single video uploads. Videos exceeding this limit will not be accepted. To work around this, consider using a free video compressor to reduce the file size while maintaining acceptable quality.
Google Blogger is a free online platform that allows users to write and publish blogs. To help users create rich and engaging content, this service enables them to upload videos and images from their computers to their blogs.
Whether you’re an ambitious creator or a casual blogger, understanding the Blogger video upload size limit and the platform’s storage limitations will help you optimize your posts and manage your account. Let's get started.
What Is the Blogger Video Upload Size Limit
Like most social networking services, Blogger enforces video size limits, but with a difference. Unlike video-oriented platforms, Blogger not only has strict file size limits for each upload, but also imposes limits on the cumulative size of all videos that can be inserted into the site. In other words, once the limit is reached, you will not be able to add videos to your blog.
Blogger Video Size Limit: Up to 100MB Per Video
While Google hasn’t officially listed the maximum video file size for Blogger, I’ve tried multiple uploads with different video files and confirmed the video size restriction, up to 100 MB per video.
Every time you want to upload a video to a Blogger post, always check the video file size in advance and ensure it does not exceed 100 MB. Otherwise, you’ll fail to publish the video and will receive an error message shown below.
![Blogger video upload error message – Your file [name] exceeds the 100 MB limit](https://images.minitool.com/videoconvert.minitool.com/images/uploads/2025/07/blogger-video-upload-size-limit-1.png)
If you encounter this error, compress your video to under 100 MB before trying again. I’ll guide you through the process step by step later.
People also ask what video formats Blogger accepts. The supported file types include:
- MP4
- AVI
- M4V
- MPG
- MPEG
- OGM
- OGV
- MOV
- WebM
- MKV
- WMV
- 3GP
How Much Storage Does Blogger Provide for Media
As part of Google services, Blogger itself does not provide storage space for uploaded videos and pictures. Instead, it integrates with Google Drive, Gmail, and Google Photos to share your Google Account storage space.
This means that even if each of your videos stays within 100MB, you could still reach the total storage limit depending on your Google Account. After all, Blogger serves as a text-oriented blogging service, not a video-sharing platform.
Storage Limit for Free Google Accounts: 15 GB
Every Google Account comes with 15 GB of free storage. Blogger also shares this limit to store direct video uploads. Therefore, if your 15 GB free storage is full, you won’t be able to upload videos to Blogger unless you upgrade to a paid plan to unlock more storage.

How to Compress a Video for Blogger
To sum up, the Blogger video size limit is 100 MB for each direct upload. It shares at least 15 GB of free storage with other Google services. Understanding these restrictions is crucial for bloggers relying on video content to optimize their blogs.
Due to the file size and storage limits, compressing videos is a must-have skill for successful single uploads and taking up less storage space on your Google Account.
So, how to compress a video for Blogger? Generally speaking, there are three effective tips.
- Use a professional video compressor.
- Change encoding parameters.
- Switch to a video editor to trim the video length.
Here, I’ve picked out three excellent tools for accomplishing these tasks.
Method 1: Use MiniTool Video Converter
MiniTool Video Converter is a free video converter for Windows, allowing you to convert between a wide range of video formats and change several parameters, including resolution, bitrate, frame rate, and encoder.
Beyond video conversion, this application offers a professional video compressor with advanced algorithms to reduce your video file size without losing quality.
Therefore, if you desire to compress videos for smaller sizes to upload them to Blogger, MiniTool Video Converter is a reliable choice. With this software, you can also enjoy the following benefits:
- Compress videos for free, with no hidden costs and watermarks.
- Reduce file size in seconds with one click, without complex settings.
- Process up to 5 videos simultaneously for efficiency and saving time.
- Shrink any video without size or length limits.
- Check video quality with a real-time preview before finalizing.
Option 1: Compress a Video to Avoid Blogger Video Upload Size Limit
Step 1. Download MiniTool Video Converter
Click the button below to download the free compression software to your computer. Follow the installation steps to complete the setup.
MiniTool Video ConverterClick to Download100%Clean & Safe
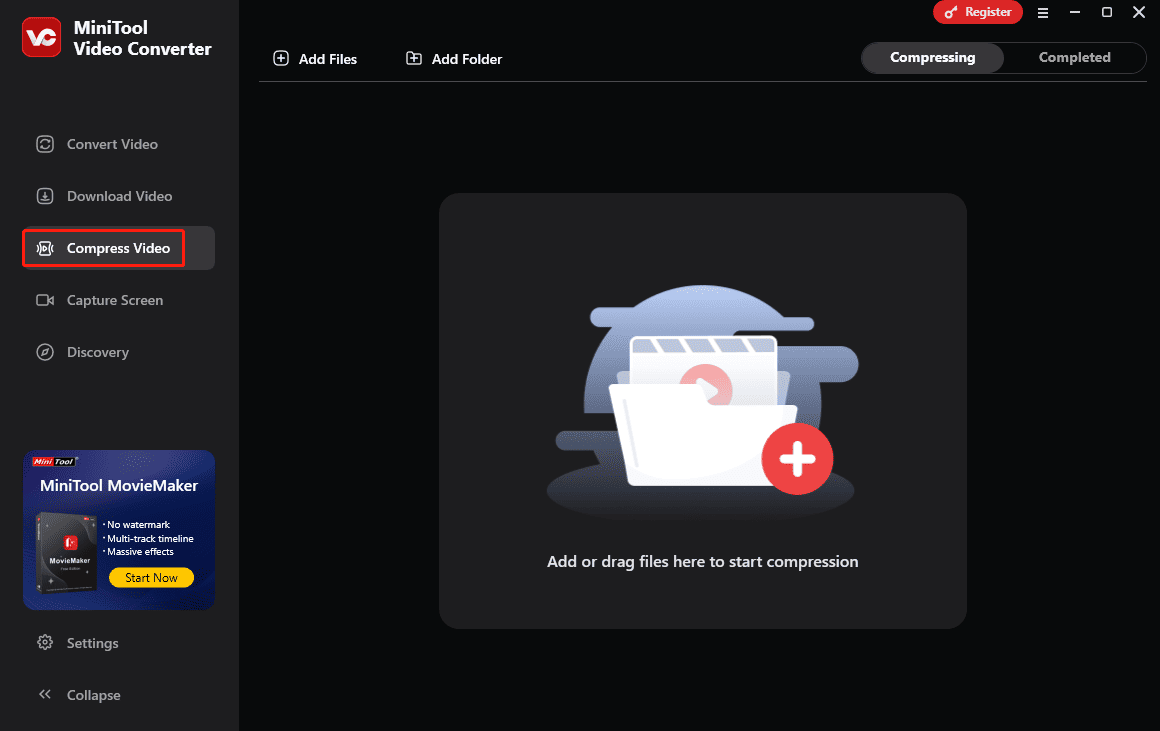
Step 2. Access the video compression tool
After launching the software, go to the Compress Video tab on the left sidebar to open the built-in video compressor.
Step 3. Add your video
Click the Add Files button at the top to import the video you want to compress for Blogger.
Step 4. Modify compression settings
Click the Settings icon to open the Compression Settings window. Then, you can:
- Adjust the compression level: By default, the video will be compressed to 70% of its original size. You can drag the slider to the left to reduce the file size and check the estimated file size immediately.
- Select the output format: Open the Format dropdown list and choose MP4, MKV, or WebM.
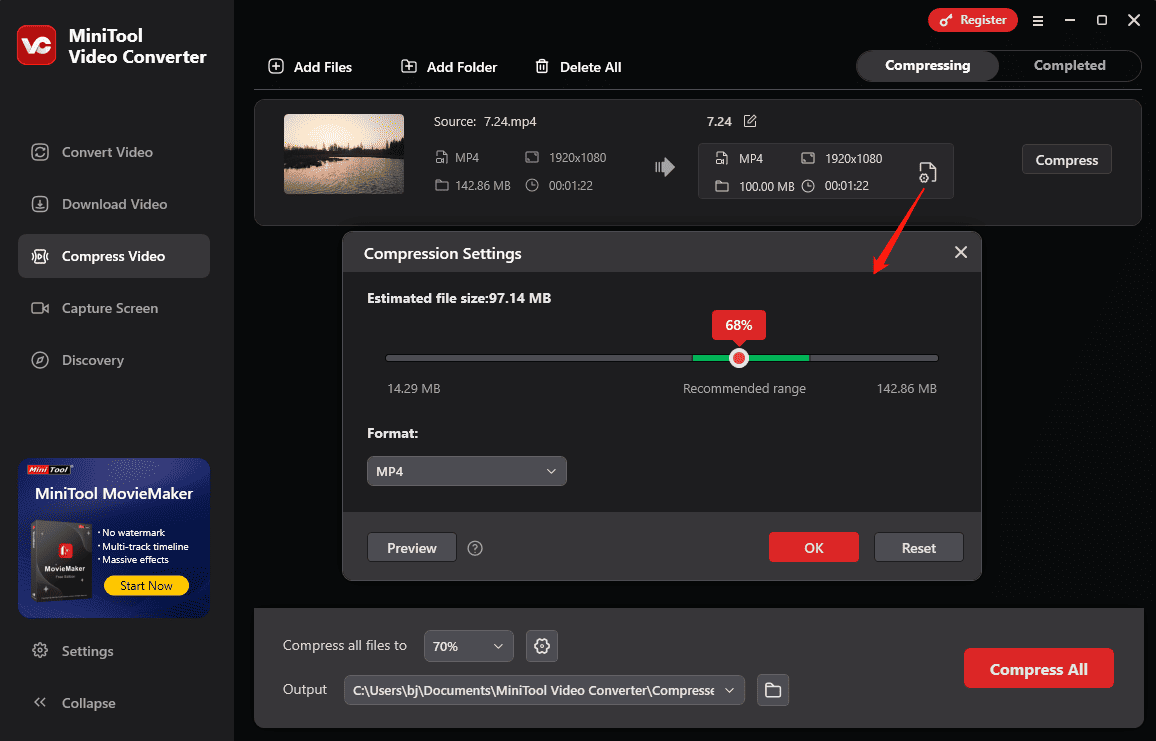
Step 5. Preview the compressed video
Click the Preview button to load a 10-second sample of the final result. Play the video to check the quality. If you’re satisfied, click OK to continue.
Step 6. Start compression
Click the Compress button to reduce the size of your video to less than 100 MB. Once finished, the video will appear under the Completed tab, where you can play or locate it on your computer.
Want to reduce the video size further? Option 2 gives you more control over your video.
Option 2: Change Parameters to Bypass Blogger Video Size Limit
MiniTool Video Converter also lets you customize key settings like format, resolution, encoder, frame rate, and bitrate to reduce file size effortlessly.
MiniTool Video ConverterClick to Download100%Clean & Safe
Step 1. Add your video
Go to the Convert Video tab and click the Add Files button to upload your video.
Step 2. Choose the output format
Click the Settings icon and select Video in the pop-up window.
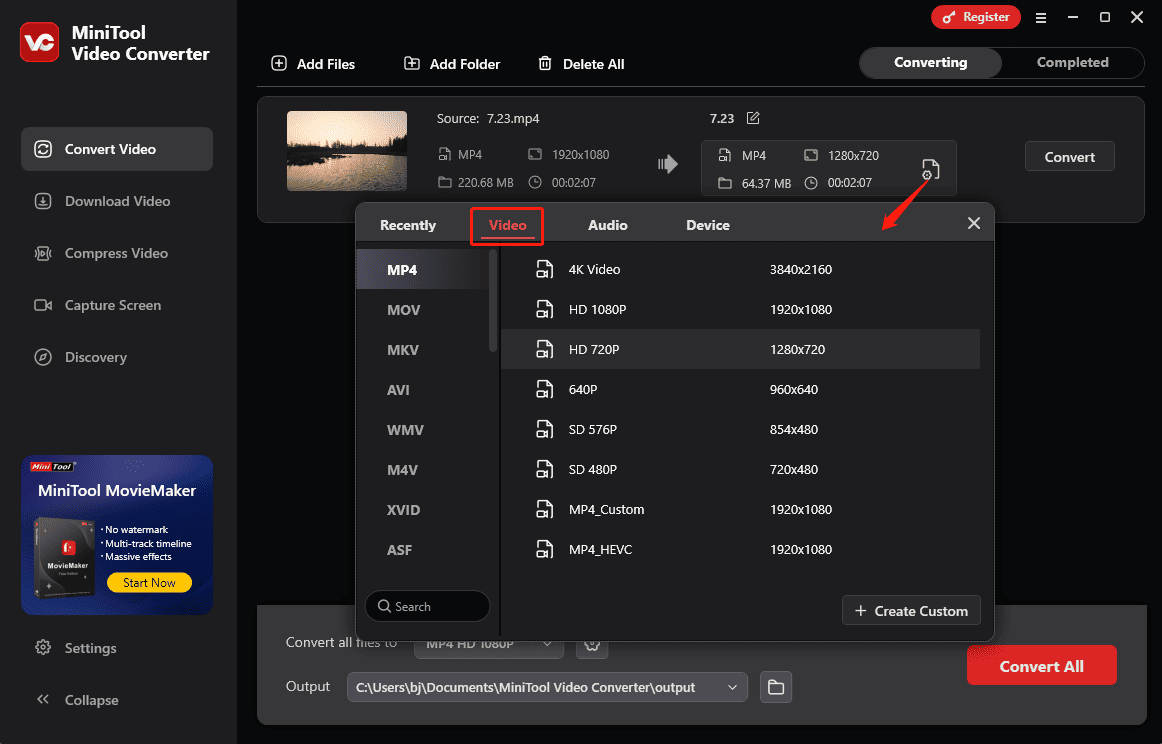
Select the desired format on the left sidebar and choose a low-resolution preset. Lowering the resolution is an effective way to reduce the file size. This is because when you downscale the resolution, the video bitrate (the actual determinant of file size) also decreases accordingly.
Step 3. Create a custom format
After confirming the video format, you can also click the + Create custom button to create a custom format to compress the video.
- Choose a low resolution and keep the default bitrate. This is because MiniTool Video Converter automatically sets the Bitrate to the smallest one among the available options.
- Then, change the Encoder. Here, I set MP4 as the output format, and I can choose HEVC for the best compression efficiency. You can experiment with all the available encoders to find the one with the highest compression efficiency.
- Click Create to apply your changes.

Step 4. Compress the video for Blogger
Select the created preset as the output format. Then, check the estimated output size. If you’re satisfied with the result, click Convert to start the compression.
![Best 8 Video Compressors No Watermark [Ultimate Guide]](https://images.minitool.com/videoconvert.minitool.com/images/uploads/2025/06/video-compressor-no-watermark-thumbnail.jpg)
Method 2: Use MiniTool MovieMaker
MiniTool MovieMaker is designed to be an easy-to-use and feature-rich video editor for everyone to create high-quality videos in minutes. It lets you trim, speed up, crop, rotate, flip, and split videos, apply filters, add transitions, and more to optimize your footage.
Best of all, this application won’t leave a watermark on the final result, ensuring clean and professional-looking videos. If you want to meet the Blogger video upload size limit by using a video editor, MiniTool MovieMaker won’t let you down.
Here’s how to compress a video for Blogger:
Step 1. Download and install MiniTool MovieMaker
Download the free video editor by clicking the button below, and install it on your PC.
MiniTool MovieMakerClick to Download100%Clean & Safe
Step 2. Upload your video
When you open the application, click the New Project button to access the main interface. Click the Import Media Files button to add your video. Then, drag and drop it to the timeline.
Step 3. Edit your video
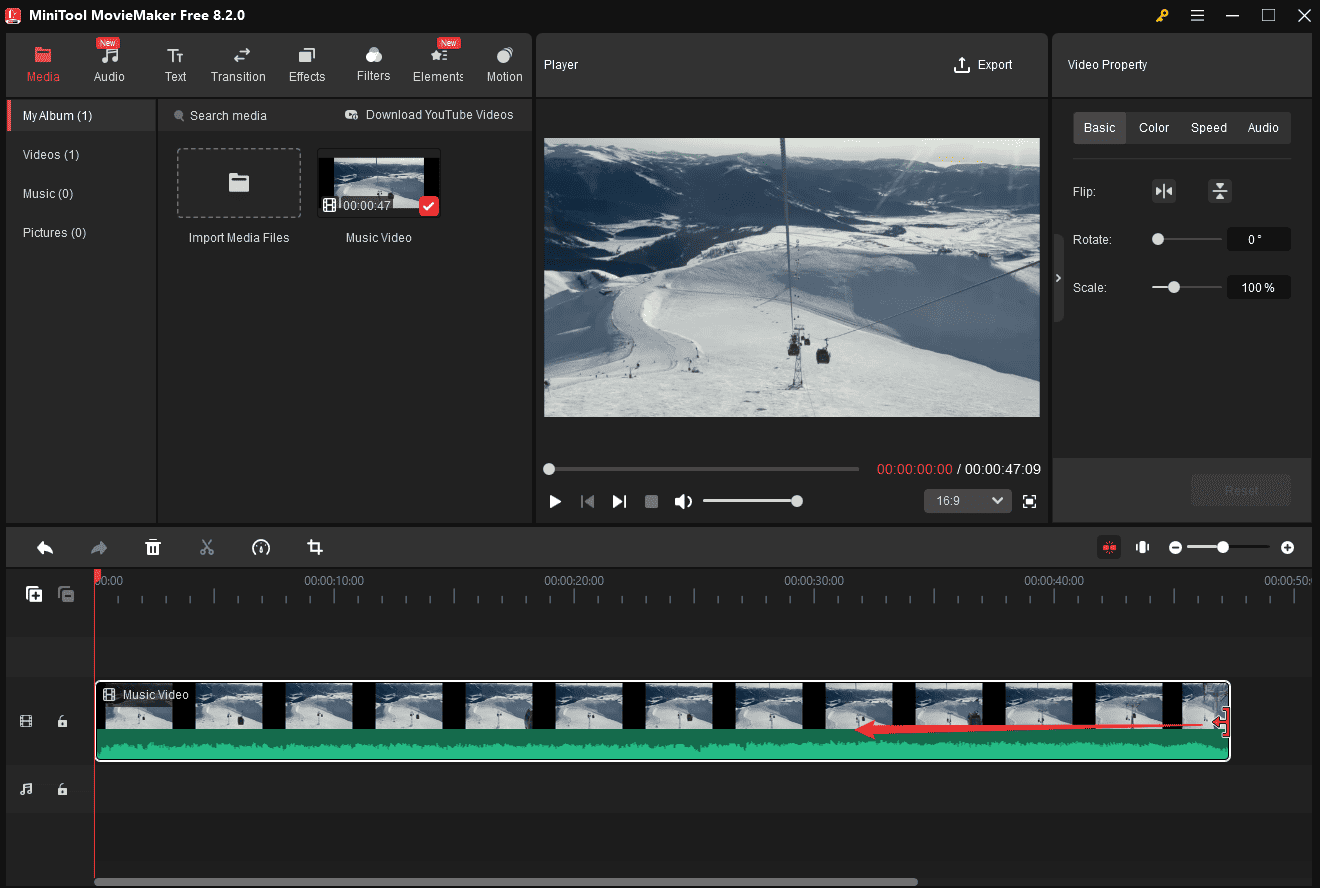
Option 1: Trim the video
Removing unwanted parts at both ends of the video can shorten the video. Shorter videos mean smaller file sizes. So, you can trim the video to reduce the file size.
To do so, hover your mouse over the start or end point of the video until the Trim icon appears and drag the icon inwards.
Option 2: Speed up the video
Increasing the playback speed also makes the video shorter, thus generating a smaller file size. Select the video on the timeline and click the Speed icon. Click Fast and choose a suitable speed.
Step 4. Enable the export window
Click the Export button in the upper right corner to open the Export window.
Step 5. Adjust the output settings
First, select a format compatible with Blogger. You can then modify the video resolution and frame rate. Next, click the Settings icon to compress the video bitrate, and click OK to continue.
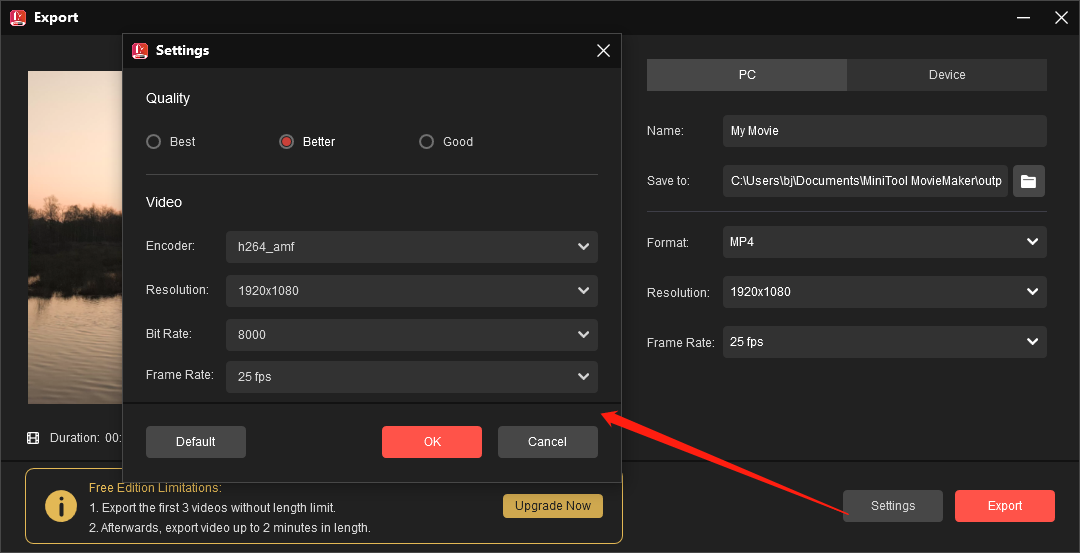
Then, make sure the estimated file size does not exceed 100 MB. Click the Export button to start rendering your video.
Method 3: Use FreeConvert
If you desire to compress a video for Blogger online, FreeConvert is a fantastic choice. It can change the video codec, bitrate, frame rate, resolution, and quality to reduce the video file size effectively.
Online tools can be quickly accessed through a web browser and require no installation, but they rely heavily on an internet connection. You may suffer from slow loading due to an unstable network.
Step 1. Access the FreeConvert video compressor
Navigate to the FreeConvert website, expand the Compress menu, and select Video Compressor.
Step 2. Upload your video
Click the Choose Files button to add your video. If you’re a free user, your video should be no larger than 1 GB. Or, you need to subscribe to unlock the maximum file size.
Step 3. Select the output format
Open the Output dropdown list to set your preferred video format.
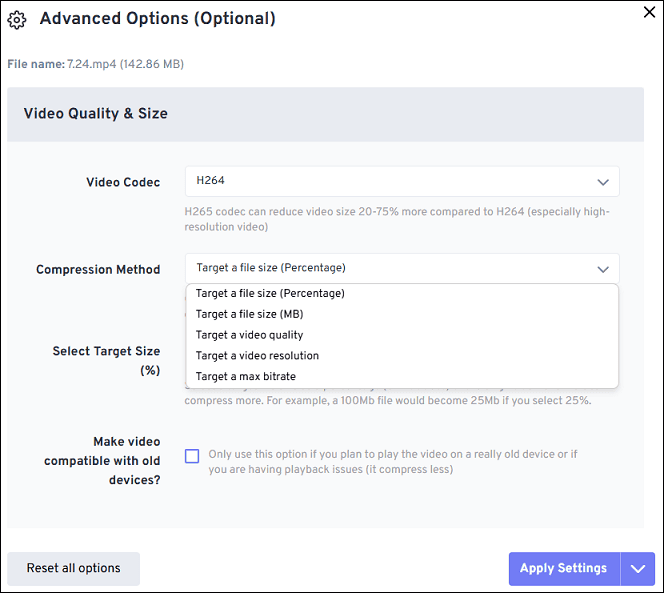
Step 4. Adjust compress settings
Click the Settings icon next to Format to select a codec and compression method to downsize your video. Among the available codecs, H.264 - GPU, H.265 – GPU, and AV1 require a Pro account. Then, click Apply Settings.
Step 5. Compress the video
Click the Compress Now button to begin the task. Once done, save the compressed video to your PC.
How to Expand Storage Space for Blogger Video Upload
If you are using a free Google Account, you will not be allowed to upload videos on Blogger once you reach the 15 GB storage limit. To continue posting videos, here are three methods to get around the Blogger video upload size limit.
Way 1: Embed Videos from YouTube
In addition to the direct video uploads, Blogger can also embed videos from YouTube. This will not use your Google Account storage. YouTube has a file size limit of 256 GB, but that’s more than enough for most videos. Also, it doesn’t have a limit on the number of videos you can upload.
When you are running out of storage space, consider uploading videos to YouTube first and then embedding them in your blog posts to save storage.
Of course, if your video is larger than 256 GB, you'll need to compress it before uploading it to YouTube. Additionally, you should verify your Google Account to upload videos longer than 15 minutes.
Way 2: Free Up Space
When your Google Account runs out of storage space, you can delete unnecessary files from Google Drive, Gmail, Google Photos, or Blogger to clean up storage.
Way 3: Upgrade for More Storage
You can also upgrade to a paid Google One plan for more storage. The Basic plan offers 100 GB of storage, and the Premium plan offers 2 TB of storage for Photos, Drive, and Gmail. If you regularly upload high-resolution videos and images to Blogger, upgrading your account is a good option.
Final Thoughts
Text-only blog posts can sometimes be boring and cause readers to lose interest in reading. Inserting videos can help draw the viewer’s attention and significantly enhance engagement. As for direct video uploads on Blogger, there is a 100 MB file size limit.
Therefore, this post explains the effective methods to bypass the Blogger video upload size limit in detail, helping you plan your blogs and manage your account efficiently.
Finally, if you encounter problems while using MiniTool Video Converter or MovieMaker, please contact us via support@minitool.com for help.
About The Author

Position: Columnist
Cora is a tech writer specializing in digital media workflows, with over six years of hands-on experience in video post-production, media transcoding, and screen capture. Her writing is always clear and practical. Cora also produces in-depth software reviews for users across skill levels to help them find the right tool and enjoy video editing.
User Comments :