In this article, let’s explore the 9 reasons for videos are not playing, such as internet connection issues, a lack of codec support, and so on. More importantly, this article provides you with 29 solutions for videos not playing on a computer, browser, or social application, such as restarting the device, changing the video format, and more.
Recently, more and more users are complaining that the videos will not play on computers, browsers, or social applications. Failing to view these videos may bring you a headache. Don’t worry. The following content will walk through the reasons for videos not playing and show you how to solve this problem.
Why Videos Not Playing
Here are the possible reasons for the videos not playing error.
Reason 1. A Weak Internet Connection
A stable internet connection has much to offer in sustaining smooth video playback. In essence, the process of playing videos means a continuous delivery of data streams. As such, when the internet connection is poor, it is difficult to download the necessary data for video playback. Eventually, your device can’t play this video.
Reason 2. Incompatible Video Formats
The compatibility issue is one of the most common factors that lead to videos not playing. For example, some media players may not support some unpopular video formats, such as TS, M2TS, VOB, and more. To solve that problem, it is an ideal choice for you to convert your videos to a format with better compatibility.
Reason 3. File Corruption
Before playing videos on your computer, you need to ensure that the videos are not damaged. Specifically, a normal video file contains all the data that can sustain the video playback. However, when the video file is broken, the data can be incomplete, which causes your computer to not play videos.
Reason 4. Damaged Cache and Cookies
Damaged cache and cookies also mean a lot. The browser cache can save parts of websites, including portions of video files, code, and images, on your PC/devices locally, which enables faster loading. However, due to various system crashes, these files and data may be corrupted. This way, as long as the browser keeps using the data from the cache, videos not playing will always happen.
Cookies refer to small files that store your preferences and browsing data, like site settings, login status, and more. Sometimes, a damaged cookie or a cookie conflict may cause a problem with the video player functionality.
Reason 5. Lack of Codec Support
Some media players can’t play video codec not supported. Strong codec support is indispensable for video playback. Necessary codecs ensure the decoding/decompression of the video data, which offers you a smooth watching experience. Hence, if the media players that you are using lack the corresponding codecs, the video playback can be a problem.
Reason 6. Limited Storage Space
Although you have transferred a video to your device, enough temporary storage space and available memory are also essential for the system. Without them, the smooth operation is impossible.
For example, playing a long or high-resolution video needs sufficient space to temporarily store or download the upcoming video segments. If the space is limited, the video may stutter, pause, or stop.
Reason 7. Outdated Graphics Drivers
Serving as a communication bridge between the graphics processing unit (GPU) and the operating system of the computer, the graphics drivers are an integral part of video playback. However, as the graphics drivers become outdated, there will be many problems.
For instance, the video playback technology and codecs develop rapidly over time. As they update, the outdated graphics drivers may not be compatible with the newer applications anymore.
In addition, for efficient video playback, hardware acceleration is often applied by modern computers. Unfortunately, outdated graphics drivers may prevent it from being used. Finally, the CPU has to be under full load, leading to bad video playback.
Reason 8. An Outdated Operating System
An outdated operating system is also a reason for videos not playing. For example, graphics card drivers mean a lot for video playback. However, the latest drivers may not be available on older operating systems. As such, when the new video technologies require the latest drivers, it is common to see the videos unplayable on old operating systems.
Reason 9. Unnecessary Extensions/Add-ons
Undoubtedly, extensions and add-ons enable you to enjoy more new functions. Some of them, including script blockers, ad blockers, and VPN add-ons, play a role by blocking some data packets, requests, or scripts.
However, those blocked things are indispensable for some websites to load and play a video. Therefore, when the extensions or add-ons on your PC block some important things automatically, it is common to see videos not playing.
![How to Fix Videos Not Playing on Android Phone [Ultimate Guide]](https://images.minitool.com/videoconvert.minitool.com/images/uploads/2023/03/videos-not-playing-on-android-phone-thumbnail.jpg)
How to Fix Videos Not Playing on Computer
The following content will offer you 10 videos not playing on computer fixes.
#1 Refresh/Restart the Computer or the Media Player
One of the most effortless methods to fix videos not playing on a computer is to refresh or restart the computer or media player. Generally speaking, running a background process or app causes system memory (RAM) consumption. If you try to refresh or restart the computer or media player, enough resources can be saved, which empowers the player to function smoothly.
#2 Reinstall the Media Player
Influenced by incomplete updates, system errors, or malware, the software files may be damaged. Reinstallation enables recovery of these files. In addition, if the application settings are changed incorrectly, there will also be something wrong with the media player. In this context, reinstallation will reset the settings to the default ones. This way, the media player can work well again.
#3 Use a Third-Party Player
To fix the issue of videos not playing on system built-in media players, you can also try some third-party players. Here, I highly recommend 3 reliable players, including VLC Media Player, PotPlayer, and Kodi. Among them, the VLC is more popular for its wide format support. If you want more advanced customization, try PotPlayer. On condition that you emphasize media library management, never miss Kodi.
#4 Change Video Format
MiniTool Video Converter is a free video converter that allows you to convert up to 5 videos simultaneously. Meanwhile, it doesn’t set any file size limit for free users. Moreover, MiniTool Video Converter features an intuitive interface and supports a wide range of video formats, including MP4, AVI, MOV, MKV, and more.
Below is a detailed guide on how to change the video format using MiniTool Video Converter.
Step 1. Download and Install MiniTool Video Converter
MiniTool Video ConverterClick to Download100%Clean & Safe
Download MiniTool Video Converter by clicking on the download button above. Then, follow the on-screen prompts to install this video converter on your PC. Then, run this application.
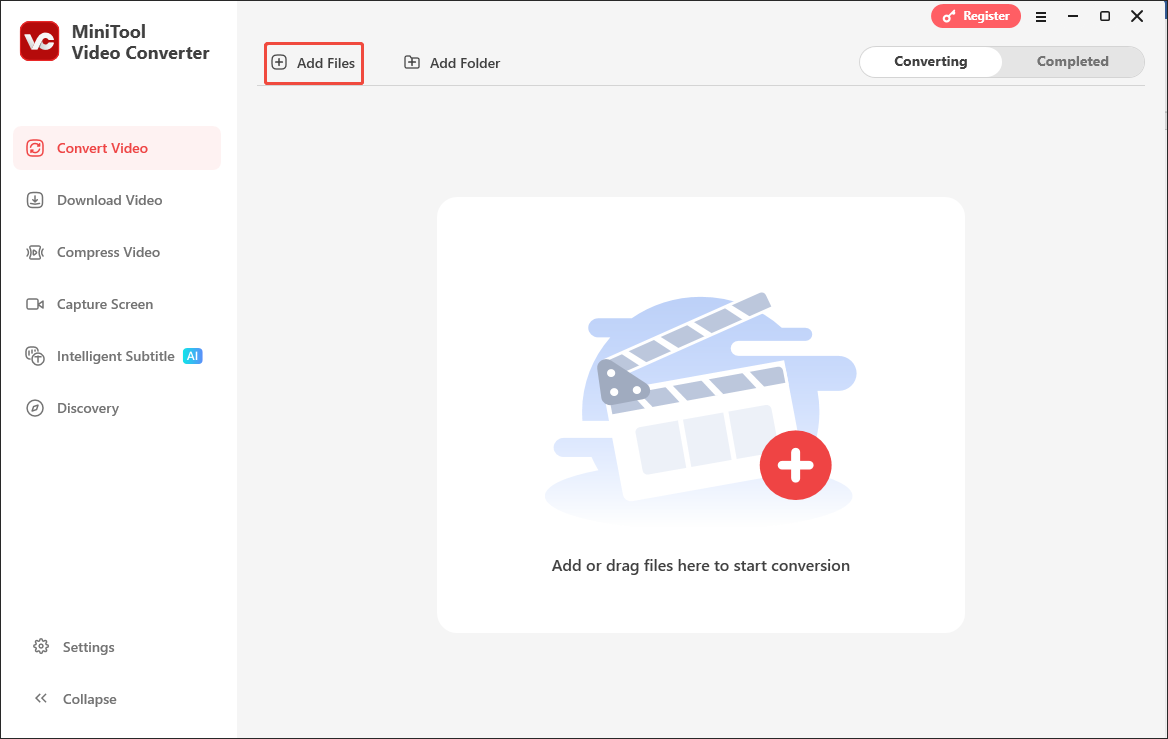
Step 2. Import the Video Files
Click on the upper-left Add Files option to upload the videos that you want to convert.
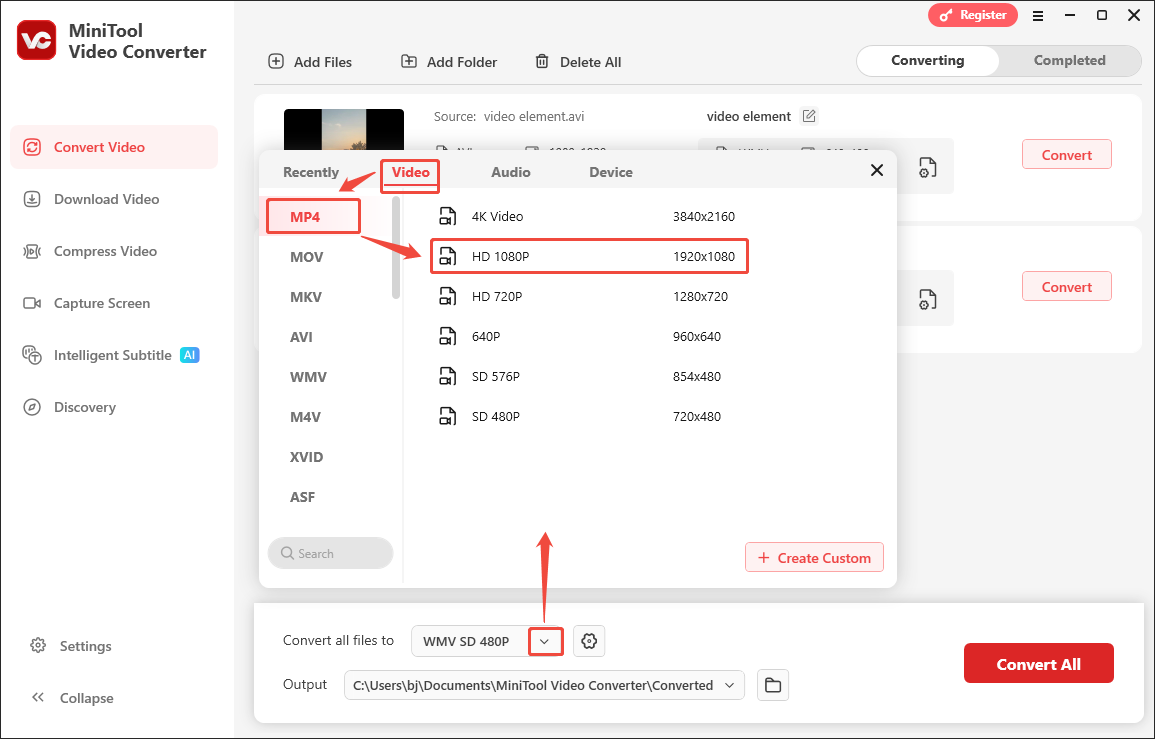
Step 3. Set MP4 as the Output Format
Expand the bottom Convert all files to option to enter the output format window. There, switch to the Video tab and click on MP4. Then, choose the resolution you want. Here, I select MP4 HD 1080P as an example.
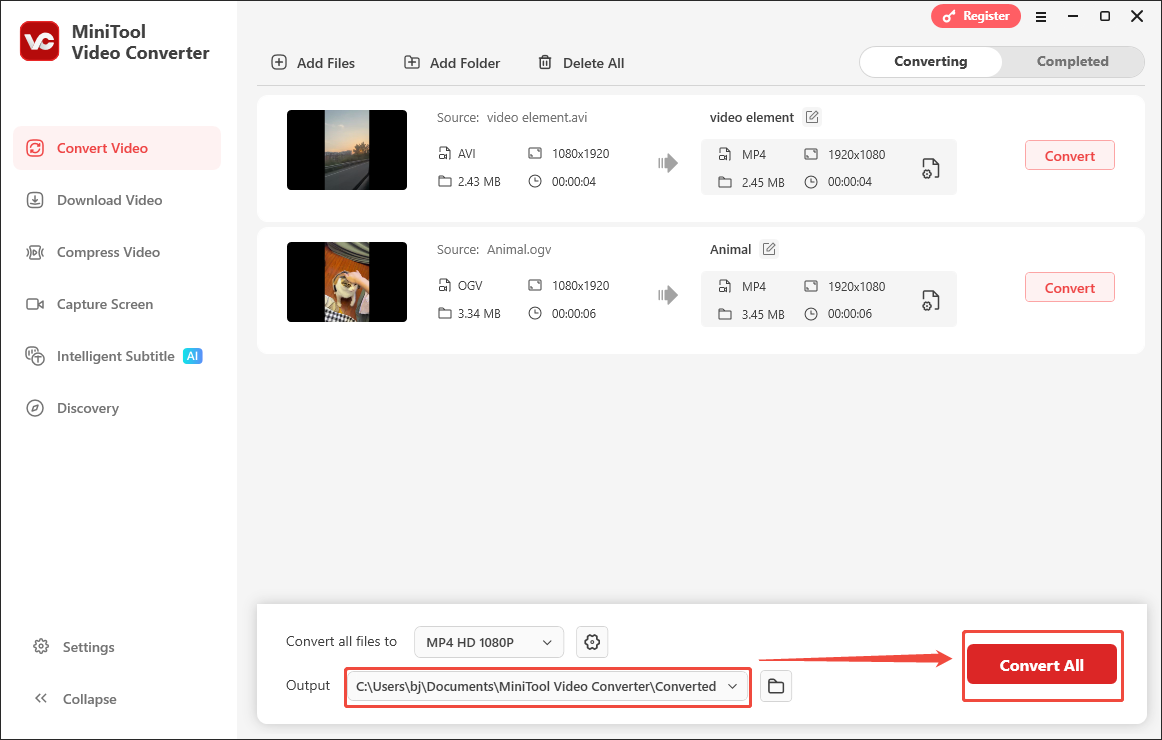
Step 4. Set an Output Folder and Start Conversion
Expand the bottom Output option to choose a destination folder for the output files. Next, begin the conversion process by clicking on the bottom-right Convert All button.
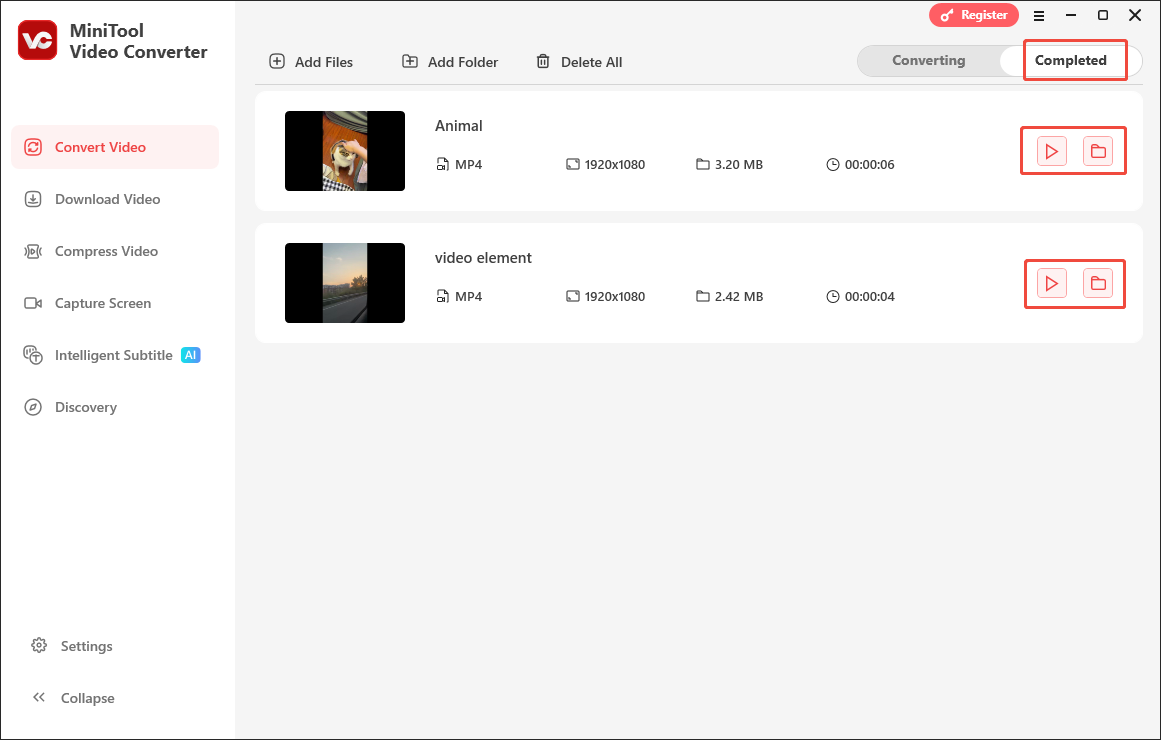
Step 5. Check the Converted Videos
When the file conversion process ends, this video converter will automatically switch to the Completed section. There, click on the Play icon to view the output videos. If you want to locate them, click on the Folder icon.
With MiniTool Video Converter, you can handle the videos not playing error effortlessly. More than a video converter, this program is also a one-stop solution for video compression and video/audio to text conversion. Even if you want to fix audio not working due to compatibility issues, MiniTool Video Converter can also help.
#5 Install More Video Codecs
To get stronger codec support for the video playback, the K-Lite Codec Pack is highly recommended. As a powerful codec provider, it offers Windows users a wide range of audio and video codecs. Supporting both 32-bit and 64-bit systems, the K-Lite Codec Pack is available on Windows 7, XP, 8, 10, and 11.
There are 4 different versions of the K-Lite Codec Pack:
- Basic: This version of K-Lite Codec Pack offers you a few codecs and filters to play common videos/audio, such as MP4, AVI, MP3, and MKV. However, a media player is not included in it.
- Standard: With all functions of the Basic version, the Standard version provides you with Media Player Classic Home Cinema (MPC-HC). By the way, this version is the most popular among users.
- Full: Based on the Standard version, the Full version K-Lite Codec Pack gives you decoding plugins for MadVR and 3D videos.
- Mega: Equipped with all features of the Full version, the Mega version enables you to enjoy more advanced filters, codecs, and tools, including GraphStudioNext and ffdshow.
Just visit https://codecguide.com/download_kl.htm to install the K-Lite Codec Pack version you want.
#6 Repair Corrupted Videos
Since video corruption will also trigger the problem of videos not playing, it is advisable for you to repair your video files. To facilitate your video repair tasks, MiniTool Video Repair can help. It has a well-organized interface and supports multiple video formats, including MP4, MOV, M4V, and F4V. More importantly. MiniTool Video Repair never costs you a dime.
Step 1. Download and Install MiniTool Video Repair
MiniTool Video RepairClick to Download100%Clean & Safe
Click on the download button above to download and install this video repair tool on your computer.
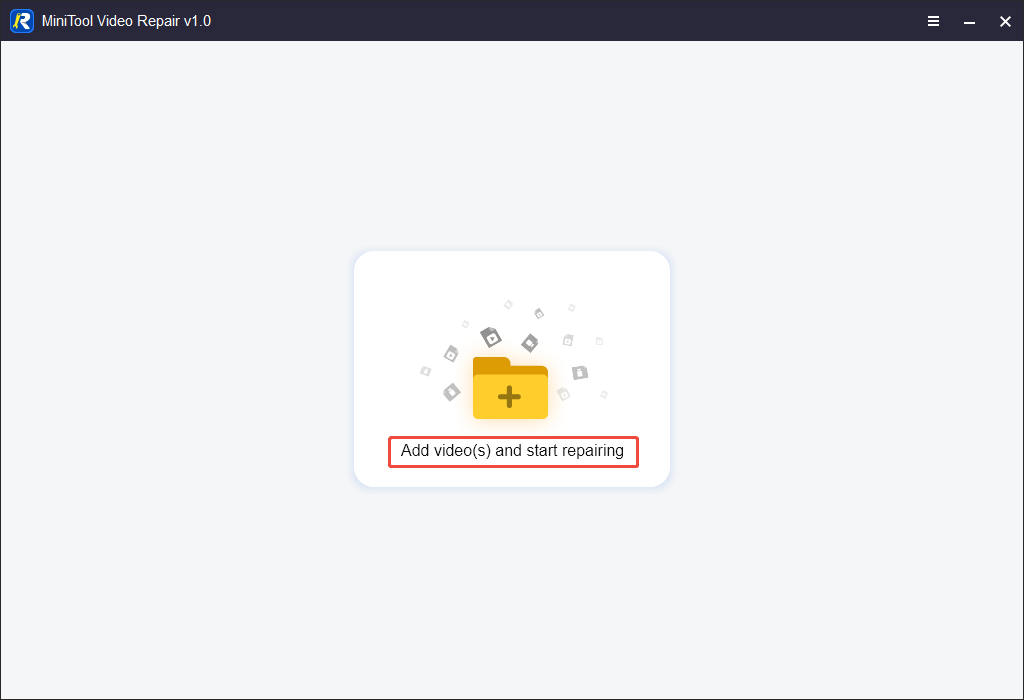
Step 2. Import the Video Files
After launching MiniTool Video Repair, click on the Add video(s) and start repairing area to import the videos that you want to repair.
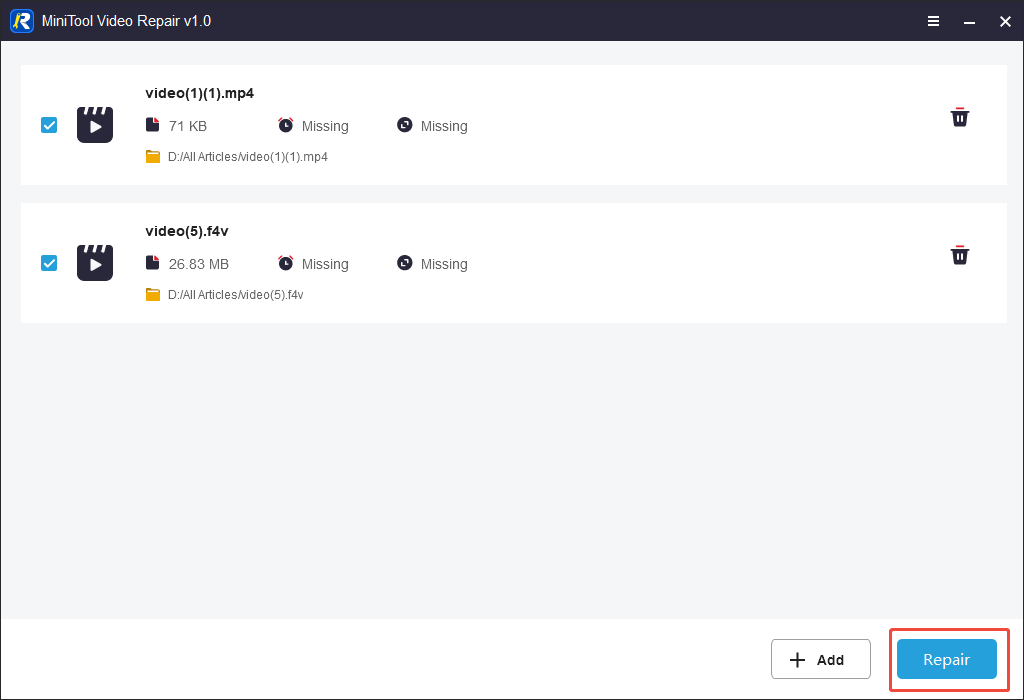
Step 3. Start Repairing
Click on the bottom-right Repair button to begin the video repair process. When the video repair completes, click on the OK button to close the pop-up window.
Step 4. Preview the Output Files and Set an Output Folder
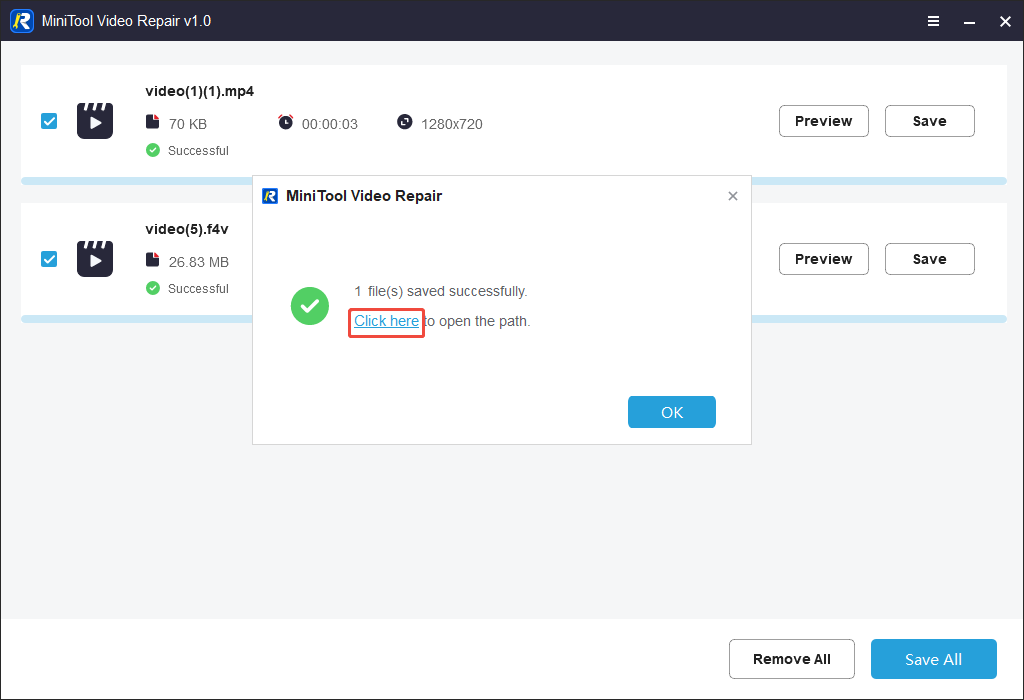
To preview the repaired videos, click on the Preview button. To choose the saving path for the repaired files, click on the bottom-right Save All button.
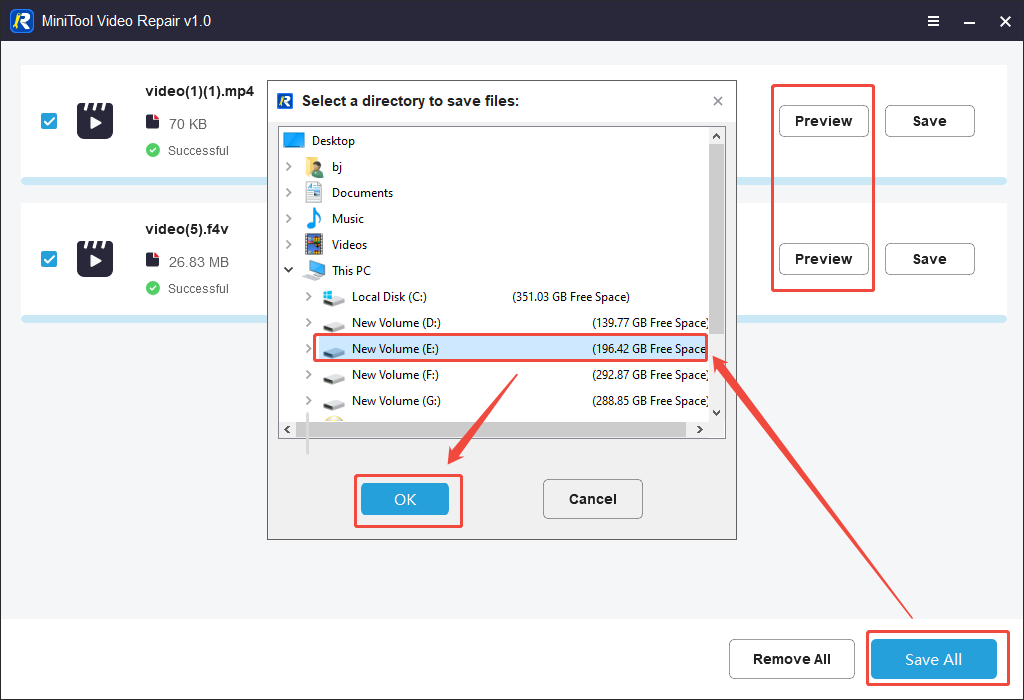
When the video saving process finishes, you will see a pop-up window. There, click on the Click here area to locate the repaired files.
With the above-detailed steps, it is more possible for you to cope with the problem of videos not playing on your computer.
#7 Trim the Video
Videos will not play if they contain a problematic part. To fix that issue, you can use a video editor to remove the broken part from your video file. Here, I highly recommend MiniTool MovieMaker. As robust video editing software, it empowers you to speed up, trim, merge, crop, flip, rotate, or reverse the video with simple clicks.
Even if you want to change the volume or aspect ratio of your videos, MiniTool MovieMaker can also meet your needs. Below is a detailed guide on how to trim the video using MiniTool MovieMaker.
Step 1. Get MiniTool MovieMaker on Your PC
MiniTool MovieMakerClick to Download100%Clean & Safe
Download MiniTool MovieMaker by clicking on the download button above. Then, follow the on-screen instructions to install this video trimmer on your PC.
Step 2. Import the Video
After launching MiniTool MovieMaker, click on the New Project option to enter the main interface. There, click on the Import Media Files area. Then, drag the video onto the timeline below.

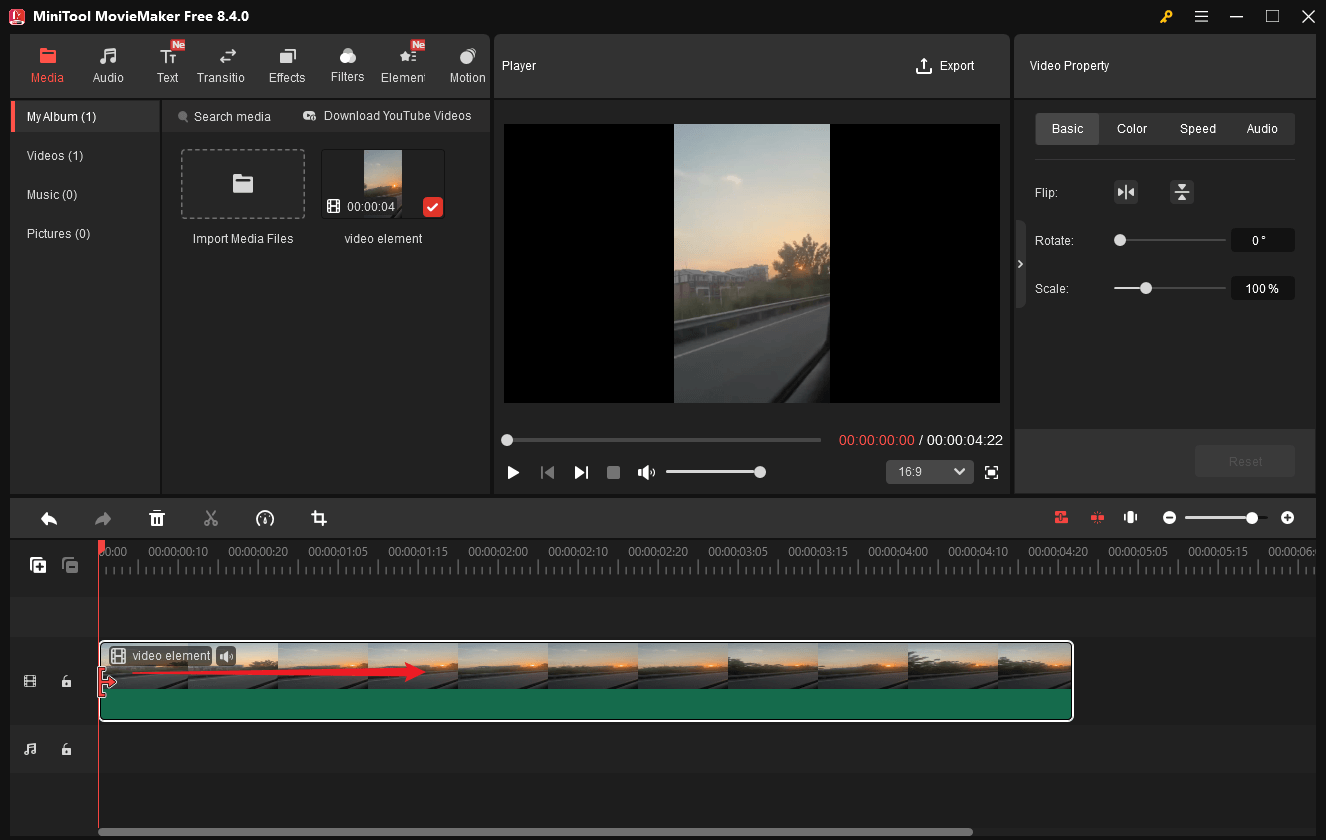
Step 3. Trim the Video
To trim an unwanted part not in the middle of the video, mouse over the beginning/end of the video clip until you see an arrow. Next, drag the arrow rightwards/leftwards to the start/end of the wanted part.
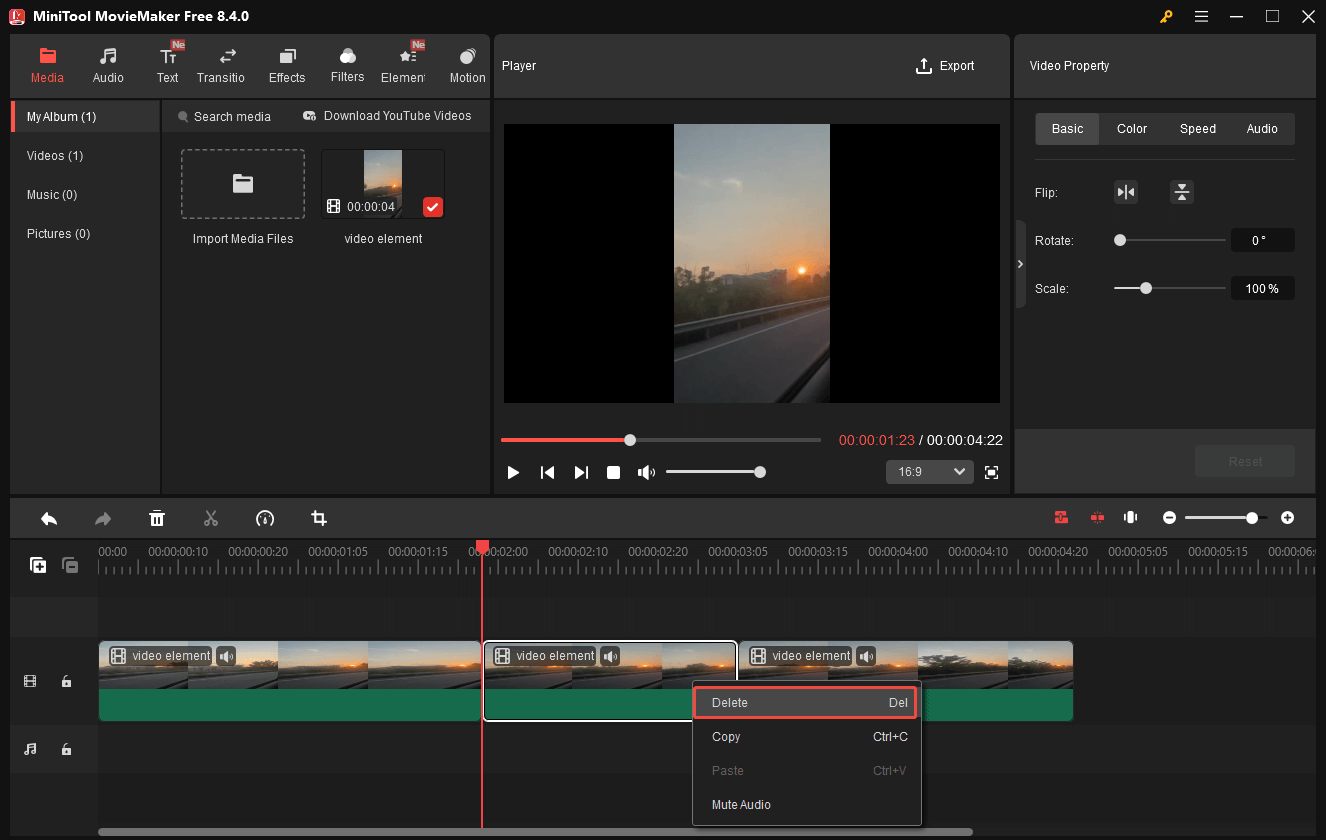
If you want to trim the middle part of the video, move the playhead to the start of the unwanted part and click on the scissors icon. Next, drag the playhead to the end of the unwanted clip and click the scissors icon again. Then, click on the unwanted part to highlight it. Finally, right-click on the clip and choose the Delete option.
Step 4. Specify the Output Settings and Start Video Exporting
Click on the Export icon at the upper right of the Player section to enter the Export window. There, expand the Format option to configure an output format. Here, I select MP4 for universal compatibility. Also, you are free to choose an output folder for the exported video. Finally, click on the bottom-right Export option to save the output video.

Step 5. Check the Output Video
When the video saving process completes, click on the Find Target button in the pop-up window to locate the trimmed video.

As a feature-rich application, MiniTool MovieMaker also provides you with various elements, including motions, transitions, filters, captions, credits, and more, to optimize your videos.
#8 Check Storage Space
To fix the videos not playing error caused by limited storage space, you can try to extend the partition or use a space analyzer.
8.1 Extend Partition
If you have downloaded or stored large video files on a partition with limited space, you can’t save the entire video, which eventually leads to the issue of videos not playing. By adding adjacent unallocated space, partition extending helps increase the size of an existing partition. This way, you can get a smoother video playback experience.
8.2 Space Analyzer
Using a space analyzer is another effective method to help you gain more storage space. As a standout tool, a space analyzer enables the scanning of your hard drive. Meanwhile, it offers you a detailed breakdown, walking you through how the space is used. In addition, some large files can be identified, which offers you a comprehensive guide to managing the storage space.
#9 Update Graphics Drivers
Updating graphics drivers enables better hardware acceleration. Meanwhile, newer drivers give more support for new codecs, which allows video playback on more media players. In addition, such an update leads to more efficient power usage. Below is a detailed guide on how to update graphics drivers on Windows.
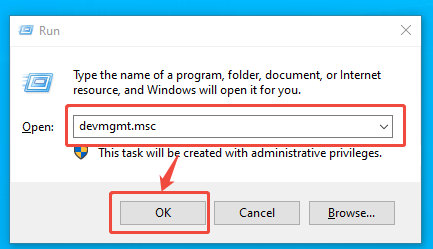
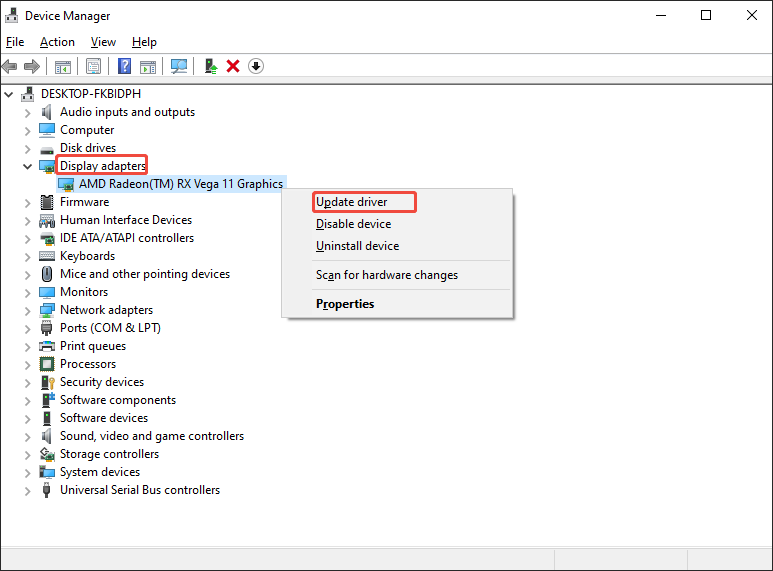
Step 1. Access the Device Manager panel.
Press the Windows + R key to open the Run window. There, type devmgmt.msc and click on the OK button to enter the Device Manager panel.
Step 2. Enter the driver update interface.
Expand the Display adapters option and right-click on the graphics card. Next, choose Update driver to enter the next interface.
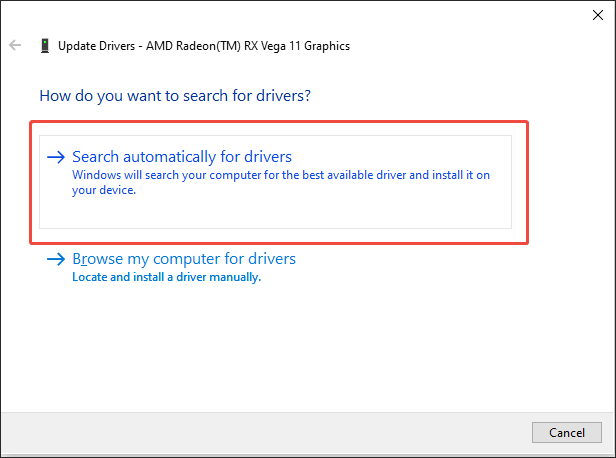
Step 3. Start the driver update.
Click on Search automatically for drivers to begin the update process.
Follow the steps to finish updating the graphics driver.
With the above-detailed steps, you can update the outdated drivers without hassle.
#10 Update Operating System
An old operating system brings you many limitations that frustrate video playback, such as security restrictions, missing drivers, and more. Ensure that you have updated the operating system to the latest version. You can also follow the guidance below to update your Windows system.
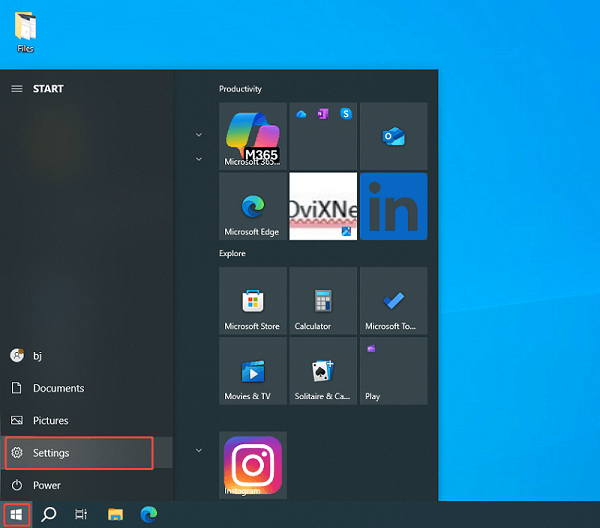
Step 1. Enter the Settings window.
Click on the Start menu and choose the Settings option to enter the Settings window.
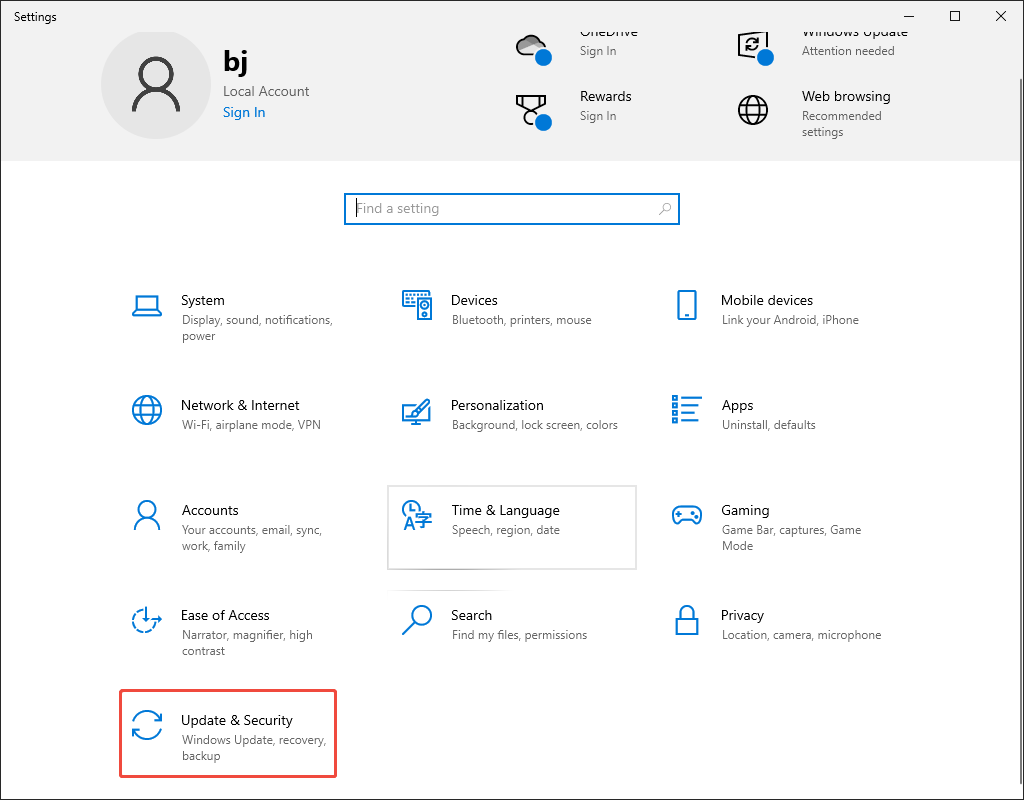
Step 2. Enter the update panel.
In the Settings window, choose the Update & Security option to enter the update page.
Step 3. Check for and start the update.
Under the Windows Update tab, click on Check for updates. If the update is available, click on Download & install to begin the update process.
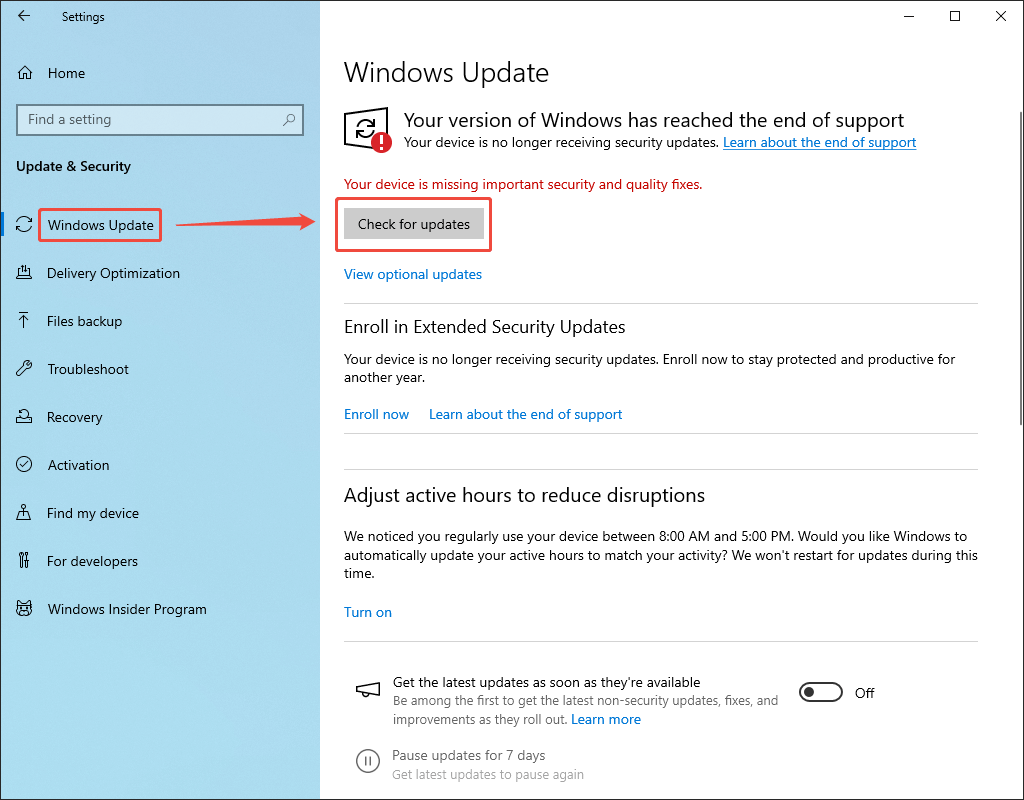
Currently, you must grasp how to update your operating system.
How to Fix Videos Not Playing on Browsers
If your browser can’t play video, the following content can help.
#1 Refresh/Restart/Update/Reinstall the Browser
Before trying other methods below, refresh or restart the web browser. If this method doesn’t work, follow the guidance below to check for the update. Here, I will take Chrome as an example.
Step 1. Open Chrome and Enter the Settings Interface
Open Chrome on your PC and click on the upper-right More icon to enter the Settings interface.
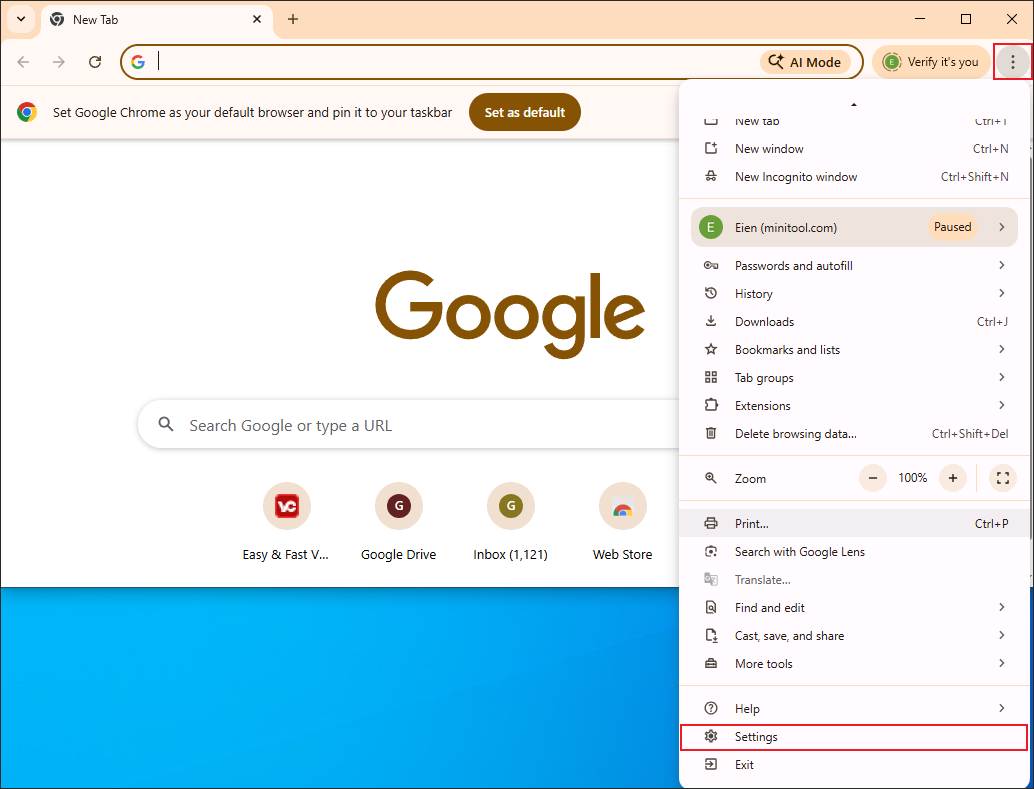
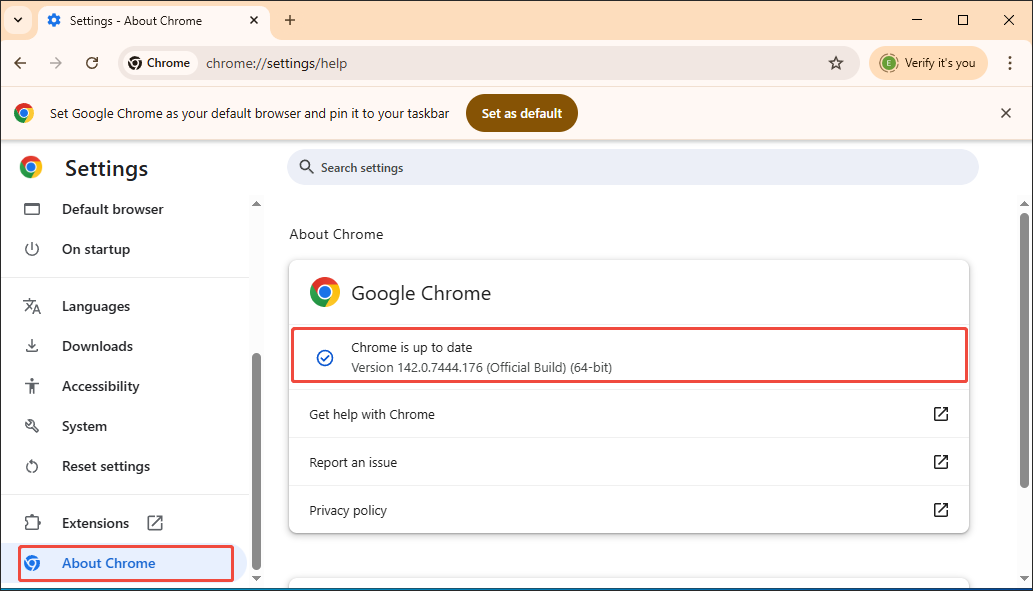
Step 2. Go to the About Chrome Tab
In the Settings interface, switch to the About Chrome tab.
Step 3. Check the Update
Check whether the update is available. If yes, follow the on-screen prompts to update the browser.
If you have updated the browser, but there is still a problem, just reinstall the web browser.
#2 Check Network Connection and VPN/Proxy
Internet connection and VPN/Proxy are also influential factors for video playback on Browsers. In the following paragraphs, I will show you how to check them on computers and mobiles.
2.1 Check internet speed (PC/Mobile)
Speedtest by Ookla is a powerful online tool that enables you to measure the internet connection. Working well with both PC and mobile users, it walks you through the latency, download speeds, upload speeds, and other relevant parameters. Below is a detailed guide on how to check the internet speed with Speedtest by Ookla.
Step 1. Go to the website of Speedtest by Ookla.
Visit https://www.speedtest.net.
Step 2. Start the speed test.
Click on the central GO button to begin the test process.
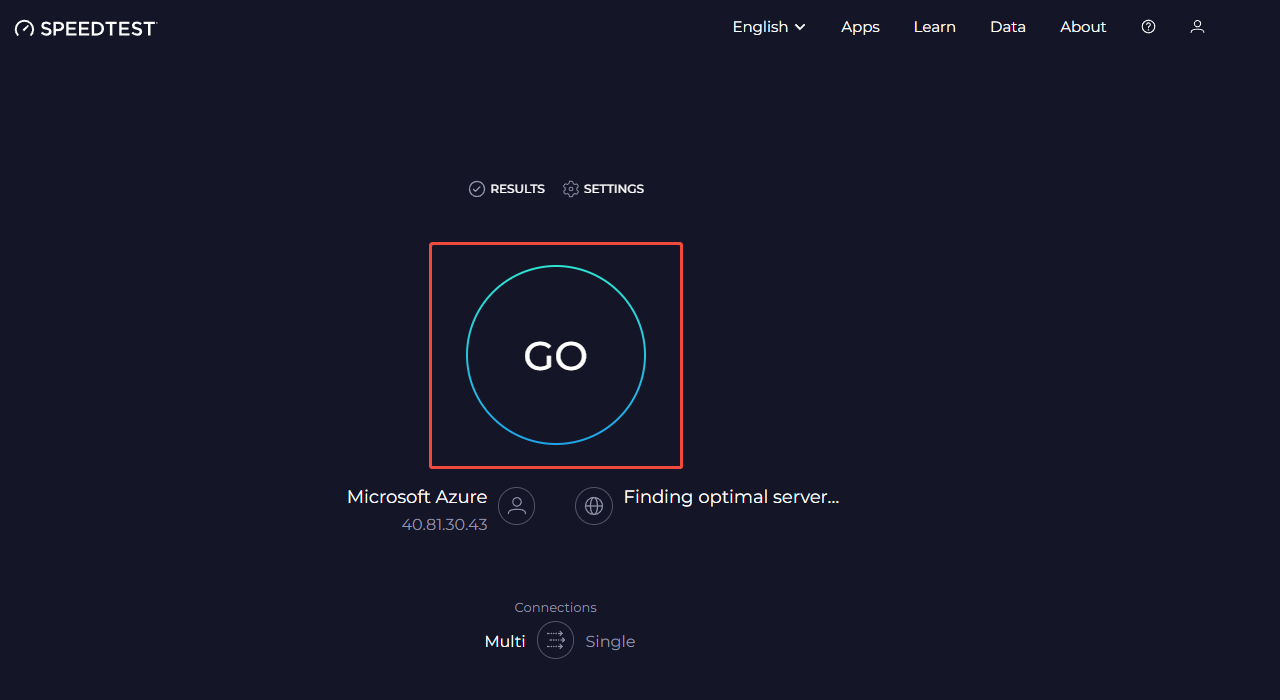
Step 3. Check the test results.
When the test process finishes, this tool will automatically switch to the result interface. There, check whether the internet speed is OK or not.
If you are skeptical about the test results, you can take several more tests.
2.2 Restart your home network: modem and router (PC/Mobile)
On condition that there is something wrong with the internet connection, try the steps below to restart your home network.
Step 1. Power down the modem and router.
Unplug the router and modem from power. Then, wait for 2 minutes.
Step 2. Power up the modem and router in order.
Plug the modem into the power first. Once all the modem lights are stable, plug the router into the power.
Step 3. Connect and test the internet connection.
When the router lights are stable, reconnect your computer or mobiles to the Wi-Fi network. Next, check whether the internet connection is stable by visiting a website or conducting a speed test.
2.3 Toggle off Airplane Mode (PC/Mobile)
Airplane mode is an optional setting on your computer or mobile device. If you turn it on by accident, all the wireless connections, like Wi-Fi and cellular data, will be disabled. To toggle off airplane mode on a PC, just follow the instructions below. Here, I take Windows 10 as an example.
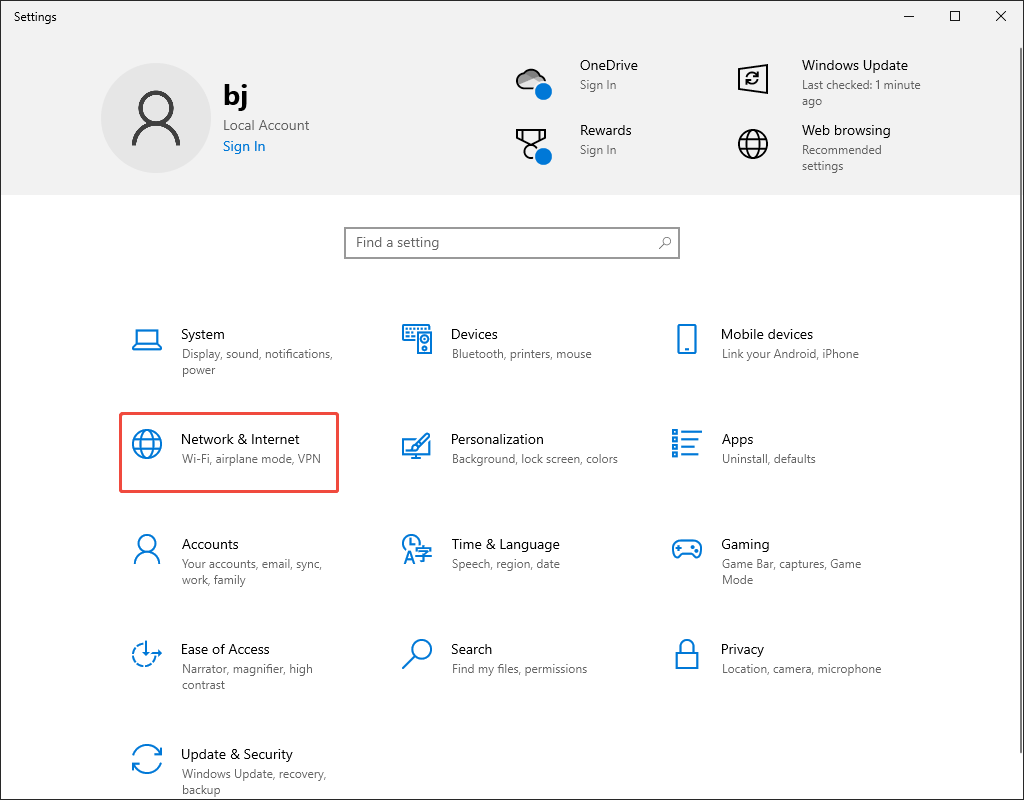
Step 1. Enter the Settings window.
Click on the bottom-left Start menu and choose the Settings option to access the Settings window.
Step 2. Access the Internet panel.
Click on the Network & Internet option to enter the next panel.
Step 3. Turn off the Airplane mode option.
At the left-side bar, switch to the Airplane mode tab. There, check whether the Airplane mode option is turned off. If not, toggle it off.
If you are a mobile user, just go to the Settings app on your device. There, you can toggle off the Airplane mode option directly.
2.4 Switch between Wi-Fi and Cellular Data/Ethernet (PC/Mobile)
To get a more stable internet connection, it is also effective for mobile users to switch between Wi-Fi and cellular data. When it comes to PC users, switching between the Wi-Fi network and Ethernet is feasible.
2.5 Use a VPN/Proxy or Disable Your VPN/Proxy (PC/Mobile)
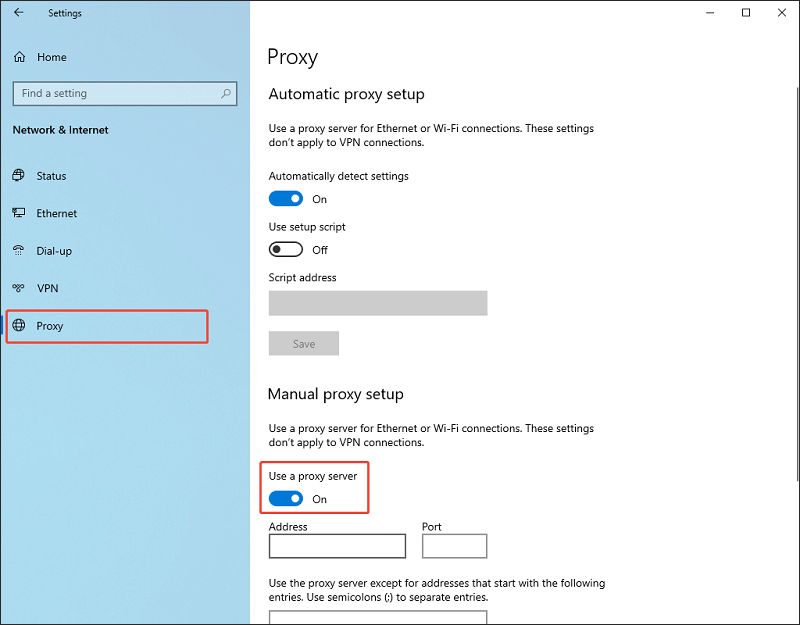
A VPN or proxy helps optimize routing and address intentional slowdowns by your Internet Service Provider (ISP). If you want to use a VPN on a mobile/PC, just download a VPN application. Then, follow the on-screen prompts to connect to a server. On condition that you want to use a proxy on a PC, try the instructions below.
Step 1. Enter the Settings interface.
Click on the bottom-left Start menu and choose the Settings option to enter the Settings window.
Step 2. Access the Network & Internet module.
Then, choose the Network & Internet option to enter the next interface.
Step 3. Toggle on the proxy.
Navigate to the Proxy tab. Under the Manual proxy setup section, turn on the Use a proxy server option.
If you want to use a proxy on a mobile, here are the methods.
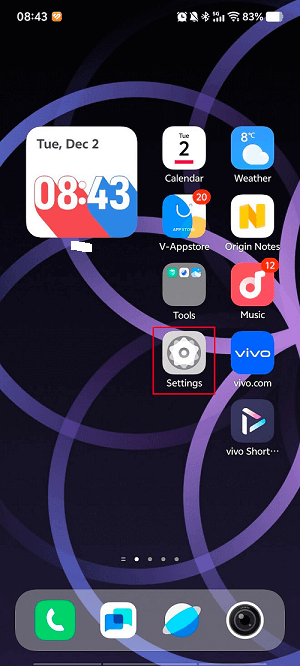
Step 1. Enter the Settings App.
After unlocking your mobile, tap on the Settings app.
Step 2. Turn on the proxy option.
Choose the Wi-Fi option.
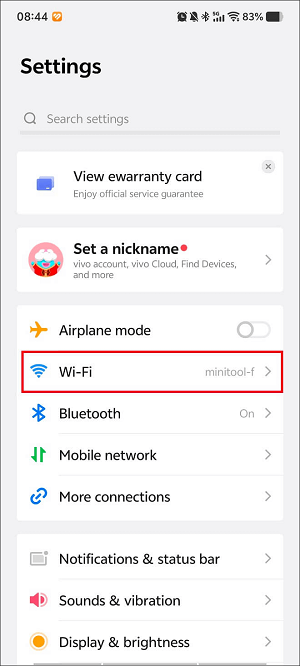
Tap the specific Wi-Fi network that you have connected to.
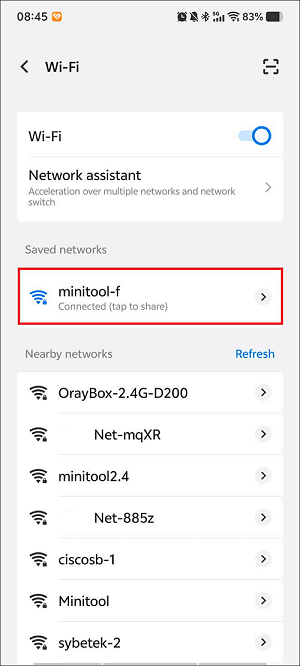
Scroll down and hit the Proxy option.
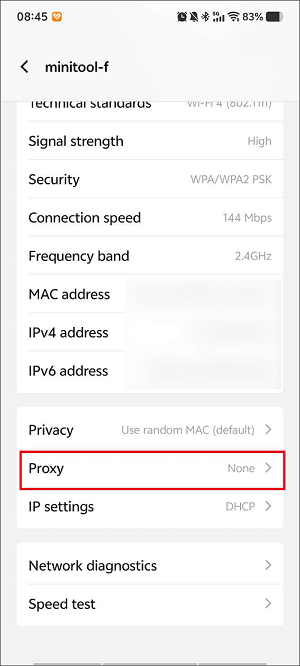
Next, choose Manual.

However, since using a VPN/proxy may generate extra activities, like data encryption and decryption, it sometimes increases latency, which may eventually negatively affect the internet speed and stability. Hence, if you want to disable the VPN or proxy, go back to the VPN app or the settings page to turn them off.
#3 Clear Cache and Cookies
As I mentioned before, cache and cookies will also lead to videos not playing. To solve that problem, you can clear the cache and cookies of the browser. Here, I will choose Chrome as an example and show you how to do that.
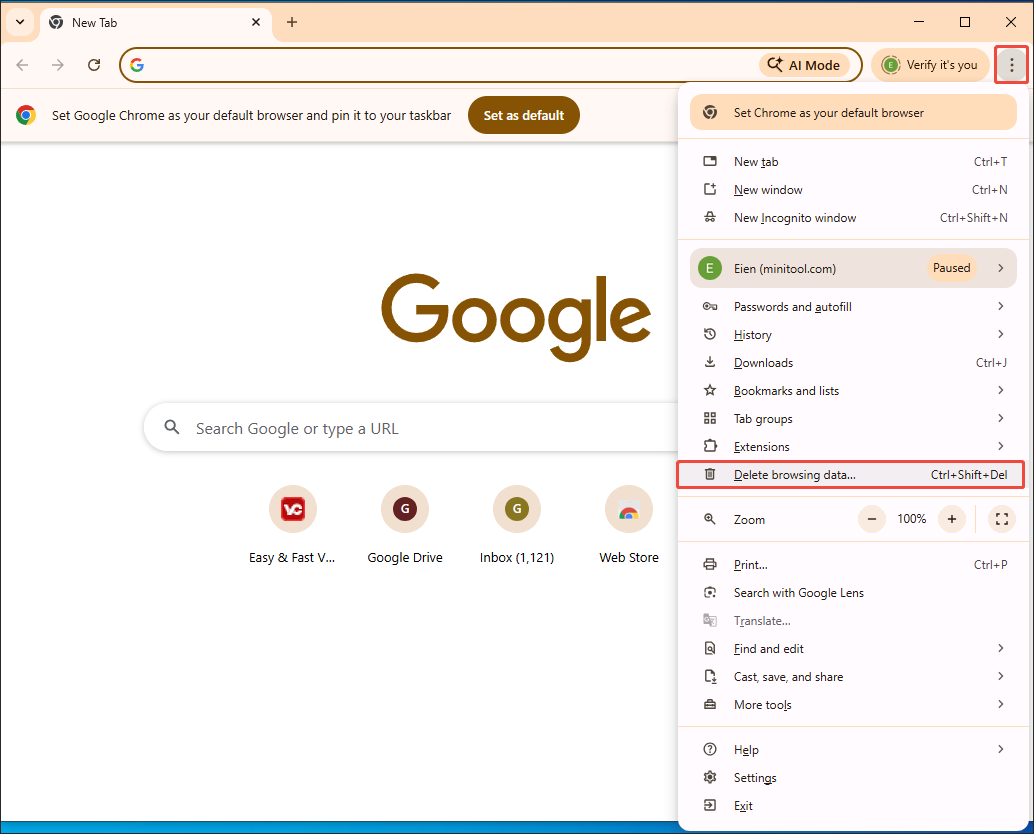
Step 1. Open Chrome and Enter the Data Delete Window
After launching the Chrome browser, click on the upper-left More icon to expand the option menu. There, choose Delete browsing data… to access the next page.
Step 2. Configure the Data Deletion Settings and Start Deletion
In the pop-up Delete browsing data window, choose the time range you want. Here, I select Last 24 hours. Next, check the Cookies and other site data option and the Cached images and files option. Finally, click on the Delete from this device button to begin the deletion process.
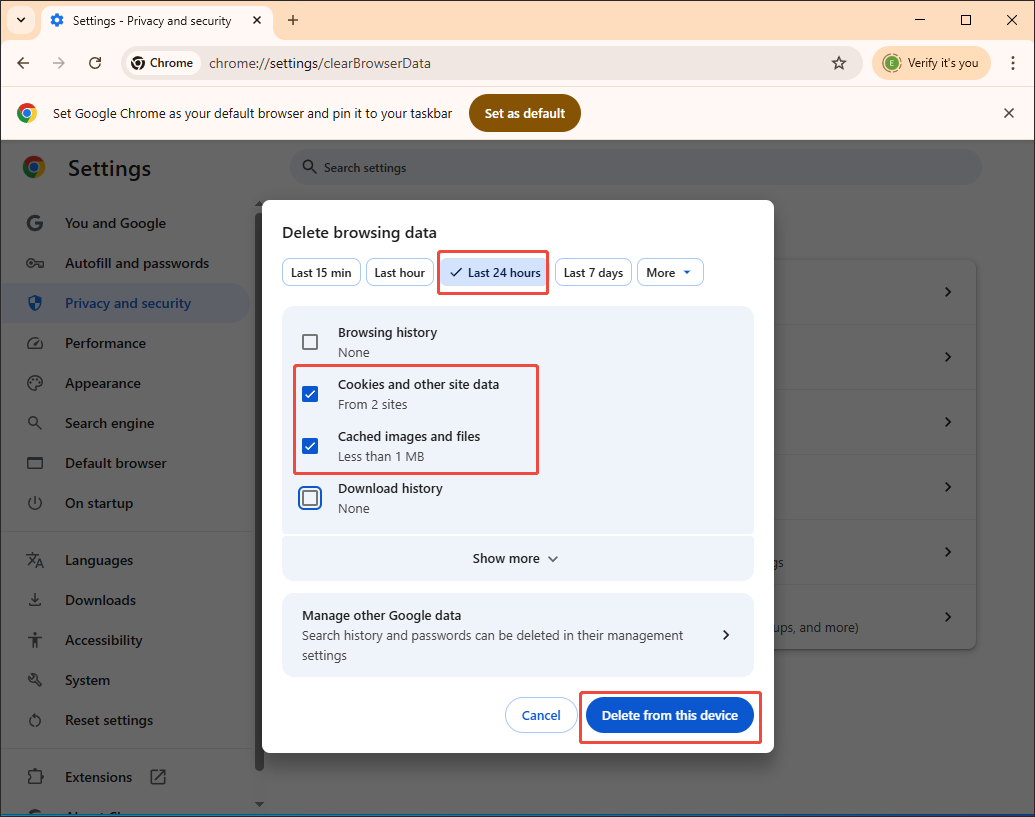
Step 3. Check the Result
When the data deletion process ends, play the video on Chrome again to check whether the method is effective.
With the guidance above, you can clear cache and cookies without hassle.
#4 Disable Extensions/Add-ons
If extensions/add-ons trigger the problem of videos not playing on browsers, follow the guide below to disable them. Here, I still select Chrome as the example.
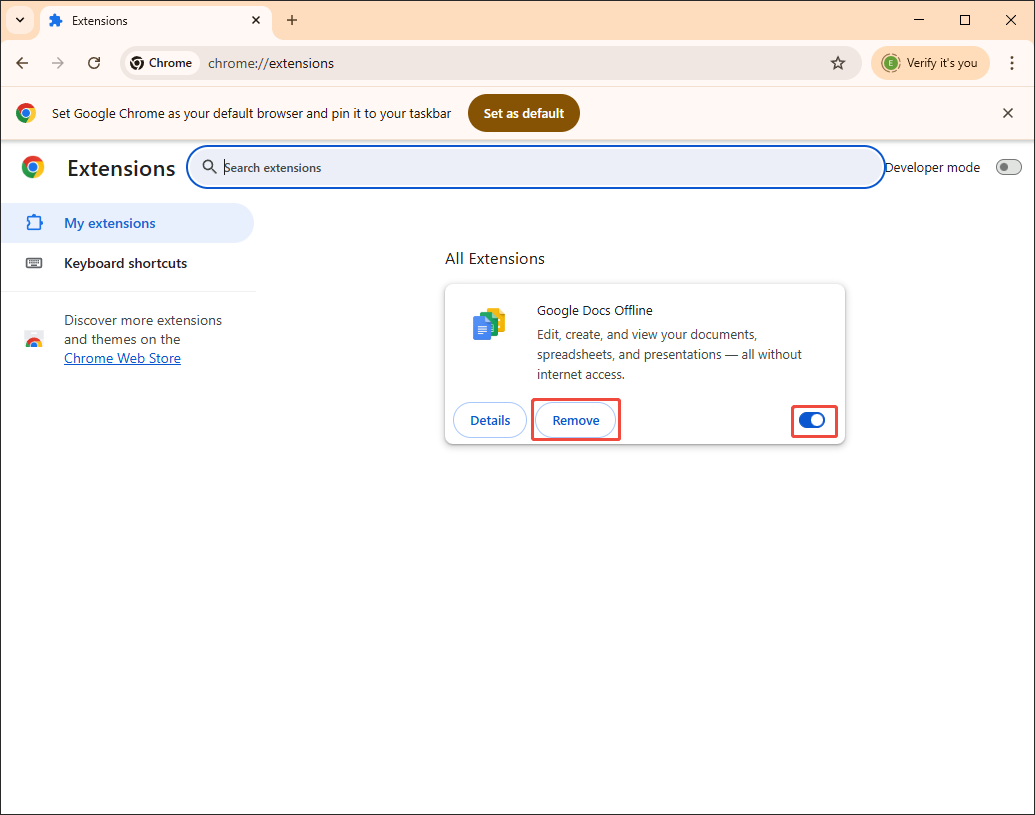
Step 1. Open Chrome and Enter the Extension Tab
Open Chrome on your PC. Click on the upper-right More icon to access the drop-down option menu. There, choose the Extensions option and then click on Manage Extensions to enter the Extension module of Chrome.
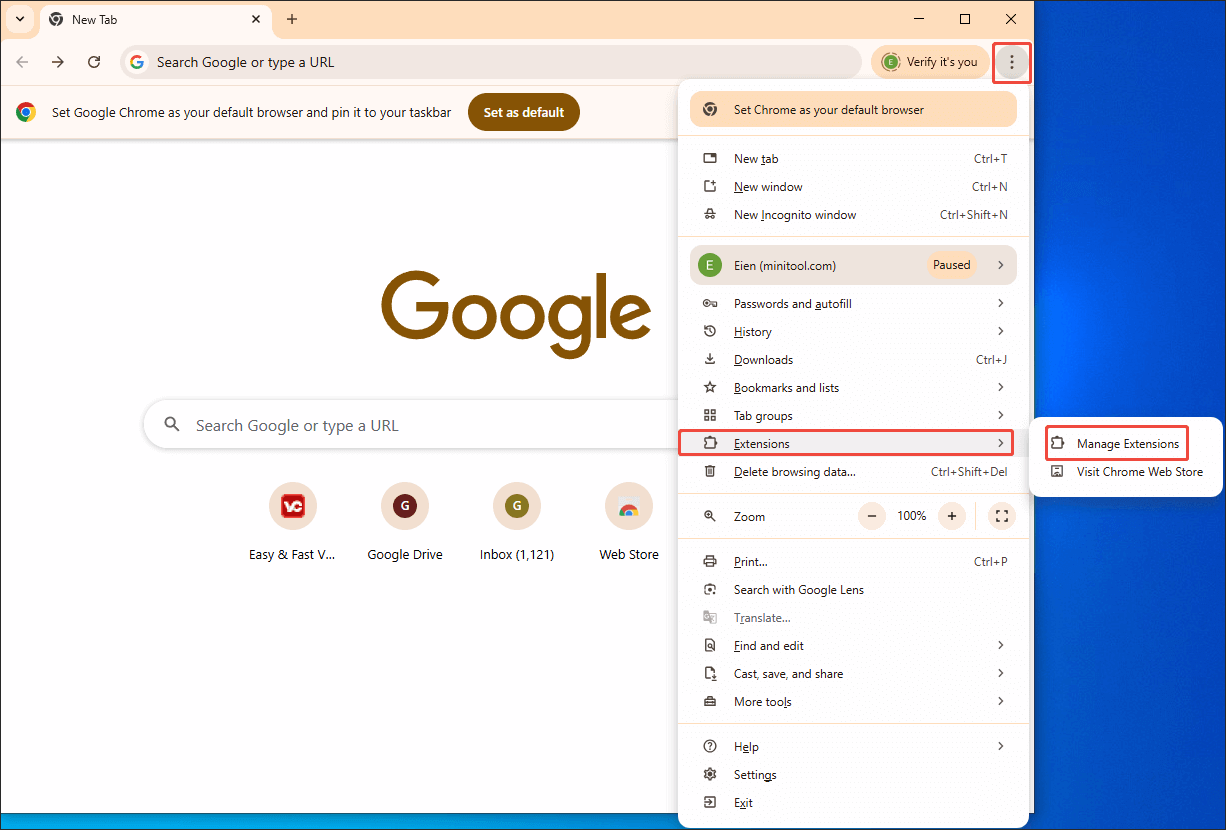
Step 2. Turn off the Extensions
In this interface, you can view all the extensions/add-ons that are running on Chrome. Next, turn them off based on your needs. If you want to delete some extensions or add-ons, click on the Remove button.
Step 3. Check the Video Playback
When the extensions/add-ons are disabled completely, play the video on Chrome again to see whether the method works.
With the above solution, the extensions/add-ons will never bring an obstacle to the video playback.
#5 Disable Hardware Acceleration
Disabling hardware acceleration has many benefits. It solves the problems such as glitches, crashes, and compatibility issues generated by outdated drivers or older hardware. Meanwhile, it also enables the performance improvement of less powerful systems. Below are the detailed steps to disable hardware acceleration on Chrome.
Step 1. Launch Chrome and Enter the Settings Interface
After opening the Chrome browser, go to its Settings interface.
Step 2. Disable the Hardware Acceleration
Switch to the System tab. There, turn off the Use graphics acceleration when available option. Next, click on the Relaunch button to restart Chrome.
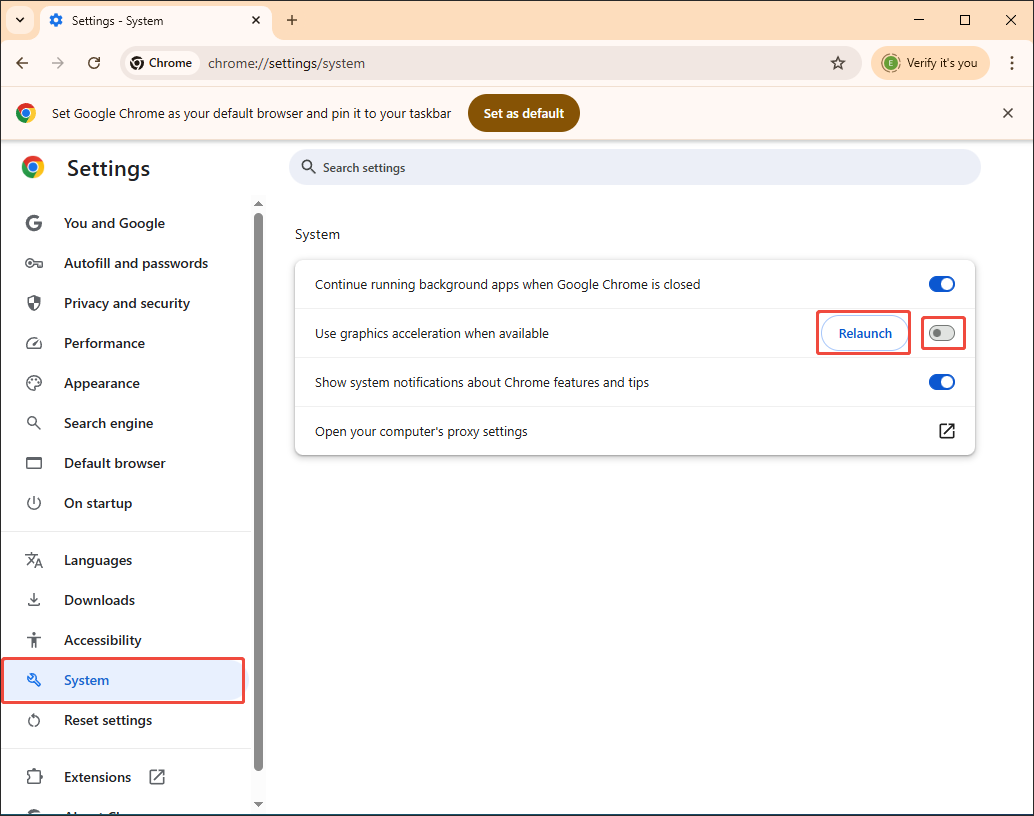
Step 3. Check the Video Playback
Play the video on Chrome again to check whether the method is workable or not.
Currently, you have grasped how to disable hardware acceleration.
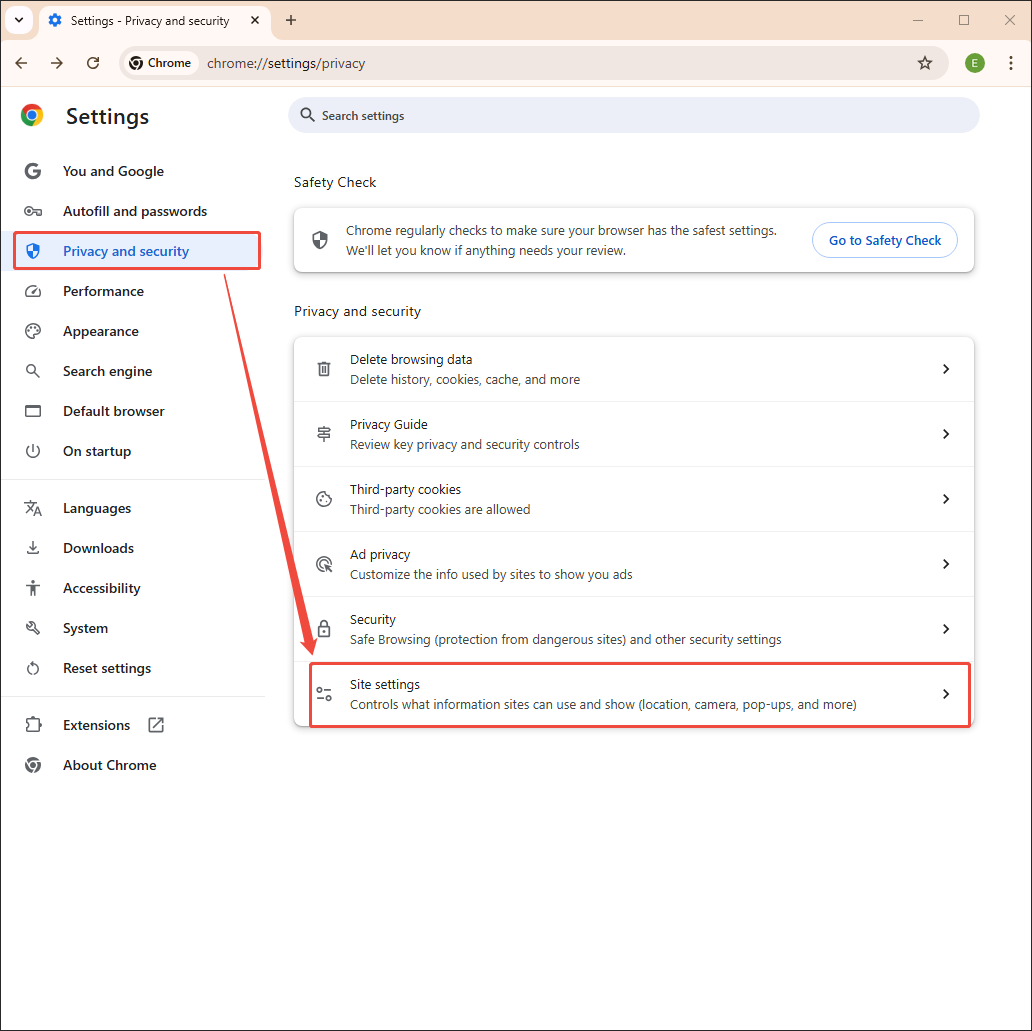
#6 Enable JavaScript
JavaScript offers many features for creating interactive elements in video players, including volume sliders, play buttons, and more. In other words, it supports the smooth operation of a video player. Hence, if you have disabled JavaScript accidentally, videos may not play in the browser. To enable JavaScript again, you can follow the steps below.
Step 1. Enter the Settings interface of Chrome
Go to the Settings page of Google Chrome.
Step 2. Access the Site Settings Tab
Switch to the Privacy and security module. There, select the Site settings option.
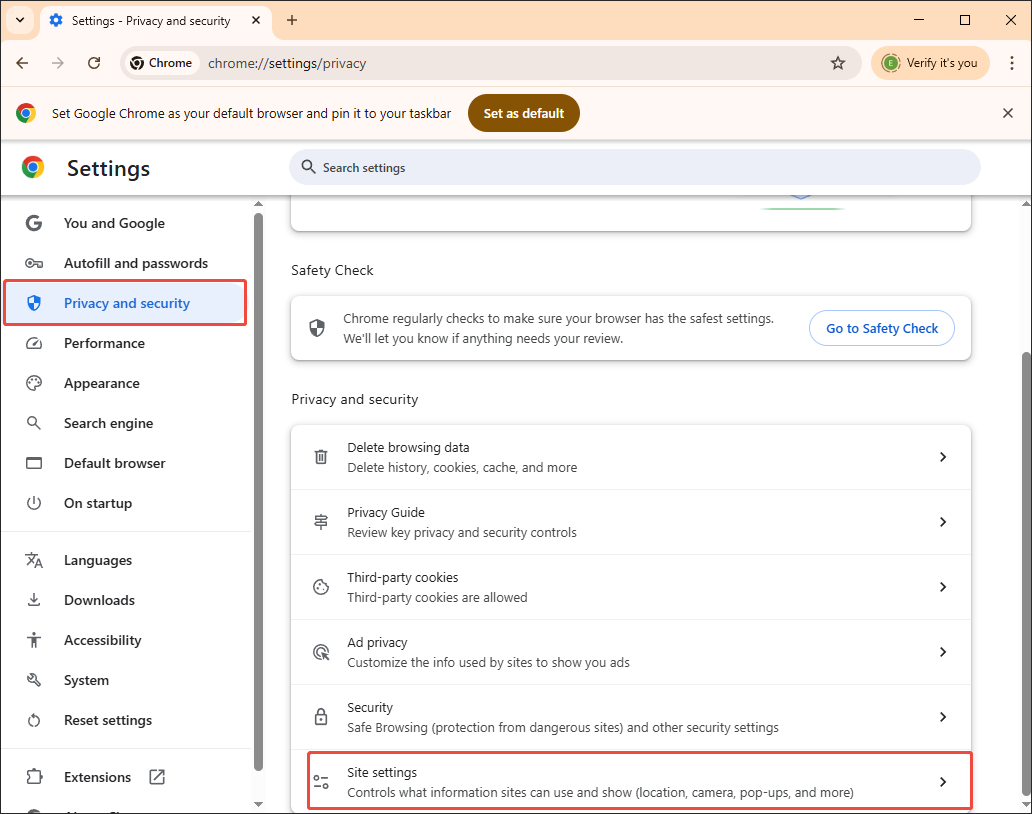
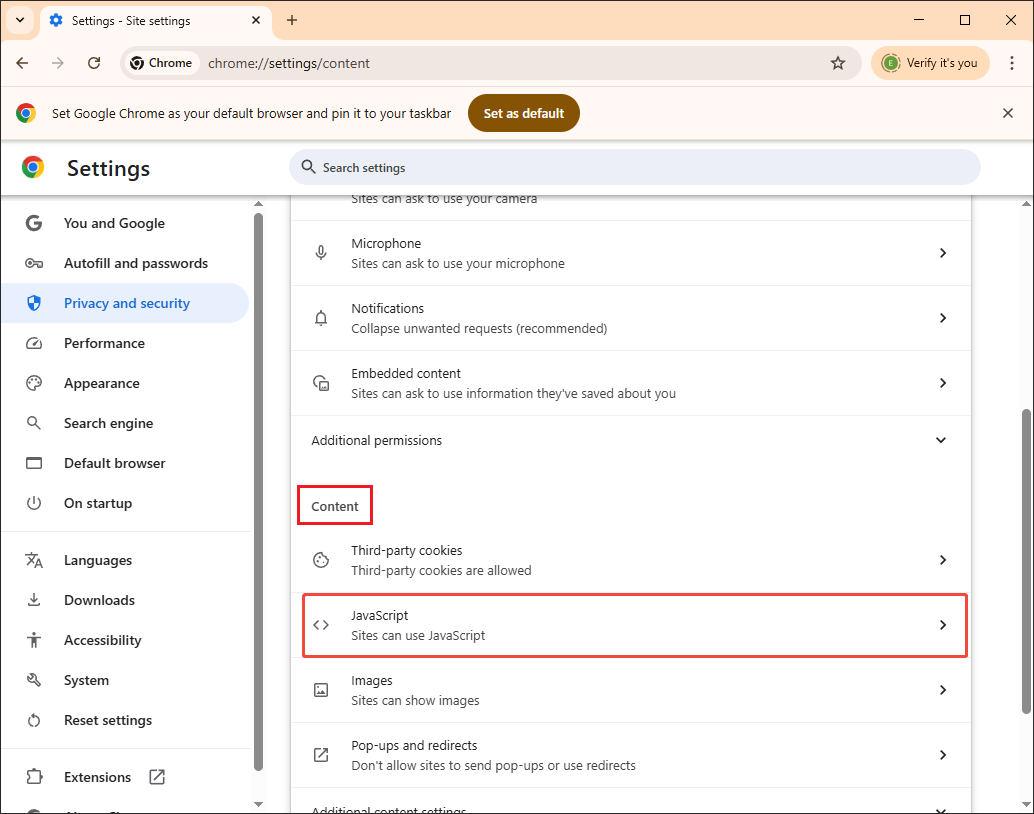
Step 3. Go to the JavaScript Panel
Scroll down to the Content tab. There, click on JavaScript to enter the next panel.
Step 4. Enable JavaScript
Under the Default behavior tab, check the Site can use JavaScript option.
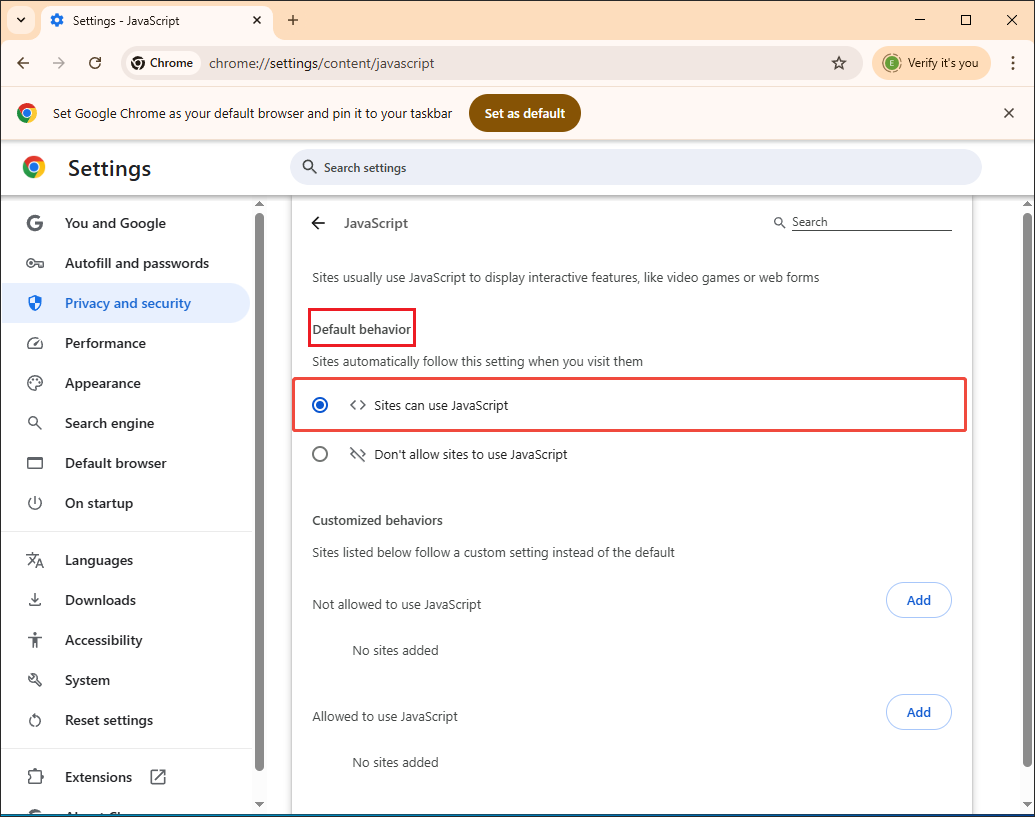
After enabling JavaScript, try to play a video in the web browser.
#7 Enable Digital Rights Management (DRM) Content
Essential DRM components and permissions enable a web browser to decrypt the protected video content. Without them, it is impossible to view some videos on popular platforms, including Netflix, Amazon Prime Video, and more. Below is a step-by-step tutorial on how to enable Digital Rights Management (DRM) Content on Chrome.
Step 1. Access the Settings Page of Chrome
Enter the Settings interface of Google Chrome.
Step 2. Enter the Site Settings Panel
Navigate to the Privacy and security tab. There, click on Site settings.
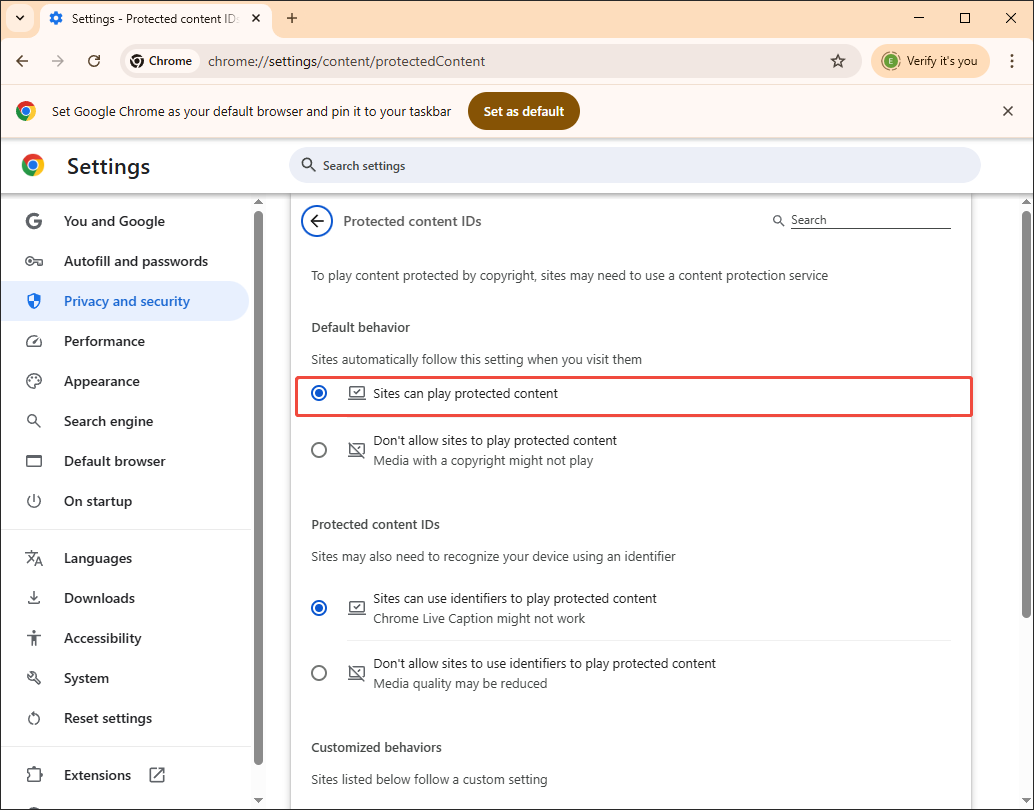
Step 3. Go to the Digital Rights Management Panel
Expand the Additional content settings drop-down menu and click on Protected content IDs.

Step 4. Enable Digital Rights Management Content
Enable the Digital Rights Management content by checking the Sites can play protected content option.
With the tutorial above, you can have more chances to fix the issue of videos not playing.
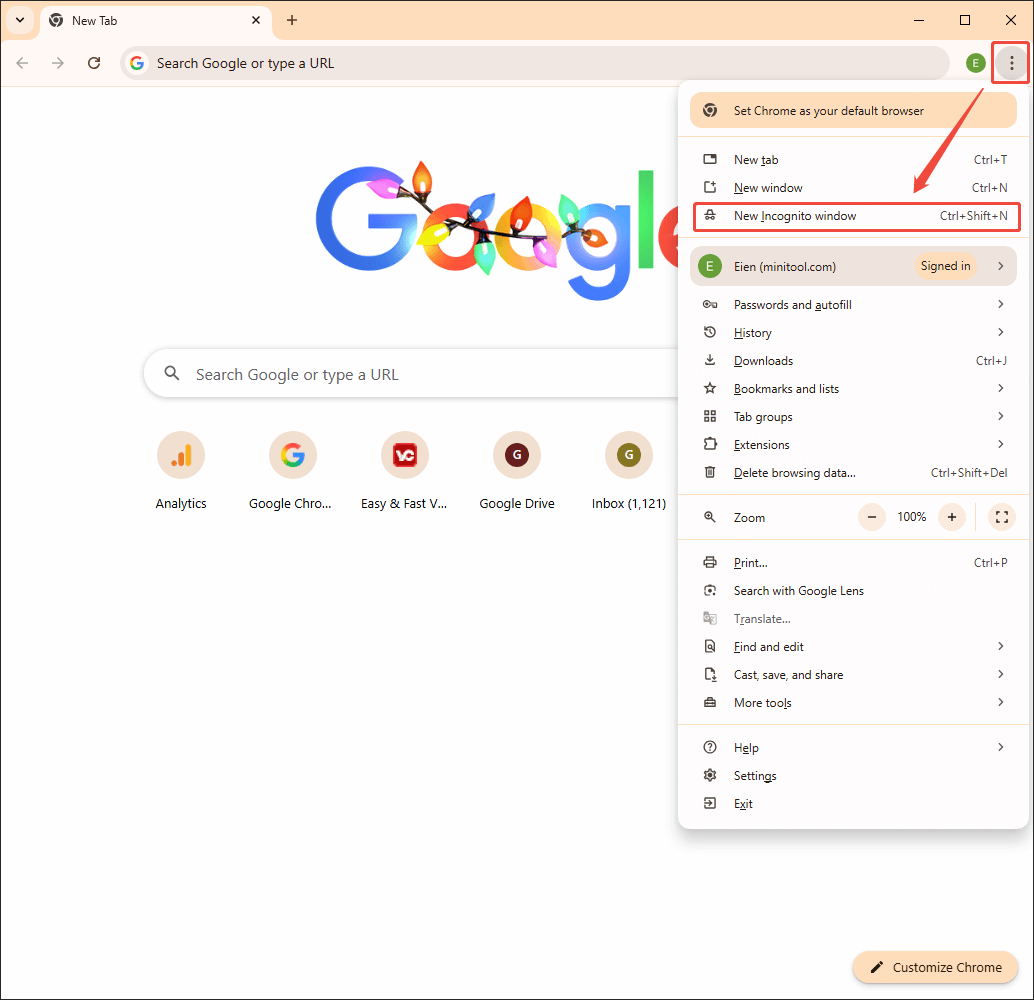
#8 Try Incognito Mode
As a private browsing feature in web browsers, the incognito mode allows video playback without referencing the problematic cache and cookies. In addition, its running often doesn’t rely on extensions/add-ons. Therefore, nothing will be blocked to prevent the video from playing.
To enable incognito mode on Chrome, just launch the browser and click on the upper-right More icon and choose New Incognito window.
#9 Reset Browser Settings
Resetting the browser settings empowers you to revert the configuration that may be problematic. For example, if you reset a browser, the extensions that conflict with a video player can be removed. Taking Chrome as an example, I will show you how to reset its settings below.
Step 1. Go to the Settings Page of Chrome
Access the Settings page of Google Chrome.
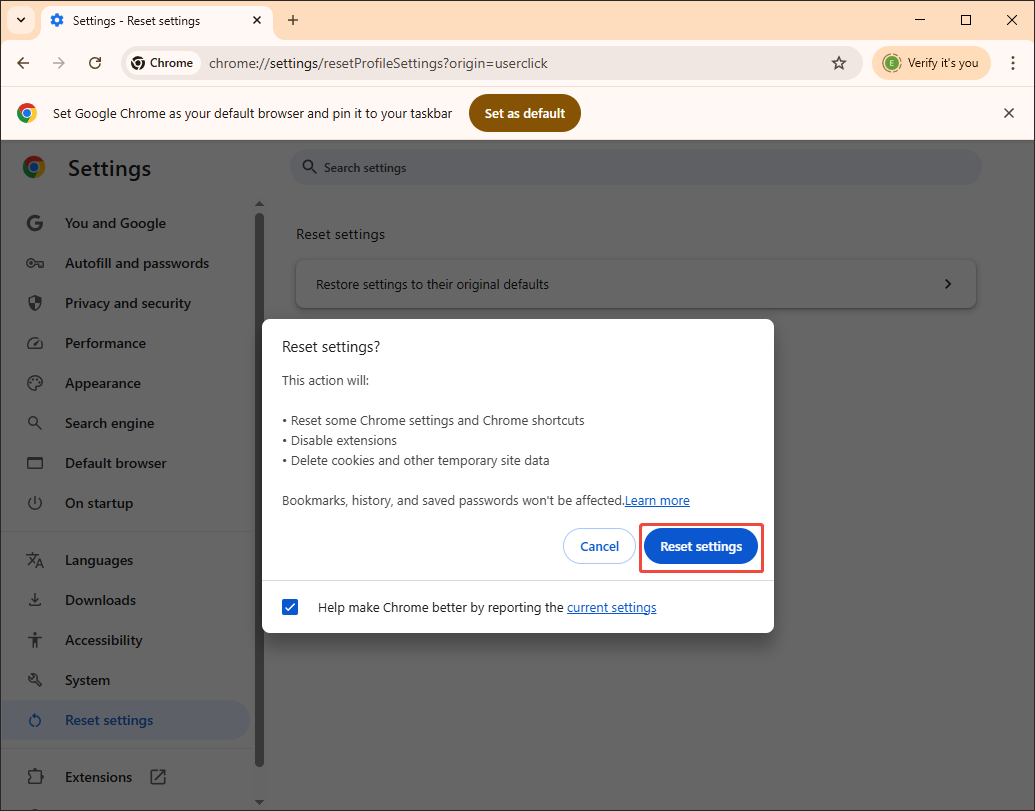
Step 2. Enter the Reset Settings Panel
Switch to the Reset settings tab. There, click on Restore settings to their original defaults to enter the pop-up window.
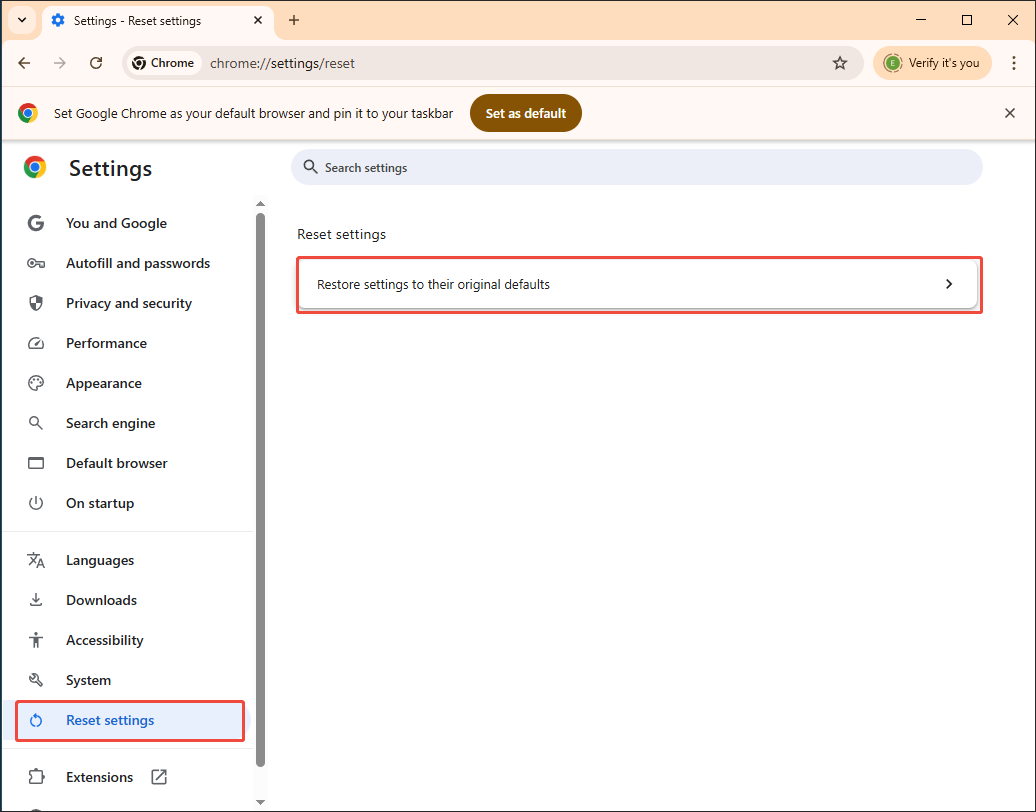
Step 3. Start the Resetting Process
Begin the resetting process by clicking on the Reset settings button.
With the above-detailed steps, you can reset the browser settings with simple clicks.
#10 Check for Browser Restrictions
Ensure that the browser has the necessary permissions (like network access) in your computer's settings. To do that, you can follow the guidance below.
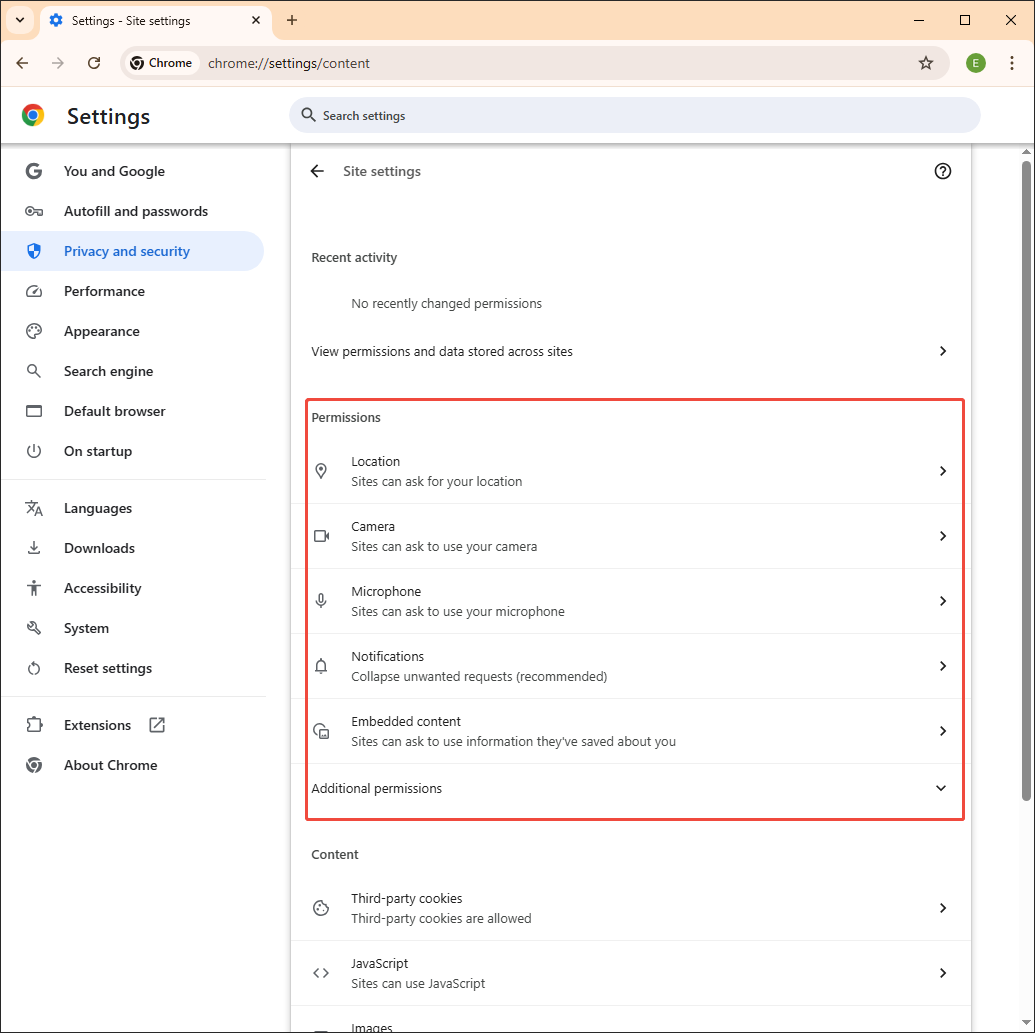
Step 1. Go to the Site settings section of Google Chrome.
Enter the Settings page of Google Chrome. Switch to the Privacy and security tab. There, click on Site settings.
Step 2. Check the browser permissions.
Scroll down to the Permissions section. There, you can check various browser permissions.
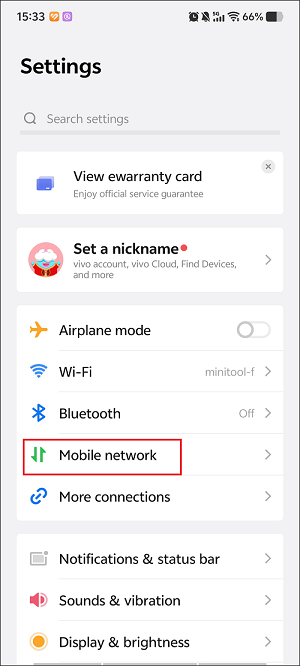
This way, you can check for browser restrictions effortlessly. Also, check if you have any data-saving modes enabled, which might restrict background data and video loading. If the restriction happens, remember to follow the steps below and disable the data-saving modes.
Step 1. Go to the Mobile network section.
After entering the Settings app, choose the Mobile network option.
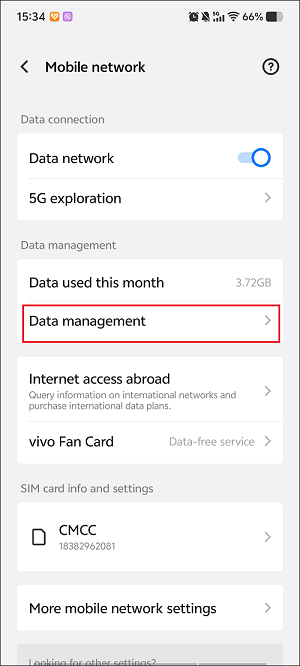
Step 2. Access the Data management panel.
Tap on the Data management option.
Step 3. Turn off the Data-saving mode.
Hit the Data-saving mode option.
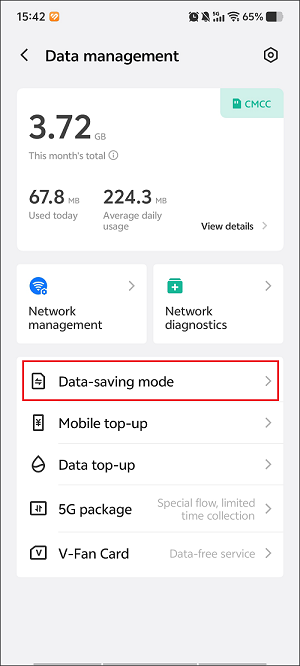
Toggle off the Data-saving mode option.
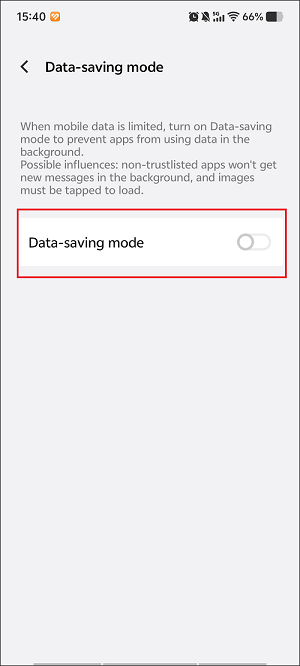
With the above-detailed instructions, you are more likely to avoid the restriction.
#11 Try a Different Browser
If the methods above don’t work, it means that there may be something wrong with your web browser. Given this, try using another web browser. You can choose Google Chrome, Microsoft Edge, Opera, Brave, Firefox, and more.
#12 Download the Video to Play Offline
For those who still can’t view the video on a web browser, it is suggested that you get the videos with third-party video downloaders. This way, even if the videos are not playing on browsers, you can view them anytime or anywhere.
How to Fix Videos Not Playing on Social Apps
Here are 7 detailed methods to fix videos not playing on social applications.
#1 Restart/Update/Reinstall the APP
Restarting the app enables clearing temporary data, which offers you a better environment for video playback. Meanwhile, ensure that you have updated the app to the latest version, which helps fix existing bugs that prevent the video from playing. In addition, reinstalling the app is also a viable solution.
#2 Clear App Cache and Data
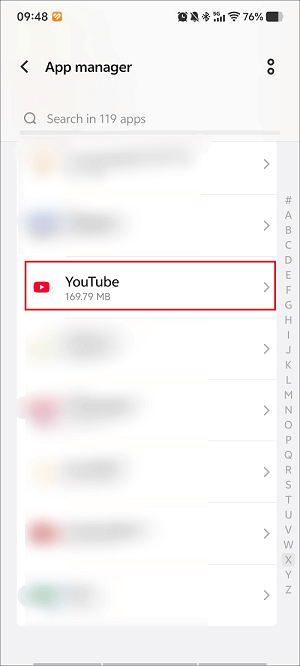
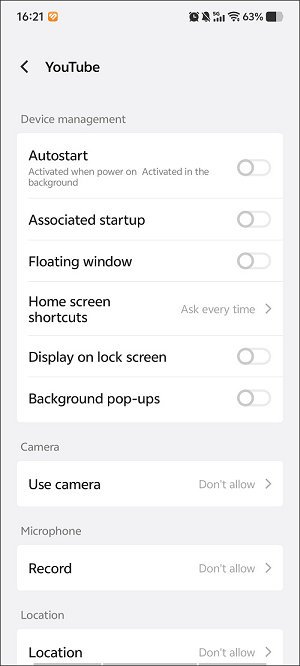
When using a mobile to play videos on a social app, it is advisable to clear the app cache and data to ensure a robust video playback environment. Taking YouTube as an example, below are the detailed steps to clear the app cache and data on a phone.
Step 1. Enter the Settings App
Go to the Settings app.
Step 2. Access the Apps Panel and App Manager
Scroll down and hit the Apps option.
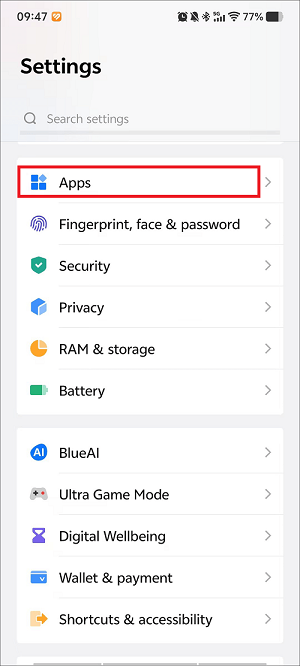
Select the App manager option.
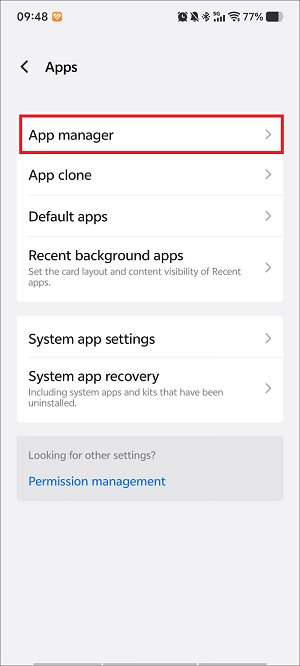
When you see an app list, scroll down and find the YouTube app. Then, hit it.
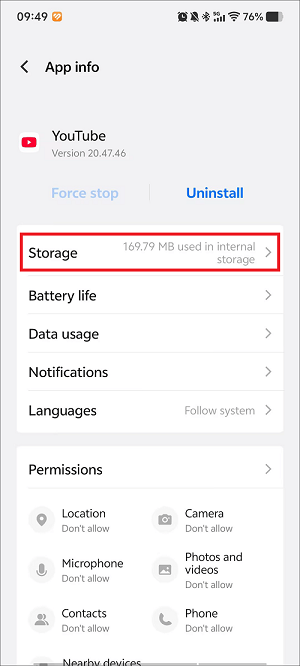
Step 3. Clear YouTube Cache and Data
In the App info interface, choose the Storage option.
Hit the Clear data option to delete the app data. If you want to remove the cache from your device, tap the Clear cache option.
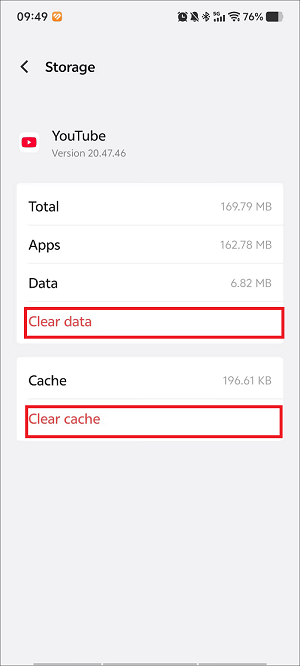
As you can see, you can clear the app cache and data in 3 simple steps, which helps you to solve the problem that videos are not playing on YouTube easily.
#3 Sign out and Sign in Your Account Again
You can also sign out and in to your account again to fix the video playback issue on the social application. Such a method enables the clearing of temporary glitches and the refreshment of the account session. In addition, with this solution, there will be a forced reconnection to the service, helping handle an erroneous login state or corrupted data.
#4 Check for App Restrictions
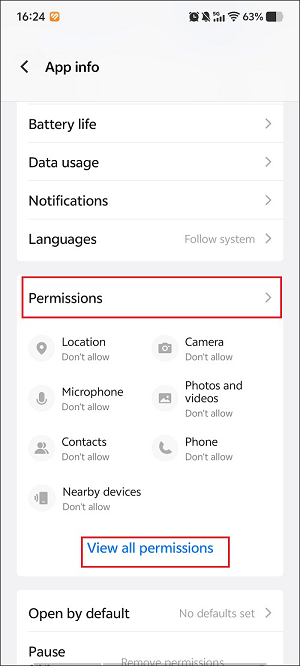
Ensure that the app has the necessary permissions (like network access) in your device's settings. Also, check if you have any data-saving modes enabled, which might restrict background data and video loading. To check the app permissions, follow the guidance below.
Step 1. Go to the App info interface.
Go to the App info interface of the Settings app.
Step 2. Access the permission management interface.
Scroll down to the Permissions section. There, hit View all permissions to enter the permission management interface.
Step 3. Manage the permission options.
Based on your needs, enable or disable the permission options.
#5 Check If the Social Platform Is Down
Another method is to check the social platform's server status. To do that, try Downdetector (https://downdetector.com). It aims to collect and analyze the outage reports from all kinds of users. With Downdetector, you can receive a lot of real-time information about the status of different services, such as YouTube, Discord, Roblox, and so on.
Also, you can visit the official Twitter or other accounts of the social apps to check whether there are announced outages. If there is no issue report, just try other methods.
#6 Unavailable Videos
Check whether the videos you want to play on the social app are unavailable. Here, I will select YouTube as an example.
6.1 Private Videos
You can’t view private videos on social media apps. For instance, a private video on YouTube is only available for the uploader and the invited users. Hence, if you want to view these videos on YouTube, ensure that you have been invited by the video uploaders. On condition that you are not invited, contact the video uploaders.
6.2 Age or Region Restriction
Some videos on social apps are unplayable due to age or region restrictions. If you want to view YouTube videos without those limitations, you can try turning off the Restricted Mode. Also, you can update your birthday in your Google account.
6.3 Copyright Issue
Due to the copyright issue, not playing video on YouTube will also happen. Specifically, video uploaders may block certain videos in some regions. To fix that issue, you can use a VPN (Virtual Private Network). This way, your virtual location can be changed to the place where these blocked videos are available. In addition, if you believe that you can view the videos, please dispute the claim.
6.4 Deleted Videos
YouTube not loading videos if they have been deleted. For example, you are unable to watch the videos that have been deleted from YouTube. Once the video is deleted, the original video URL doesn’t work anymore.
To solve that problem, you can use the original URL to check an archived version on the Wayback Machine. It is also feasible to look for the video on other platforms.
6.5 Member-only Videos
Member-only videos refer to exclusive videos for those who have paid to be a channel member. To view such videos, ensure that you have paid for the membership of specific channels. If you have done that but are still unable to view the videos, try to check the internet connection, toggle off the Restricted Mode, or contact creator support.
#7 Contact Social Platform Support Center
If the above solutions don’t work, please contact the support centers of specific social platforms, like YouTube, Facebook, Twitter, and more. Remember to share your problems with the workers in detail; they will help you as quickly as possible.
To Wrap Things Up
This article has summarized 9 possible reasons for videos not playing, like internet connection issues, incompatible video formats, file damage, and more. No matter whether you want to play videos on computers, browsers, or social apps, this post has summarized 29 methods that can help. If you have any problems when using MiniTool products, please ask for help by sending an email to support@minitool.com.
About The Author

Position: Columnist
With over 6 years of experience as a tech writer, Eien specializes in creating clear, simple guides for video conversion, transcription, screen recording, etc. He stays connected with the tech community and its readers to understand the real-world problems users face. By combining their feedback with his own hands-on testing, Eien always provides proven solutions to complex software problems in time.
User Comments :