If iMovie can’t import MP4, the problem is usually caused by incompatible codecs or corrupted video files. This guide introduces multiple solutions, including converting MP4 files to MPEG-4 or MOV formats with MiniTool Video Converter, MiniTool MovieMaker, and VLC Media Player.
iMovie is a popular video editing tool that supports formats like MP4 and MOV. However, many users may run into the “iMovie can’t import MP4” issue. After testing different methods, I found several effective solutions to fix it.
Why iMovie Can’t Import MP4
- Incompatible video codec
- Corrupted MP4 files
Reason 1. Incompatible Video Codec
iMovie is more compatible with the MPEG-4 and H.264 codecs. Therefore, if your MP4 files are encoded with other codecs, it is more likely for you to encounter the iMovie can’t import MP4 issue.
In addition, if audio and subtitle streaming are included in your MP4 files, they will contain additional codecs. Provided that iMovie doesn’t give support for those codecs, you can’t import MP4 into iMovie.
Reason 2. Corrupted MP4 Files
Corrupted MP4 files will also lead to the iMovie can’t import MP4 error. Generally speaking, complete data has much to offer in sustaining video playback. However, if your MP4 downloading is incomplete, your MP4 videos will be corrupted, which eventually causes the iMovie can’t import MP4 error.
To fix the issue caused by file corruption, you can delete the original files and re-download them. In the downloading process, please ensure that your downloading tasks have been completely accomplished.
In addition, you can try to recover your corrupted MP4 files with some tools, such as MiniTool Video Repair, which supports recovering multiple MP4, MOV, M4V, and other files simultaneously for free.
MiniTool Video RepairClick to Download100%Clean & Safe
Fix 1. Convert Your MP4 Files with MiniTool Video Converter
To make MP4 files compatible with iMovie, you may need to transcode them. For this, MiniTool Video Converter is a reliable and easy-to-use choice.
MiniTool Video Converter is a powerful video/audio converter that supports audio-to-audio, video-to-audio, audio-to-video, and video-to-video conversion. It works with formats like MP4, AVI, MKV, WMV, MP3, WAV, AIFF, M4A, and more.
Next, I’ll walk you through how to convert MP4 to the MPEG-4 codec using MiniTool Video Converter step by step.
Fast Track:
- Install MiniTool Video Converter.
- Import the MP4 file.
- Select an output location.
- Set MPEG-4 as the output codec.
- Begin conversion process.
- Check the converted files.
Step 1: Install MiniTool Video Converter.
MiniTool Video ConverterClick to Download100%Clean & Safe
Download MiniTool Video Converter. Then, follow the on-screen instructions to install this file converter on the computer.
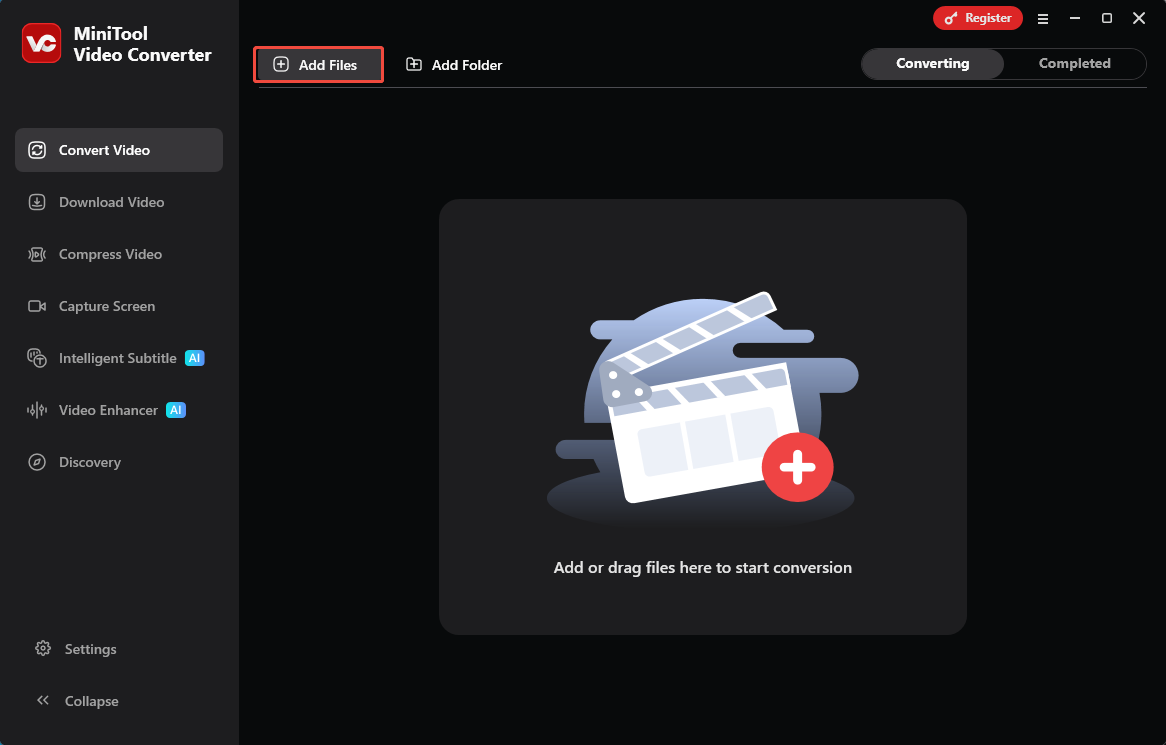
Step 2: Import the MP4 file.
After running MiniTool Video Converter, click on the Add Files option to upload the MP4 file.
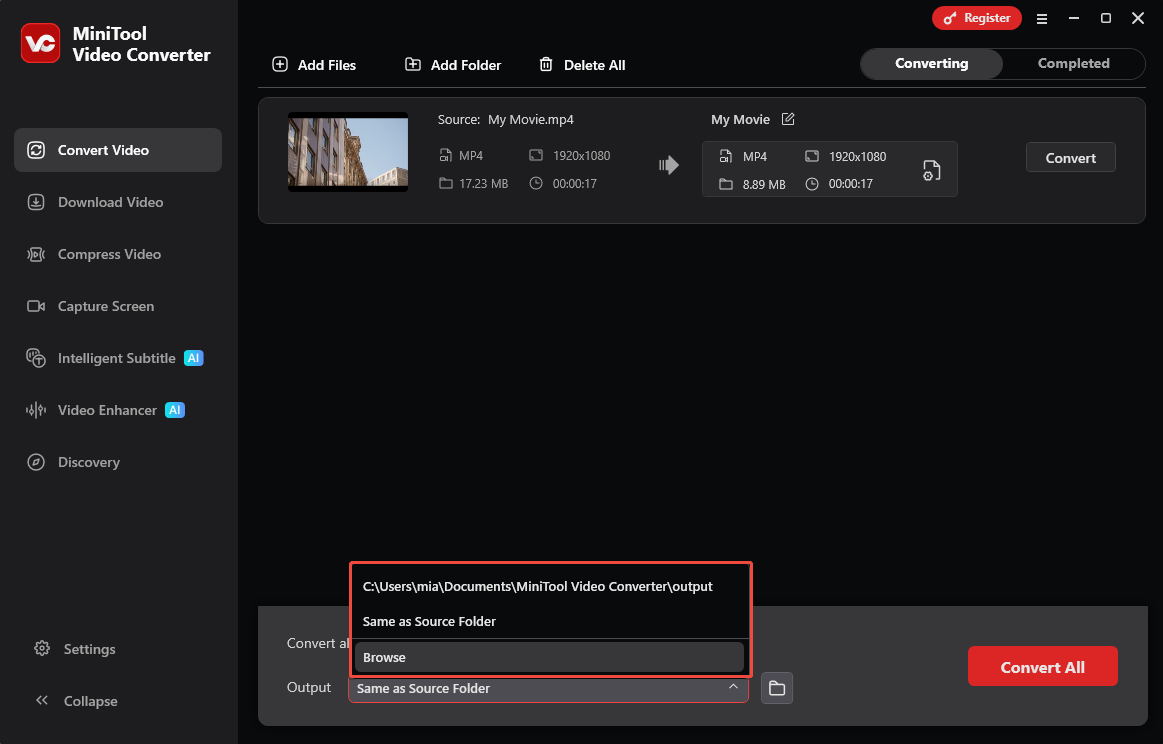
Step 3: Select an output location.
Expand the bottom Output option to choose a saving path for your converted files. If you want to put your converted files into the location that saves your source files, click on Same as Source Folder. To select a specific output location, choose Browse.
Step 4: Set MPEG-4 as the output codec.
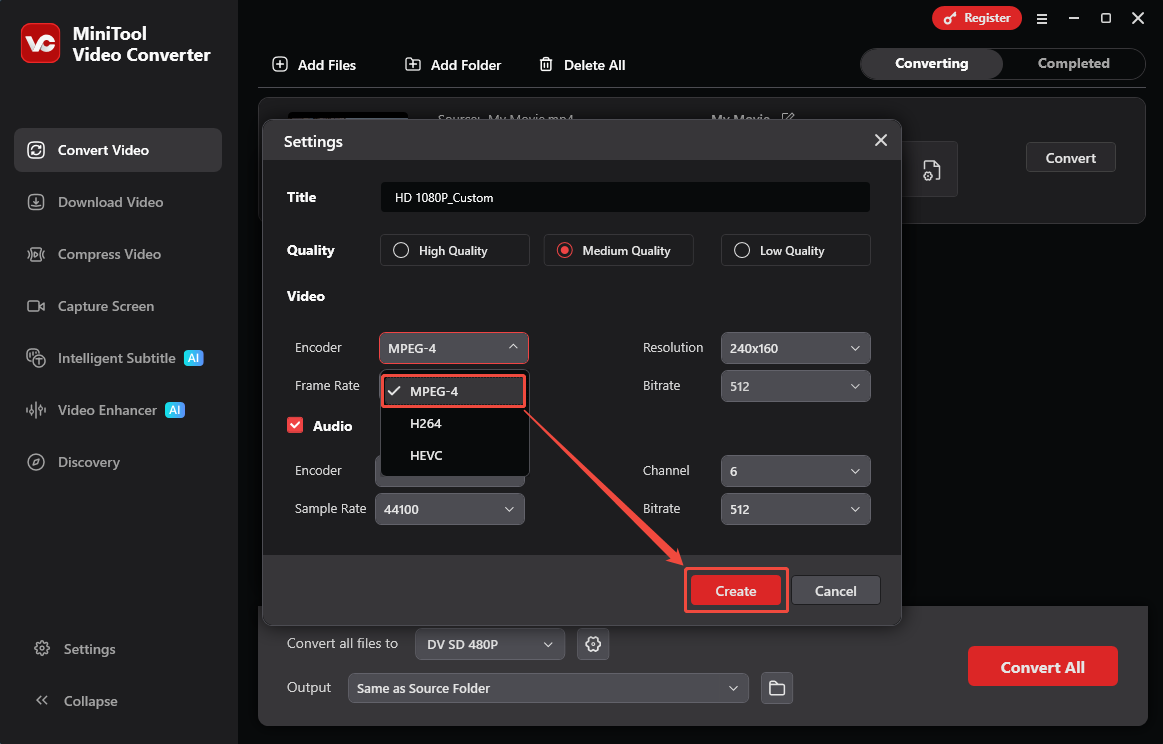
Click on the Edit icon to open the output format window. Next, navigate to the Video tab and click on MP4. Then, click on the pen icon next to HD 1080P to access the Settings window, where you can customize the encoder of your MP4 file.
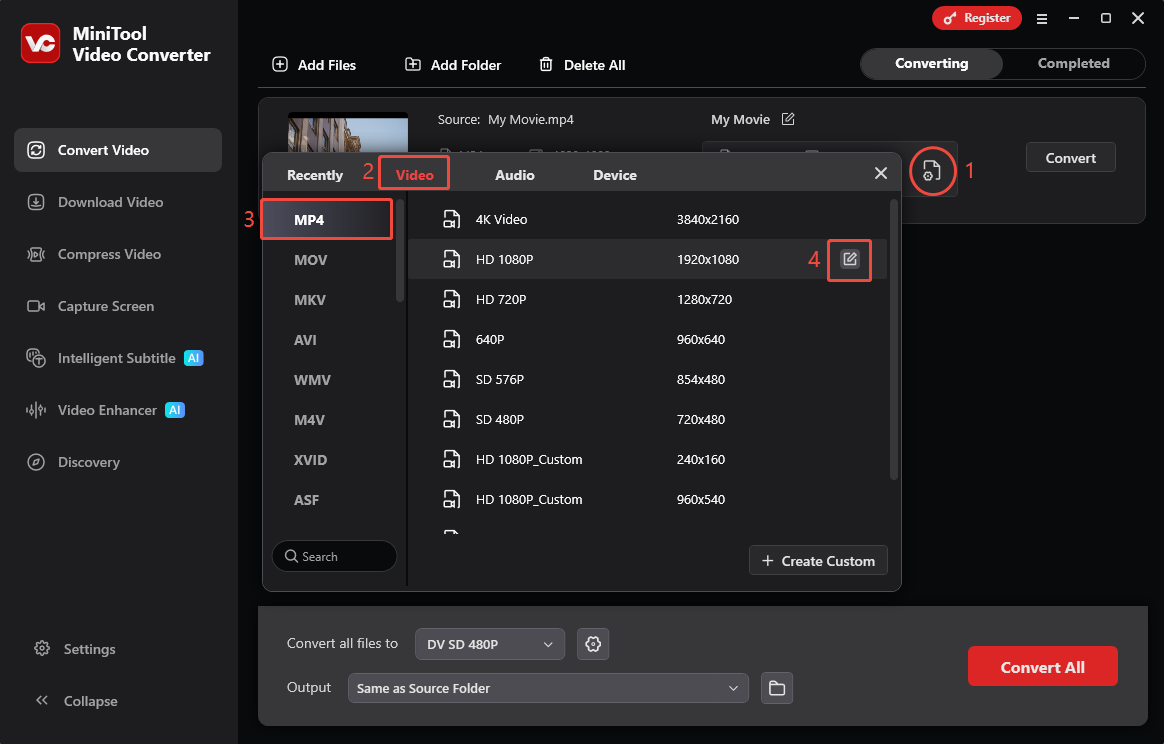
In the Settings window, expand the Encoder option and choose MPEG-4. Then, click on the Create button to confirm the changes that you have made.
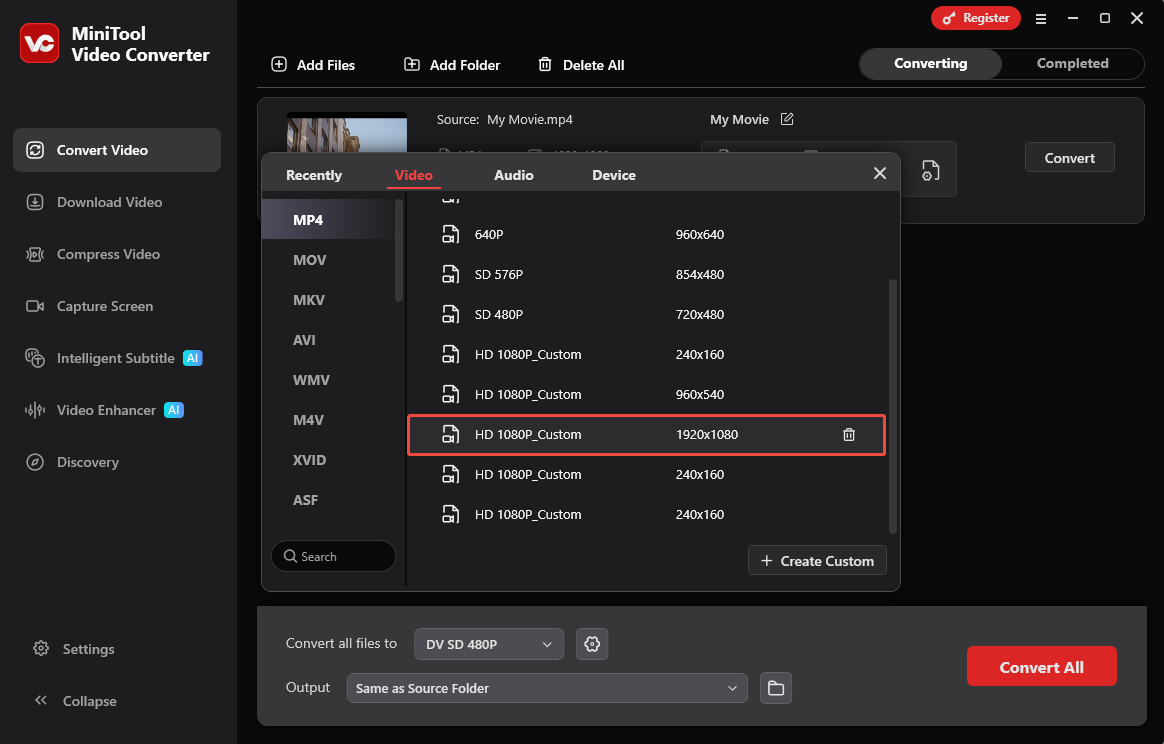
Click on HD 1080P_Custom to set an output format for a single MP4 file.
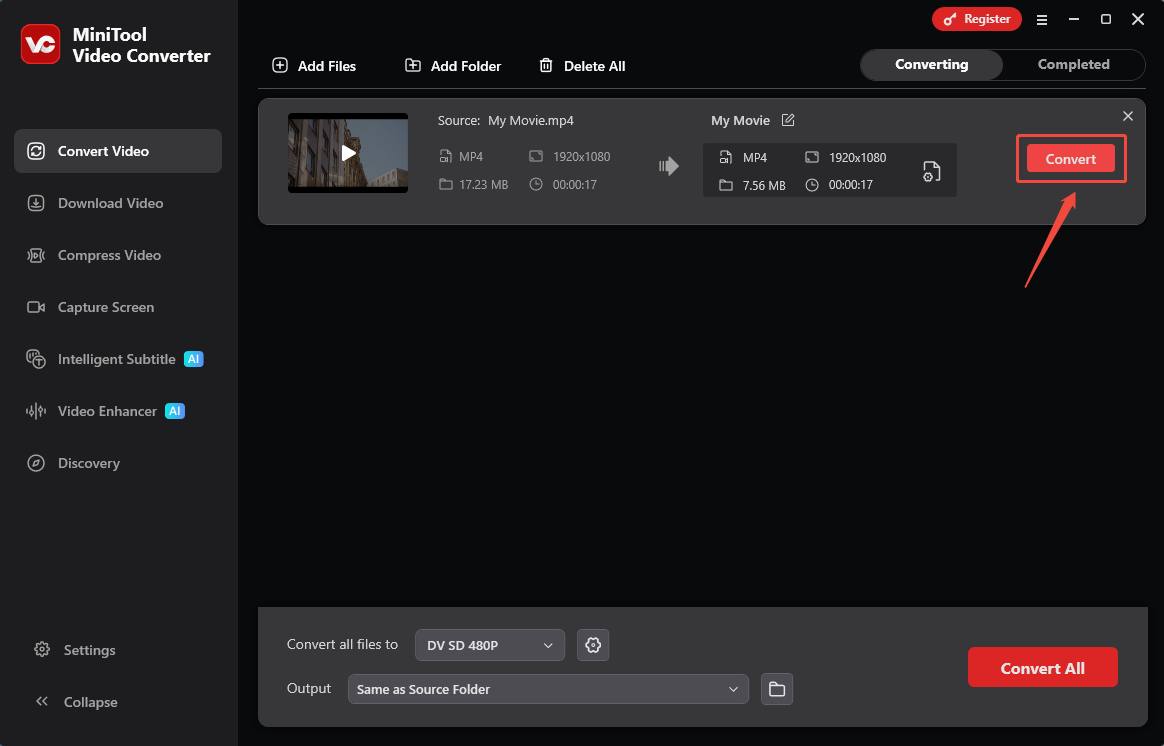
Step 5: Begin conversion process.
Activate the MP4 transcoding by clicking on the Convert option.
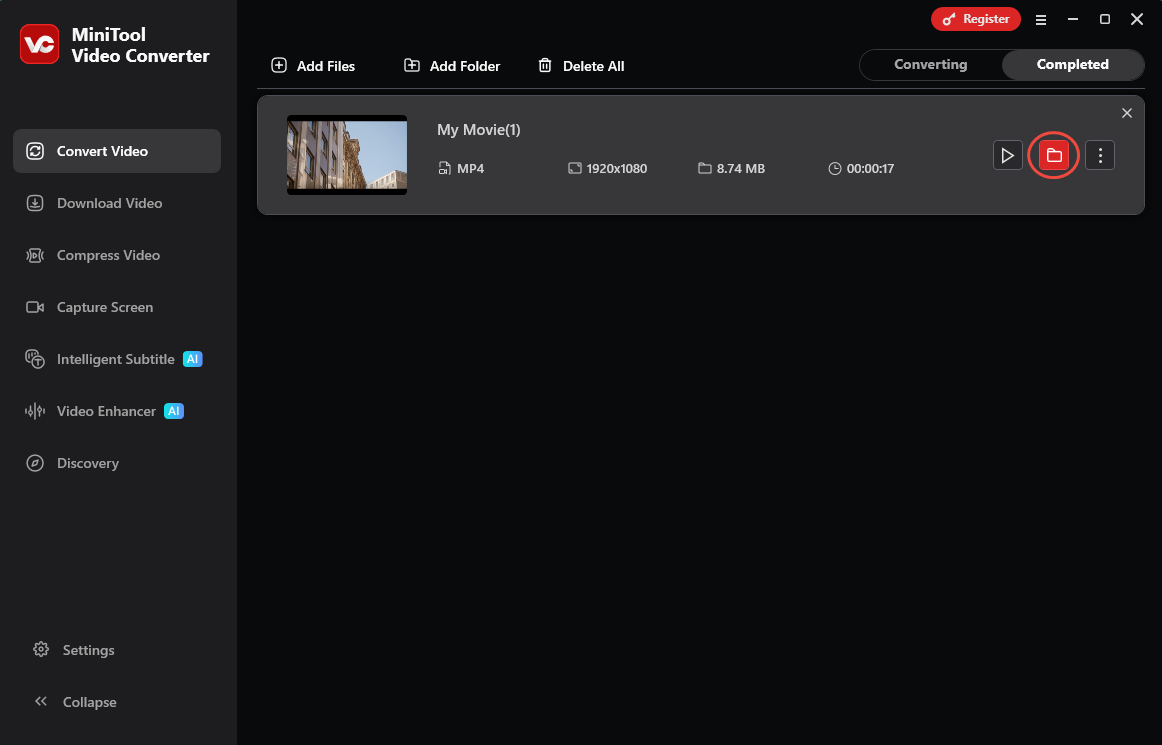
Step 6: Check the converted files.
Once the transcoding is over, switch to the Completed section and click on the folder icon to locate the converted files.
With the detailed steps above, you can fix the iMovie can’t import MP4 issue easily. Besides solving this problem.
MiniTool Video Converter also offers customizable settings for encoder, resolution, bitrate, frame rate, sample rate, and audio channel, making MP4 transcoding easy. Better yet, it’s free to use.
In addition, MiniTool Video Converter supports batch conversion of up to five files at once and provides an ad-free experience.

Fix 2. Convert Your MP4 Files with MiniTool MovieMaker
MiniTool MovieMaker is another great choice to fix the iMovie can’t import MP4 issue. It is an easy-to-use video editor suitable for both beginners and experienced users. It offers basic and advanced editing features, including adjusting video speed and volume, rotating videos, and more.
Below, I’ll show you how to use it to convert MP4 to an iMovie-supported format.
Fast Track:
- install MiniTool MovieMaker.
- Import the target video.
- Add the video to the timeline.
- Choose MOV as the output format.
- Start the conversion.
- Locate the converted MOV file.
Step 1: Download and install MiniTool MovieMaker.
Click on the download button below to download and install MiniTool MovieMaker on your computer.
MiniTool MovieMakerClick to Download100%Clean & Safe
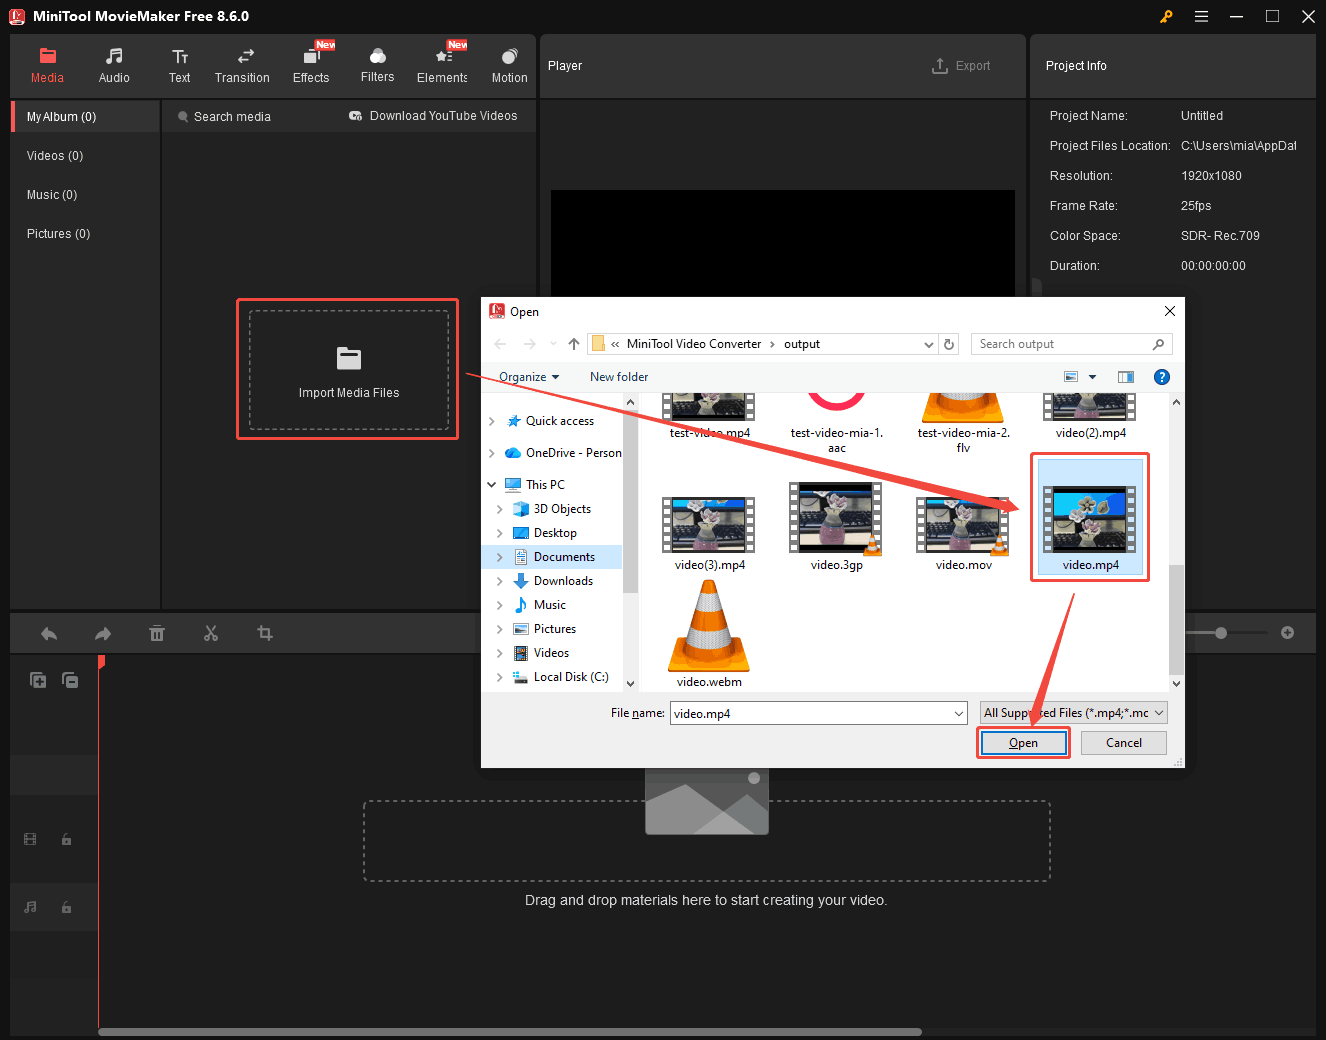
Step 2: Import the target video.
After launching MiniTool MovieMaker, close the pop-up promotion window. Next, under the Media tab, click on the Import Media Files button to locate your video files. Then, choose the video that you want to convert and click on the Open button in the bottom-right of the Open window.
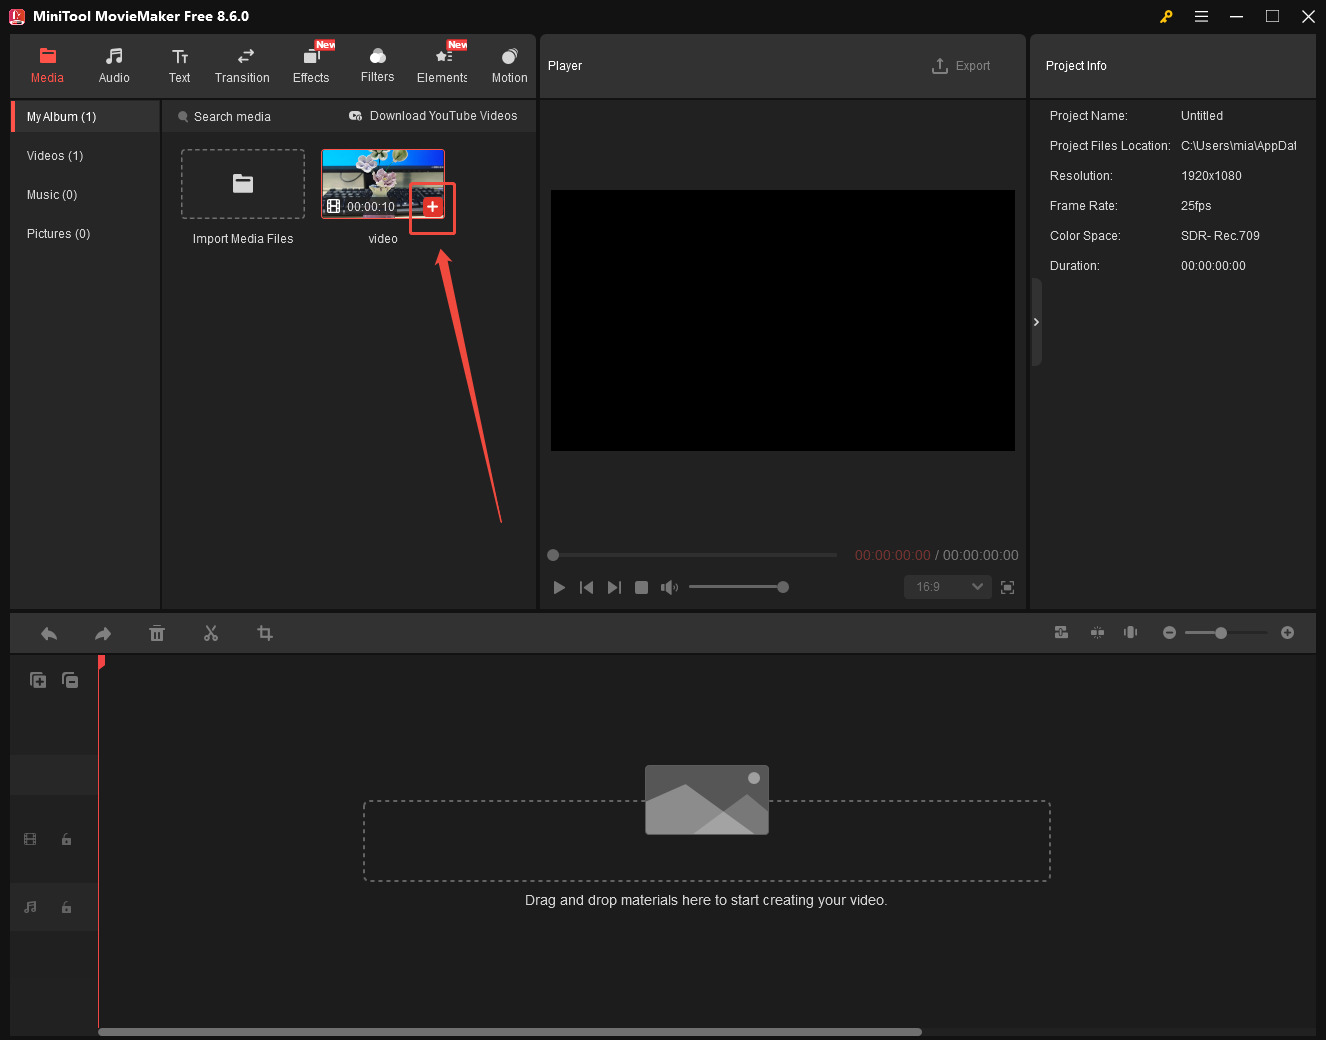
Step 3: Add the video to the timeline.
Add the video to the video track below by clicking on the plus icon above your video file. Also, you can drag and drop the video onto the timeline. After that, based on your needs, you can switch to the modules to add ideal elements to your video.
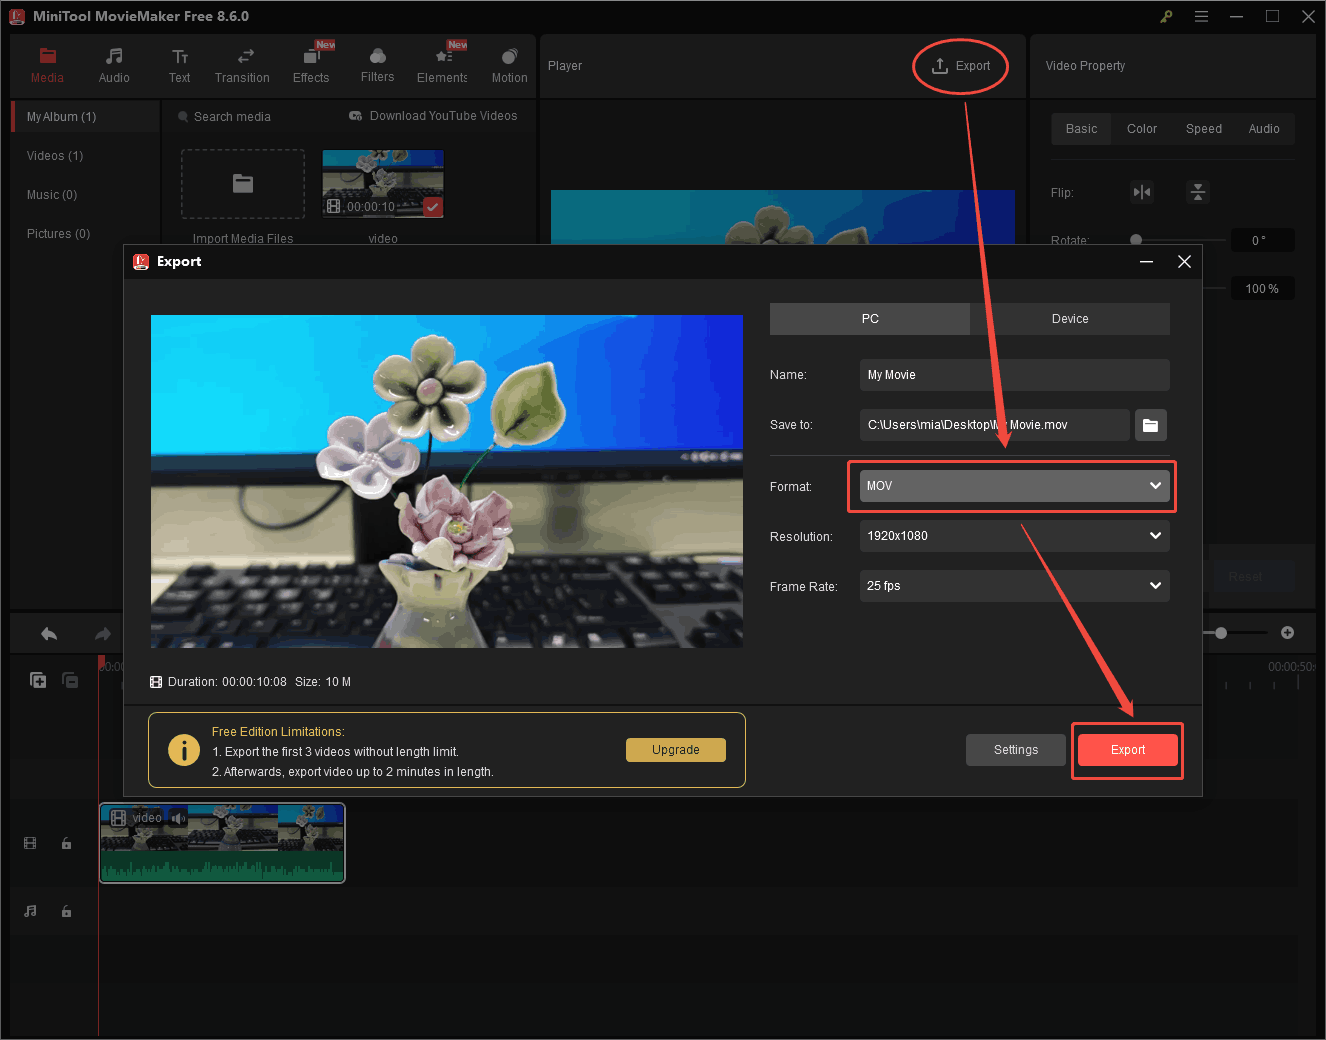
Step 4: Choose MOV as the output format.
Access the Export window by clicking on the Export icon in the upper right of the Player window. Then, expand the Format option and choose MOV. Simultaneously, you can adjust the parameters, like frame rate and resolution.
Step 5: Start the conversion.
Finally, click on the Export button to begin the conversion from MP4 to MOV.
Step 6: Locate the converted MOV file.
Once the file conversion is done, click on the Find Target button in the pop-up window to locate and check your video file.
With MiniTool MovieMaker, fixing the iMovie can’t import MP4 issue becomes easy. However, since it is only available on Windows, I’ll introduce a converter for Mac users in the next section.
Fix 3. Convert Your MP4 Files with the VLC Media Player
- Open VLC.
- Go to Media > Convert / Save.
- Add your video.
- Select Video – H.264 + MP3 (MP4).
- Choose an output folder.
- Click Start.
- Check the converted MP4 file.
As a popular media player, the VLC media player is capable of playing various audio/video files. Apart from that, it also serves as a reliable file converter that enables you to convert your MP4 files to an iMovie-compatible format. Below are the detailed steps to convert your files with the VLC media player.
Step 1. Open VLC.
Download and install the VLC media player on your PC.
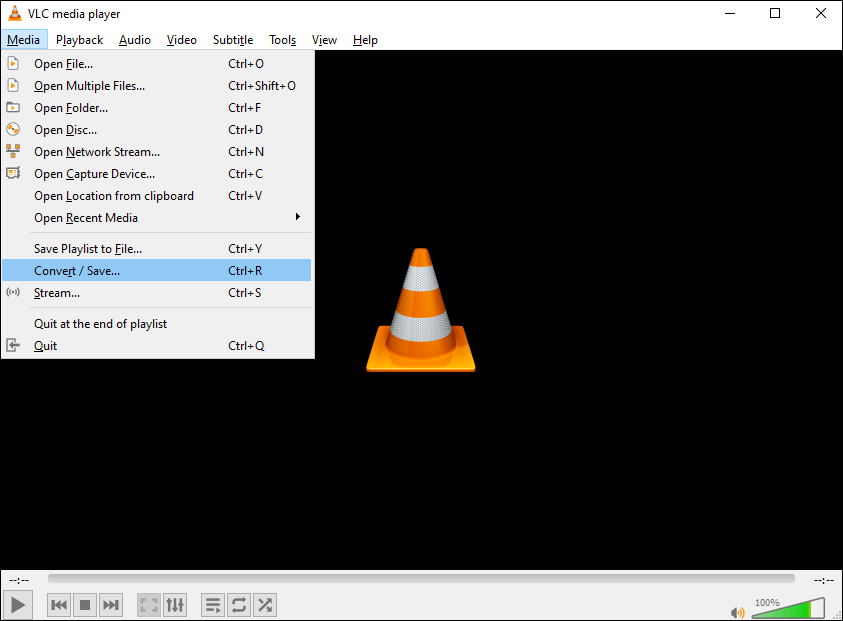
Step 2. Go to Media > Convert / Save.
Click on Media in the upper-left option menu and choose Convert / Save.
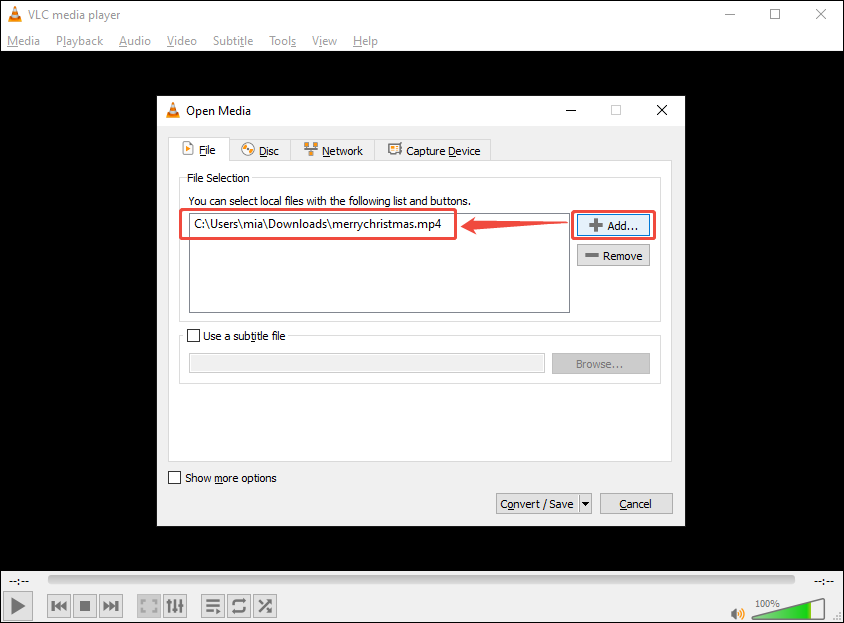
Step 3. Add your video.
In the pop-up window, click on Add… to upload the video that you want to convert.
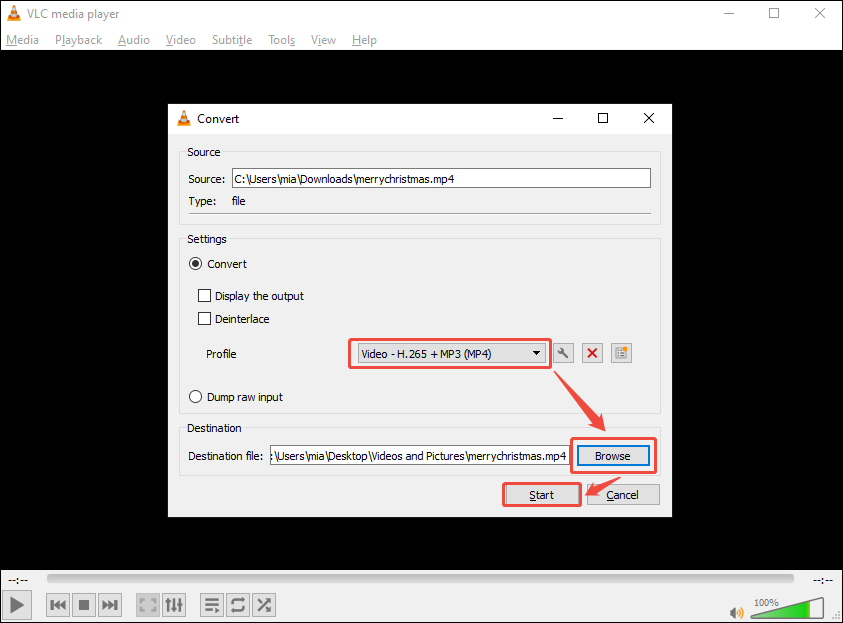
Step 4. Select Video – H.264 + MP3 (MP4).
Select the Convert / Save option. Then, choose Video – H.264 + MP3 (MP4) as the output format.
Step 5. Choose an output folder.
Click on the Browse button to choose a saving path for your converted file.
Step 6. Click Start.
Begin transcoding your MP4 files by clicking on the bottom-right Start button.
Step 7. Check the converted MP4 file.
Once the transcoding task is over, go to the output location to locate and check your MP4 file.
More importantly, apart from fixing the iMovie can’t import MP4 issue, the VLC media player enables you to play various audio/video files, including MP3, MP4, VOB, etc. With the above-detailed instructions, it will never be problematic for Mac users to handle the iMovie can’t import MP4 issue.
To Wrap Things Up
The “iMovie can’t import MP4” issue can be fixed by repairing damaged files or converting MP4 videos into iMovie-compatible formats. With tools like MiniTool Video Converter, MiniTool MovieMaker, and VLC Media Player, you can easily transcode MP4 files and import them into iMovie without hassle.
To solve the problems that you may encounter in the process of using MiniTool Video Converter, MiniTool MovieMaker, or MiniTool Video Repair, ask for help by sending an e-mail to support@minitool.com.
User Comments :