Is VLC not recording video/audio on your computer? How can you solve this problem? This free video converter post from MiniTool collects 6 useful solutions to fix the VLC recording not working issue. Check out this post right now!
Introduction to VLC Media Player
VLC, short for VLC Media Player, is a powerful media player software that has various functions. It allows for cropping, trimming, and rotating video clips, extracting audio from video, converting between different formats, etc.
VLC Media Player supports various streaming protocols, which enable you to play streaming videos. Another great advantage is that it features screen capture. When you watch streaming videos in VLC, you can use the screen capture function to record the streaming video or take a screenshot from it.
But sometimes, you may encounter a problem like “VLC not recording video.” The result could be a black screen with or without sound when you attempt to record a video on your computer using VLC. What's going on? How can I fix the problem? Read the following content for more information.
![Streamlabs Not Recording Audio & How to Fix? [Ultimate Guide]](https://images.minitool.com/videoconvert.minitool.com/images/uploads/2025/02/streamlabs-not-recording-audio-thumbnail.png)
How to Record with VLC Media Player
Here’s a step-by-step guide on how to use VLC Media Player to capture the computer screen:
Step 1: Download and install VLC from its official website.
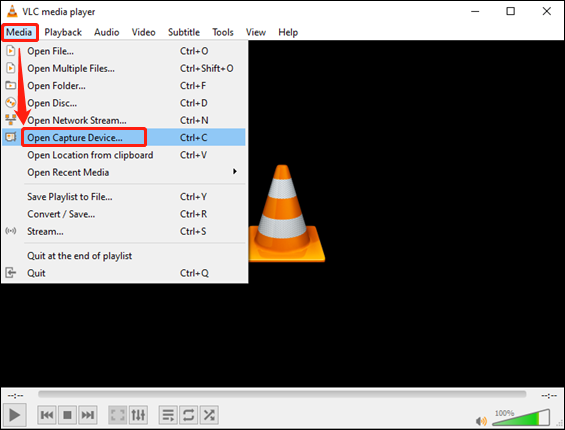
Step 2: Launch VLC Media Player to enter its main interface. Then, choose the Media tab and click the Open Capture Device… option.
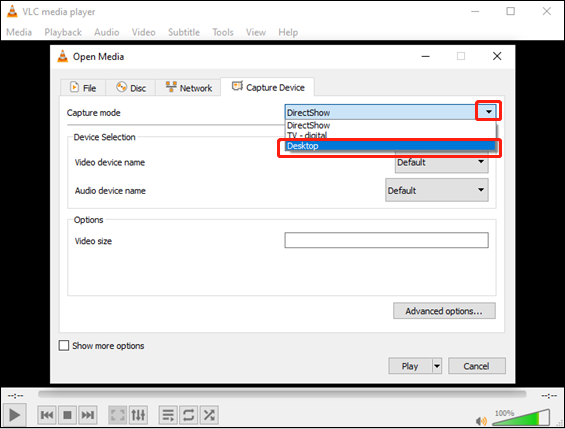
Step 3: In the Capture Device section of the pop-up window, expand the Capture mode option and choose Desktop.
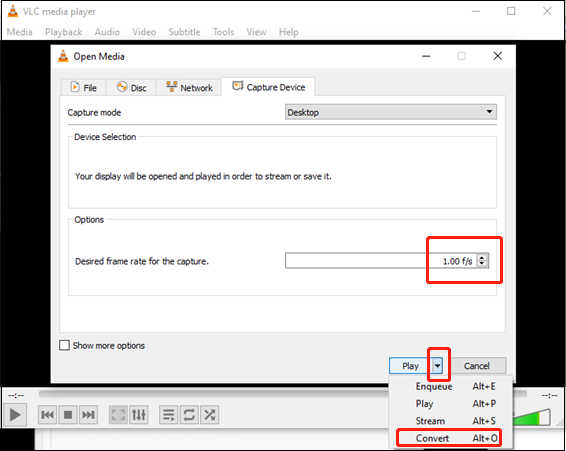
Step 4: You can set the frame rate based on your needs. Then, expand the drop-down menu next to the Play button and choose Convert.
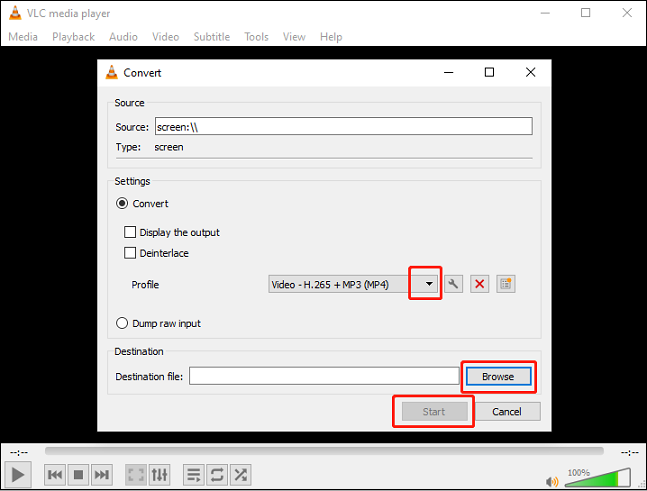
Step 5: Open the Profile option to choose the output format you want. Next, click the Browse button to choose an output destination. After that, click the Start button to start recording your computer screen.
Step 6: When you want to end the recording, click the stop icon. You can check the recording in the folder you chose before.

6 Solutions to Fix the VLC Not Recording Issue
The following content covers 6 effective solutions for the VLC not recording issue.
Solution 1: Disable Video Acceleration
VLC Media Player is not recording video, only audio? You can choose to disable the Hardware-accelerated decoding.
Here’s how:
Step 1. After installation, open VLC Media Player on your computer.
Step 2. Click on the Tools tab in the top menu bar. From the drop-down menu, select the Preferences option.
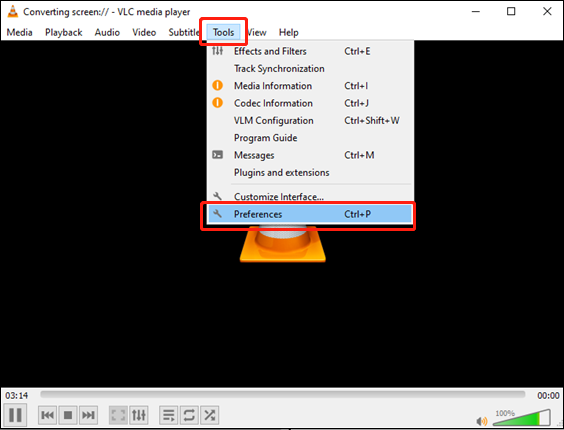
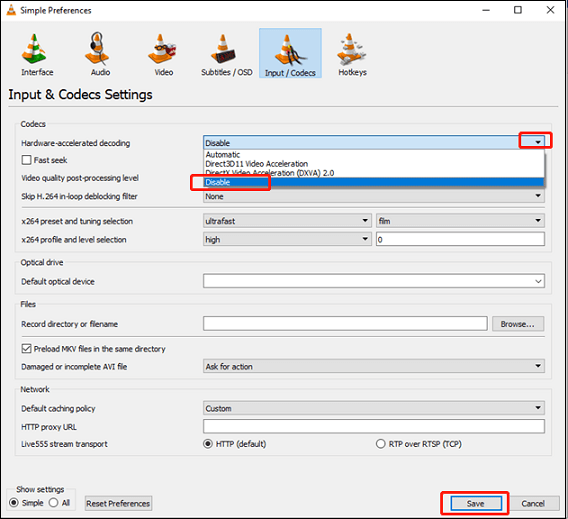
Step 3. In the Simple Preferences window, go to the Input / Codecs tab. In the Codecs section, open the Hardware-accelerated decoding menu and choose the Disable option. After that, click the Save button to keep the changes you just made.
Solution 2: Change Video Output Module
VLC recording not working? If you select an incorrect output mode, the VLC recording function may not work. Therefore, you can try changing the output video mode to fix the VLC not recording video issue. Please follow the steps below.
1: Launch VLC Media Player on your computer.
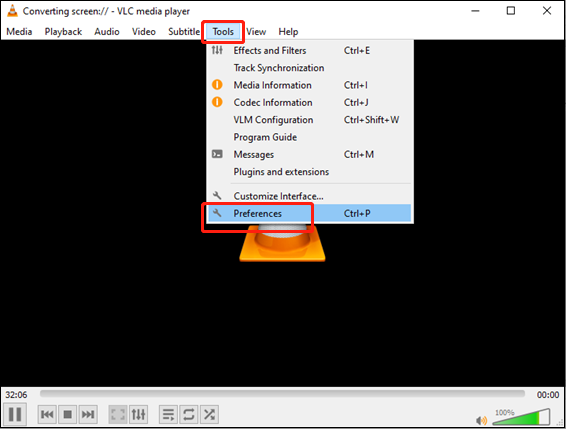
2: Then, choose the Tools option on the top menu bar and click the Preferences button to open the Simple Preferences window.
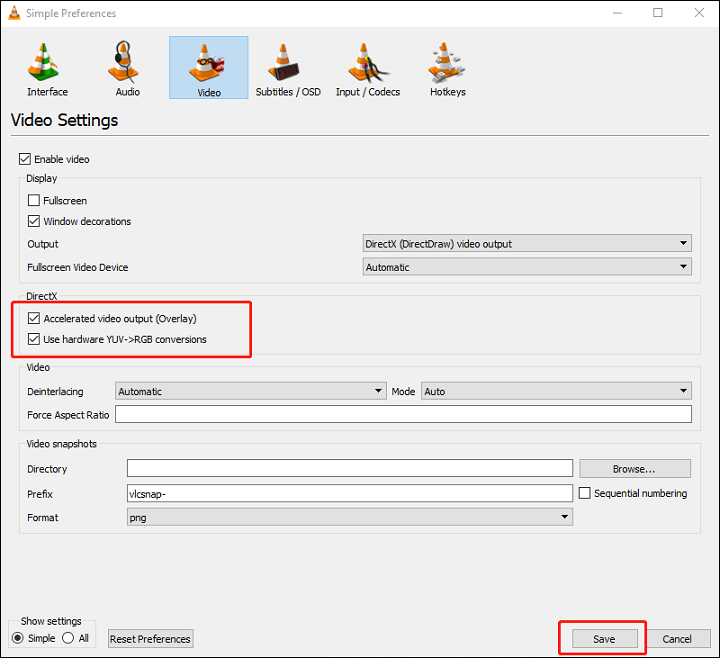
3: In the Simple Preferences window, choose the Video tab, open the Output option, and select DirectX (DirectDraw) video output.
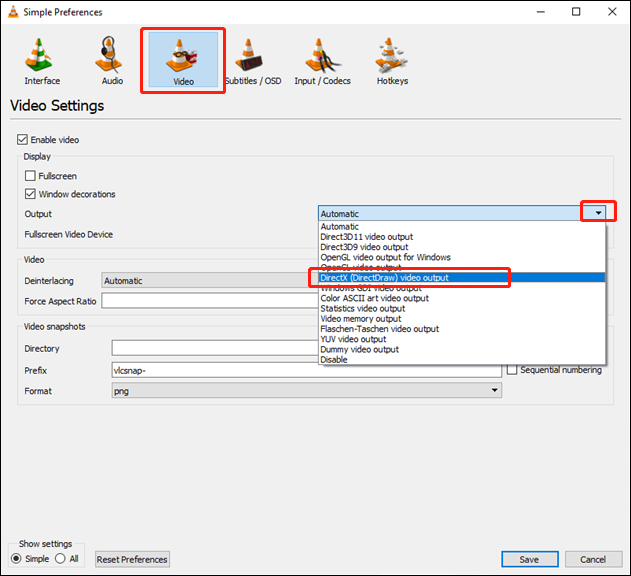
4: Make sure the Accelerated Video Output (Overlay) and Use Hardware YUV and RGB Conversions options are both selected. Then, click the Save button at the bottom right.
Solution 3: Reboot the Sound Card
If there is no sound in VLC's recordings, you should see if the sound card is not responding or if there are other programs on your computer that are using it. The quickest solution to VLC's video-only recording issue is to try restarting the sound card. Here’s how:
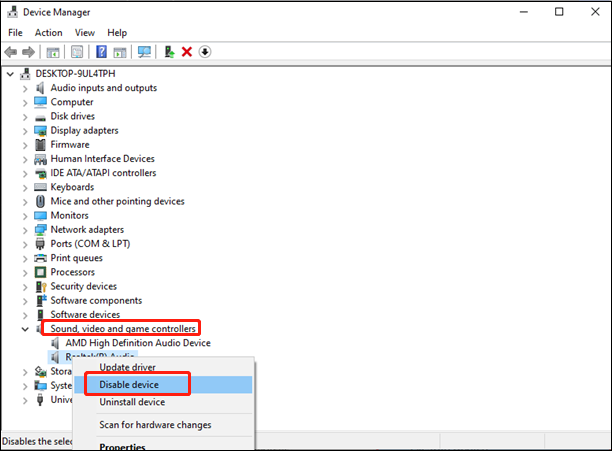
Step 1: Access the Device Manager window on your computer.
Step 2: Double-click the Sound, video, and game controllers option, right-click the Realtek(R) Audio button, and choose the Disable device option to start the device restart.
Solution 4: Update VLC Media Player
The outdated version of VLC could cause the VLC screen capture not working issue. Try updating VLC Media Player and see if it works. Here’s a specific guide:
Step 1: Open VLC, click Help, and select the Check for Updates… option.
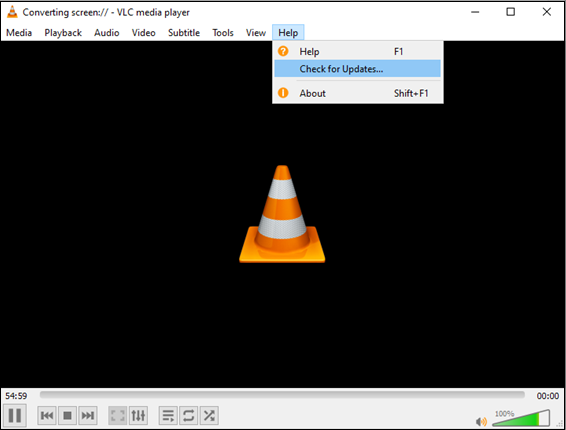
Step 2: If there is an update available, click Yes and install the new version of VLC Media Player on your computer.
Solution 5: Restart Your Computer
Restarting the computer can fix many problems. To solve the VLC not recording issues, you can restart your computer.
Solution 6: Use Other Screen Recorders
If the above methods are not working, then it's time to try using some other screen recorders. In the following content, I list 3 screen recorders that I used the most.
Option 1: MiniTool Video Converter
When it comes to screen recorders, MiniTool Video Converter is the top 1 in my mind. Every time I need to record my desktop screen, it always meets my satisfaction.
MiniTool Video Converter is a free and professional screen recording tool that can capture the computer screen without watermarks and time limits. It can capture anything on your 4K screens, such as games, movies, online meetings, presentations, video/audio calls, live streams, and so on.
In addition, this free screen recorder enables you to record video with audio from the computer and the microphone simultaneously or separately. You can also choose to record the whole screen or record part of the screen. Furthermore, before recording, you can customize settings like frame rate, quality, hotkeys, and more.
Here’s a step-by-step guide on how to record using MiniTool Video Converter:
Step 1: Download and install MiniTool Video Converter on your PC for free.
Click the download button below to download MiniTool Video Converter and then follow the on-screen setup instructions to install it on your computer.
MiniTool Video ConverterClick to Download100%Clean & Safe
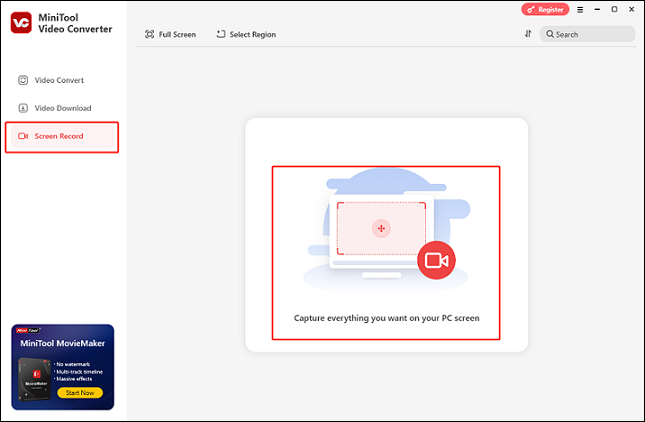
Step 2: Access the MiniTool Screen Recorder window.
Launch MiniTool Video Converter. Then, click the Screen Record tab and click the Capture everything you want on your PC screen area to open the MiniTool Screen Recorder window.
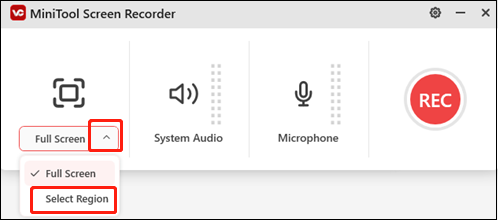
Step 3: Choose the area you want to record.
You can keep the default option to record the full screen. Or you can expand the Full screen option, click the Select Region option, and then drag and move the mouse cursor to select the area you wish to record.
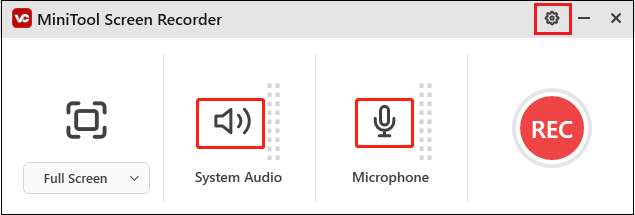
Step 4: Control the audio source.
Click the System Audio icon and the Microphone icon to turn them on or off based on your needs. If you wish to adjust the quality, frame rate, hotkeys, and more settings, just click the gear icon on the top right to open the Settings window and finish the settings.
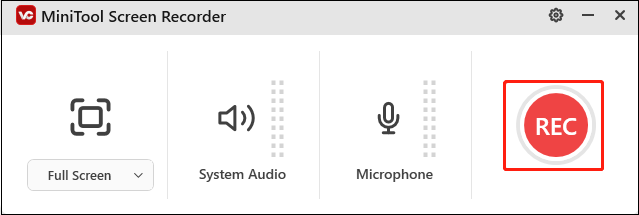
Step 5: Start recording.
When you want to record the screen, click the red REC button or press the F6 key to start recording. After a three-second buffer time, the recording will begin.
Step 6: Stop the recording.
During the process of recording, you can press F9 to pause or resume the recording. When you want to stop the recording, just press F6 on your keyboard. After that, check the recorded video in the Screen Record section.
You can record computer screens easily with MiniTool Video Converter!
Other features of MiniTool Video Converter:
- It enables you to download YouTube videos, music, playlists, etc., with no hassle.
- It can serve as a file converter, supporting a wide range of format conversions, like MOV to MP4, MKV to AVI, OGV to DivX, AAC to MP3, WAV to M4A, and more.
- It offers formats for multiple devices and platforms, like Apple, Samsung, Vimeo, YouTube, Facebook, etc.
- It supports converting up to 5 files at the same time.
- It empowers you to customize the output parameters according to your requirements, like encoder, quality, bitrate, resolution, frame rate, and more.
- It can be used as a file compressor, reducing file size by changing resolution, quality, and more.
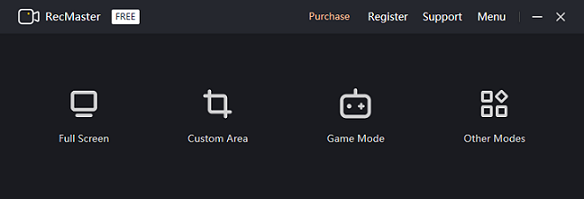
Option 2: RecMaster
RecMaster is another desktop screen recorder that you can try. It features multiple screen recording modes, including game mode recording, full-screen recording, custom area recording, webcam recording, audio-only recording, follow cursor recording, and more.
In addition, RecMaster can record any activity on your HD/4K screen with high quality, such as live streaming, movies, online calls, and more. You can adjust a wide range of settings to best suit your needs, including format, quality, frame rate, encoder, output resolution, and more.
Furthermore, RecMaster's built-in annotation and editing features allow you to annotate while recording or edit your video after completion. The cursor's colors and movement effects are customizable. Additionally, you can assign a click sound or distinct color to the left and right clicks.
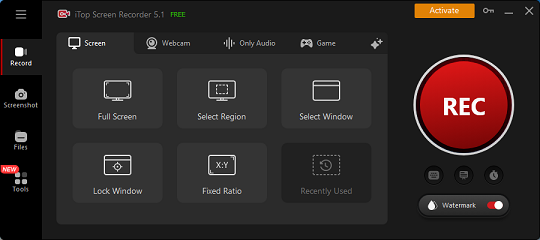
Option 3: iTop Screen Recorder
The third screen recorder I want to recommend is iTop Screen Recorder. It is free, professional, and can record 1080p and 120fps videos without lag or dropped frames, making it perfect for capturing games, movies, on-screen tutorials, and more. You can choose to record the entire screen or just a portion based on your needs.
Additionally, iTop Screen Recorder allows you to record your webcam with audio. To minimize distractions and maintain your privacy, you can erase, blur, or replace the background, flip and rotate the webcam, and adjust the size and position of the webcam overlay.
Moreover, iTop Screen Recorder enables you to customize hotkeys, format, resolution, frame rate, bitrate, and other options before recording. You can also record system audio and microphone sound together or separately. Furthermore, the Premium edition lets you configure automatic screen recording, which will automatically end after the allotted time has passed and be saved.

Bonus: Excellent Video Editor
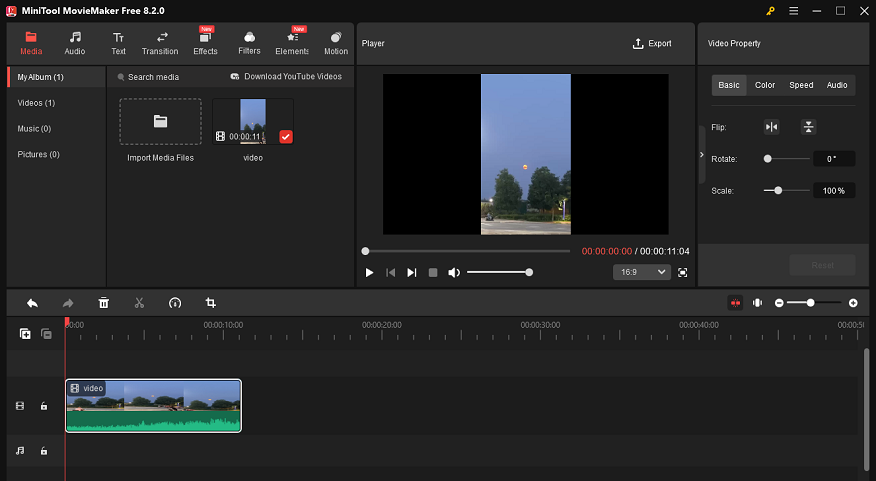
In this part, I’d like to recommend an amazing video maker – MiniTool MovieMaker. Whenever you need to edit videos, this one definitely can help you.
MiniTool MovieMaker is a feature-rich and expert video editor that comes with many advanced functions. It can edit videos by trimming, cropping, splitting, reversing, rotating, and more. Also, this free application offers all kinds of filters, effects, transitions, etc., which you can add to your videos for free.
Moreover, MiniTool MovieMaker can function as a media player that supports playing video/audio files in different formats, including MP4, MOV, MKV, AVI, WebM, MP3, WAV, AAC, M4A, and more. It can also convert a file to another format.
Furthermore, MiniTool MovieMaker can serve as a file compressor, compressing files with minimum quality loss. After exporting files, you can adjust output parameters, like frame rate, bitrate, resolution, etc. Just customize them as you prefer.
MiniTool MovieMaker is 100% free of ads, bundles, or watermarks. Just click the download button to try it!
MiniTool MovieMakerClick to Download100%Clean & Safe
Conclusion
VLC not recording? How can you fix that? This post offers 6 useful and workable solutions that you can try one by one. If the first 5 solutions don’t work, then in my opinion, the sixth solution, 6 – try another screen recorder, is the best solution. With MiniTool Video Converter, RecMaster, or iTop Screen Recorder, you can record your computer screen with no hassle.
At last, as a bonus, I recommend an expert and powerful video editor – MiniTool MovieMaker, in case some day you need to do some video editing work. And I’m sure this video editing software can do you a big favor. Hope this article can really help you a lot!
You can get in touch with us via support@minitool.com if you have any questions while using MiniTool Video Converter or MiniTool MovieMaker. Alternatively, you can send me messages directly on Twitter. I’ll reply to you as soon as I can.
User Comments :