Why Do You Need to Screenshot on ASUS Laptop
There are the main reasons why you need to take a screenshot on laptop:
- By taking a screenshot on laptop, you can capture exactly what problem you’re running into. Then, you can show your screenshot to others to ask for help.
- Taking screenshots on computers can help you keep the information that is very important to you for later use.
- If you can’t describe a situation/won’t be able to express yourself clearly, you may as well use the screenshots to make what you’re talking about clear to others.
- When you want to share a serial number, product ID, or email address with other people, copying & pasting is a good choice to make sure you’re giving the correct information; taking a screenshot of key information is another perfect choice.
What about the methods and steps to screenshot ASUS laptop? The following content tells all.
Take Screenshot on Acer/HP/Lenovo Laptops
The basic ways to screenshot on other laptops are the same as that to take ASUS laptop screenshot; only a few steps and details may be different. Please click on the following links to know how to screenshot laptops of other brands.
How to screenshot on Acer laptop?

How to screenshot on HP laptop, desktop, or tablet?
How to take screenshot on Lenovo laptop?
Take Screenshot ASUS Laptop Method 1: Use Print Screen Key
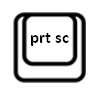
If you take a look at the buttons on your keyboard, you’ll find there’s a print screen key labeled as prt sc, PrtScn, PrtSc, PrntScrn, Print Scr, Prt Scrn, Print Scrn, etc. How to print screen on laptop using this key? That depends on the operating system you’re using.
How to Take Screenshot on Windows 8/10
1. Also, you need to open the window or app that contains the information you want to record.
2. This time, you need to locate both the Print Screen key and the Windows logo key on your keyboard.
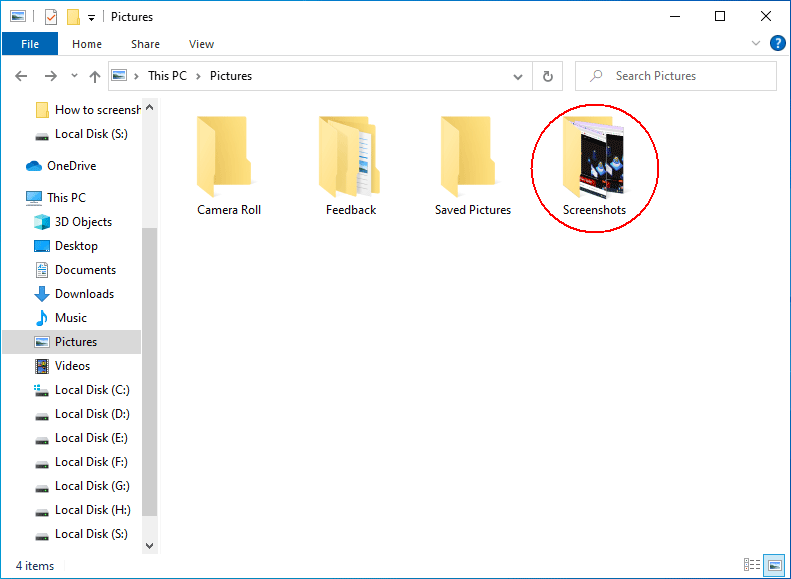
3. Press Print Screen + Windows at the same time.
4. The screenshot of the entire screen will be taken immediately and saved automatically to the Screenshots folder in your Pictures library on PC.
How to Take Screenshot on Windows 7
1. Open the window or app that contains the information you want to record.
2. Look for the Print Screen key (the name varies as mentioned above) on your keyboard. It’s generally located at the top right section.
3. Press the key and it will take a screenshot of the entire screen for you.
4. Now, you need to open a program or app that allows you to paste an image; for instance, Microsoft Word or Paint.
5. Press Ctrl + V in the opening program to paste the screenshot. Also, you can right click on the blank area and select Paste.
6. Select the screenshot and save it as an image in the format you want. Then, choose a storage path for it and give it the desired name.
Take Screenshot ASUS Laptop Method 2: Use the Built-in Snipping Tool
If you’re installing Windows systems on your ASUS laptop, it may come with the Snipping Tool, the Snip & Sketch, or both of them. How to use them for ASUS screenshot?
What Is ASUS UEFI BIOS Utility And How To Boot From USB
How to Screenshot with Snipping Tool
Let’s see how to screenshot on ASUS laptop by using the Snipping Tool. Please note that steps 4 ~ 6 are optional.
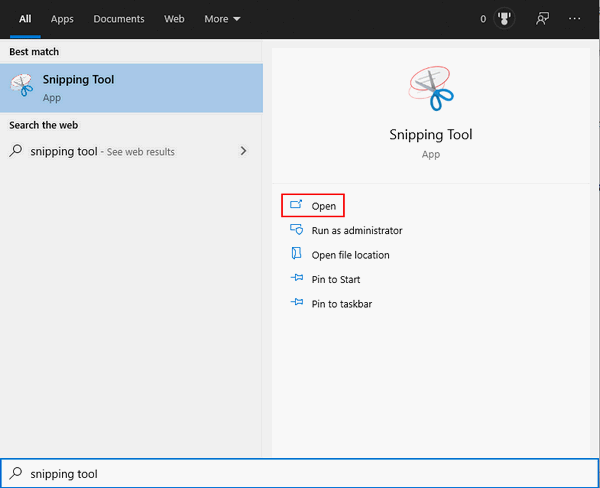
1. Press Windows + S to open Windows search.
2. Type Snipping Tool into the search box.
3. Click Open or press Enter if Snipping Tool is under the Best match.
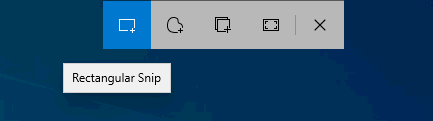
4. Select a Snipping mode you want.
5. Click Delay to delay snip creation in a few seconds.
6. Click Options to customize the settings.
7. Click New and move your cursor to select an area.
8. Edit the screenshot if you want to.
9. Click File -> Save As to save the ASUS screenshot.
Top 5 Snipping Tools For Mac You Should Try
How to Screenshot with Snip & Sketch
1. Click on the Start button in the lower left corner.
2. Scroll down to the bottom of the Start menu to find the Other column.
3. Look for the Snip & Sketch option and click to open this tool.
4. If you need to change its settings, please click on the three-dot icon in the upper right corner and select Settings. (Optional)
5. If you want to delay the ASUS screenshot, please click on the down arrow after New and select Snip in 3 seconds/Snip in 10 seconds. (Optional)
6. Click on the New button in the top-left corner to open a small screenshot panel.
7. Select a snip type and specify the area you want to capture with your cursor.
8. Edit the screenshot image if you want to.
9. Click on the Save as icon at the top right or press Ctrl + S.
10. Select a suitable location to store the image and click Save.
Also, you can search for Snip & Sketch using the steps mentioned in How to Screenshot with Snipping Tool or open the tool by pressing Windows + Shift + S on the keyboard.
Take Screenshot ASUS Laptop Method 3: Use Snagit
Snagit is also a wonderful screenshot program designed to help users capture video display and audio output. You can use Snagit for both screen recording and image editing on common versions of Windows operating systems.
How to download & install Snagit on an ASUS laptop:
1. Open your ASUS laptop and open a browser to visit the Snagit official website.
2. Click on the Free Trial button at the top or the b button under Get Snagit Today; then, select a location to store the setup file.
3. Navigate to the setup file and double click on it.
4. Follow the on-screen instructions to finish the installation process.
![Why Is My Screen Recording Not Working? How to Fix it [Solved]](https://images.minitool.com/videoconvert.minitool.com/images/uploads/2022/08/why-is-my-screen-recording-not-working-thumbnail.jpg)
How to Screenshot on ASUS Using Snagit
1. Launch Snagit and sign in with your account or create a new account.
2. Answer the question Snagit asks and choose a way to start a capture: Capture Window (Default) or Capture Window & Widget.
3. Click Save and wait.
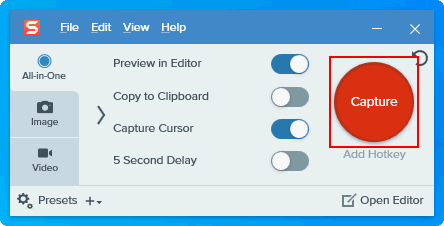
4. Click on the red circle Capture button on the right side.
5. Hover over a window or region to auto-select the area or select a custom area by clicking, dragging, and dropping.
6. Click on the camera icon which means to Capture an image. (You can also click on the video icon to Record a video.)
7. The screenshot image will appear in the opening Snagit Editor. You can edit your image according to your needs.
8. Click File -> Save As to store the screenshot. (You can also click on the Share button in the top right corner to share it out via various methods.)
7 Easy Ways to Fix ASUS Laptop Black Screen Issue
Take Screenshot ASUS Laptop Method 4: Use the Xbox Game Bar
If you’re using Windows 10 or Windows 11 on the ASUS laptop, you can also use the Xbox Game Bar for taking a screenshot.
How to enable Xbox Game Bar on Windows 11:
1. Open Settings on Windows 11 by pressing Windows + I or in other ways.
2. Select the Gaming tab from the left pane.
3. Look for the Xbox Game Bar option and click on it.
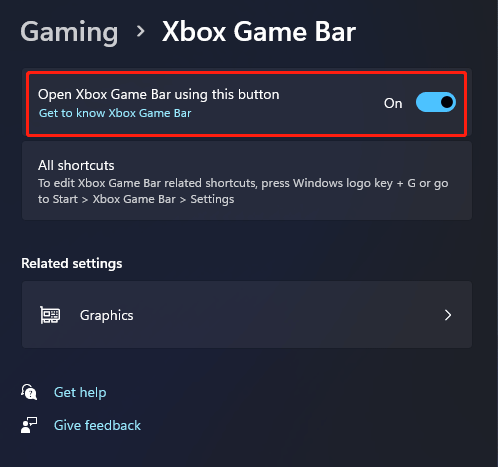
4. Find the Open Xbox Game Bar using this button on a controller feature and toggle its switch to On.
5. Restart your computer.
Please read this page to know how to enable/disable Xbox Game Bar on Windows 10.
How to Take a Screenshot on ASUS Laptop with Xbox Game Bar
Let’s see how to take a screenshot on ASUS after enabling Xbox Game Bar.
1. Press Windows + G to open Xbox Game Bar.
2. Click Take screenshot (the camera icon) to take a picture of what’s happening now.
3. Also, you can press Windows + Alt + Print Screen to capture the active window directly.
How to record a video: click Record from now (the circle icon) to start a clip -> click Stop recording (the square icon) to stop the recording whenever you want.
![How to Record Video on PC Windows 10 [Solved]](https://images.minitool.com/videoconvert.minitool.com/images/uploads/2020/11/capture-record-videos-windows-10-thumbnail.png)
Take Screenshot ASUS Laptop Method 5: Use a Browser
Many browsers offer users a feature to capture the screen: Chrome, Firefox, Edge, Safari, etc.
How to Take Screenshot in a Browser
Here, I’ll take Chrome as an example to show you how to take screenshot on ASUS in an opening browser.
1. Open the window or information you want to record.
2. Open Chrome on your laptop.
3. Press Ctrl + Shift + I to open the Element Inspector.
4. Press Ctrl + Shift + P.
5. Type screenshot into the search bar. DON’T PRESS Enter!!!
6. Use the arrow keys to select a screenshot option: Capture area screenshot, Capture full size screenshot, Capture node screenshot, or Capture screenshot.
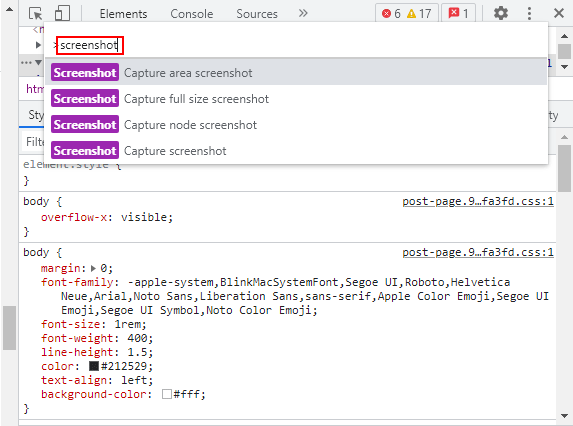
7. Define the area you want to capture if necessary. The screenshot image will be saved automatically.
Also, you can add a browser extension like Full Page Screen Capture to do the work for you.
How to Screen Record on ASUS Laptop – MiniTool Video Converter
If you want to screen record on ASUS Laptop, I recommend MiniTool Video Converter.
MiniTool Video Converter is an excellent tool that can capture any activities on your PC screen. Whether you want to record streaming videos, gameplay, video meetings, online courses, etc., it has you covered.
As a high-quality screen recorder, MiniTool Video Converter can record your 4K screen with different qualities. Moreover, it’s 100% free and doesn’t have time limits or watermarks.
Let’s see how to record screen on ASUS laptop with MiniTool Video Converter.
1. Hit the download button below to download MiniTool Video Converter and follow the setup instructions to install it on the PC.
MiniTool Video ConverterClick to Download100%Clean & Safe
2. Run MiniTool Video Converter and switch to the Screen Record tab. Then, click on the Capture everything you want on your PC screen region to open the MiniTool Screen Recorder panel.
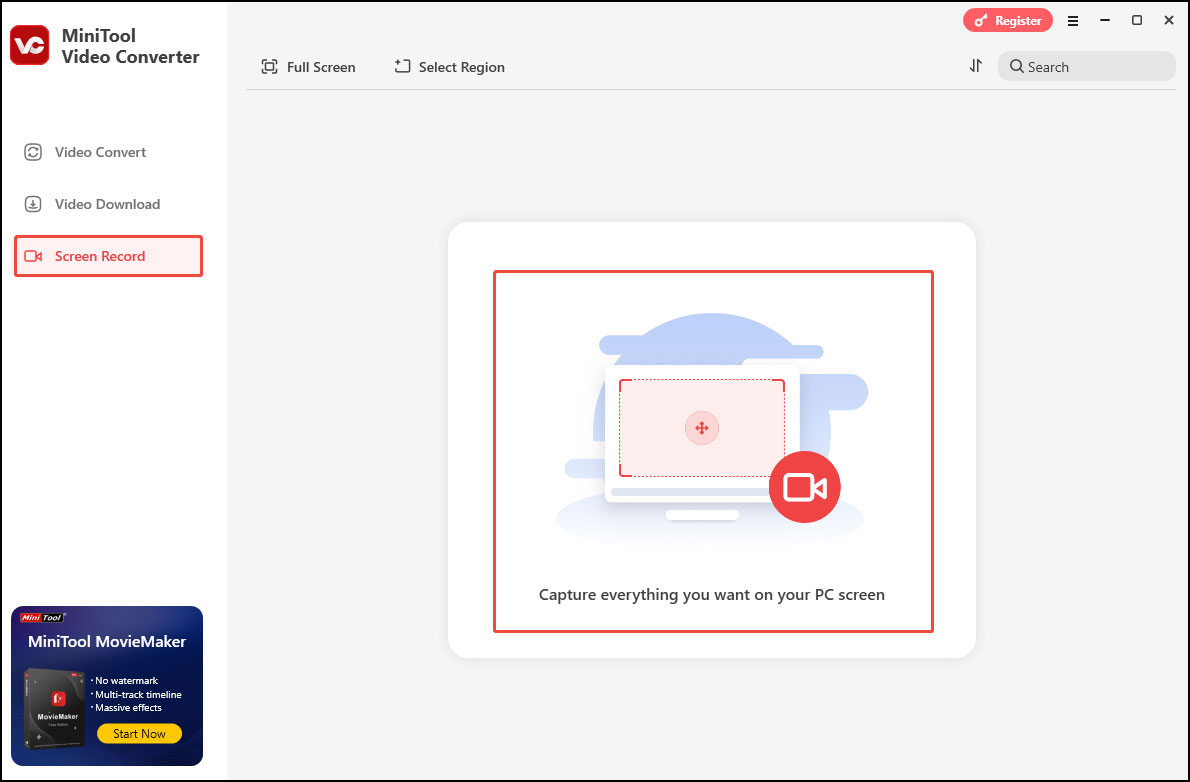
3. You can keep the default option to record the entire c screen. Or, open the Full screen option, click Select Region, and then specify an area you want to record.
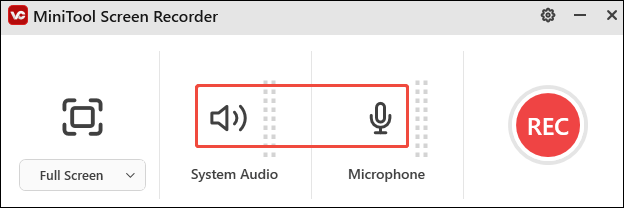
4. Click the System Audio icon and the Microphone icon to turn them on or not based on your needs. If you want to customize the quality, frame rate, hotkeys, and other settings, just click the gear icon on the top right to open the Settings window.
5. Click the red REC button to start recording. After a three-second countdown, the recording process will begin.
6. Press F6 on your keyboard to end the recording. The recording will be listed in the Screen Record section.
Verdict
This page first introduces the ASUS laptop in brief and shows you why you need to take screenshot on it. Then, it offers 6 useful methods for you to screenshot/record on ASUS laptop easily. Please read them with care and contact us via support@minitool.com if you have any problems when using MiniTool Video Converter.
Click here if you don’t know how to restore the ASUS laptop to factory settings.
User Comments :