Acer is one of the most popular hardware and electronics manufacturers; it released a lot of products for people to choose from: laptops, Chromebooks, desktop PCs, monitors, and projectors. Recently, more and more users have asked how to screenshot on Acer laptop. To do you a favor, this post is written here.
Take Screenshot on Acer Laptop
When your Acer laptop runs into a problem, you can search the error code online for causes and fixes of the problem. If you don’t see any error codes or messages, you can describe your situation online to find possible solutions to fix the issue.
FYI: What Is Acer Boot Menu? How To Access/Change Acer BIOS?
Screenshots Record Important Information for You
Well, what if you can’t remember the stop code, the error code, or the error message that appeared on your Acer laptop? A wonderful way to record it is by taking a screenshot on Acer. Well, the question is how to screenshot on Acer; several easy and free methods for taking screenshots on Windows will be introduced in the next part.
Attention:
If you want to know more details about the Acer recovery tools and methods, please read this page with care.

How To Take A Screenshot On A Mac: Methods And Guides.
Method 1: Use the Print Screen Key
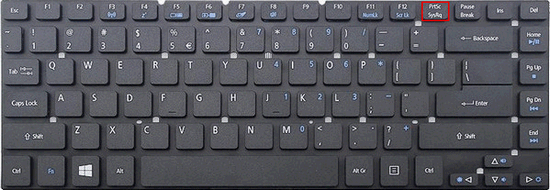
Taking a look at the keyboard you’re using carefully, you’ll find there’s a key named PrtScn, PrtSc, PrntScrn, Print Scr, Prt Scrn, Print Scrn, Pr Sc, etc. As the name suggests, this button can be used to take screenshots on your Windows computer.
Using the Print Screen key is the fastest and easiest way to screenshot on Acer. But you need to notice that it also has an obvious downside: you can’t edit a screenshot conveniently.
How to Take a Screenshot on Acer Windows 7
If you’re still running the old Windows 7 operating system on your Acer laptop, you should press the Print Screen button on the keyboard to take a screenshot and then paste the image to an opening app (Word, Notepad, etc.) by pressing Ctrl + V.
How to fix Microsoft Word won’t open on Windows & Mac?
How to Screenshot on Acer Windows 10 (Or Windows 8)
If you’re running Windows 8 or Windows 10 on the laptop, you can use the above steps to take a screenshot and save the image manually. However, there’s a more convenient way to take screenshot on Acer; it won’t require you to save the screenshot image manually.
How to screenshot on Acer laptop Windows 10:
- Decide what you want to capture.
- Press Print Screen + Windows and the screenshot will be took & saved automatically.
- Go to check the image in the Pictures library on your Acer laptop.
Some users may find pressing the Print Screen key doesn’t take a screenshot for them. Why? That is because some Acer laptops have an Fn function key on the keyboard. In this case, pressing Fn + Print Screen is the correct answer to how to take screenshot on Acer.

How to Find Acer Screenshots on Windows 10/8
As mentioned just now, the screenshots taken by pressing Print Screen + Windows on Windows 10 or Windows 8 will be saved automatically to the Pictures library. How do you find them? Where is the exact storage path?
The default storage path of the screenshot images on Windows 10/8 is C:\Users\username\Pictures\Screenshots.
- You should first open File Explorer on your PC.
- Then, navigate to the location manually to open the Screenshots folder.
- Also, you can copy & paste this path into the top address bar and press Enter to open the folder directly.
Another way to see your screenshots on Windows is: opening the Photos app -> shift to Folders -> select Pictures -> click Screenshots.
How To Take A Screenshot On Windows 8 (Or 8.1): User Guide.
How to take a screenshot of active window on Acer?
The above steps are effective for taking a screenshot of the entire screen on your Acer. However, some Acer users said they only want to take a screenshot of an active window on the screen sometimes. Is this possible? Luckily, there’s an easy workaround: pressing Alt + Print Screen, which allows users to capture any active windows.
- Browse the windows opening on your Acer laptop.
- Make sure the window you want to record is active. If it’s not, make it active now.
- Press Alt + Print Screen simultaneously on the keyboard.
- View & save the recorded image using either way mentioned above.
Method 2. Use MiniTool Video Converter
How to screenshot on Acer laptop? An offline screen recorder can also suit your needs. In this section, I will recommend a great offline screen recorder called MiniTool Video Converter and offer you a step-by-step tutorial.
About MiniTool Video Converter
As a watermark-free screen recorder, MiniTool Video Converter allows you to record a multitude of on-screen activities, including video calls, online courses, gameplay videos, and more, without time limits. In addition, this screen recorder is an MP4 recorder, which makes your file viewing and sharing more convenient.
How to Screenshot on Acer Laptop Using MiniTool Video Converter
Below are the detailed steps to screenshot on Acer laptop with MiniTool Video Converter.
Step 1. Download MiniTool Video Converter by clicking on the download button below. Then, follow the on-screen instructions to install this application on your computer.
MiniTool Video ConverterClick to Download100%Clean & Safe
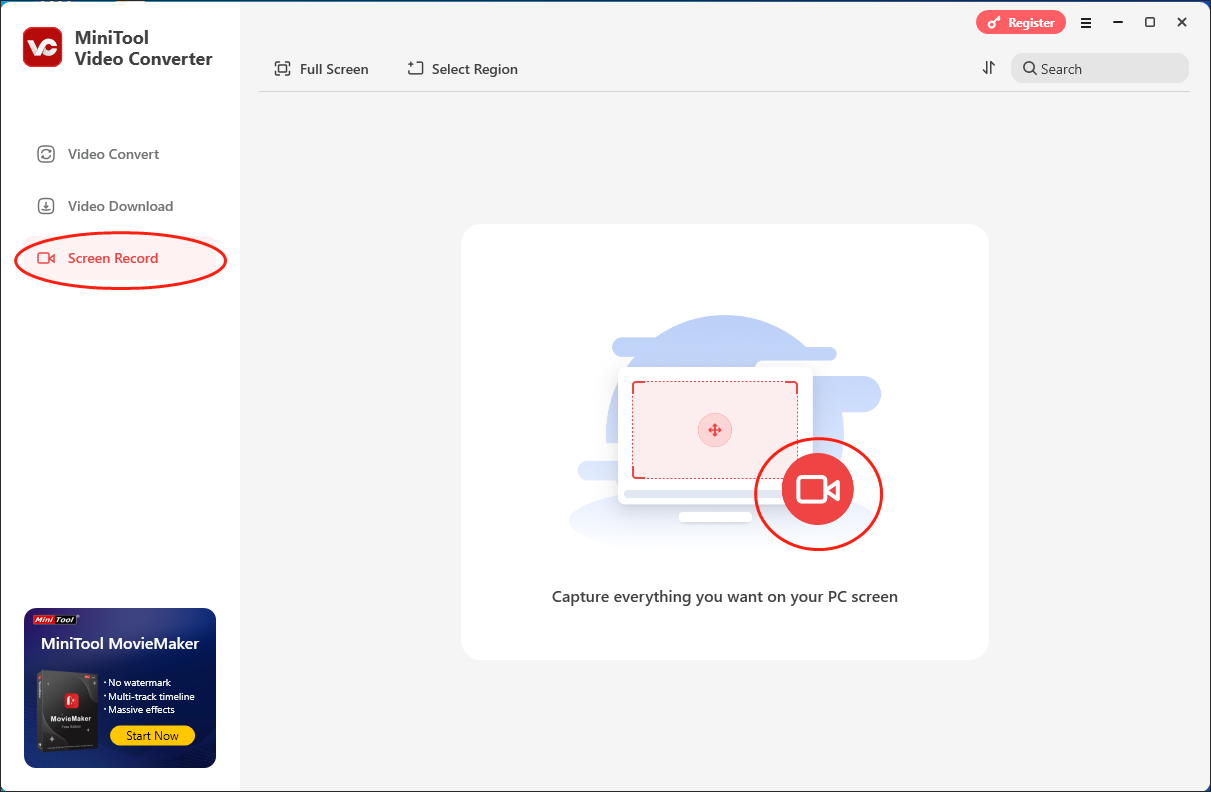
Step 2. After launching MiniTool Video Converter, move to the Screen Record section and click on the recording icon to access the MiniTool Screen Recorder window.
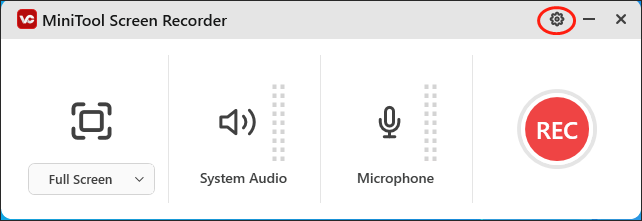
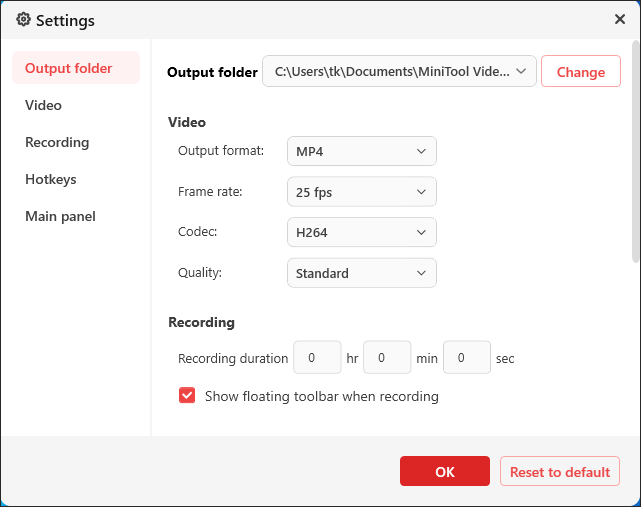
Step 3. Click on the upper-right gear icon to access the Settings interface.
In the Settings interface, you are free to choose a saving path for your recording file. Meanwhile, you can customize the recording quality and frame rate based on your needs. Once the customization is done, click on the OK button to confirm the changes.
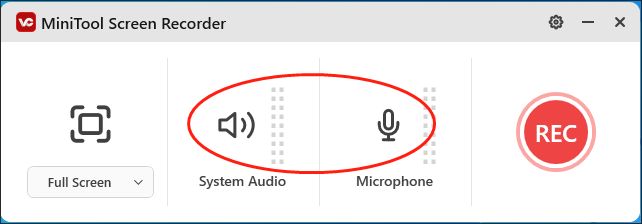
Step 4. Click on the System Audio icon and Microphone icon to manage the audio recording according to your needs.
Step 5. The MiniTool Screen Recorder will capture the whole screen by default. If you want to customize the recording area, press the Alt + R keys to make a choice.
Step 6. Press the F6 key to commence the recording task. After a 3-second countdown, start the computer activity that you want to record.
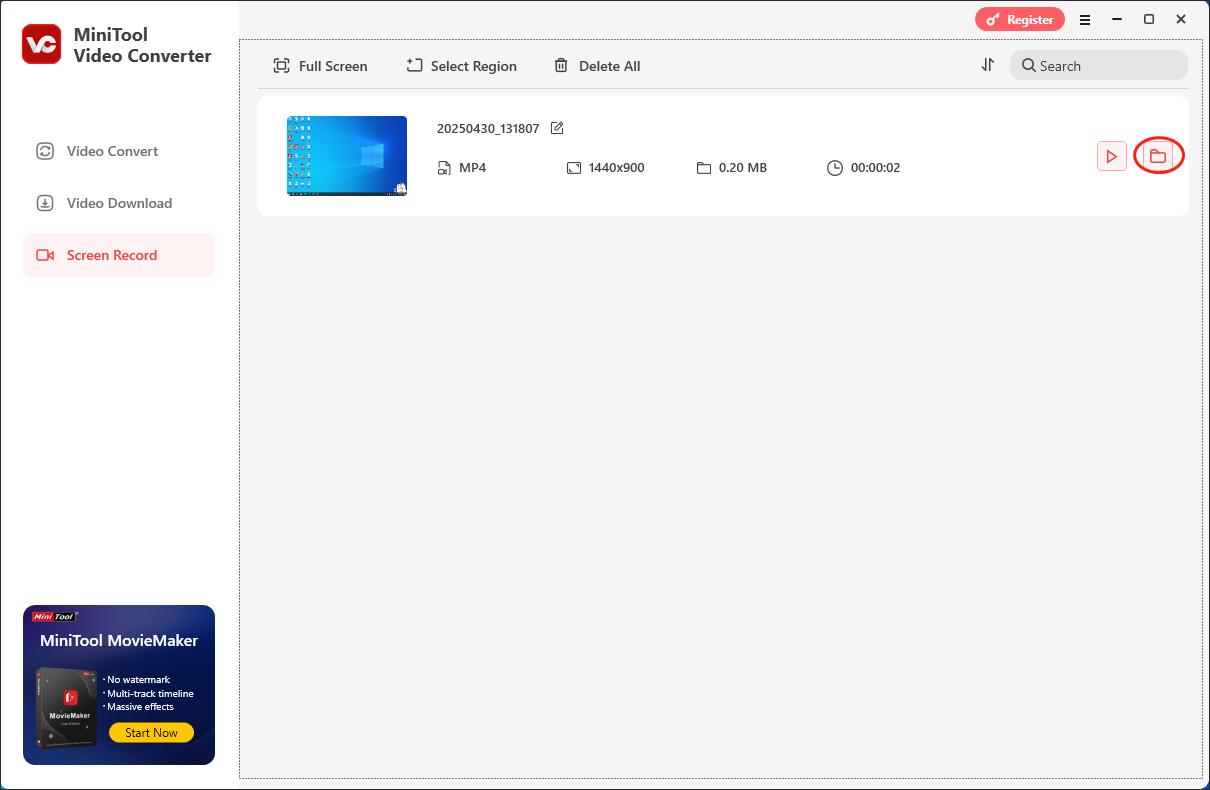
Step 7. Once the recording is over, terminate it by pressing the F6 key again. Then, click on the folder icon in the file list to locate and check your recording file.
As you can see, MiniTool Video Converter is a must-have tool that enables you to screenshot on Acer laptop.
Method 3: Use the Snipping Tool
The Snipping Tool is a desktop app designed by Microsoft for Windows users to screenshot on Acer laptop or other laptops & desktops. It’s one of the useful tools built-in Windows since Windows Vista.
How to Open the Snipping Tool
There are 5 common ways to open the Snipping Tool on Windows.
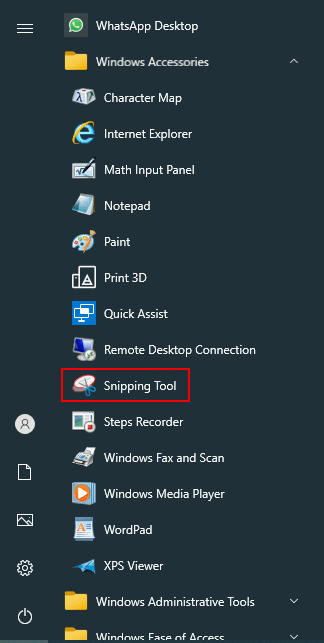
Open from Start Menu
- Click on the Start button in the lower left corner or press the Start (Windows logo) button on your keyboard to bring up the Start menu.
- Click All Programs/All apps to expand the list (optional).
- Expand the Accessories or Windows Accessories folder.
- Select Snipping Tool from the list.
Use Windows Search
- Click on the search icon/box on the taskbar or press Windows + S to open the search panel.
- Type Snipping Tool into the textbox.
- Select it from the search result or press Enter to open.
Open via Run
- Open the Run dialog by pressing Windows + R or other ways.
- Type snippingtool into the textbox.
- Click OK or press Enter to open the tool.
Launch from CMD
- Run Command Prompt as you usually do: for instance, press Windows + S, type cmd, and click Command Prompt.
- Type snippingtool.exe and press Enter.
Open from Windows PowerShell
- Right click on the Start button or press Windows + X.
- Select Windows PowerShell.
- Type snippingtool and press Enter.

How to Capture Your Screen with the Snipping Tool
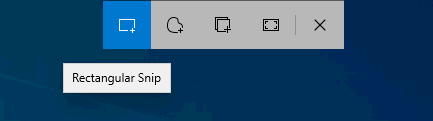
You can configure the Snipping Tool manually and start to take a screenshot on Acer using it. You can choose one of these options after clicking Mode (or pressing Alt + M): Free-form Snip, Rectangular Snip, Window Snip, or Full-screen Snip.
How to screenshot on an Acer:
- Navigate to the window that contains the information you want to capture.
- Click New from the top menu bar of Snipping Tool.
- You can also press the Alt + N keys to take a new screenshot using the same mode you used last.
- Click and drag your mouse across the region you need.
- The screenshot will be displayed on your screen as soon as you release the mouse button.
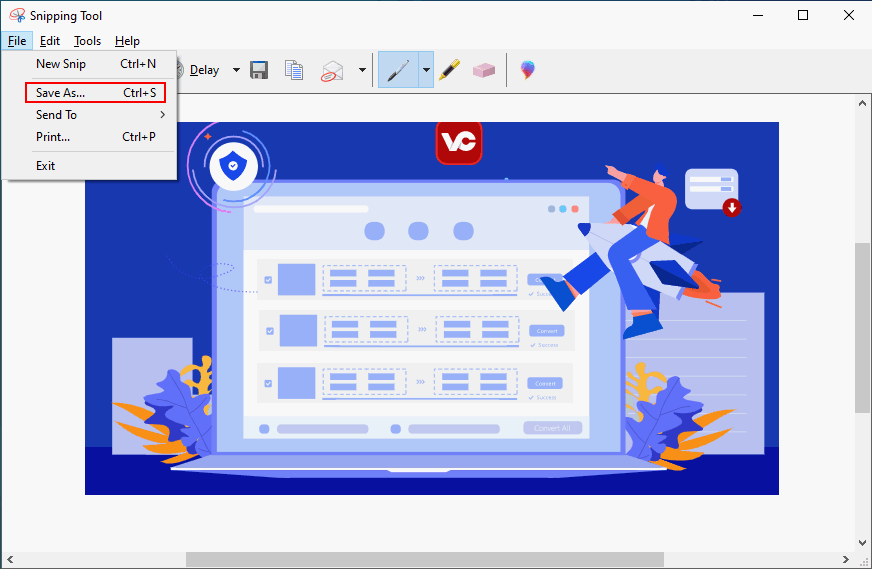
- Click File from the menu bar and then select Save As.
- Also, you can press Ctrl + S to save the current screenshot or press Ctrl + C to copy it to the clipboard.
Top 5 Snipping Tools For Mac You Should Try.
Method 4: Use Snip & Sketch
The Snip & Sketch is a new tool only available in Windows 10 and later versions. It can be regarded as the newest version of Microsoft’s Snipping Tool.
- Press Windows + S and type Snip & Sketch into the textbox.
- Also, you may type it directly into the search bar at the bottom of the screen if you have.
- Select the Snip & Sketch tool from the search result or press Enter to open it if it’s under Best match.
- Open the window that contains what you want to record.
- Click on the New button in the upper left corner to open the Snip panel or click on the down arrow after it to select from Snip now, Snip in 3 seconds, or Snip in 10 seconds.
- Choose a snip type from Rectangular Snip, Freeform Snip, Window Snip, and Fullscreen Snip.
- Click and drag your mouse pointer to select the screen portion you want to capture. If you select Fullscreen Snip, the screenshot will be taken at once automatically.
- Release the mouse button and your screenshot will be displayed in the Snip & Sketch tool automatically. It will also be saved to the clipboard temporarily if the Auto copy to clipboard feature is enabled, so you can press Ctrl + V to paste it inside an app.
- You can edit the screenshot according to your needs. (Optional)
- Click on the Save As icon at the top right or press Ctrl + S to save the screenshot to your Acer laptop.
More tips & skills:
- How open the Snip panel without opening the Snip & Sketch app first? You should press Windows + Shift + S on the keyboard.
- You can import an image and use Snip & Sketch to edit it.
- You can open the screenshot taken by Snip & Sketch in other apps like Windows Photo Viewer.
[Solved] Windows Photo Viewer Can’t Open This Picture Error!
Method 5: Use Apps or Browsers
Some apps or browsers you installed on your Acer contain a feature to take the screenshot. You just need to navigate to the app/browser on your computer -> open it -> take a screenshot with the feature -> edit the screenshot if possible -> save the screenshot to a safe place.
How to Screenshot on Acer Chromebook
What if you’re using an Acer Chromebook? The methods and steps to take screenshot on Acer Chromebook are very different.
Alt=The image of an Acer laptop
Capture the Full Screen on Acer Chromebook
Using keyboard combinations is the easiest way to capture the entire screen on an Acer Chromebook.
- Locate the Ctrl key and Show windows key (represented by a rectangle with two vertical lines) on your keyboard.
- Keep the window you want to capture on the screen.
- Press Ctrl + Show windows simultaneously to capture the entire screen.
Capture Part of the Screen on Acer Chromebook
If you don’t need the full screen of your Acer Chromebook – only a portion of it is useful, you can capture the full screen and then crop the screenshot with some tools. However, the better way is to capture a certain area of the screen by pressing Ctrl + Shift + Show windows on the keyboard and adjusting the screenshot area.
Where do the screenshots save on Chromebook?
A thumbnail of the snapshot will appear at the right bottom corner of the screen whenever you take a screenshot. You can click on it to view the image.
In addition, you can go to the Files app manually: click on the Launcher at the bottom left -> find the Files icon under the search box -> click on it to open file manager -> navigate to My files -> open Downloads.
Final Words
If you don’t know how to screenshot on Acer laptop, this page will be very helpful for you. It introduces mainly 5 methods on how to take a screenshot on Acer laptop and then shows you 2 different ways to screenshot on an Acer Chromebook.
In addition, if you have any questions or suggestions about MiniTool Video Converter, please send an e-mail to support@minitool.com. Also, you can share your problems with me on Twitter. I will give you a hand as quickly as possible.
About The Author

Position: Columnist
With over 6 years of experience as a tech writer, Eien specializes in creating clear, simple guides for video conversion, transcription, screen recording, etc. He stays connected with the tech community and its readers to understand the real-world problems users face. By combining their feedback with his own hands-on testing, Eien always provides proven solutions to complex software problems in time.
User Comments :