How to Screen Record on Razer Laptop via Razer Cortex
Razer Cortex is a versatile application that is designed to enhance your gaming experience. More importantly, it can function as a screen recorder with no lag. You can use it to screen record on your Razer laptop. Here’s how:
Step 1. Run Razer Cortex and log in to your Razer account. If you haven’t gotten Razer Cortex, you need to go to the Razer website to download and install it first.
Step 2. Choose from Game Mode and Screen Mode. If you want to record gameplay on your Razer laptop but the game is not listed, you need to use the Add Game option to add it manually.
Step 3. Next, you need to enable the Razer Cortex overlay. You can do that by pressing the Ctrl + ‘ keys. Alternatively, you can go to Settings > Display > Screen Recording > Enable. Meanwhile, you need to enable the Capture Audio option if you want to record the game audio.
Step 4. Press Ctrl + Alt + V to begin the recording process. Click the Stop icon on the toolbar to finish the recording.
How to Screen Record on Razer Laptop with MiniTool Video Converter
MiniTool Video Converter is a completely free screen recorder for Windows and it is available on Razer laptops. It enables you to record the screen with no time limits or watermark. What’s more, it allows you to record the whole screen, selected region, or specific window. Additionally, it can record the 4K screen at standard, high, or original quality and then save the recording in the MP4 format.
MiniTool Video Converter is an excellent game screen recorder with no lag that can help you record games smoothly while playing. You can refer to the following steps to screen record on a Razer laptop with MiniTool Video Converter.
Step 1. Just click the button below to download MiniTool Video Converter and then install it on your Razer laptop.
MiniTool Video ConverterClick to Download100%Clean & Safe
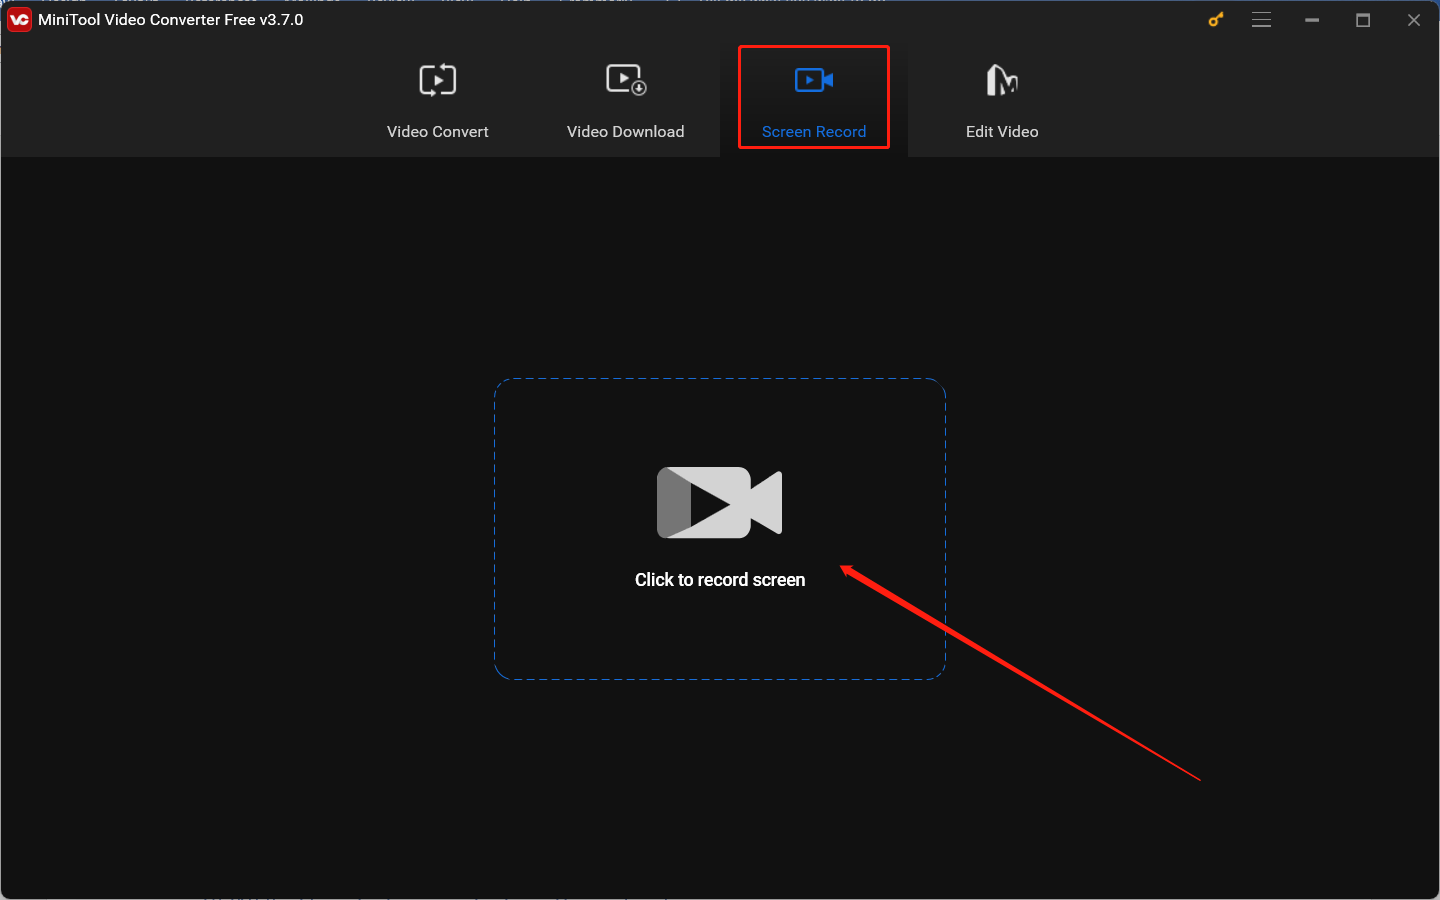
Step 2. Run MiniTool Video Converter, switch to the Screen Record module, and hit the Click to record screen area to access MiniTool Screen Recorder.

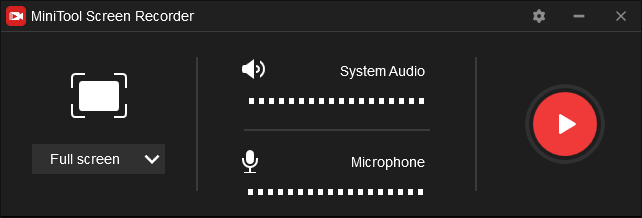
Step 3. The MiniTool Screen Recorder panel will appear. On this panel, you can choose to record the full screen or the selected region with the option to record the audio from the system and microphone.

Step 4. Furthermore, you can click the Settings icon to adjust other recording settings, such as the recording quality, frame rate, and others. Then don’t forget to click OK to confirm the changes.
Step 5. Next, you can click the red Record button or press the default F6 key to start the recording process. During the recording process, you can press F9 to pause and resume it. To end the recording, press F6 again.
Step 6. The recording will appear on the MiniTool Video Converter panel. You can right-click on it to preview, rename, delete, or locate it.
Other Useful Screen Recorders for Razer Laptop
Razer laptops (especially the Razer Blade series) are known for their high performance and cutting-edge technology. They are running on Windows systems. Therefore, you can use a Windows built-in screen recorder to make screen recordings. Alternatively, you can also try other third-party screen recorders that are available on Windows. Here’s a list of screen recorders that can be used on Razer laptops:
- Bandicam
- OBS Studio
- ShareX
- CamStudio
- ScreenPal
BONUS: How to Screenshot on Razer Laptop
Sometimes, you may need to take a video screenshot or capture a still image on your Razer laptop. How to screenshot on Razer laptop? Like other Windows computers, you can take a screenshot with the Print Screen key or the Snipping Tool. For certain Razer laptops, you can press Fn + F12 to take a screenshot and then the screenshot will be saved in the Picture library.
Conclusion
How to screen record on Razer laptop? You can use Razer Cortex. Alternatively, you can use MiniTool Video Converter to record on Razer laptops easily. In this post, we have also shown you other good screen recorders for Razer laptops and ways to screenshot on Razer laptops.
Also read:


User Comments :