How to Record DVD to Computer by VLC
VLC is famous as a multimedia player that is available on various operating systems. Besides, VLC can function as a video converter, DVD ripper, and screen recorder. You can not only use VLC to rip videos from DVDs to save them to the computer but also record DVDs to the computer. You can refer to the below steps to record DVD to computer with VLC.
Step 1. Download, install, and open VLC. Then insert the DVD into the DVD driver.
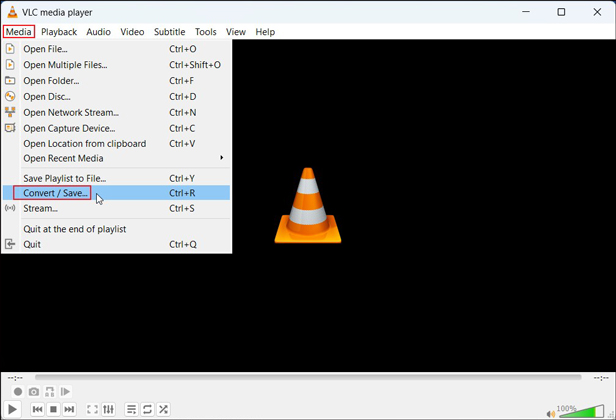
Step 2. Click the Media tab at the top menu bar and select the Convert/Save… option.
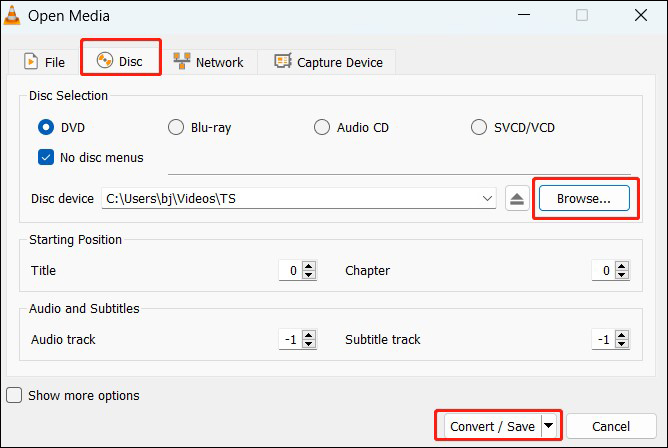
Step 3. The Open Media window will pop up, you need to switch to the Disc tab. You need to make sure that the DVD option and the No disk menus options are ticked. Then click the Browse button to choose the DVD you want to record and click Convert/Save to process to the next step.
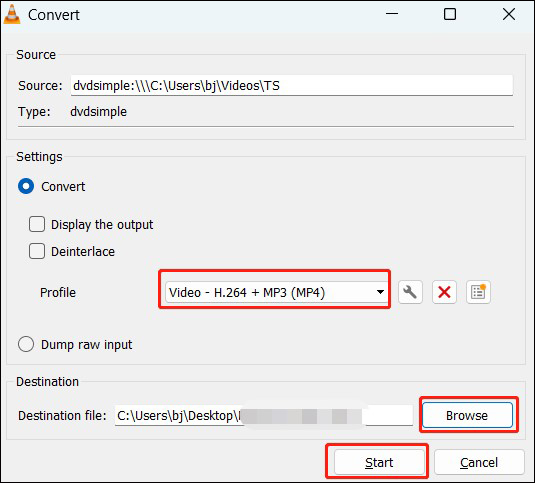
Step 4. On this Convert page, expand the Profile menu to choose the recording format, and the Video – H.264 + MP3 (MP4) option is recommended. Next, click the Browse button in the Destination section to choose a folder to save the recording. Finally, hit the Start button to record the DVD to the computer.
How to Record DVD to Computer with MiniTool Video Converter
MiniTool Video Converter is a 100% free screen recorder that can help you record videos from DVDs without time limits and watermarks. It enables you to choose the recording area according to your needs like recording the full screen or a specific region. Meanwhile, it allows you to record the screen with the option to record microphone audio and system sounds separately or simultaneously.
With it, you can easily record DVD to computer for viewing conveniently. Here’s how to record DVD to computer via MiniTool Video Converter. You need to download and install MiniTool Video Converter first and then follow the below steps.
MiniTool Video ConverterClick to Download100%Clean & Safe
Step 1. Insert the DVD into your computer’s DVD driver and locate the DVD folder to find the video you want to record.
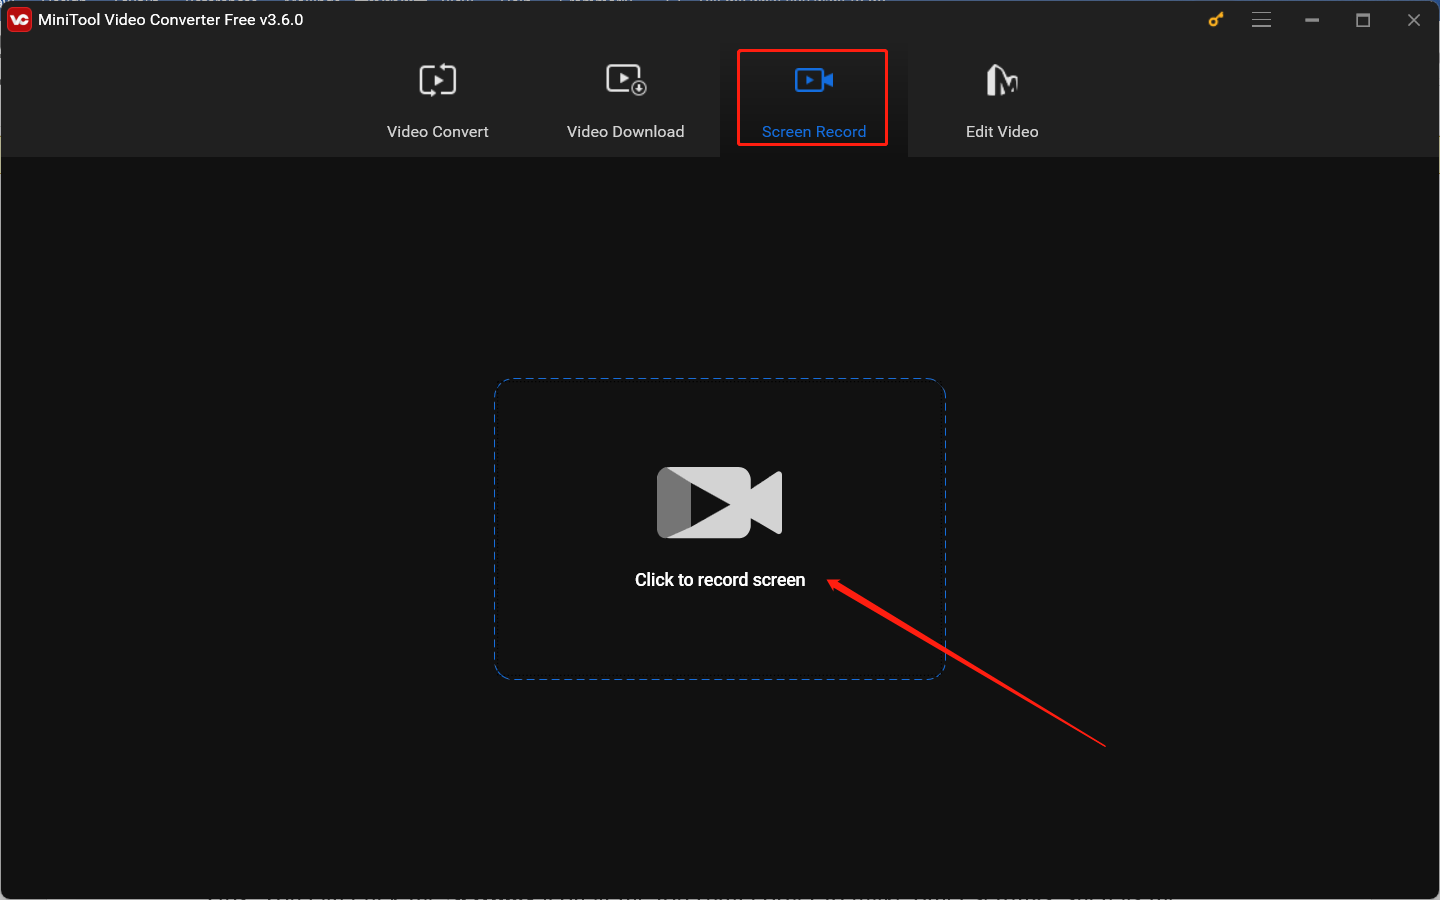
Step 2. Run MiniTool Video Converter, switch from Video Convert to Screen Record, and click the Click to record screen region to open MiniTool Screen Recorder.
Step 3. Set the recording area according to the video you will play. By default, MiniTool Screen Recorder will record the whole screen. You can also click the inverted arrow next to Full screen to choose Select region and then drag the cursor to select the recording area. For the recording audio source, you can only keep the speaker icon on to record the system audio.
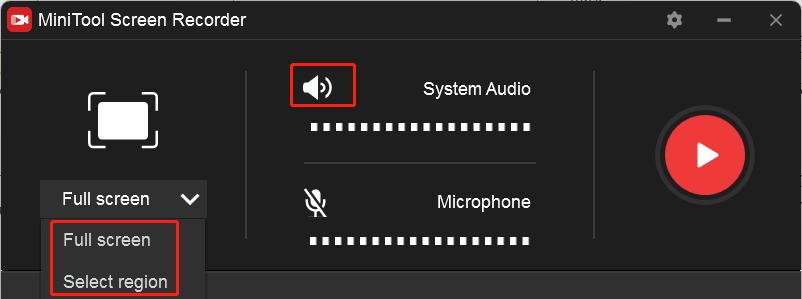
Step 4. Click the Record button or press the F6 key and then quickly start the video within 3 seconds. Because the recording will begin after a 3-second countdown. After the recording ends, you can press F6 again to finish the recording.
How to Copy/Rip DVD to Computer
How to save videos from DVD to computer? In addition to using screen recorders, you can also try DVD rippers. Among various DVD rippers, HandBrake is worth a try. It is available on Windows, macOS, and Linux. You can use it to rip DVDs to popular digital formats, including MP4, MKV, and WebM, or to devices. Moreover, it provides you with various presets to choose from. Below is how to copy DVD to computer using HandBrake.
Step 1. Insert the DVD into the DVD driver first and open HandBrake. On the left sidebar, choose your DVD driver and then Handbrake will scan it.
Step 2. Expand the Title list to choose the one you want to rip and open the Preset menu to select a needed encoding preset and output format.
Step 3. Click the Start Encode button to rip DVD to computer.
Conclusion
How to record DVD to computer? Try to use VLC or MiniTool Video Converter. As a bonus, this post also shows how to copy DVD to computer with HandBrake.


![How to Record Fortnite on PC/Switch/PS4 [Ultimate Guide]](https://images.minitool.com/videoconvert.minitool.com/images/uploads/2024/07/how-to-record-fortnite-thumbnail.jpg)
![Why Google Meet Recording Is Unavailable & How to Fix It [6 Ways]](https://images.minitool.com/videoconvert.minitool.com/images/uploads/2024/08/recording-unavailable-google-meet-thumbnail.jpg)
User Comments :