This post from the free file converter explains the reasons for recording yourself drawing on screen, and offers 4 methods to help you record yourself drawing on the computer and 3 tips to improve the recording.
Reasons for Recording Yourself Drawing on the Computer
Nowadays, many people capture their digital painting process and share the recording on social media. It brings a lot of benefits to recording yourself drawing on the computer. See as follows.
- Self-reflection and improvement: Recording yourself drawing on the computer allows you to review your work. By reviewing the painting process, you can learn from the mistakes and refine your skills. This self-reflection is a crucial part of skill enhancement. It also serves as a digital diary that helps you keep track of your growth and improvements, which can be inspiring and rewarding.
- Promotion: Recording and sharing your drawing process on social media can be an effective marketing tool. The recording can demonstrate your talent, style, and unique approach, which may attract potential clients to buy your painting classes and work.
- Educational tool: The recording can be educational content. It shows every step and detail of drawing a digital painting. People, especially beginners, can watch the recording time after time to learn painting skills.
- Community engagement: Sharing the recording on platforms like YouTube allows artists to engage with their audience, fostering a community around their work. Viewers can leave comments, ask questions, or provide feedback. It’s also an effective way for artists to improve and tailor their content.
- Entertainment: It’s entertaining for the audience and even the artist to watch digital drawing recordings. It's fascinating to see the transformation from a blank canvas to a completed piece of art, making it enjoyable content for social media platforms or personal enjoyment.
In conclusion, recording the drawing process on the computer is a great way for artists to self-reflect and keep track of their progress. It also provides a platform for others to learn from them.
![How to Record a Speedpaint [Windows & Mac & iPad]](https://images.minitool.com/videoconvert.minitool.com/images/uploads/2024/06/how-to-record-a-speedpaint-thumbnail.jpg)
Methods to Record Yourself Drawing on the Computer
How to record yourself drawing on a screen? The following are the best 4 methods to help you accomplish it.
MiniTool Video Converter
MiniTool Video Converter is a free video converter for Windows users that allows people to convert a wide range of video and audio formats without watermarks. It supports converting video to video, audio to audio, video to audio, and vice versa. It can batch-convert media files at the same time. It allows users to personalize the target file’s name, output folder, output format, etc. You can also use it to compress large media files.
In addition, MiniTool Video Converter has a free screen recording feature. It can capture any activities on your screen. It has no recording time limits and adds no watermark to the recording. It supports recording the microphone and system audio simultaneously and respectively, or muting the recording if you want. It also enables users to record mouse movements. Thus, it’s the most recommended tool to record yourself drawing on the computer.
Pros:
- It’s free and doesn’t add watermarks to the recording.
- It’s beginner-friendly. Its clear interface makes it easy to record the computer screen.
- It supports users to save the recording to many popular formats.
- It allows users to personalize the parameters for the recording.
- It enables users to capture the entire screen or a specific area.
Cons:
- It can only be used on Windows.
Now, hit the button below to download and install MiniTool Video Converter on your computer first. Then follow the steps below to begin the recording process.
MiniTool Video ConverterClick to Download100%Clean & Safe
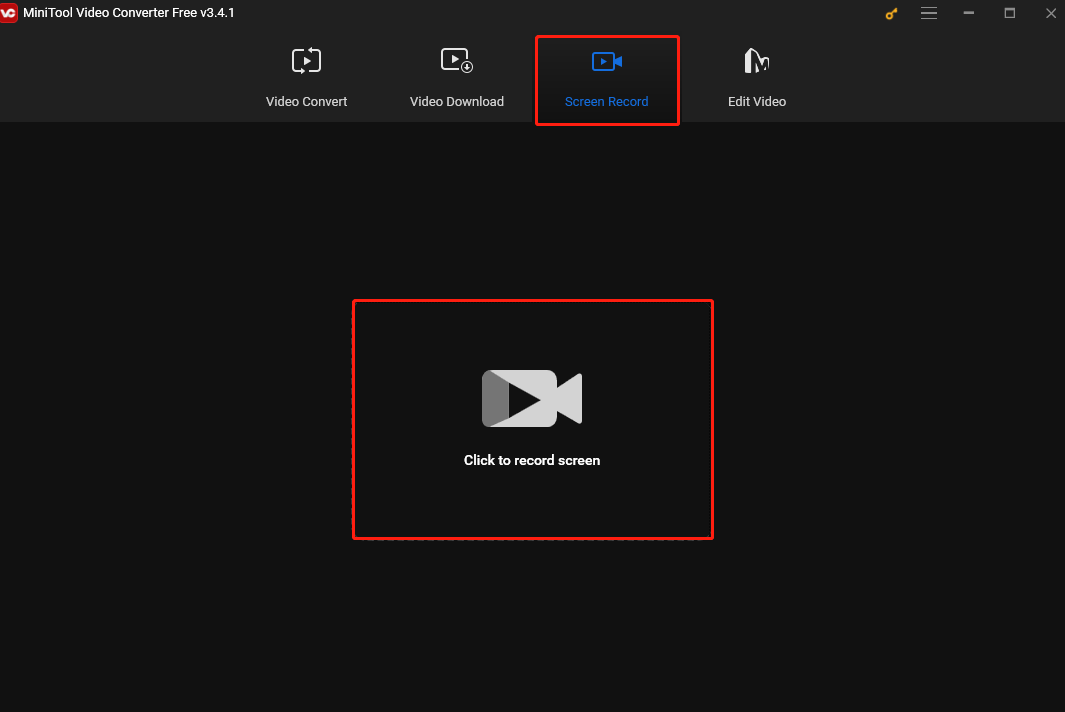
Step 1. Launch MiniTool Video Converter.
Step 2. Click Screen Record and Click to record screen to open MiniTool Screen Recorder.
Step 3. In the MiniTool Screen Recorder window, if you want to capture the partial screen, you can click Select region on the down-drop menu of Full screen and move your mouse to select your desired recording area. Click the System Audio or Microphone icons to turn them on or off.
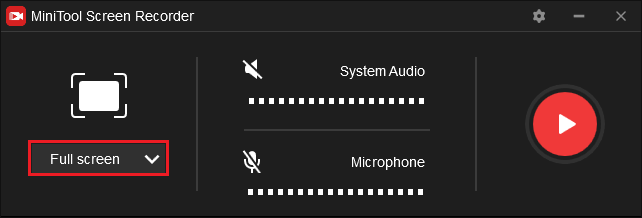
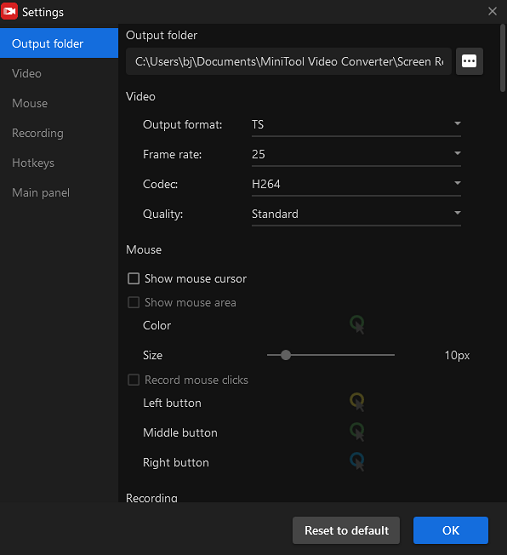
Step 4. For more settings, click the gear icon on the top right of the window.
Step 4. Press F6 or click the red Record button to begin recording yourself drawing on the computer. To pause and resume the recording, press F9.
Step 5. Press F6 again to stop the process.
OBS Studio
OBS Studio is also a good tool to record yourself drawing on the computer. OBS is popular among content creators. It is a free open-source cross-platform application for video recording and live streaming. People use it to create tutorials, capture gameplay and online meetings, etc. It enables users to record audio and video. In addition, users can also use it to stream directly to platforms like YouTube, Twitch, Facebook, and more.
Pros:
- It’s free to use, enables users to record their screens at any length, and adds no watermark to the recordings.
- It has cross-platform compatibility. It can be used on Windows, Mac, and Linx.
- It comes with various customization options. Users can customize the settings for the recording, such as resolution, frame rate, and output format.
Cons:
- It might be challenging for a beginner to record their screen. OBS Studio has a complex user interface with many settings and options that may make it difficult for those new to the software to capture the screen. It takes time and effort to learn and master OBS Studio.

QuickTime Player
If you want to record yourself drawing on Mac, try QuickTime Player. QuickTime Player is a media player that comes with the computer. It can loop a video, play a video with picture-in-picture, play videos from the Internet, etc. It’s also packed with editing features. It can reduce the video quality or change video codecs, extract the audio from a video file, create a video or GIF using an image sequence, and more.
In addition, it can record your computer screen. Thus, it’s a good choice for Mac users to record themselves painting on the computer.
Pros:
- It’s free to use and allows users to record the screen with no watermark or time limit.
- There is no need to download it. It’s a pre-installed application on Apple devices, so users don’t have to go through the hassle of downloading and installing it.
- It’s simple to use. Its clear user interface makes it easy to navigate and users can carry out a recording within just several simple clicks.
- It allows users to choose the resolution for the recording file.
Cons:
- Sound recording limitation. QuickTime Player may not be able to record system sounds by default. To fix it, you need third-party software such as SoundFlower.
- QuickTime Player cannot export videos in MP4 format.
Apowersoft Free Screen Recorder
Apowersoft Free Screen Recorder is a powerful screen recording tool that allows users to record anything on the PC screen as videos. It can record the screen activity with internal audio and a microphone. This software has a simple real-time video editor that allows you to draw lines, arrows, circles, and texts during recording.
Pros:
- It’s free to use.
- It supports multiple recording formats such as MP4, WMV, FLV, AVI, GIF, etc.
- It allows users to choose resolution, bitrate, frame rate, and mouse cursor style for the recording.
- It enables users to record the entire screen or select a specific area to record.
Cons:
- The free version has limited features.
Additional Tips for Recording Yourself Drawing on the Computer
After you finish recording, you may need to edit it to make it more engaging, informative, and professional.
MiniTool MovieMaker is a free video editor without watermarks. It allows users to add filters, transitions, background music, and text to the video, change the speed of the video, cut unwanted parts by trimming, and more. Below is the tutorial for editing your recording with MiniTool MovieMaker.
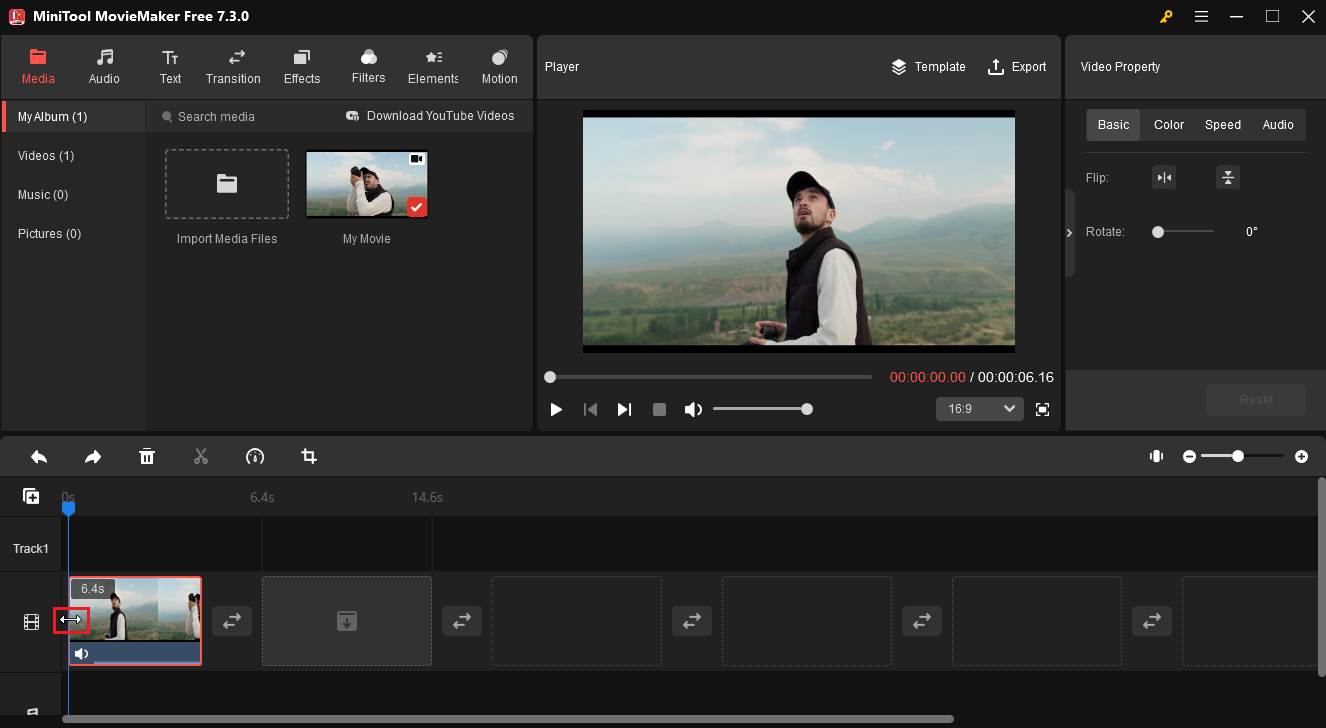
Trim the Recording
To record the whole drawing process, people tend to start recording a few seconds before they begin drawing and end the recording a few seconds after they finish drawing. Thus, trimming the recording to cut surplus parts at the beginning and end is necessary, especially when you want to share the recording on social media.
Here are the steps.
Step 1. Download and install the software on your computer. Then launch it.
MiniTool MovieMakerClick to Download100%Clean & Safe
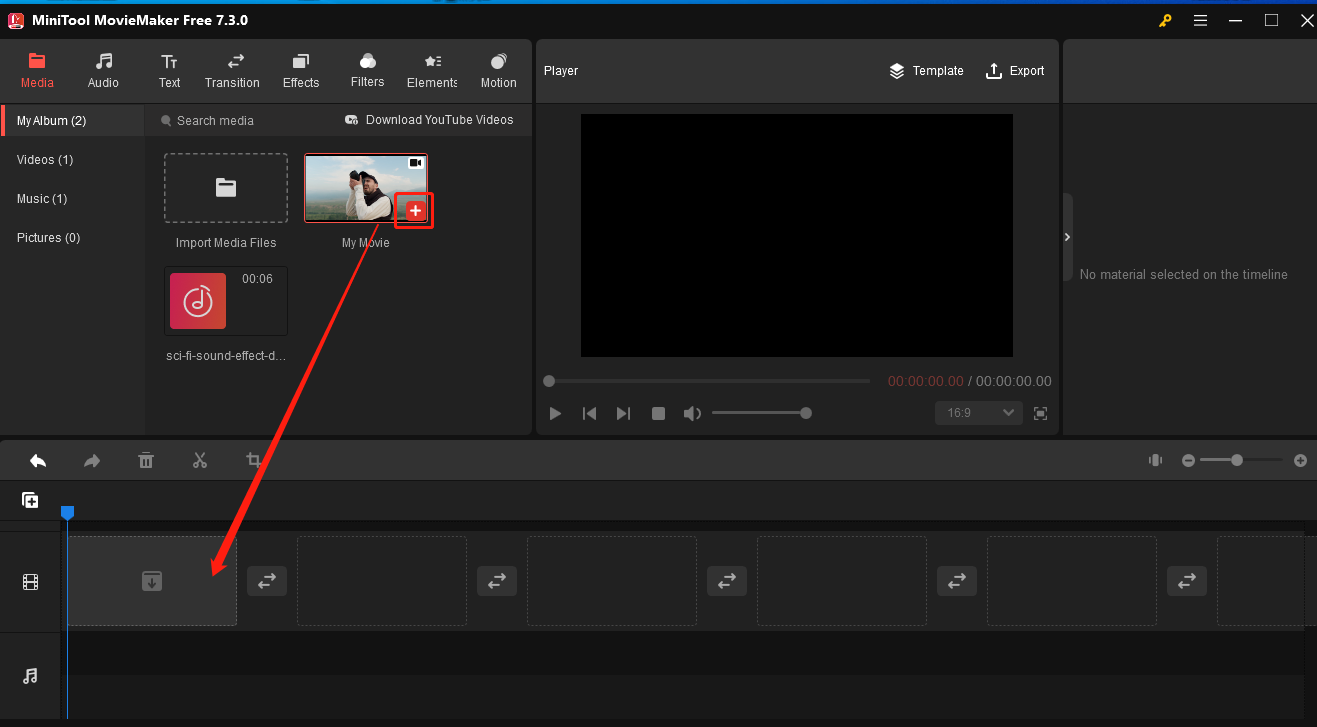
Step 2. Close the project library window to enter the main user interface. Click Import Media Flies to load the recording.

Step 3. Hit the + icon on the video thumbnail to add it to the timeline. Or directly drag and drop the target video to the timeline.
Step 4. Hover the mouse cursor at the beginning of the recording on the timeline until you see a double-headed arrow appear, and drag the arrow rightwards to the wanted part. Mouse over the end of the recording until the double-headed arrow appears, and drag the arrow leftwards to the wanted part. The unwanted parts at the beginning and end will be removed.
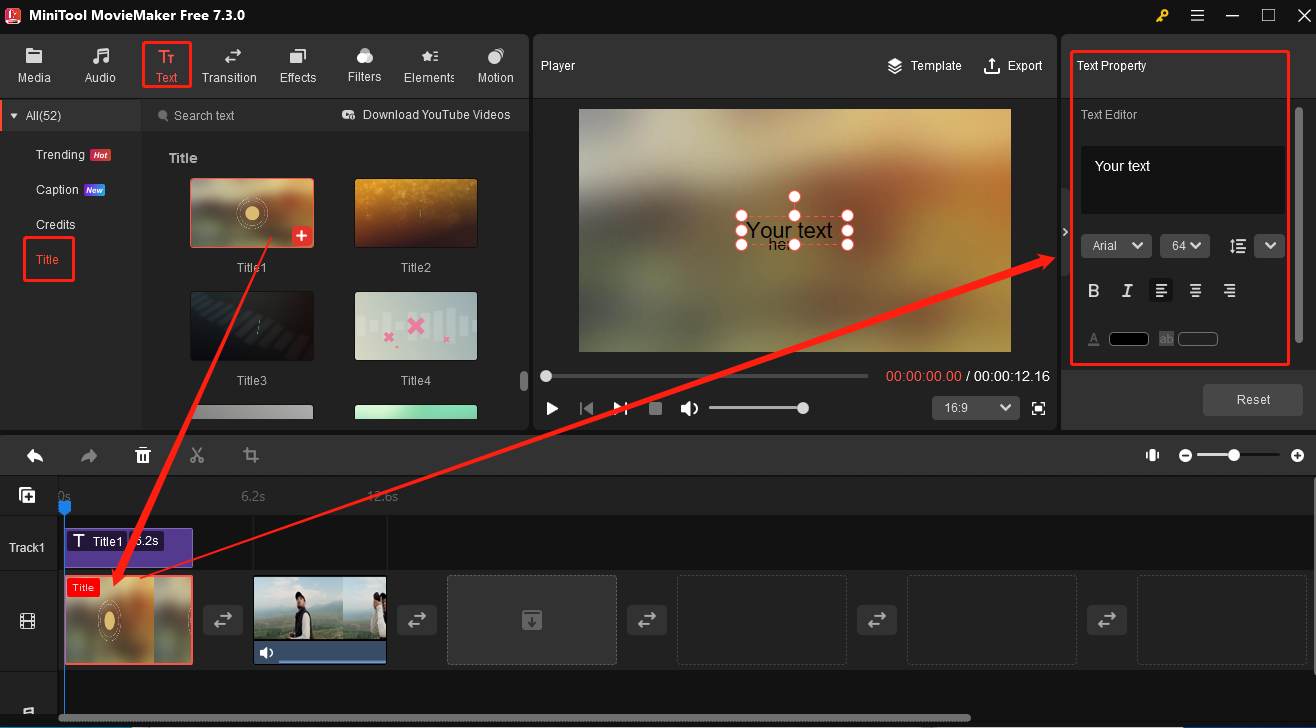
Add Text to the Recording
MiniTool MovieMaker offers Titles, Captions, and Credits to help you optimize your recording. A title card appears at the beginning of a video to explain what the video is about. An End Credits card is placed at the end of a video to give more information about the people behind the scenes. Caption is also important for a video, especially when making tutorial videos.
The following are the steps.
Step 1. Click Text from the top menu to access the text library after trimming the video.
Step 2. Add and edit a Title card. Click Title under the Text tab, choose one you like, and drag it to the timeline at the beginning of the video. Click the Title card on the timeline and go to Text Property to edit its text. You can adjust its font, font size, color, and more.
Step 3. Add and edit an End Credits card. The way to add and edit the End Credits card is the same as adding a Title card. But you are suggested to put the End Credits card at the end of the video.
Step 4. Add and edit Caption. Click the recording on the timeline and move the playhead to where you want to add the caption. Click Caption under the Text tab, choose your desired one, and click the + icon to add it to the timeline. You can add multiple captions to the recording. Go to Text Property to exit the text. You can also split and trim the caption on the timeline.
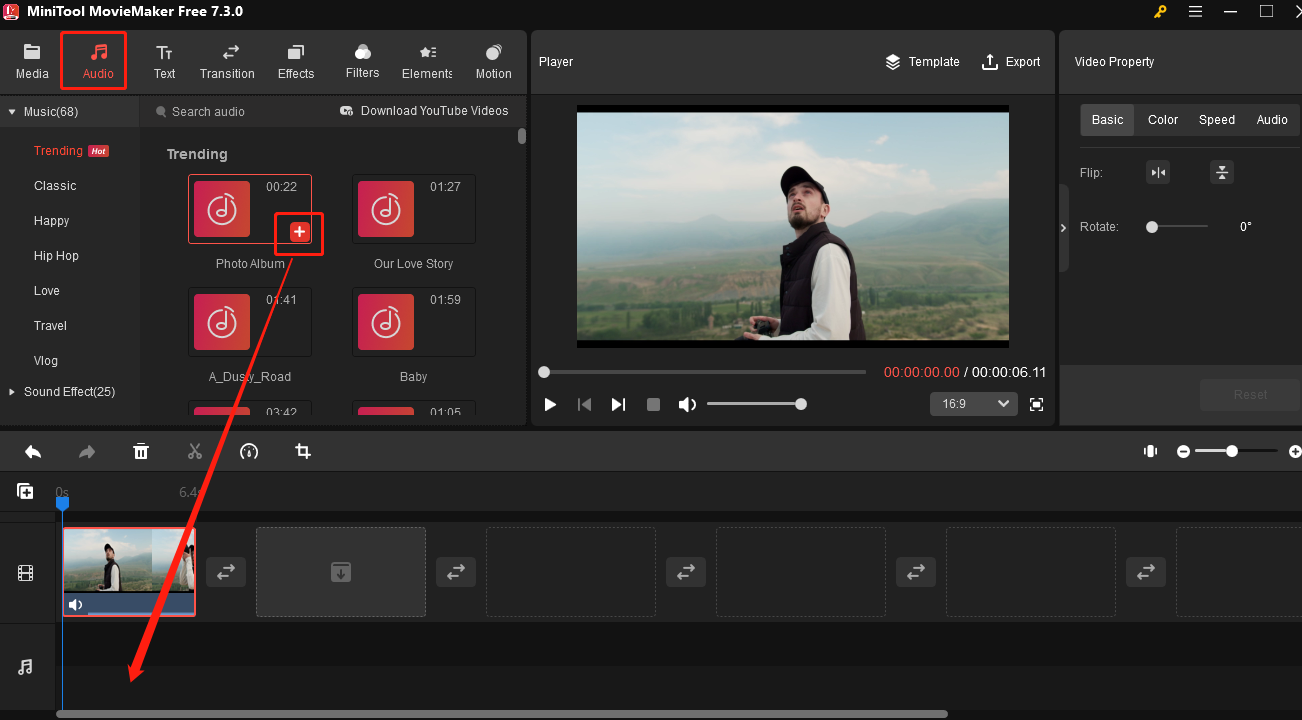
Add Music to the Recording
Adding background music to the recording can enhance the video audiovisual experience. Music is emotional and rhythmic which can create a different atmosphere, making the audience more involved in the video. Follow the steps below to add music to your recording with MiniTool MovieMaker.
Step 1. Load your audio. Hit the + icon on the audio thumbnail to add it to the timeline.
You can also use the built-in music tracks provided by the software. Click Audio in the main interface, download the desired music, and click + to add it to the timeline.
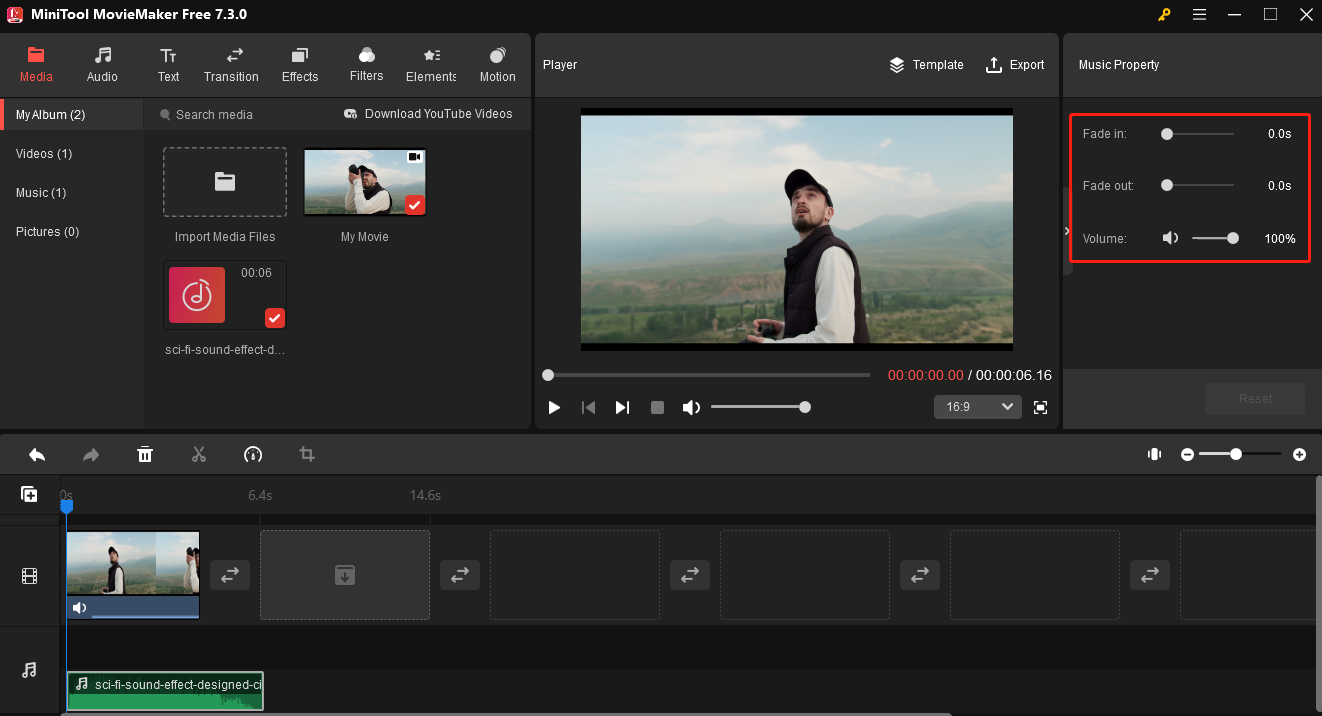
Step 2. This application allows users to edit the audio. Click the audio on the timeline and adjust its volume, or apply fade-in or fade-out effects in the Music Property.
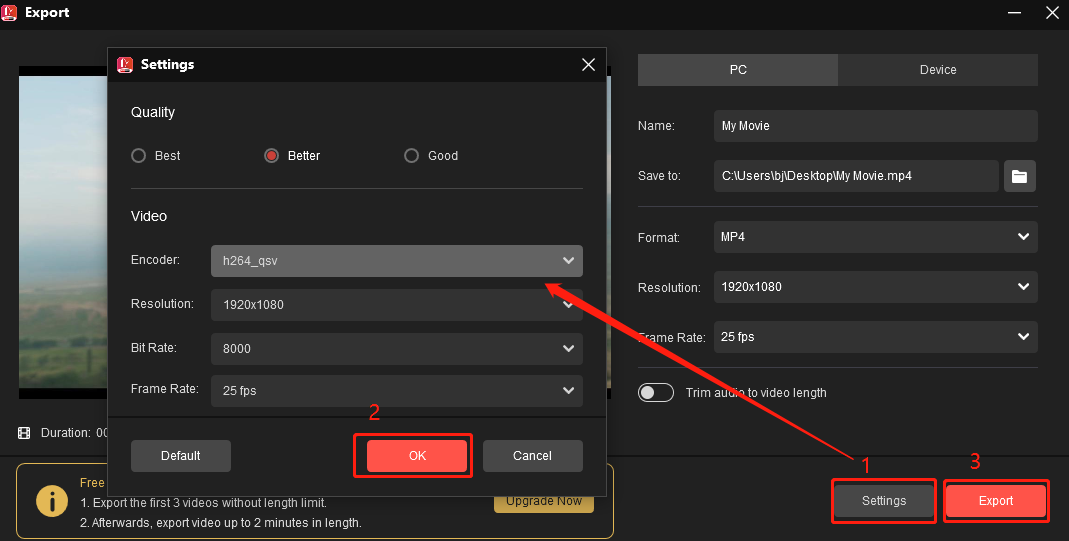
Step 3. Click Export to open the Export window. In the following popup, you can name the video, and choose its output folder and format. Click Settings for more. Click OK to save your changes, and click Export to export the file.
Conclusion
Recording yourself drawing on the computer has a lot of advantages and editing your recording to improve its viewing effect also matters. This post covers 4 methods to help you record yourself drawing on Windows and Mac and 3 tips to edit your recording.
If you encounter any issues while using MiniTool Video Converter, don’t hesitate to contact us via support@minitool.com.
User Comments :