If you are looking for ways to screen record on Surface Pro, you’ve come to the right place. This article provided by the free file converter will guide you on how to screen record on Surface Pro using the built-in screen recording tools of Windows and other third-party screen recorders like MiniTool Video Converter.
Surface Pro is a 2-in-1 device that merges a tablet and laptop, which has a detachable keyboard and can work with Surface Pen. It supports operating on Windows 8 and later versions. For the operating systems supported by different versions of Surface Pro, you need to check their official websites. How to screen record on Surface Pro? You will find the answer in the following content.
How to Screen Record on Surface Pro
In this part, we will display how to screen record on Microsoft Surface Pro with MiniTool Video Converter and Windows’ built-in screen recorder.
#MiniTool Video Converter
MiniTool Video Converter is a completely free screen recorder without time limits and watermarks. It is compatible with Windows 10/11, which means you can use it on Surface Pro.
MiniTool Video Converter enables you to record the full screen and specific regions according to your needs. Also, it can help you record a microphone and system audio simultaneously or separately.
How to Screen Record on Surface Pro with MiniTool Video Converter
Step 1. Click the below download link to get MiniTool Video Converter for free and install it on your Surface Pro PC.
MiniTool Video ConverterClick to Download100%Clean & Safe
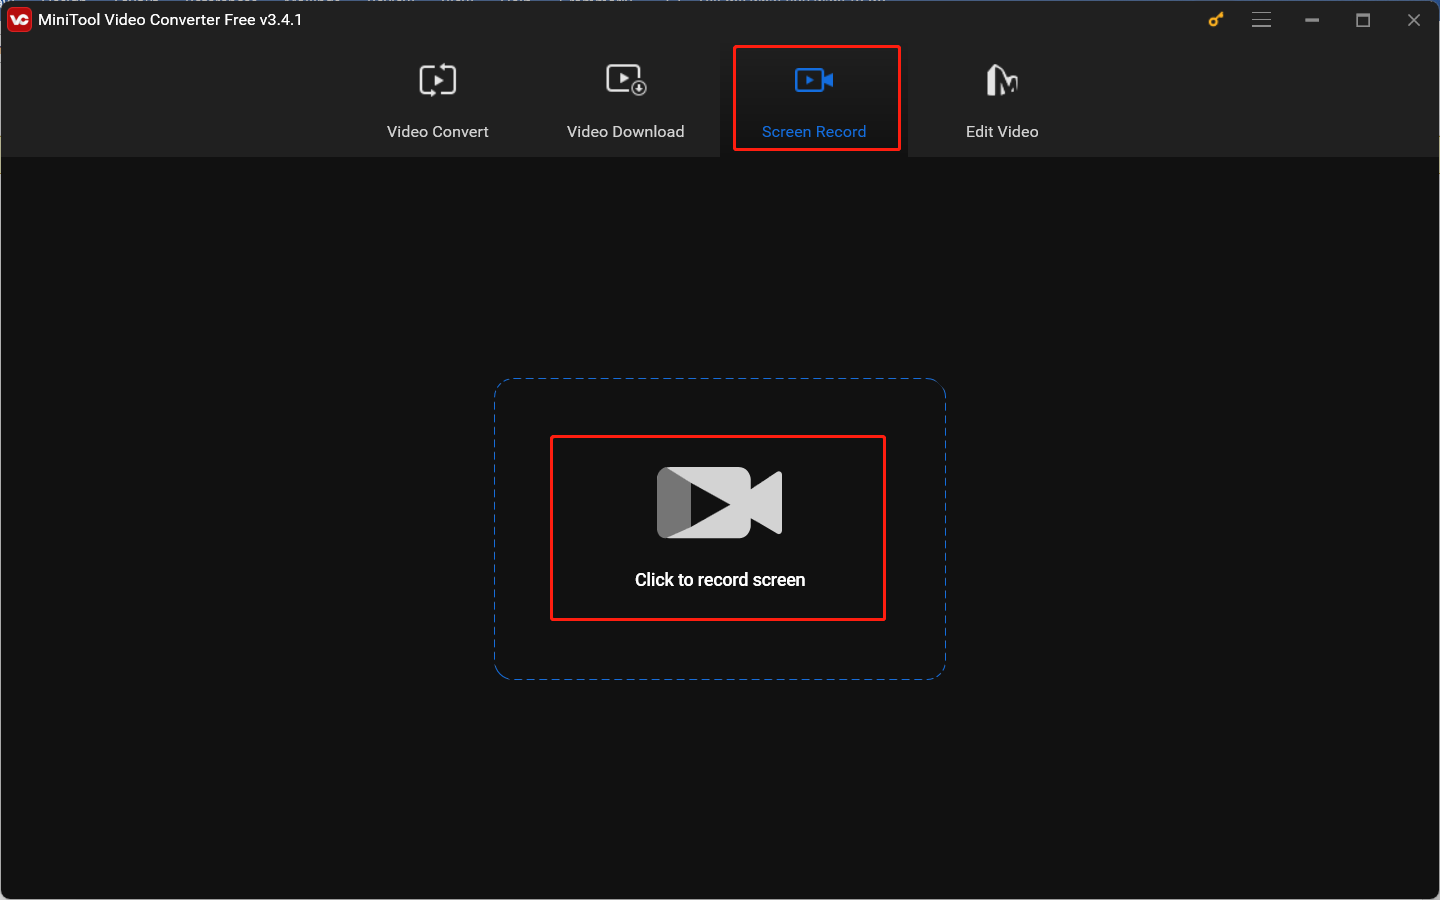
Step 2. Run MiniTool Video Converter and go to the Screen Record tab. To open MiniTool Screen Recorder, you need to click the Click to record screen area.
Step 3. You can keep the default option Full screen to capture the entire screen. Or if you want to record a window of a certain application or specific area, you can choose the Select region option and then click and drag the cursor to choose the recording area.
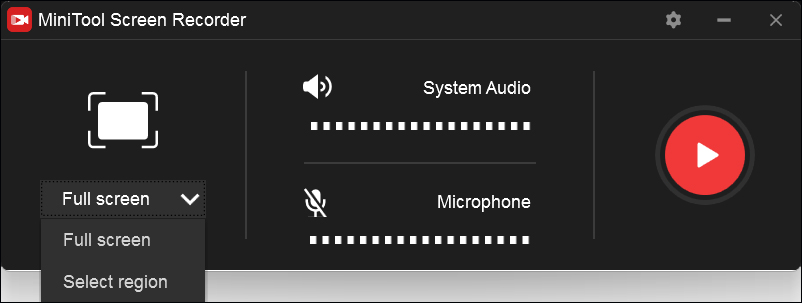
Step 4. By default, MiniTool Screen Recorder will record the system audio. You can click on the Specker icon to turn off the recording system audio. Also, you can click on the Microphone icon to record the audio from a microphone.
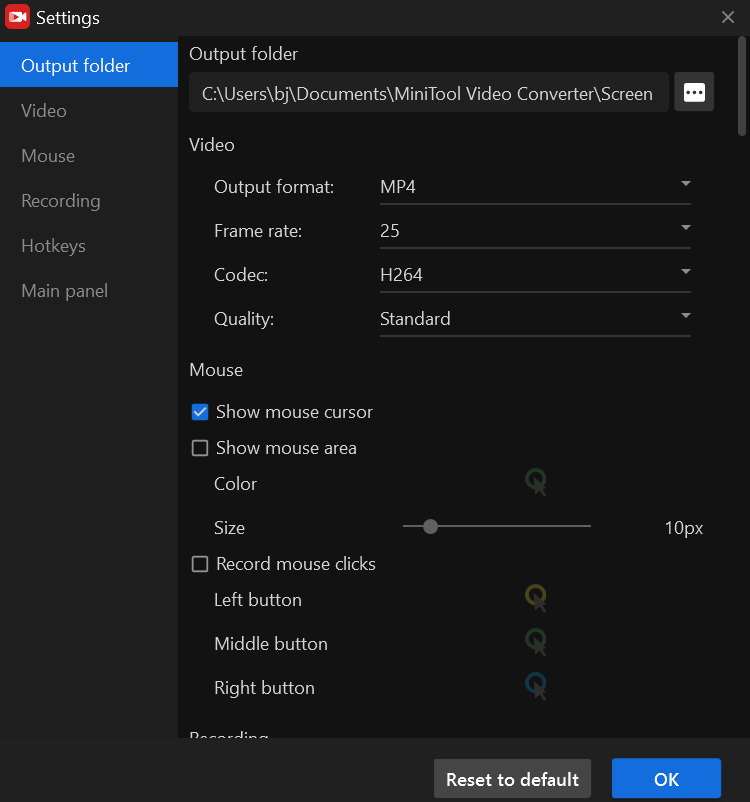
Step 5. Click the Settings icon at the higher-right corner. On this page, you can choose the recording format, quality, frame rate as well as codec, set it to record the mouse cursor, customize the recording hotkeys, and other parameters. Then don’t forget to click OK to save the changes.
Step 6. To start recording, you can click the red Record button or press the F6 key on the keyboard. Then there will appear a 3-second countdown.
Step 7. Finally, you can press F6 again to end the recording. Later, you can right-click on the recording to preview, delete, rename, or locate it.
#Xbox Game Bar
Xbox Game Bar is one of the built-in screen recording tools for Windows 10/11. With it, you can easily record screens and take screenshots on Surface Pro. One thing you need to pay attention to is that Xbox Game Bar only allows you to record the full screen and is not available to the Windows desktop and File Explore. Here’s a tutorial on how to screen record on Surface Pro with Xbox Game Bar.
Step 1. Press Win + G to launch Xbox Game Bar
Step 2. Select the Capture option and click the Start recording icon to start recording on Surface Pro.

Step 3. If you intend to end the recording, you can click Stop recording to stop the recording.
In addition to using Xbox Game Bar, you can also use other built-in screen recording tools to screen record on Surface Pro. For more details, you can read this post: How To Record Your Screen On Windows 11: Ultimate User Guide.
How to Screenshot on Surface Pro
Sometimes, you need to take a screenshot on Surface Pro. Do you know there are how many ways to take screenshots on Surface Pro? In this part, we will show you how to take a screenshot with or without a keyboard. Now, let’s check them one by one.
#Using Buttons
Using physical buttons is the fastest way to take a screenshot on Surface Pro.
- Surface Pro 4 or newer: Press and hold the Power button and the Volume Up button simultaneously.
- Surface Pro 3 or older: Press and hold the Windows button and the Volume Down button at the same time.
- Surface Duo: Press and hold the Power button and the Volume Down button to take a screenshot.
Where to find the screenshots? Go to This PC, find Pictures, and you will find your screenshots in the Screenshots folder.
#Using the Keyboard
If your Surface Pro is equipped with a type cover or keyboard, you can use the shortcuts to take a screenshot. You can press PrtScn or Windows + PrtScn to capture the full screen. The difference between them is that the screen will dim briefly when you take a screenshot by pressing Windows + PrtScn.
What can you do if you want to capture an active window? You just need to press Alt + PrtScn at the same time.
#Using the Surface Pen
With a Surface Pro, you can take screenshots on Surface Pro without a keyboard. When you want to screenshot the whole screen, you can press the top button of the Surface Pen twice and then the Surface Pro automatically takes a screenshot and saves it. If you want to capture a selected area, you should drag the Pen tip from one corner to its opposite corner to select the capture area. Then the selected capture area will appear on a new page in OneNote after you lift the Pen tip.
To Wrap Things Up
How to screen record on Surface Pro? You can use the built-in screen recording tools of Windows or some third-party screen recorder. Also, this post shows you ways to take a screenshot on Surface Pro. Hope this post is helpful to you!
About The Author

Position: Columnist
Olivia is always full of enthusiasm for life and loves to record. She often records beautiful and memorable moments of life with her camera and then uses some editing tools to put the photos, videos and audio together. She also has a passion for writing and offers suggestions to readers on images, audio, videos and news. To provide more professional articles and solve problems for readers, she is continuing to learn multimedia as well.
User Comments :