Like users of any other system, Windows 11 users may need to capture the computer screen sometimes. What should they do? Microsoft offers some options for its users to record the screen on Windows 11. Besides, there are a lot of third-party tools provided for users to record video in Windows 11– with or without audio.
Microsoft released Windows 11, its latest version of the operating system, a few months ago. Since then, you can easily find different types of topics related to Windows 11 on the internet:
- Why does Windows 11 require TPM 2.0?
- How to fix right click not working on Windows 11/10?
- How to use Windows 11 Task View?
- Etc.
Default Options to Screen Record Windows 11
Today’s topic is how to screen record on Windows 11. Whenever users need to record the information they need or keep a record of the operations to perform a task, they should capture the screen. But the question now is how to record in Windows 11.
Taking users’ needs for Windows 11 screen capture into account, Microsoft offers some features & apps to help them record screen on Windows easily. Let’s take a look at them one by one.
You may be wondering what a Windows.old folder is and whether it’s safe to delete this folder especially when your PC is going to run out of disk space. Yes, you can delete the Windows.old folder to release several gigabytes of free space. But if you have deleted important data by mistake or run into other computer problems, please visit the home page and select a tool suitable for your case.
Option 1: Print Screen Key
Pressing the print screen key is always an easy way to take a screenshot of a Windows computer screen. Well, the name of this key may be slightly different: PrtSC, PrtScn, etc., so you need to locate it first on your keyboard.
How to screenshot on Windows 11:
- Please open the window or display the information you want to record on the Windows 11 screen.
- Press the print screen key to capture screen Windows 11 directly. This will copy the full desktop image to your clipboard.
- Open a program or app that allows you to add an image.
- Press Ctrl + V to paste the screenshot or right click on the blank area and select Paste.
What is the Windows 11 screen record shortcut? You can use the following shortcuts to record screen Windows with ease.
- Windows + Print Screen
- Alt + Print Screen
- Fn + Print Screen
- Fn + Windows + Print Screen
- Fn + Alt + Print Screen
What’s the default Windows 11 screenshot location? It’s C:\Users\username\Pictures\Screenshots; you can open File Explorer in Windows 11 and navigate to this path manually to view the screenshots anytime you want.
Option 2: Xbox Game Bar
Xbox Game Bar is a utility feature that is built into Windows 11 (and Windows 10). Microsoft added this feature to help users record and share clips of video games like they can in the original Xbox devices. But the Xbox Game Bar is not only useful for recording games; it can also be used to record other apps on Windows 11.
How to Enable Xbox Game Bar Windows 11
- Click the Windows icon on the taskbar or press the Windows key on your keyboard.
- Select Settings from the Start Menu. (How to fix Windows 11 Start menu not working problem?)
- Choose Gaming from the panel on your left hand.
- Find the Xbox Game Bar option in the right panel. Then, click on it to access related settings.
- Navigate to the Open Xbox Game Bar using this button on a controller Then, flip the switch to On.
- Restart your Windows 11 computer to make changes take effect.
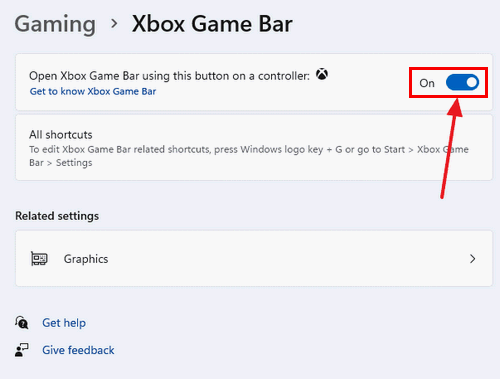
How to set up the capture options in Xbox Game Bar?
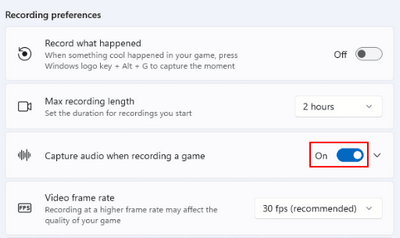
You can open Settings -> select Gaming from the left panel -> click Captures from the right panel -> modify the Captures location and Recording preferences according to actual needs.
How To Fix When Your Windows 11 Settings App Is Not Working?
How to Open & Use Xbox Game Bar Windows 11
How to open Xbox Game Bar:
- You can open Xbox Game Bar in Windows 11 by pressing Windows + S -> typing Xbox Game Bar -> clicking Open (or pressing Enter if it’s under the Best match).
- Well, an easier way to open Xbox Game Bar is by pressing Windows + G. This is the default shortcut for opening Xbox Game Bar on both Windows 11 and Windows 10 devices.
Then, the overlay consisting of many widgets (each has its functions) will appear on your PC screen.
How to record in Windows 11:
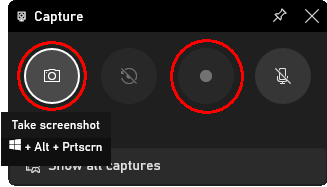
- Find the Capture widget on your screen.
- Display the window or information you want to record.
- Click on the first button to Take screenshot.
Where are my game clips and screenshots saved?
The default screenshots location is C:\Users\username\Videos\Captures. You can also check it manually by:
- Click Start on the taskbar.
- Select Settings.
- Choose Gaming.
- Click Captures.
- The storage path will be displayed under Screenshots and game clips will save to.
- You can also click on the Open folder button to view your screenshots directly.
What about the Windows 11 record screen video?
You can also record a video using the Xbox Game Bar.
- Find the Capture widget on your screen.
- Display the window or information you want to record.
- Click on the third button to Start recording your screen.
- The Capture Status widget will appear.
- Click on the blue circle button whenever you want to end the recording process.
- You’ll see a notification message “Game clip recorded”; it means your video is saved to the default directory mentioned above.
How to record screen Windows 11 with audio?
Please go to Settings -> Gaming -> Captures and turn On the “Capture audio when recording a game” option before starting recording.
Common shortcuts for using Xbox Game Bar:
- Open Xbox Game Bar: Windows + G.
- Take a screenshot: Windows + Alt + Print Screen.
- Record configuration: Windows + Alt + G.
- Start/stop recording: Windows + Alt + R.
- Microphone on or off: Windows + Alt + M.
- Start/pause broadcast: Windows + Alt + B.
- Show camera in broadcast: Windows + Alt + W.
How to disable Windows 10 Xbox Game Bar?
Windows 11 Game Bar Not Working
Some users said they find their Windows 11 game bar not working. What happened? How to fix this problem?
Possible reasons for Xbox Game Bar not working on Windows 11:
- Game Bar is not enabled on your device: you can go to check it via Windows Settings.
- Xbox Game Bar is disabled in Registry Editor: please locate and change the Registry value to enable the game bar.
- Xbox Game Bar is disabled via Local Group Policy Editor: the Xbox Game Bar functionality is forced to be disabled by a Local Group Policy on a device running Windows 11 Pro or belonging to an organization. You can change the settings to re-enable Xbox Game Bar as long as you have permissions.
- Xbox Game Bar component is damaged or corrupted: you should repair or reset the entire Xbox Game Bar component to try to fix the issue.
- The IeFrame DLL (Dynamic Link Library) is not available: please perform an SFC (System File Checker) scan to repair or replace the problematic ieframe.dll.
- Windows update problem (Windows 11 KB5004300 update): the partially incompatible update of the Xbox Game Bar is causing the issue. You should roll back your system or perform a clean install of a Windows version that is proven to support the game bar.
How To Fix Windows Cannot Find gpedit.msc Error?
Useful fixes for Xbox Game Bar not working:
- Enable the Xbox Game Bar via settings, Registry Editor, or Local Group Policy Editor.
- Repair or reset your entire Xbox Game Bar component.
- Repair or replace the failed ieframe.dll file.
- Uninstall/roll back the recent Windows update or perform a clean install of another Windows system.
Option 3: Windows 11 Snip and Sketch
Windows 11 Snip and Sketch is a default screenshot app everyone can use easily. You can open the Snip & Sketch app and use it to capture your screen with ease.
How to open Snip & Sketch Windows 11 (the normal way):
- Press Windows + S on the keyboard or click the Search icon on the taskbar.
- Type Snip & Sketch into the textbox.
- Press Enter if the app appears under Best match. You can also click Open under the app on the right side of the search window.
Snip & Sketch shortcut:
Well, the most direct way to open the Snip & Sketch app is using the Windows 11 screen recorder shortcut: Windows + Shift + S. Please locate these keys on your keyboard and press them at the same time.
Besides, you can activate the Print Screen key to open Snip & Sketch in Windows 11 if you want.
- Press Windows + I to open Settings.
- Select Accessibility from the left pane.
- Click Keyboard in the right pane.
- Look for the Use the Print screen button to open screen snipping option.
- Flip the switch to On (from Off).
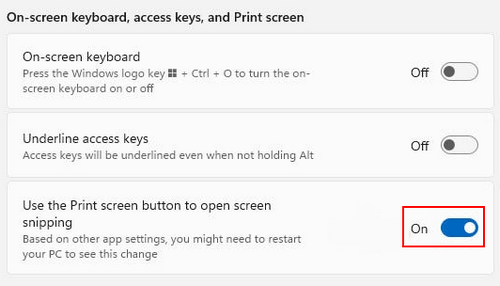
How to screen capture in Windows 11 using this tool:
- The Snip & Sketch window provides you with four snip modes: Rectangular Snip, Freeform Snip, Window Snip, and Fullscreen Snip.
- Please select a snip mode and specify the area you want to take a screenshot.
- Edit the screenshot in Snip & Sketch if you want.
- Click on the Save as icon in the top right corner or press Ctrl + S to save the screenshot.
Option 4: Windows 11 Snipping Tool
Snipping Tool is a more advanced free screen recorder built into Windows 11. Microsoft combined the Snipping Tool and the Snip & Sketch tool in Windows 11 and kept Snipping Tool as the name of the new Windows 11 screen-shooter.
How to open the Windows 11 Snipping Tool?
The most direct way to open it is to press Windows + Shift + S. Of course, you can search for Snipping Tool & access it or open it from apps.
How to record screen on Windows using Snipping Tool?
- Click on the New button to start the screenshot immediately.
- Also, you can click on the arrow key to select a snip mode or delay the snip in a few seconds before that.
- Then, you need to select the area that you want to record.
- Edit your screenshot according to needs.
- Save the screenshot to a safe place.
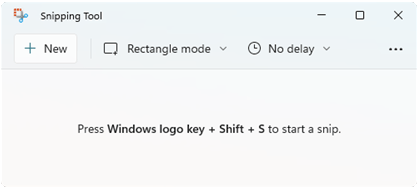
In addition to the above methods and tools provided by Microsoft, you can also use other ways to screen record in Windows 11 and there are many other choices of screen recorder Windows.
Use Third-party Windows 11 Screen Recorder
If you find the Windows 11 screenshot not working or you want to find a better way for recording the screen on Windows 11, you may turn to a third-party Windows 11 screen recorder.
Best Screen Recorder for Windows 11
What’s the best screen recorder for Windows 11? Different users’ answers to this question are different since their demands and requirements are usually not the same. Well, according to users’ feedback, MiniTool Video Converter can be used as a wonderful free screen recorder Windows 11. You can click on the button below to download this recorder directly; then, double click on the setup file and follow the on-screen instructions to install it on your PC.
MiniTool Video ConverterClick to Download100%Clean & Safe
How to screen record on Windows by using MiniTool Video Converter:
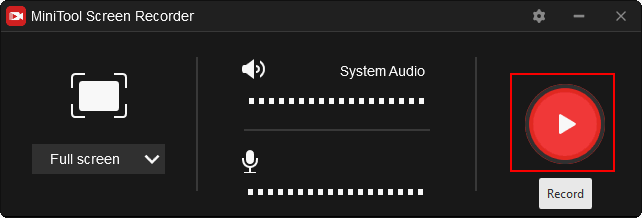
- Launch MiniTool Video Converter and select the Screen Record tab at the top.
- Locate the Click to record screen area in the middle and click on it.
- The MiniTool Screen Recorder panel will appear.
- Please choose from Full screen and Select region.
- How to record screen on Windows 11 with audio? Please click to enable the System Audio.
- Now, click on the Record button to start recording what you want.
- The recording will be started in 3 seconds automatically and it tells you to Press F6 to stop recording.
- Right click on the video you get and choose to Preview, Delete, Rename, or Open folder.
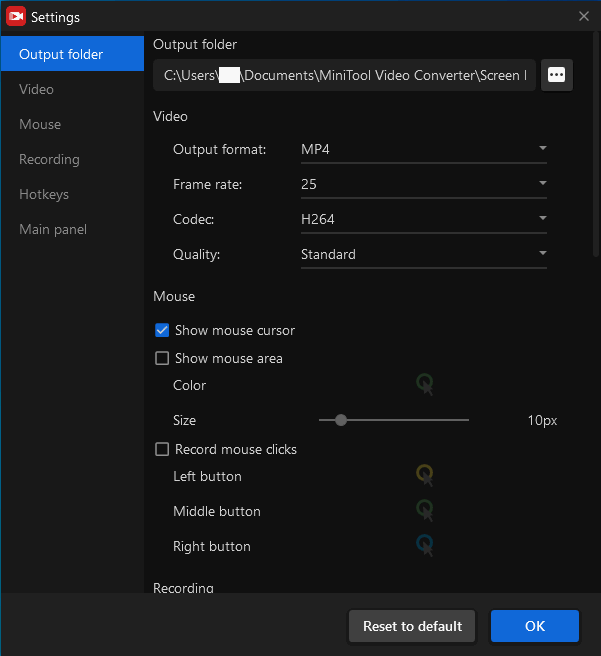
You can click on the Settings icon in the top right corner of the MiniTool Screen Recorder to customize your recording: change the output folder, change the output format, choose to display mouse cursor or not, etc.
Use Apps or Browsers
Some programs (for instance, Microsoft Word) and browsers (for instance, Google Chrome and Mozilla Firefox) are containing a feature to help you capture your device screen.
- You should install the program or browser with a screenshot feature.
- Open a certain program/browser.
- Activate the built-in screenshot feature to capture your screen.
Conclusion
Windows 11 is the latest operating system of Microsoft; it provides you with many snip-in options to record the screen. Besides, there are many third-party screen recorders & tools that can be used to take screenshots and record videos on Windows 11. This page shows you how to screenshot on Windows 11 with the default options, third-party screen recorder, and the apps/browsers with screenshot feature.


![How to Record Video on PC Windows 10 [Solved]](https://images.minitool.com/videoconvert.minitool.com/images/uploads/2020/11/capture-record-videos-windows-10-thumbnail.png)
User Comments :