Figma is a collaborative interface design tool that is available on Windows, macOS, Android, and iOS operating systems. Some of you, like designers, product managers, or developers, are familiar with Figma. You usually use its vector graphics editor and prototyping tools for UI and UX design. It is important to know how a user may interact with your designs. With the prototyping feature of Figma, you can explore that.
Sometimes, you may need to record a Figma prototype as a video or GIF. To share your prototype with your clients, stakeholders, or team members conveniently, videos and GIFs are easy to share via social media or email. What’s more, you can get feedback from others quickly and effectively by sharing a recorded prototype. Additionally, recording a prototype to a video or GIF gives a clear and visual representation of the user flow and interactions, which helps your clients or stakeholders have a thorough understanding of the prototype’s functionality. How to record a Figma prototype? Just follow me to explore the effective methods!
Recommended Way to Record Figma Prototype
How to choose a proper screen recording tool to capture your Figma prototype? From my perspective, I’d like to choose a free screen recorder that can capture high-quality videos as well as not add a watermark to my recording. After using various screen recorders and MiniTool Video Converter for a long time, MiniTool Video Converter is a can’t-miss screen recorder for Windows users.
Why Choose MiniTool Video Converter?
Whether for Figma prototype representation or sharing, a comfortable viewing experience mainly depends on high-quality screen recording.
MiniTool Video Converter is a high-quality screen recorder, enabling you to capture the 4K screen at standard, high, or even original quality and then save the recording in the MP4 format. You can easily watch and share the MP4 recording. Furthermore, it allows you to make screen recordings not only at 50 FPS, 30 FPS, and 25 FPS but also at lower frame rates such as 20 FPS and 15 FPS.
MiniTool Video Converter enables you to record the whole screen to capture anything happening on the screen. Also, you can customize the recording area to record a specific area or a program window. It aids you in recording the screen with the system audio. In addition, its feature for microphone audio recording helps you to create explanatory or training videos. You can use it to record your Figma prototype with your narration.
MiniTool Video ConverterClick to Download100%Clean & Safe
Explore Other Features of MiniTool Video Converter:
- Support converting audio and video files in a wide range of formats.
- Work as an audio extractor to extract audio from video.
- Give support to convert videos for devices, including iPad, iPhone, Huawei, Samsung, and Android devices.
- Enable you to directly convert videos for YouTube, Facebook, Vimeo, and Instagram.
- Offer customizable format parameter options, such as encoder, resolution, frame rate, sample rate, etc.
- Serve as a video downloader to get videos and playlists from YouTube.
- …
How to Record a Figma Prototype with MiniTool Video Converter
You can follow the below tutorial on how to record prototype in Figma using MiniTool Video Converter.
Stage 1. Open Your Figma Prototype
Before starting recording, you need to make sure your prototype is perfect, including its dimensions, color, text spelling, and others. Next, open the prototype.
Stage 2. Run MiniTool Video Converter
1. Once you have downloaded and installed MiniTool Video Converter, you can directly launch it. If you haven’t, simply hit the button below to download its installation package and then follow the on-screen instructions to install it on your PC.
MiniTool Video ConverterClick to Download100%Clean & Safe
2. After running it, you will be guided to the Video Convert module. You need to switch to the Screen Record module and hit the Click to record screen area to access the MiniTool Screen Recorder panel.

Stage 3. Personalize Recording Settings to Capture Figma Prototype
On the MiniTool Screen Recorder panel, you adjust the following settings.
1. Customize the recording area. By default, it captures the entire screen including the bottom taskbar. If you want to precisely record the area where the Figma prototype is located, you need to customize the recording area. Click the inverted arrow next to Full screen to choose the Select region option and then click and drag the mouse cursor to choose the recording region. Then you can see the red dotted area is the target recording region.

2. Set recording audio sources. If you want to add commentary or other narration, you can choose to record your Figma prototype with audio from the microphone. Also, you can choose to record with both system and microphone sounds or not. Just click the speaker and microphone icons to turn the system audio and microphone sound on or off.

3. Adjust other settings. Optionally, you can hit the gear icon at the top right to open the recording Settings window. On this window, you can customize the recording saving path, quality, frame rate, recording duration, and others. If you have made some changes, don’t forget to click the OK button to confirm the changes.

Stage 4. Start Recording Figma Prototype
Once everything is ready, you can click the red Record icon to start recording and return to the Figma prototype page within the 3-second countdown. Alternatively, you can go back to the Figma prototype page first and press the default F6 hotkey to begin the recording. If you encounter any interruptions, you can press F9 to pause and resume the recording process.
Stage 5. Finish the Recording Process
When you’re done showing your Figma prototype, you can press the F6 key again to end the recording. Then the MiniTool Screen Recorder panel will pop up, and you can see the recording under the panel. You can right-click on the recorded video to preview, delete, rename, or locate it
How to Convert a Figma Prototype Recording into a GIF
Is there a way to convert the Figma prototype recording into a GIF? Of course! MiniTool MovieMaker is a feature-rich video editor without watermark that can not only create videos from images but also turn videos into GIFs. You can use it to convert a Figma prototype recording into a GIF. What’s more, this multitrack video editor has many editing features to improve your video quality and inspire your unlimited creativity. You can refer to the below steps to convert your Figma prototype recording into a GIF with MiniTool MovieMaker.
MiniTool MovieMakerClick to Download100%Clean & Safe
Step 1. Hit the button above to obtain and install this excellent program on your PC. Next, launch it and close the promotion window to enter its main editing interface.
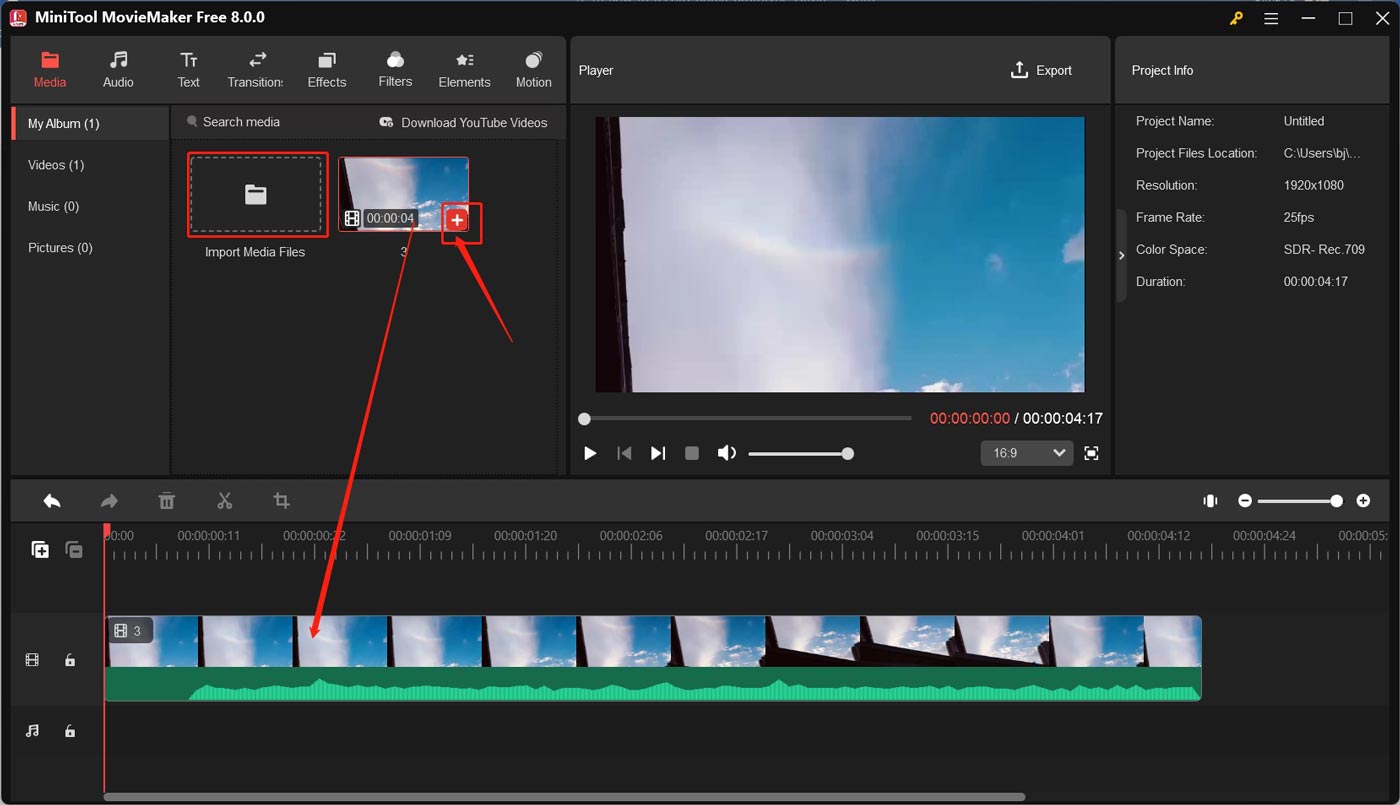
Step 2. Click the Import Media Files option to upload the Figma prototype recording and then click the plus icon on the recording to add it to the timeline.

Step 3. Optionally, you can edit the recording according to your preference. For instance, you can trim the beginning and end of the video, add captions to the video, or make other edits.
Step 4. Click the Export option in the Player section to access the Export window. Expand the Format list and choose the GIF option as the export format. At last, click the Export button to convert the Figma prototype recording into a GIF. After the conversion process is complete, you can click the Find Target button to locate the GIF file.

How to Record Figma Prototype on Mac
For Mac users, what is the best way to record Figma prototypes? QuickTime Player is worth a try. It is a built-in program for Mac, and its main role is to act as a multimedia player, supporting the playback of a variety of video and audio formats, including MOV, MP4, M4V, MP3, and so on. Moreover, it has a recording feature to capture the screen, movies, and audio. It enables you to record the full screen and a selected region, making it a good tool to create tutorials and capture games.
Besides, QuickTime Player provides you with some basic editing features that enable you to trim, split, rearrange, combine, rotate, and flip videos as well as add annotations. How to record a Figma prototype with QuickTime Player on Mac? Below are detailed steps:
Step 1. Run QuickTime Player on your Mac computer to get to its main interface. Next, open the Figma prototype you want to record.
Step 2. Click the File option in the top menu bar, select the New Screen Recording option, and then the Screen Recording panel will appear.
Step 3. You can hit the inverted arrow next to the Record icon to set the microphone audio to record or decide whether to show mouse clicks in the recording.
Step 4. If you want to record your Figma prototype in full-screen mode, you can click the Record icon and then click anywhere on the screen to start recording. If you want to record a specific area, simply click and drag the cursor to choose the recording region after clicking the Record icon. Then click Start Recording.
Step 5. To finish the recording process, you can click the Stop icon in the menu bar or press shortcut keys (Command + Control + Esc). Then the recorded video will be opened automatically. You can make some basic edits like trimming and rotating. Finally, you can click the File option, select the Save option, and choose a folder to save the recorded video.
How to Record Figma Prototype with Chrome Extensions
Alternatively, you can capture your Figma prototype using Chrome extensions if you don’t want to download software. The prominent advantages of using Chrome extensions are various. For example, the recordings will be stored in cloud storage space services, and most recording extensions make it easy to share recordings via links or social media. Among various screen recorder extensions,
Loom is worth a try. If you prepare to record your prototype in the web version of Figma, it is an easy way to use Loom. You can directly access it from the Chrome toolbar and set up the recording settings quickly. What’s more, Loom also has the online version, desktop versions for Windows, Mac, and Linux, as well as the mobile version for iOS and Android. However, its free version has limited features, such as limited recording duration, limited export options, and others. If you don’t mind its disadvantages, you can follow the below instructions and have a try.
Step 1. Open the Chrome Web Store to find Loom and hit Add to Chrome. Then sign in to your account.
Step 2. Go to Figma and open the prototype you want to record. Click the Loom icon on the top right to activate the Loom extension.
Step 3. On the top-right panel, you can set the camera and microphone you want to record. Next, click the Start Recording button.
Step 4. A new window will appear to ask you to choose the recording content. If you open your Figma prototype on its web version, you need to click the Chrome Tab option and choose the Figma tab. If you access the prototype on the Figma desktop app, choose Window and select the Figma window. Later, click the Share button.

Step 5. When you want to complete the recording, click the Finish icon. Then you can download the video to your computer or get a shareable link of the recording.
If you want to convert prototype recordings into GIFs or refine recordings, MiniTool MovieMaker is an exceptional tool that can complete these tasks well.
MiniTool MovieMakerClick to Download100%Clean & Safe
Other Useful Tools to Record Figma Prototypes
In addition to the above screen recording tools, I also rounded up several screen recorders for you to choose from. OBS Studio, Bandicam, ShareX, and LICEcap are good choices. Among them, LICEcap is the special one that can directly record Figma prototype as GIF.
Final Words
How to record Figma prototype as a video or GIF? You can use MiniTool Video Converter or Loom to record your prototype as a video. If you need a GIF, MiniTool MovieMaker can help you convert videos into GIFs. Also, you can try other screen recorders mentioned in this article. Finally, when you are using MiniTool Video Converter and MiniTool MovieMaker, feel free to share your questions and feedback with me on Twitter or contact us at [email protected].


User Comments :