HDMI, which stands for High-Definition Multimedia Interface, is a proprietary video and audio interface for transferring uncompressed video data together with uncompressed or compressed audio data from an HDMI-compliant source device.
Therefore, an HDMI to MP4 recorder refers to a recording device or software that can capture the media data transferred through the HDMI interface and save the recorded video in MP4 file format.
What Are the HDMI to MP4 Recorders?
Just as mentioned above, an HDMI to MP4 recorder can be a hardware device or software program.
Popular HDMI to MP4 Recorder Devices
There are so many HDMI MP4 recording devices in the market. For example, on Amazon, you can find the following:
- Box Pro, 1080p@60fps Video Recorder, DVR with HDMI Capture, Playback on TV
- UHD Pro, 4K Video Recorder, HDMI Capture DVR with H.265/H.264 Codec, Cinematic 4K@24fps
- Capture Card, Audio Video Capture Card with Microphone 4K HDMI Loop-Out, 1080p 60fps Video Recorder for Gaming/Live Streaming/Video Conference, Works for Nintendo Switch/PS4/OBS/Camera/PC
- AVerMedia EZRecorder 330G – 4K Pass-Through and 1080p60 Video Recording, DVR with HDMI Capture
- Rybozen 4K Audio Video Capture Card, USB 3.0 HDMI Video Capture Device, Full HD 1080P for Game Recording, Live Streaming Broadcasting
Excellent HDMI to MP4 Recorder Software
As for software applications, there are still many options like Bandicam, VSDC Screen Capture, and MiniTool Video Converter. They all can help you directly or indirectly record digital media data in MP4.
How to Record HDMI Video Data in MP4?
Next, we will elaborate on the ways to capture video content transmitted through the HDMI interface and export the video in MP4 format.
Solution 1. HDMI to MP4 Recording with MiniTool Video Converter
How to record video data on other devices like gameplay on game consoles and TV shows on televisions? All you need is an HDMI cable, a video capture device, and a free screen recorder such as MiniTool Video Converter.
Recommended capture card:
- Elgato Cam Link 4K, External Camera Capture Card
- AXHDCAP 4K HDMI Video Capture Card
- Guermok Audio/Video Capture Card
- Rybozen 4K Audio Video Capture Card
- Kondor Blue HDMI to USB-C Capture Card
Step 1. Download and install MiniTool Video Converter
In the first place, prepare your HDMI to MP4 recorder by downloading and installing it on your target computer.
MiniTool Video ConverterClick to Download100%Clean & Safe
Step 2. Transfer Video Source to PC
Secondly, you need to connect the device which contains the video source to your computer. Plug one side of the HDMI cable into the video output port of the source device. Then, insert the other side of the HDMI into the video input port of the capture card. Next, connect the capture card to the PC.
Step 3. Launch MiniTool Video Converter and Start Recording
1. Open MiniTool Video Converter and navigate to the Screen Record tab.
2. Select Click to record screen.
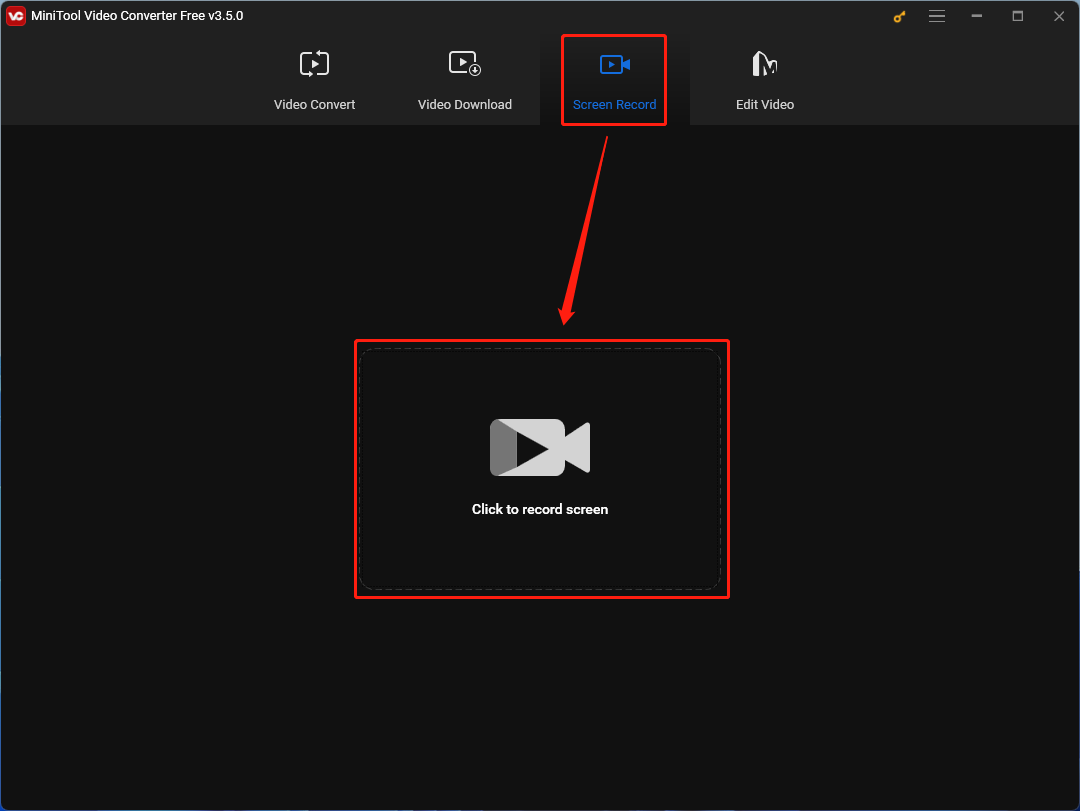
3. In the next window named MiniTool Screen Recorder, you can customize your recording area and audio recording. You are recommended to record in full screen with both system audio and microphone on.
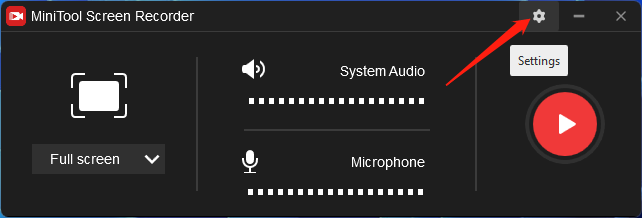
4. If you have more advanced requirements for the recording, just click the Settings icon (gear) in the upper right.
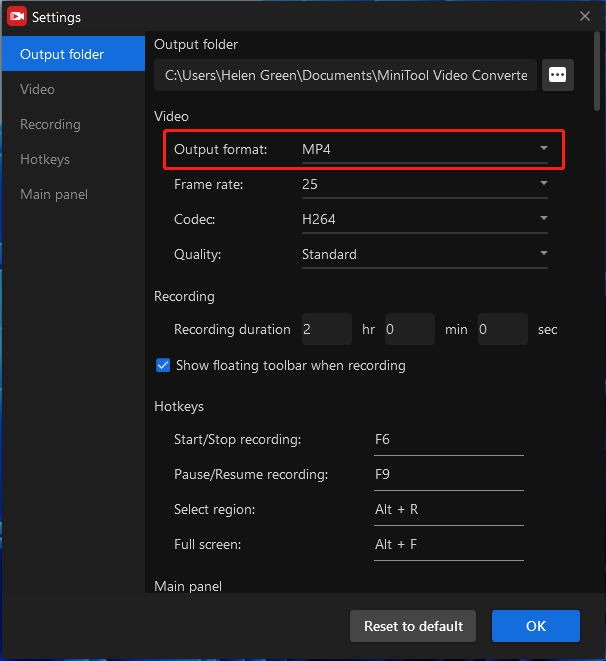
5. In the next window, you can find the default export video format is MP4. That is exactly what you want! Besides, you can do other settings including output location, video frame rate, video quality, recording duration, as well as recording hotkeys. If you don’t have time to wait in front of the PC for a long recording, you can rely on the recording duration feature.
6. When you have configured everything. Click the big red Record button on MiniTool Screen Recorder screen to start recording.
7. Press F6 on your keyboard to stop recording. If you have set up recording duration, it will automatically stop recording when it reaches the period.
When you get your HDMI to MP4 video, it isn’t the end. You may need to edit it to make it better. Especially for a video from a preset-duration recording, you need to cut off the unwanted start part. Therefore, you need professional video editing software like MiniTool MovieMaker, which can easily remove the extra parts by splitting and trimming.
MiniTool MovieMakerClick to Download100%Clean & Safe
Solution 2. HDMI to MP4 Recording by Bandicam
Bandicam supports most video capture cards that are compatible with Windows, which makes it possible for you to record external video data from iPhone, iPad, Apple TV, CCTV, IPTV, Xbox, PlayStation, etc. on your PC.
If you are going to capture a webcam, there is no need for a capture card. Yet, if the target recording source is an external HDMI device, a capture card and recorder software is necessary.
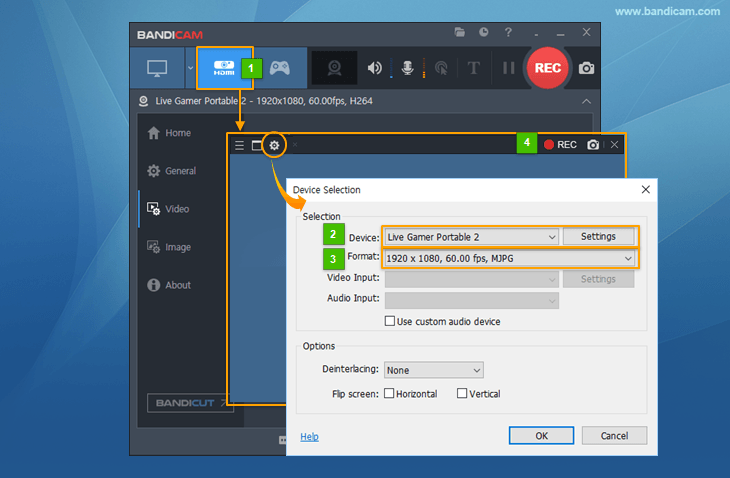
Step 1. Download, install, and open Bandicam on your computer.
Step 2. Select HDMI from the top left.
Step 3. In the new window, click the settings icon (gear).
Step 4. In the Device Selection popup, set up the device you want to record. Also, you can specify the output video format: resolution, frame rate, video size, and color space.
Step 5. Click the REC option on the device screen to start recording. If you can’t see the device screen, try to install a device driver and choose a different video size.
Step 6. Stop recording when finishes.
To Wrap Things Up
It may sound complex and difficult to record a video from an HDMI connection. After reading the above content, you can find out that the process is still easy with an HDMI to MP4 recorder such as MiniTool Video Converter. Vice versa, recording a video from MP4 to HDMI is also simple.
If you have any doubts about MiniTool Video Converter, feel free to contact its support service via [email protected]. You will get answered ASAP!


![How to Fix Bandicam Audio Not Recording Issue [Ultimate Guide]](https://images.minitool.com/videoconvert.minitool.com/images/uploads/2023/05/bandicam-audio-not-recording-thumbnail.jpg)
User Comments :