DISH Network Overview
DISH Network, also called DISH, is an American provider of satellite television and IPTV services. With its subscription, you can access various TV channels via a variety of TV packages. Also, it offers a line of DVR set-top boxes called Hopper, which enables you to access millions of on-demand TV shows and movies. Meanwhile, DISH Hopper allows you to record TV shows.
In addition to TV packages and Hopper, DISH Network provides you with the DISH Anywhere application to enjoy on-demand video content and live TV on your computer and smartphone. Please pay attention! DishTV is not provided by DISH Network, which is a satellite television service in India.
How to Record on DISH Network in 3 Ways
In this part, I will show you how to record on DISH Network via the DISH remote, the DISH Hopper, and the DISH Anywhere application. Just follow me to check the three ways one by one.
Way 1. Record on DISH Network Using the DISH Remote
First, let’s explore how to record on DISH Network via the DISH remote.
Step 1. Find the program you want to record through Guide or Search.
Step 2. Locate and highlight the program you want to capture.
Step 3. Select the record option. You can also select the preferred timing settings if available. Then the recording successfully set message will pop up.
Way 2. Record on DISH Network Using the DISH Hopper
DISH Hopper is a useful DVR that enables you to record and play back movies, sports, and other TV shows. How to record on DISH Hopper? Below are detailed steps:
Step 1. Press the Guide button on the remote control to access the program guide.
Step 2. Find the program you want to capture and highlight it.
Step 3. Press the Record button on the remote control to open the recording options for that program.
Step 4. Adjust the recording options, like recording frequency as well as the start and end time. Next, press the Record button again to set the program to record.
Way 3. Record on DISH Network Using the DISH Anywhere Application
DISH Anywhere offers a built-in recording feature to record shows. In addition to using the built-in recording feature of DISH Anywhere, you can also try other third-party screen recorders.
Option 1. Using the built-in recording feature
Step 1. Open the DISH Anywhere application and log in to your account. Then you can use the Guide, Search, or Sports to find the show you want to record.
Step 2. Tap on the Record option. You can choose from New Episodes and All Episodes if available. Then a confirmation of your timer will appear.
Option 2. Using third-party screen recorders
There are many screen recording applications that can help you record activities happening on DISH Anywhere. For phone users, you can try DU Recorder, XRecorder, or AZ Screen Recorder. If you access DISH Anywhere on your computer, MiniTool Video Converter, Bandicam, Camtasia, and QuickTime Player are worth trying.
Here, I just take MiniTool Video Converter as an example. It is a completely free screen recorder that can record any activities happening on the screen, such as live streaming videos, online lectures, video games, and more. You can refer to the tutorial below to record DISH Network with MiniTool Video Converter.
Step 1. Download, install, and launch MiniTool Video Converter.
MiniTool Video ConverterClick to Download100%Clean & Safe
Step 2. Visit the official website of DISH Anywhere (dishanywhere.com) and then sign in with your mydish.com username and password. Locate and open the show you want to capture.
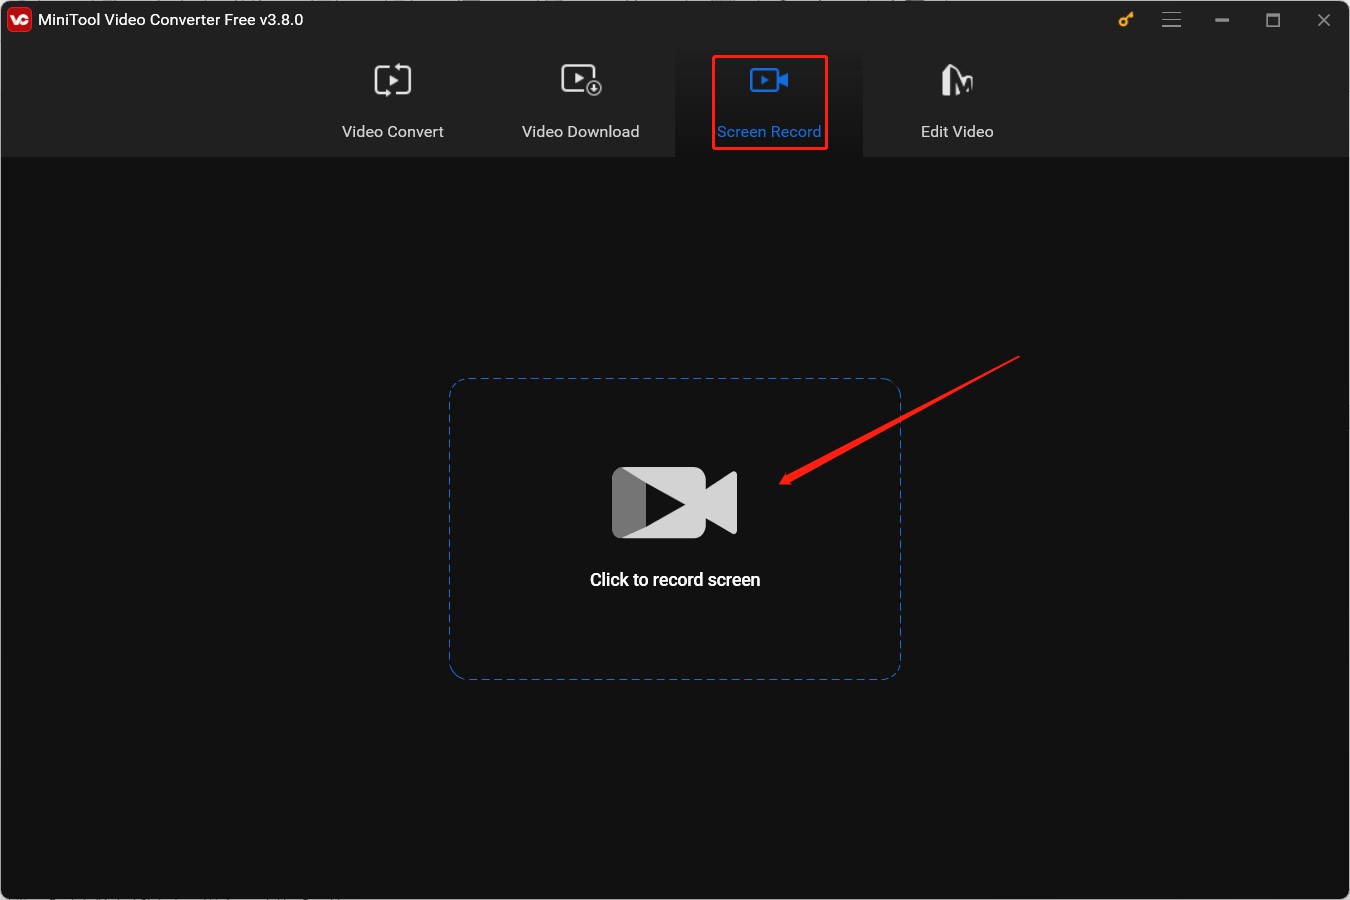
Step 3. Return to MiniTool Video Converter. Switch to the Screen Record module from the top menu and hit the Click to record screen area to access MiniTool Screen Recorder.

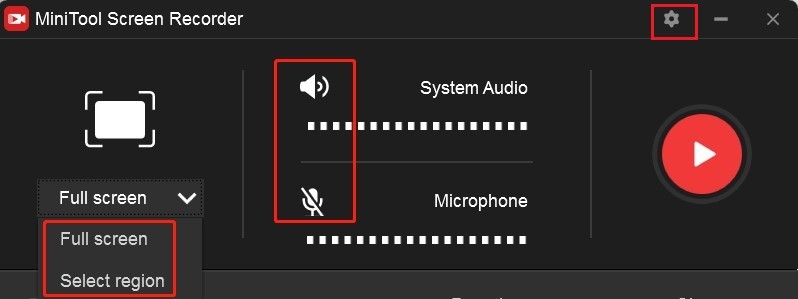
Step 4. Customize the recording area and audio source on this panel. You can choose to record the whole screen or a selected region with the audio from the system and microphone simultaneously or separately. Furthermore, you can click the Settings icon at the top right to adjust other recording settings.

Step 5. Click the Record button or press the default F6 key to start the recording process. You can pause and resume the recording during the recording process by pressing F9. When you want to end the recording, simply press F6 again.
Conclusion
In the content above, I have displayed what DISH Network is. Meanwhile, the tutorial on how to record on DISH Network is also covered. You can follow the above guidance and have a try.


User Comments :