This article from MiniTool recommends five H264 digital video recorder apps and describes how to convert a video format to the H264 encoder. If you're trying to capture a video from a screen or webcam on Windows, here you can find an appropriate video screen recorder for use.
What Is H264 Digital Video Recorder?
H264 is a high-performance video encoding and decoding technology. In recent years, H264, commonly referred to as MPEG-4 Part 10/AVC for advanced video coding, is predicted to replace other video standards as a recommended option.
After MPEG4, the International Organization for Standardization (ISO) and the International Telecommunication Union (ITU) jointly suggested that H264 is regarded as a new digital video compression format. H264 digital video recorder is becoming more and more popular in the market for encoding technology, notably for video surveillance systems due to its great coding efficiency. And, there is no gainsaying the fact that the same video uses less network bandwidth and storage space.
After making inquiries, it was found that H264 video which is in MP4 format is the default video setting for 95% of screen recording applications. H264 (MP4) video is the most frequently used video type for file documentation, uploading, saving, and broadcasting because of its slashing encoding technology and exquisite playback compatibility.
![What Is H264 & How to Play/Convert H264 Files [Solved]](https://images.minitool.com/videoconvert.minitool.com/images/uploads/2020/11/h264-thumbnail.png)
Advantages of H264 Digital Video Recorder
- Less need for video storage: When compared to the MPEG-2 compression standard, the H264 compression standard can more effectively reduce the storage of the video's original document size and the cost of data traffic.
- Premium images: The H264 video compression standard produces bright, clear,and high-quality pictures.
- Strong fault tolerance: The proper tools are given by H264 to resolve problems involving packet loss, which usually occur in unsteady network conditions.
- Large network adaptability: H264 features a network adaptation layer, making it simple to transmit H264 files on different networks (such as the Internet, CDMA, GPRS, WCDMA, etc.).
What Factors May Influence the H264 Screen Recording?
Encoding Approach
Generally speaking, there are two different types of forms: software encoding and hardware encoding. Software encoding, as the term suggests, is video processing that occurs in software by using an internal encoder such as H264. On the other hand, hardware encoding runs on a certified GPU, like one from Intel, AMD, or Nvidia.
What distinguishes them from one another? The first point, software-based encoding is substantially slower than hardware-based encoding. However, the machine must be at least a middle-end or high-end rig to make use of it. You may not be able to use your computer if it is outdated or even of very poor quality. The second point, although software encoding is less efficient than hardware encoding, it typically supports additional encoders and formats (not only the H264 MP4). Meanwhile, it produces higher-quality clips and has better stability, especially when it comes to computer software.
Screen Recording Format
Since there are several kinds of screen recording programs, including online (launcher), plug-in, and desktop versions, they must provide a wide range of configurations, functions, file storage and sharing methods. Only a user-friendly and intuitive video making tool will be the first choice for all video makers, especially beginners.
5 Best H264 Screen Recorder Software Options
H264 digital video recorder is unique for its efficiency and high quality. There are several H264 screen video recorder applications available that allow you to screen record H264 video on your PC in a quick-loading way.
MiniTool Video Converter
MiniTool Video Converter is a completely free video converter for Windows that supports a variety of formats, converts files quickly, and offers many output quality options. Additionally, it comes with the ability to download YouTube videos and record computer screens.
How does MiniTool Video Converter work? Read the detailed instructions below.
Download and Install
Step 1: Click on the Free Download button.
MiniTool Video ConverterClick to Download100%Clean & Safe
Step 2: Open the setup file and click Yes.
Step 3: When the pop-up window appears, please hit the Install Now button. If you would like to change the default installation path, click Custom Installation.

Step 4: Click on the Start Now button.
Then, you will enter the main interface of the free video converter. Four table options are displayed on the screen: Video Convert, Video Download, Screen Record and Edit Video.
Guide to Screen Record with MiniTool Video Converter
In this section, we mostly concentrate on using the Screen Record of MiniTool Video Converter.
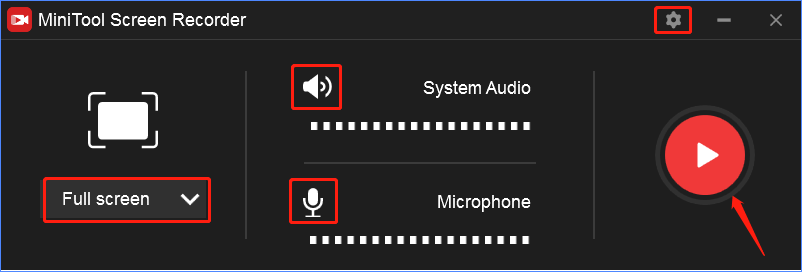
Step 1: Switch to the Screen Record.
Step 2: Click the Click to record screen button to open the MiniTool Screen Recorder window.
Step 3: Click the drop-down menu to choose Full screen or Select region.
Step 4: Click the System Audio icon to turn on or turn off the system sound.
Step 5: Click the Microphone icon to turn on or turn off the microphone sound.
Step 6: Click the Settings icon to enter the settings page.
Note: Here, you can change the default save path from the Output folder and adjust the video output format, video frame rate, video codec and video quality. Also, you can set up the display state of the mouse, recording duration and hotkeys, and minimize to system tray when recording. Please keep in mind to click OK to save your changes.
Step 7: Press the red Record button or F6 hotkey to start recording your screen.
Step 8: Press F9 to pause or resume the recording process.
Step 9: Press F6 again to stop recording.
Note: The recorded video file will be listed. You can right-click the file to preview, delete, rename the recording, or open its output folder. When you close the MiniTool Screen Recorder window, you will go back to the Screen Record interface, where you can also see the recorded file.
Loom
The screen recorder Loom is available for free on Mac, Windows, Chrome, iOS, and Android. It's simple to set up, simple to use, and beloved by thousands of people who use Loom to record their screens, graphically convey ideas, and give feedback. With Loom, you can quickly make a link to share with anybody after recording your screen. In addition, you can add time-stamped remarks and reactions to any of your recorded videos, and save them to your device when you work together with your team. Loom's video features make it easy to acquire up-to-date information, whether you're screen recording a product demo, offering feedback, or simply expressing your opinion.
Loom's Main Features:
- Systems: Desktop app (Windows, Mac), Mobile app (iOS, Android), and Google Chrome extension.
- Recording: High-quality screen and webcam capture approximatelyfive minutes long and record in HD at 720p, 1080p, 1440p or 4k resolution.
- Editing: Cut and add looms; click to delete unnecessary words.
- Hosting: Cloud storage for up to 25 videos.
- Cost: Free with a premium upgrade possible.
- Privacy: Decide who may view your video with security and access restrictions.
Camtasia Studio
Camtasia Studio uses the digital video recorder H264 of the manufacturing standard to create web-based videos. The new format is supported by two current production settings (blog and web) and three new presets (YouTube, HD display, and Screencast.com).
While using the streamlined and user-friendly H264 digital video recorder software, Camtasia Studio can be used to create training manuals, presentations, and conference videos. It easily allows you to record system audio, camera video, microphone, keynote slide displays, and screen activity. For instance, you can record in front of a live audience and edit on your computer. Next, you can export it as a respectable-sized HD video clip to share anywhere you want, including on the video-sharing websites like YouTube and Vimeo, Apple devices, website or blog.
Iris Screen Recorder
Iris is a powerful screen recorder for Mac OS X that permits the user to record directly to Apple ProRes or H264 and to record and encode later. On compatible Macs, it uses GPU-accelerated processing and encoding to boost capture speed.
Features to Mention:
- Audio capture in applications.
- Two audio sources can be used while recording.
- High-quality color matching.
- Recordings can be paused and resumed at any time.
- Capturing in retina quality with compatible Macs.
- Recording timersautomatically begin and end recordings.
- Support for hotkeys.
- Naming and tagging properly.
- Send recordings on Facebook, Vimeo, AirDrop, Email, and Messages.
- Presets allow you to keep your favorite settings.
ZD Soft Screen Recorder
ZD Soft Screen Recorder is equipped with high performance for Windows. H264/AAC uses little CPU power that encodes frame rate HD video with real-time screen and sound capture. There is an easy method to utilize to capture videos from the screen to your disk without requiring you to install a lot of different programs, like the H264 digital video recorder app.
Guide to Record Screen with ZD Soft Screen Recorder
Step 1: Go to the official website of ZD Soft Screen Recorder to download and install it on your computer.
Step 2: Launch it and there will appear a floating interface that you can set up the recording.
Step 3: Click the Speaker/Microphone/Webcam/Mouse icon to change the relevant settings.
Step 4: Click on Recordings folder to determine the save path.
Step 5: Click the red dot to initiate the recording.
Step 6: Launch the screen which you want to record.
Step 7: Use multiple annotation tools to draw and erase the live video recording. And use the markup tools to alter the text size, thickness, and color.
Step 8: Press the red button again to stop the recording.
How to Convert Your Video to H264?
You can take a screenshot of the whole or part of the computer screen, add sound from your devices or microphone, and save the recording as an MP4, WMV, MKV, AVI, MOV, FLV, or TS file. If you need to upload videos to social media, then you might want to convert the video format to H264.
As mentioned above, MiniTool Video Converter has the capability of converting the format. It supports more than 20 output formats and allows you to create a specific output format. You can modify the video resolution, video frame rate, video bitrate, and video encoder when configuring the output format to H264, MPEG-4, or HEVC. Also, you can adjust the encoder, channel, sample rate and bitrate of the audio track.
Below are the steps on how to convert the video format to H264.
Step 1: Launch it to enter the main interface of MiniTool Video Converter.
Step 2: In the Video Convert tab, click on Add Files to add a video that you want to convert its format to H264.
Step 3: Click the Diagonal arrow under Target to open the output format window.
Step 4: Click the Video tab to select the MP4 output video format.
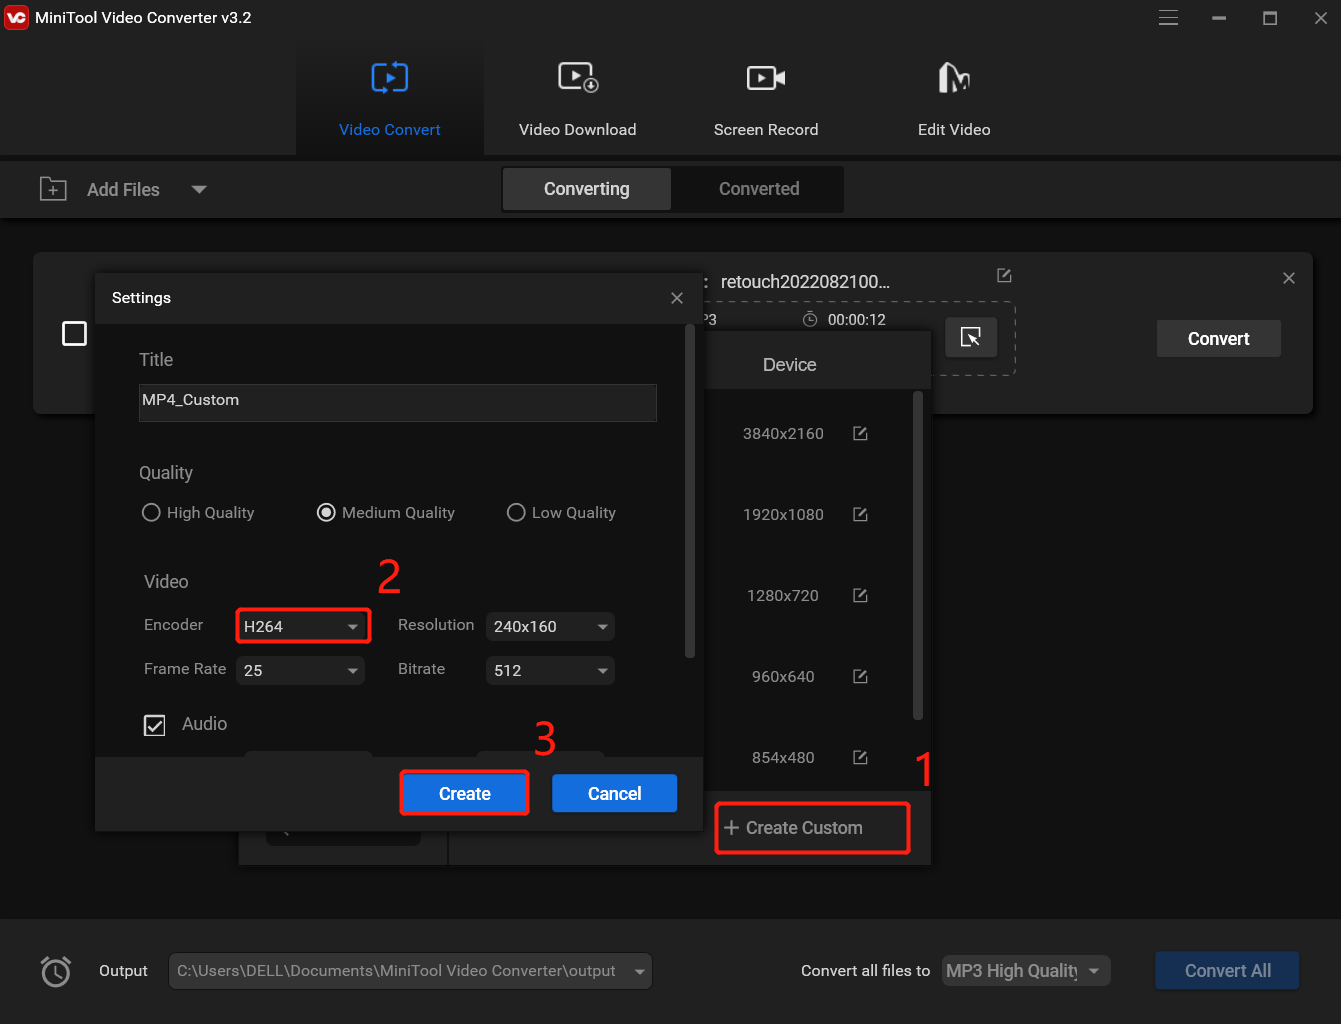
Step 5: Click on Create Custom and go to the Settings window.
Step 6: Select the H264 encoder for the video.
Step 7: Change other parameters for the output video.
Step 8: Click on Create and go back to the Video tab.
Step 9: Select the freshly created output format at the bottom of the MP4 menu.
Step 10: Click the Convert button to convert the video to H264.
Step 11: Find the converted video in the Converted section.
Step 12: Click the Show in folder to locate the file.
Conclusion
After reading this article, you have learned how to choose the best H264 digital video recorder app and how to convert your video to H264. You'd better not miss MiniTool Video Converter if you want to make your work process more efficient. With the powerful and free MiniTool Video Converter, you can easily convert files to various formats, download YouTube content, as well as capture your computer screen.
If you have any questions concerning MiniTool Video Converter, please kindly contact us at support@minitool.com. We will find a solution as soon as we can.
User Comments :