Do you need to compress video for YouTube? How to compress a video for YouTube? This article offered by the free file converter from MiniTool will recommend some useful YouTube video compressors and tell you how to use them to make a YouTube video compression.
Why need to compress videos for YouTube? If you shoot a video in a large size, it will take a long time and devour large amounts of bandwidth resources when you upload a large video on YouTube. Or if your video is larger than the maximum size of YouTube (256GB) or longer than 2 hours, you need to compress it and trim it to upload it on YouTube successfully. The following content has rounded up several good video compressors for YouTube and will guide you on how to compress video for YouTube.
6 Best YouTube Video Compressors for PC
This part shows a brief introduction to some useful compressors for YouTube.
#1. MiniTool Video Converter
MiniTool Video Converter is an excellent YouTube video compressor. It supports compressing multiple video formats, such as MP4, MOV, MKV, AVI, MPEG, VOB, WEBM, OGV, etc. Moreover, you can adjust the compression level of the video at will to achieve the video quality you want. In addition, the software also allows you to preview the compressed video.
Furthermore, MiniTool Video Converter can compress up to five videos at once. If you need to compress multiple videos, this software is a great choice. You can also export compressed videos as MP4, WebM, or MKV files. Among them, MP4 and WebM are both upload formats supported by YouTube.
MiniTool Video Converter is an excellent YouTube video compressor. It is also a free video converter that easily converts audio and video formats. It also lets you download videos from websites like YouTube and capture your computer screen as MP4 files.
#2. MiniTool MovieMaker
MiniTool MovieMaker can work as a YouTube video compressor since it supports you exporting your video in a smaller file format and provides customizable output parameters like resolution, encoder, bitrate, and others. As its name suggests, it is primarily a movie maker and video editing software. In addition to reducing the video size through compression, you can also use its trim or split feature to remove unnecessary parts to make the video shorter.
What’s more, MiniTool MovieMaker is a YouTube video maker that can help you create stunning videos with its various useful editing features.
#3. VLC Media Player
VLC Media Player is known as a multimedia player. Most people don’t know it can also work as a video compressor. You can use it to compress a video or audio by turning it to a lower-size format or customizing its quality, bitrate, frame rate, and others. With VLC Media Player, you can compress a video for YouTube easily since it provides options for YouTube including Video for YouTube SD and Video for YouTube HD.
#4. HandBrake
HandBrake is a free and open-source video transcoder. It is available for Windows, Mac, and Linux. It supports importing videos in most popular formats and its supported sources include DVDs and Blu-ray sources without copy protection. You can use it to compress videos for YouTube. It offers many presets for standard or high-quality conversions. Furthermore, it enables you to tweak many basic and advanced options to improve your video encodes.
#5. Movavi Video Converter
Movavi Video Converter is a good YouTube video compressor that is compatible with both Windows and Mac. It enables you to compress large video file sizes without losing quality. Moreover, it supports a wide range of formats like MP4, AVI, MOV, VOB, MKV, and more. You can use it to get a video in a smaller file size and upload it on YouTube easily.
It can also work as a video upscaler that offers you the AI-powered feature to upscale the quality of your videos. Furthermore, it has some editing tools that enable you to trim or crop your video and make other editions to create stunning videos.
#6. Windows Movie Maker
Windows Movie Maker, as its name indicates, is a video editing software application for Windows that can help you create and edit videos for Facebook, Vimeo, YouTube, and other platforms. Surprisingly, Windows Movie Maker can also help you to compress your video for YouTube. Because it provides you with an export setting for YouTube. Though it was discontinued in 2017, you can still get its installation package from other websites.
Also read: Download Windows Movie Maker Windows 11/10/8/7: Install/Uninstall
In addition to the above video compressors for YouTube, you can try other good video compressors like Adobe Media Encoder, Any Video Converter, iMovie, and others.
How to Compress Video for YouTube on PC
After knowing the useful YouTube video compressors on PC, it is necessary to learn how to use them to make YouTube video compression. This part mainly guides you on how to compress a video for YouTube with MiniTool Video Converter, MiniTool MovieMaker, VLC, and Handbrake.
MiniTool Video Converter
Here’s how to make YouTube video compression with MiniTool Video Converter.
Step 1. Click the download button below to get MiniTool Video Converter and install it on your computer.
MiniTool Video ConverterClick to Download100%Clean & Safe
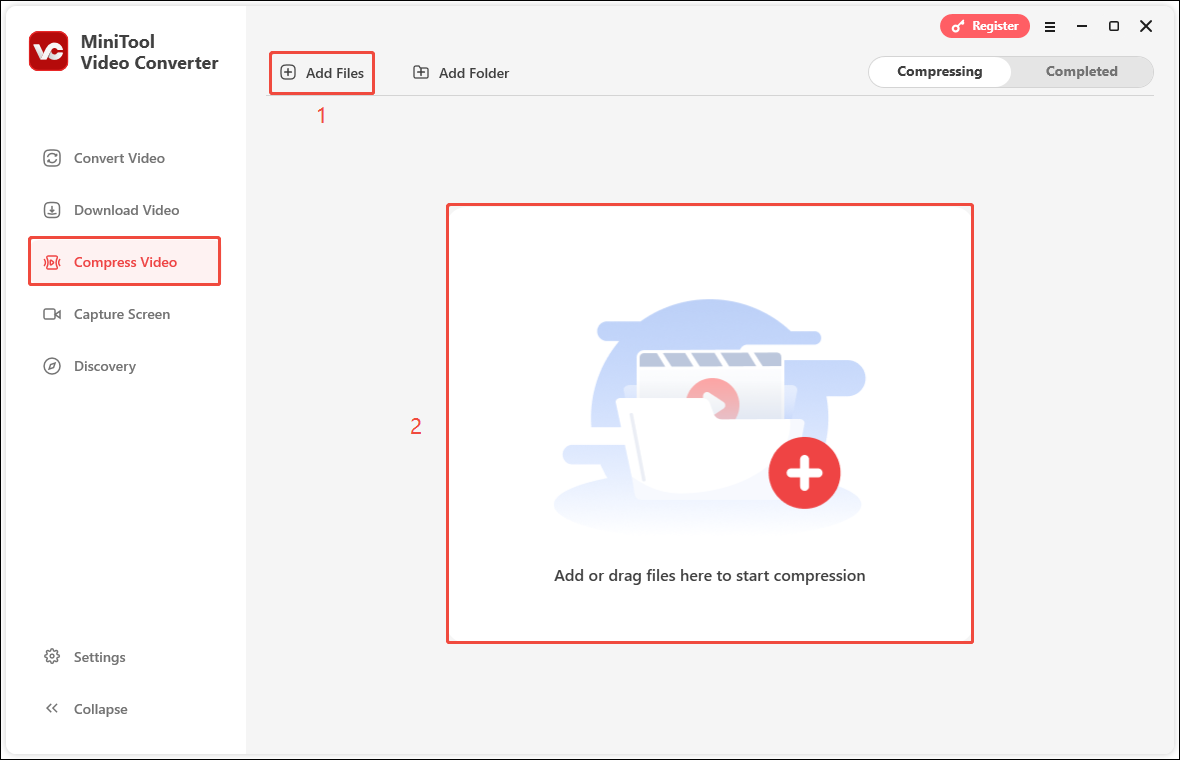
Step 2. Open this free video converter to enter its main interface. Switch to the Compress Video option, click Add or drag files here to start compression or Add Files to choose the YouTube video you want to compress, and click Open to import it.
Step 3. Click on the settings icon for the video file to open the Compression Settings window. Then, drag the red dot on the slider to adjust the compression percentage. After that, choose the output format. You can click the Preview button to check the video quality if you want. Lastly, click OK to save your changes.
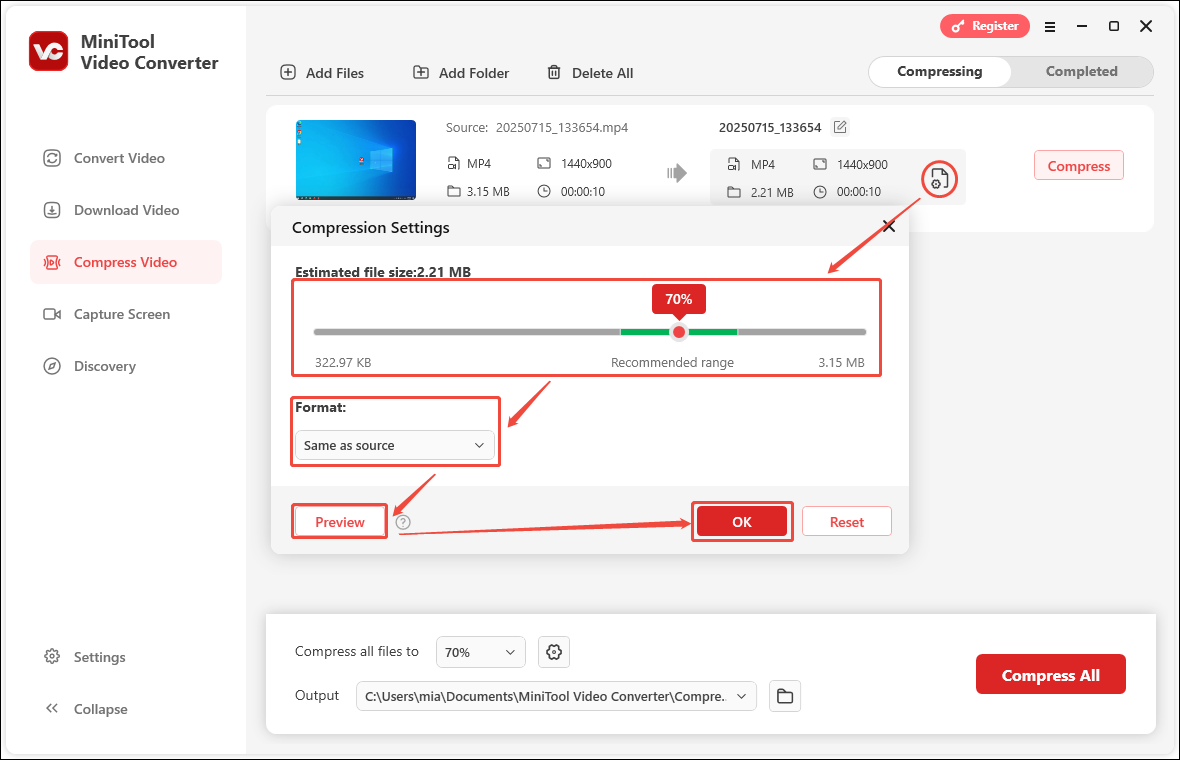
Step 4. Click the Compress button to start compressing.
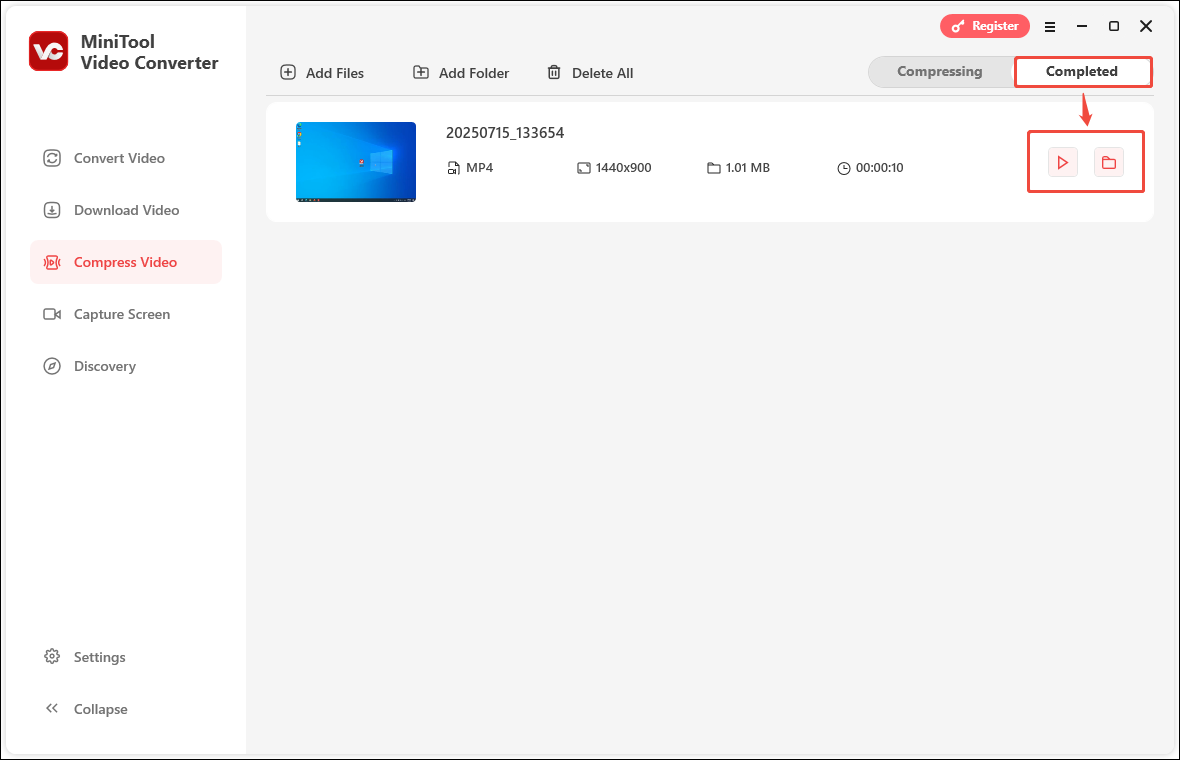
Step 5. When the video is finished downloading, it will automatically jump to the Completed tab. Here, you can find the compressed video. Click the play icon of the video to play it directly, and click the folder icon to view the location where the file is saved.
![How to Compress Zoom Recording Effectively [Windows/Online]](https://images.minitool.com/videoconvert.minitool.com/images/uploads/2025/08/how-to-compress-zoom-recording-thumbnail.jpg)
MiniTool MovieMaker
Just follow the below steps to compress video for YouTube with MiniTool MovieMaker.
Step 1. Download MiniTool MovieMaker by clicking the below download button and install it on your computer.
MiniTool MovieMakerClick to Download100%Clean & Safe
Step 2. Open MiniTool MovieMaker and click the New Project button to enter its main editing interface.
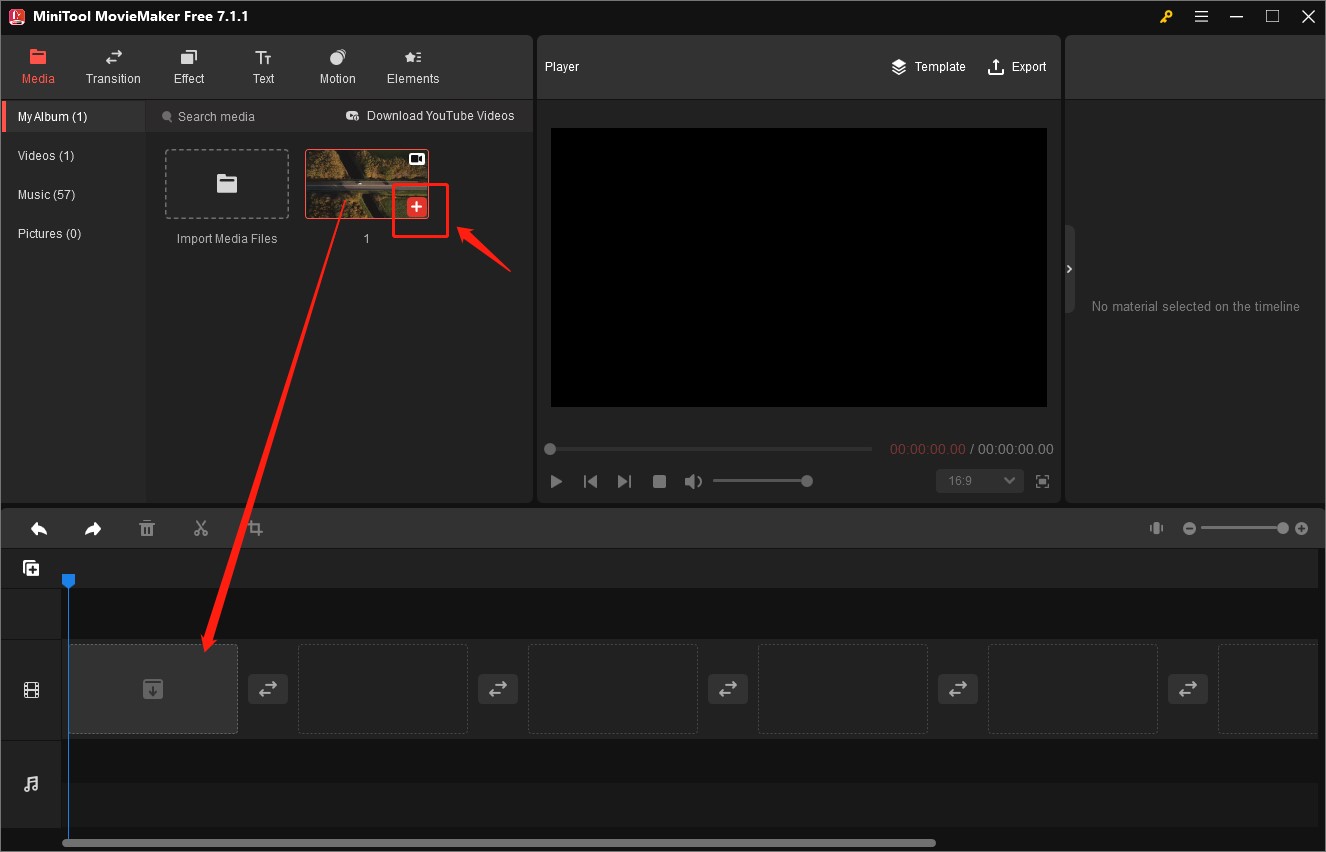
Step 3. Click the Import Media Files area under the default Media tab to upload your video for YouTube and click Open to import it. or you can directly drag and drop the target video file here.
Step 4. Click the plus (+) icon on the target video under the Media tab or add it to the timeline. Also, you can directly drag and drop it onto the timeline.
Step 5. You can reduce the video size by removing unnecessary parts. In MiniTool MovieMaker, you can use the trim and split tools.
If you need to remove the beginning or end of the video clip, you can move your cursor over the beginning or end of the video clip until it becomes a double-headed arrow and drag the arrow rightwards or leftwards to remove the unwanted part.
You can use the split tool to split it out and delete it if you just need to remove a certain part. Drag the playhead to anywhere you want the split to occur and click the Scissor icon. Then select the part you want to delete and click the Delete icon on the timeline toolbar.
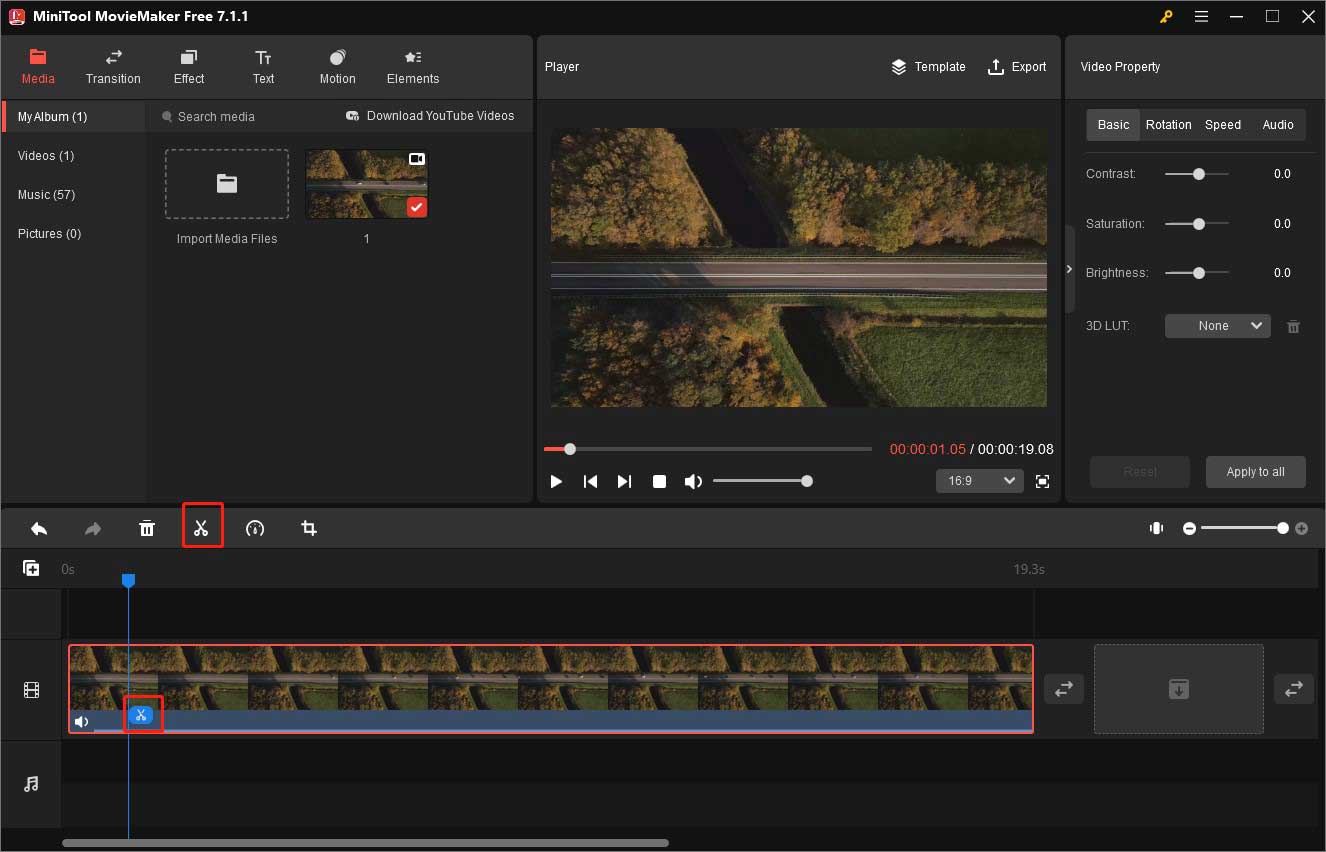
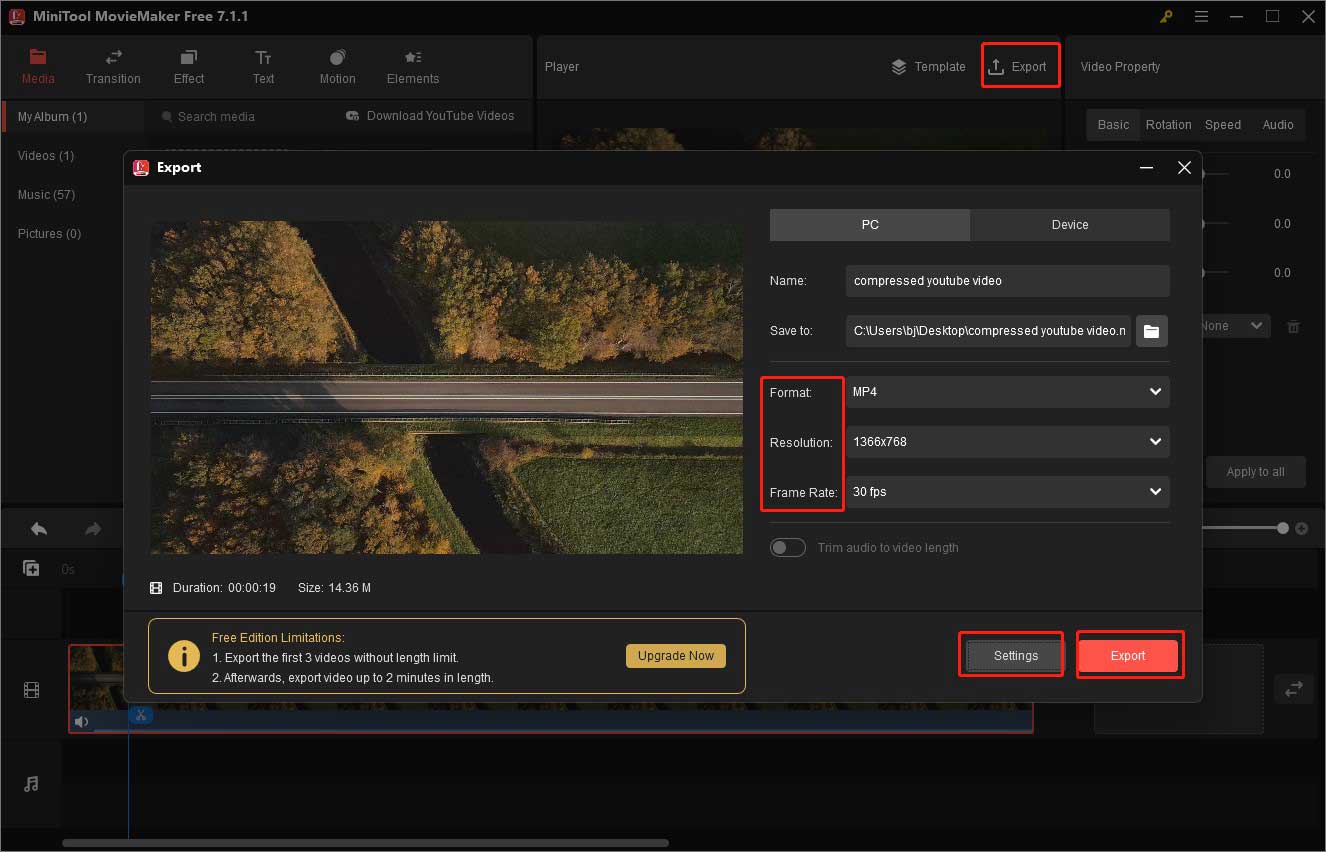
Step 6. If don’t want to remove any part of your video, you can just click the Export option in the Player section to open the Export window. In the Export window, you can change its format, resolution, or frame rate. Furthermore, you can click the Settings button to personalize other output parameters. Then click the Export button.
VLC Media Player
Below is a guidance on how to use VLC Media Player to make YouTube video compression.
Step 1. Download and install VLC Media Player.
Step 2. Open VLC, click the Media tab from the top menu, and select the Convert/Save… option to open the Open Media window.
Step 3. Click the + Add tab to import the video you want to compress and click the Convert/Save button.
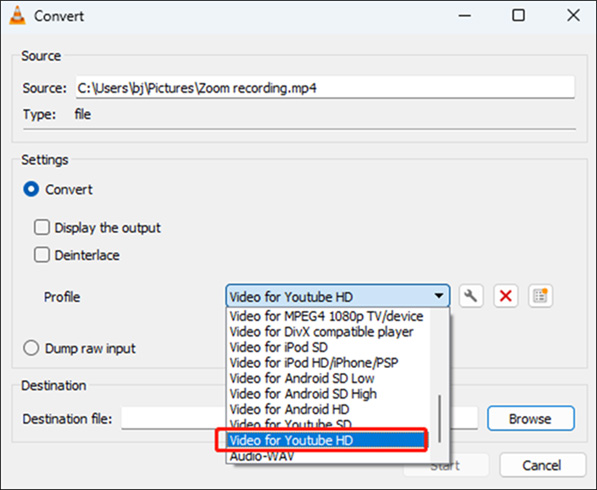
Step 4. In the Convert window, expand the Profile dropdown and select the Video for YouTube HD option or other profile you prefer.
Step 5. Next, you can click the Edit selected profile icon to enter the Profile edition window. Click the Video codec to change the codec, video bitrate, frame rate, and others, or click the Audio codec tab to edit the audio parameters. Then click the Save button.
Step 6. Click the Browse button in the Destination section to select a folder for saving your compressed video.
Step 7. Click the Start button to start compressing.
HandBrake
Use HandBrake and follow the below steps to compress video for YouTube.
Step 1. Get HandBrake from its official website and install it on your desktop.
Step 2. Enable HandBrake and click the File option to upload the video for YouTube that you need to compress. Alternatively, you can drag and drop the video to upload.
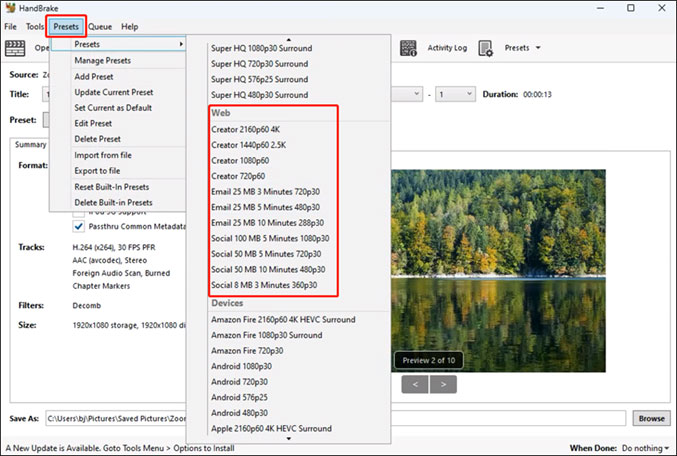
Step 3. Click the Presets tab on the top menu, move to Presets, and scroll down to the Web section. Next, you can select an option and click on it to apply it to your video.
Step 4. If you need to change the aspect ratio, you can click the Dimension tab. If you want to change other output parameters of video and audio, you can go to the Video or Audio tab.
Step 5. Later, click the Browse button at the bottom to choose a folder for storing the compressed YouTube video.
Step 6. Click the Start Encode button to begin the compression process.
How to Compress Video for YouTube Online
In addition to using offline video compressors, you can also use online tools if you have a stable Internet connection or you don’t want to download any software. Clideo and VEED are good options.
Clideo
Clideo is a versatile tool that can edit videos, compress videos, make slideshows, and others. As a video compressor, it supports many formats, such as MP4, WMV, and VOB, and enables you to compress a video easily with its simple interface.
Step 1. Go to the Clideo website and click the Compress option.
Step 2. Click the Choose File button to upload your video from your computer or click the inverted arrow next to Choose File to import video from Google Drive, Google Photos, or Dropbox.
Step 3. Here are three compression options including Basic, Strong, and Superb. The Superb option is not available for free users. You can choose one for your video.
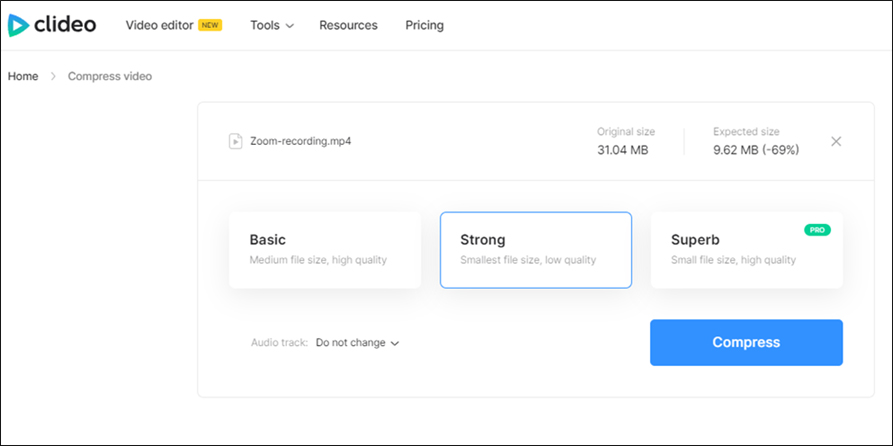
Step 4. Click the Compress button to start compression. Once the compression is finished, you can click the Download tab to save your compressed video for YouTube.
VEED
VEED is an all-in-one tool that works as a video editor, screen recorder, video compressor, etc. It can help you shrink video size. You can use it to compress MOV, MP4, AVI, YouTube videos, and others. What’s more, it can also help you compress GIFs.
Step 1. Visit the official website of VEED, go to the Products tab, and click the Video Compressor option.
Step 2. Click the Compress a video button and click the Upload a File tab to import your video.
Step 3. Expand the Quality dropdown and choose one from Low, Medium, and High. Expand the Resolution dropdown, you can select the 1920 × 1080 (1080p, HD, Instagram, YouTube) option or other options.
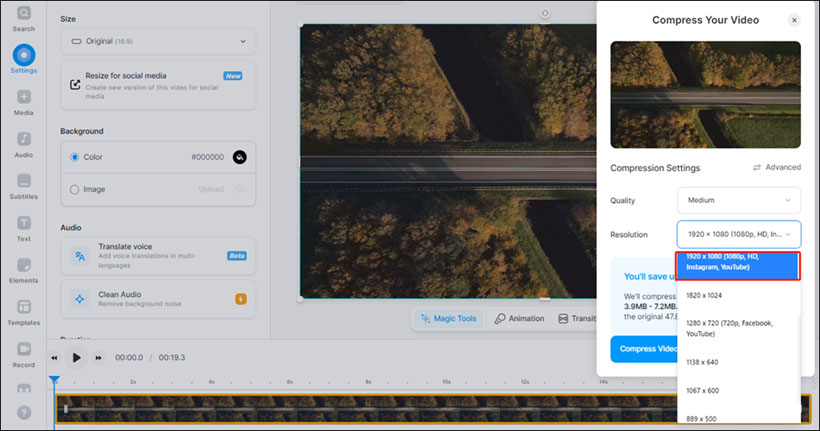
Step 4. Click the Compress Video button to start compression. Later, you can click the Download file to save the compressed video to your computer.
![3 Useful Methods to Compress Drone Video [Windows/Mac]](https://images.minitool.com/videoconvert.minitool.com/images/uploads/2025/08/compress-drone-video-thumbnail.jpg)
Final Words
You can try to shrink the video size before uploading on YouTube if you want to upload it quickly or save bandwidth resources. Or you need to compress a video to meet the upload requirements of YouTube. The above has shown you several useful YouTube video compressors and told you how to use them to compress videos for YouTube. You can choose a video compressor like MiniTool Video Converter and follow the above guidance to have a try.
Hopefully, this article can be helpful to you! If you have any questions or comments about MiniTool Video Converter, please don’t hesitate to email us at support@minitool.com.
User Comments :