In this article offered by the best free video converter – MiniTool Video Converter, we will guide you through the process of recording Palworld gameplay so that you can share your experiences with friends and fellow gamers or simply relive the magic of your virtual world.
Palworld, the enchanting, pixelated universe where creatures and humans coexist, has captured the hearts of gamers worldwide. As you embark on thrilling adventures, build your dream home, and engage in exciting battles with your pals, you might want to preserve these memorable moments by recording your gameplay.
#1 Choosing the Right Recording Software
Before you dive into recording Palworld adventures, it’s crucial to select the right recording software. Many options are available, each with its features and capabilities:
- Windows built-in recording software: Xbox Game Bar.
- Graphics card embedded recording tools: NVIDIA ShadowPlay and AMD ReLive.
- Popular third-party recording choices: MiniTool Video Converter, OBS Studio, or Elgato Game Capture.
These programs offer user-friendly interfaces and a range of customization options, ensuring a seamless recording experience.
#2 Setting Up Your Recording Software
Once you’ve chosen your recording software, it’s time to set it up for Palworld. Follow these general steps to configure your preferred recording program:
Step 1. Download and Install
The Windows built-in game capturing program and graphics card embedded utilities are preinstalled. They don’t need downloading and installation. If your choice is one of the third-party applications like MiniTool Video Converter, you can follow the steps below to get it ready.
MiniTool Video ConverterClick to Download100%Clean & Safe
- Download the recording software from the official website.
- Follow the installation instructions to set up the program on your computer.
Step 2. Adjust Settings
- Open the recording software and navigate to the settings menu.
- Configure video and audio settings according to your preferences. Ensure that the recording quality is optimal for capturing the vibrant world of Palworld.
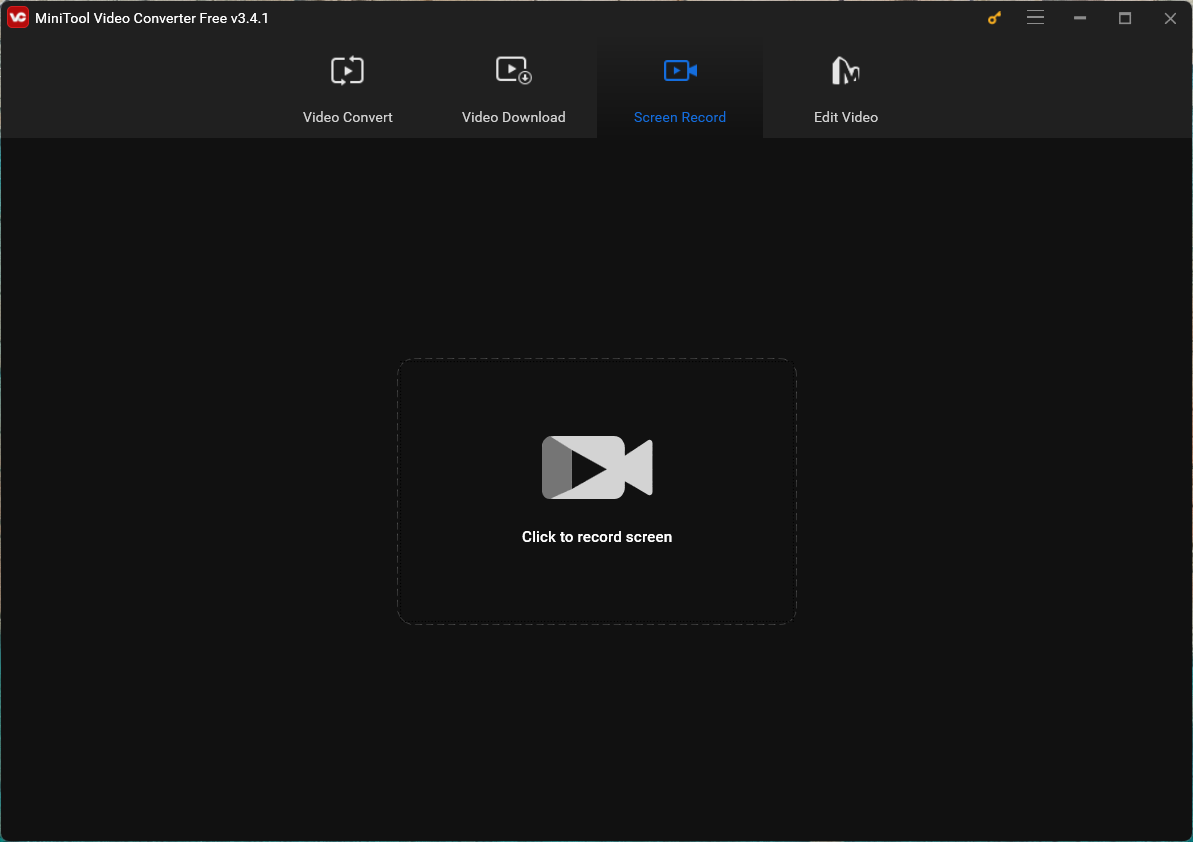
For the video converter from MiniTool, after launching it, go to the Screen Record tab from the top menu and then click the Click to record screen option at the central of the software window.

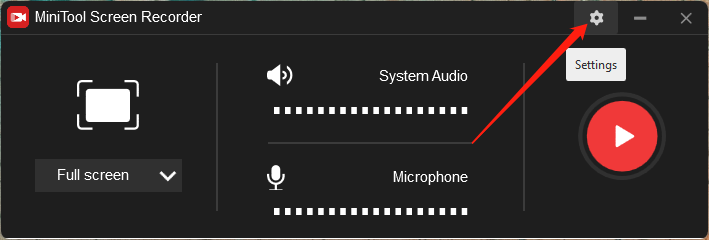
Then, in the MiniTool Screen Recorder, you can personalize the recording area (full screen or selected section) and sound recording (whether to record system audio and microphone or not). Palworld should be the focus to capture every detail of your gameplay. That is to say, you are recommended to record Palworld in full screen and with both game background sounds as well as your commentary.
For more settings for the coming recording, just click the Settings icon in the upper right of the window.

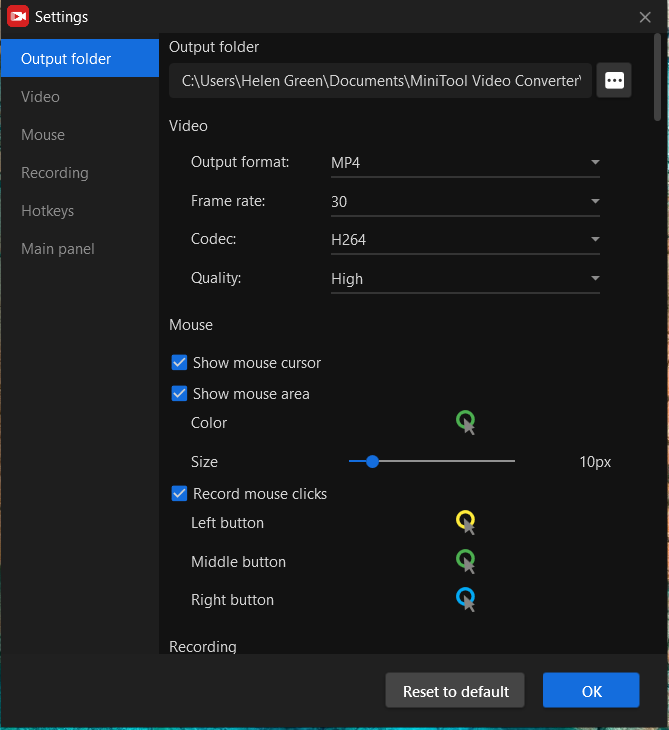
Next, specify your recording preferences in MiniTool Screen Recorder Settings.
- Output folder: where to save the recorded videos.
- Video output format: what file format would you like your recordings to be? You can choose from MP4, WMV, MKV, AVI, MOV, FLV, and TS.
- Video frame rate: there are 30fps, 25fps, 20fps, and 15fps 4 options.
- Video codec: currently, only H264 is available.
- Video quality: you can set your recordings to be high (recommended) or standard quality.
- Mouse movement: mouse cursor, mouse area (color and size), and mouse clicks (left, middle, and right buttons).
- Recording duration: preset your recording duration for a set time activity.
- Recording hotkeys: start/stop recording (F6), pause/resume recording (F9), select recording region (Alt + R), and recording at full screen (Alt + F)

Familiarize yourself with the hotkeys for starting, stopping, pausing, and resuming recordings. This knowledge will help you seamlessly control the recording process during your Palworld adventures.
#3 Recording Palworld Gameplay
Now that your recording software is set up, it’s time to start capturing your Palworld journey. Follow these steps to record your gameplay:
Step 1. Launch Palworld
Open Palworld and ensure that your game is running smoothly.
Step 2. Activate Recording Software
Start your recording software and confirm that it recognizes Palworld as the target application.
Step 3. Start Recording
Start playing Palworld. Use the designated hotkey or button (F6 for MiniTool Screen Recorder) to begin recording. This action initiates the capture of your Palworld gameplay.
Step 4. Play and Enjoy
Engage in your Palworld adventures as you normally would, knowing that every moment is being recorded.
Step 5. Stop Recording
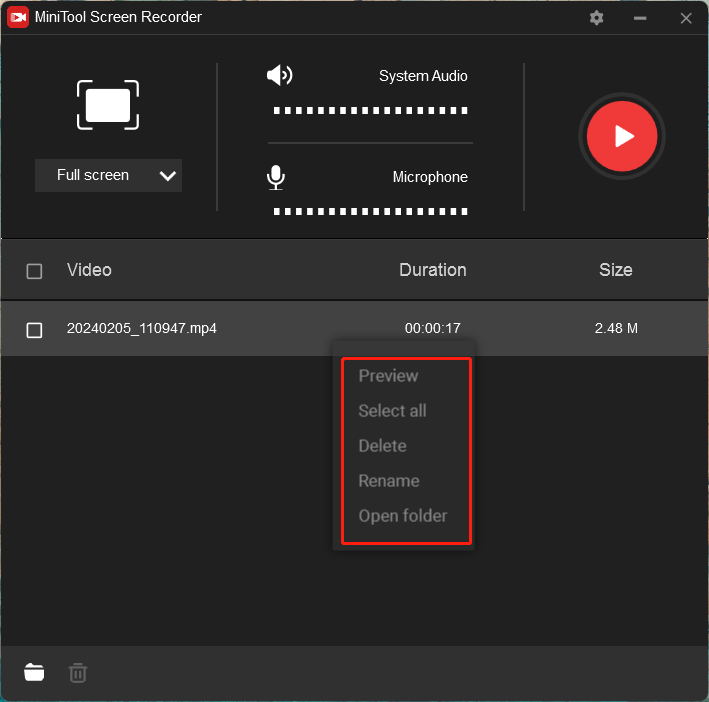
Once you’ve captured the desired gameplay, use the hotkey or button to stop the recording. For MiniTool Screen Recorder, you should press the F6 key on your keyboard. Then, you can right-click on the recorded Palworld video in MiniTool Screen Recorder and choose to preview, delete, rename, or locate it.

#4 Editing and Sharing Your Palworld Videos
After recording your Palworld gameplay, you may want to edit the footage to highlight key moments or create a more polished video. Consider using video editing software like MiniTool MovieMaker, Adobe Premiere Pro, or Sony Vegas. Merge your clips; cut off unwanted moments; speed up or slow down your fighting; add music, effects, captions, or funny stickers; and enhance the overall viewing experience.
MiniTool MovieMakerClick to Download100%Clean & Safe
Once your video is edited to perfection, you can share it with the gaming community on platforms like YouTube, Instagram, TikTok, Twitter, Twitch, or other social media. Let others join in on the excitement of your Palworld escapades and share tips, tricks, and laughs along the way.
Conclusion
Recording Palworld gameplay allows you to preserve and share the magic of this captivating, pixelated universe. With the right recording software and a bit of editing, you can create compelling videos that showcase your adventures, battles, and the unique bond you share with your pals. So, gear up, hit that record button, and let the world witness the wonders of your Palworld journey!


User Comments :