This post from MiniTool Video Converter will give you a step-by-step guide on how to make a video tutorial and offer some tips to help you create good video tutorials.
When you search for something like how to crop video on Windows 11 or how to fix background processes in Windows in Chrome, most of you would like to switch to the Videos tab to watch video results because a video offers step-by-step instructions to solve your problem.Studies have shown that most web visitors don’t take much time to read long paragraphs. When people look for answers to their problems, they prefer to consult a video tutorial instead of a large block of text because a video is more straightforward and time-saving to show them the process of fixing a problem.Video tutorial is a popular video type and you’ll find numerous video tutorials on different topics on YouTube, the second largest search engine in the world.If you just start a YouTube channel and want to make some video tutorials for it, you’ve come to the right place. This post explains a step-by-step guide on how to make a video tutorial.Let’s look at the main steps to make a video tutorial.![[Solved] How to Record on Snapchat Without Holding the Button](https://images.minitool.com/videoconvert.minitool.com/images/uploads/2022/05/how-to-record-on-snapchat-without-holding-the-button-thumbnail.jpg)
Step 1. Confirm a Topic and Consult Relevant Information
Before you start recording, you should choose your topic. If you don’t have any ideas, you can go to YouTube, Reddit, Quora, and other platforms to find hot topics. You can also use some keyword tools to identify your keyword.Generally speaking, the higher the search volume of a topic, the more viewers will be attracted, and your video is more likely to rank well.Additionally, you can also select the latest hot topics for your video. For example, if Microsoft adds some new features for its certain products, you can make a relative video to tell people how to use it.Once your theme is determined, it’s time to consult relevant information. You can search for your topic in Chrome and then check some results. Watch relevant videos, too.Step 2. Determine the Feasibility of Your Operation
After you choose a topic and determine specific solutions, it’s time to rehearse your operation to check its feasibility. In this way, you can avoid the situation where you can’t continue the operation in the middle of the recording.If your topic involves different solutions, try out them one by one and write the possible ones.Step 3. Write a Storyboard
Next, you should write a storyboard to outline the main steps. You don’t have to write all the specific steps if you’re already familiar with them. If not, write them down in case you forget the next step in the screen recording.
Step 4. Record Operation Process in a Video
Now, it’s time to record your screen and make a video tutorial. Sometimes, depending on your topic, you might need a camera to record something in real life. This part mainly talks about recording your computer screen for a video tutorial.What kind of screen recorder should you choose? When you search for a screen recorder in Chrome, it gives you various options. Which one to choose?Firstly, you should choose a screen recorder without watermarks. Some paid applications offer a free trial version but it might watermark your videos or has a recording time limit. Then, choose a screen recorder that can capture high-quality videos.If you’re on a budget and need a free screen recorder without watermarks, MiniTool Video Converter is recommended here. It’s 100% free to use and doesn’t offer any in-app purchases.With MiniTool Video Converter, you can record your desktop in full-screen or in selected regions. To make your video clear, this program allows you to show mouse clicks and mouse areas, and it also gives you options to record mouse clicks.With MiniTool Video Converter, you can record your screen as long as you need and save the video in different formats, including MP4, WMV, MKV, AVI, MOV, FLV, and TS.Here’s how to use MiniTool Video Converter to record your screen.MiniTool Video ConverterClick to Download100%Clean & Safe
Step 1 . Download and install MiniTool Video Converter on your Windows PC.Step 2. Launch MiniTool Video Converter, click the Screen Record tab, and click the Click to record screen area to activate MiniTool Screen Recorder.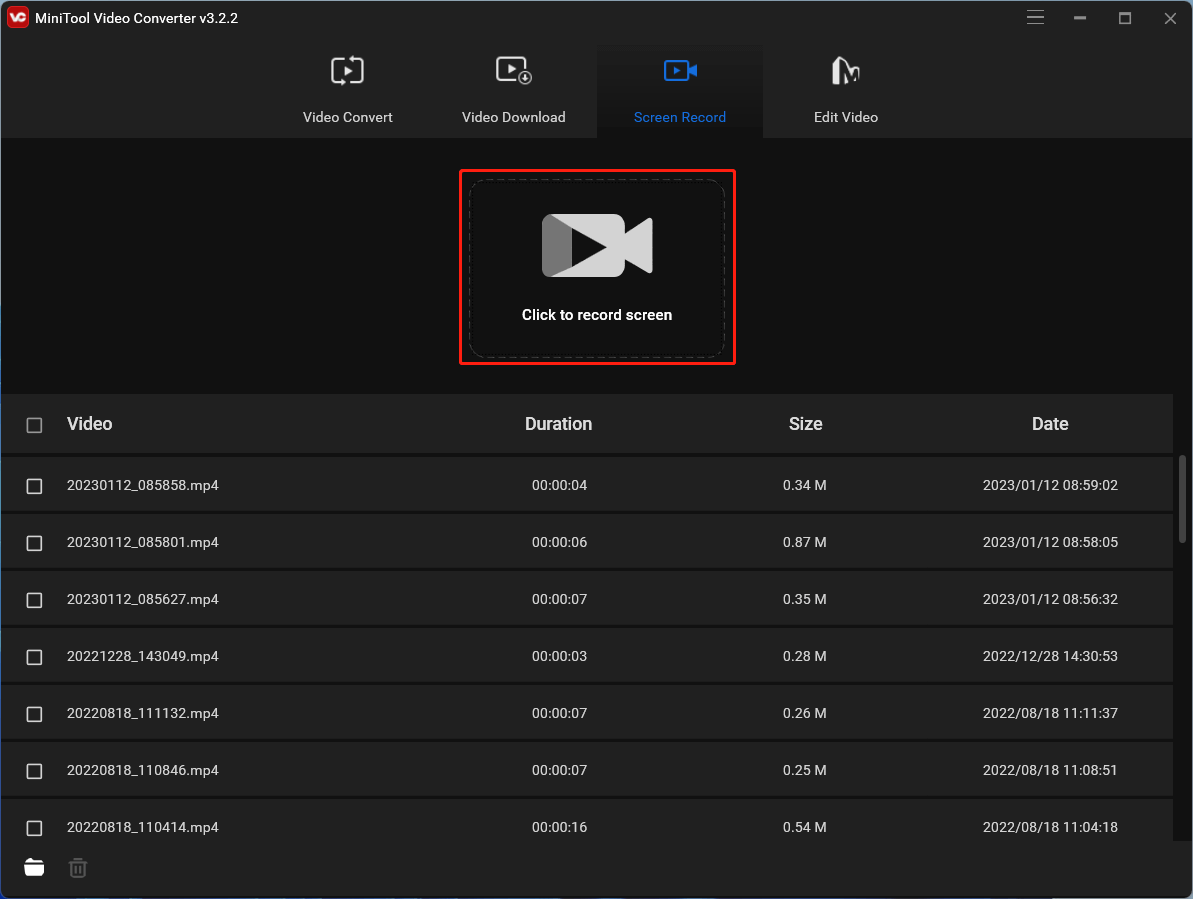 Step 3. Click Full screen and select Select region to customize the recording area. Choose whether to record the system audio or sound from the microphone. Click the Settings icon to do more settings.
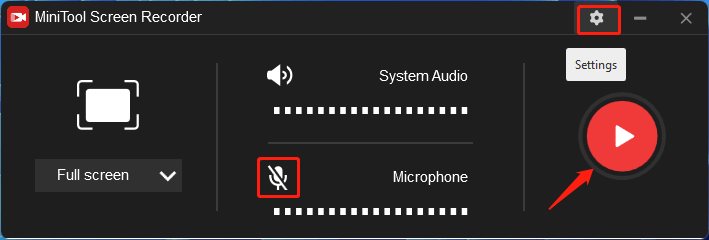 Step 4. From the Settings window, you can choose an output folder, video format/quality/codec/frame rate, adjust mouse settings, and click OK to save changes.
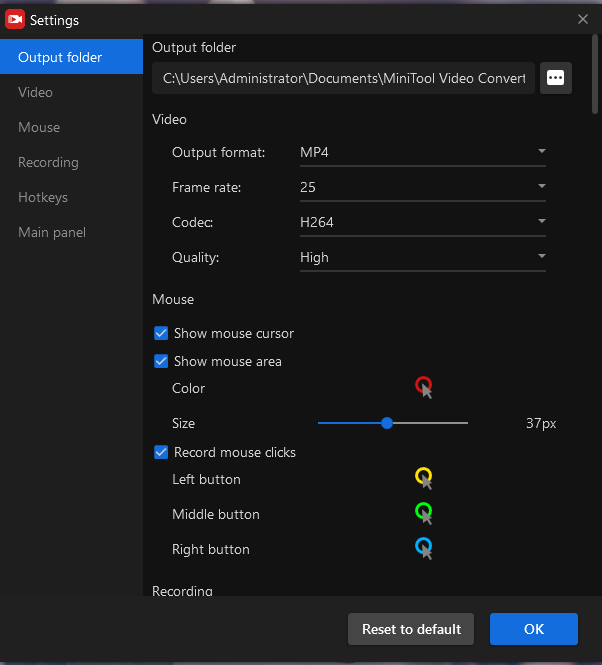 Step 5. Click the red Record button or press F6 to start recording. Press F9 to pause/resume recording. Press F6 again to stop the recording.Tips for recording a video tutorial:
- Your video should keep a moderate speed. That means you should not move your mouse too fast during the recording. If so, your audience will not understand the whole process.
- Guarantee the accuracy of your operation. During the recording, click the target button in the right order and do not click other unnecessary ones.
- If you select several methods for your topic, you can record them one by one. This is convenient for later editing.
- Hide the floating toolbar when recording. Or it will always appear in your video.
- To record a video tutorial without noise or unnecessary sounds, you can turn off the system audio or the sound from your microphone.
Step 5. Edit Your Recorded Videos
Once you’ve finished the screen recording, continue to edit your video. Generally speaking, you may need to trim the unnecessary beginning or end parts of a video, cut out unwanted portions in the middle of a video, or speed up the long responding sections.To edit your video recordings, you can try out MiniTool MovieMaker, a great video editor without watermarks. It can trim, split, crop, and speed up your videos, add titles/captions/credits to your video, and more.Most importantly, MiniTool MovieMaker supports exporting videos up to 1080p for free and without watermarks.Here’s how to edit your video recordings with MiniTool MovieMaker.MiniTool MovieMakerClick to Download100%Clean & Safe
Step 1. Download and install MiniTool MovieMaker on your PC. Launch it and close the pop-up window.Step 2. Click Import Media Files to open your recordings, and add them to the timeline.Step 3. Trim a video. Option 1: Drag either edge of the clip on the timeline towards the center to remove the unwanted beginning and end parts.Option 2: Choose the video in the timeline, click the Split (scissor) icon, select Full Split, and switch to the TRIM tab. Move the Zoom in/Zoom out slider to locate each frame precisely. Drag the playhead to the target place and click the Scissor icon to set the start and end points of the video you’d like to keep. Click OK to save changes.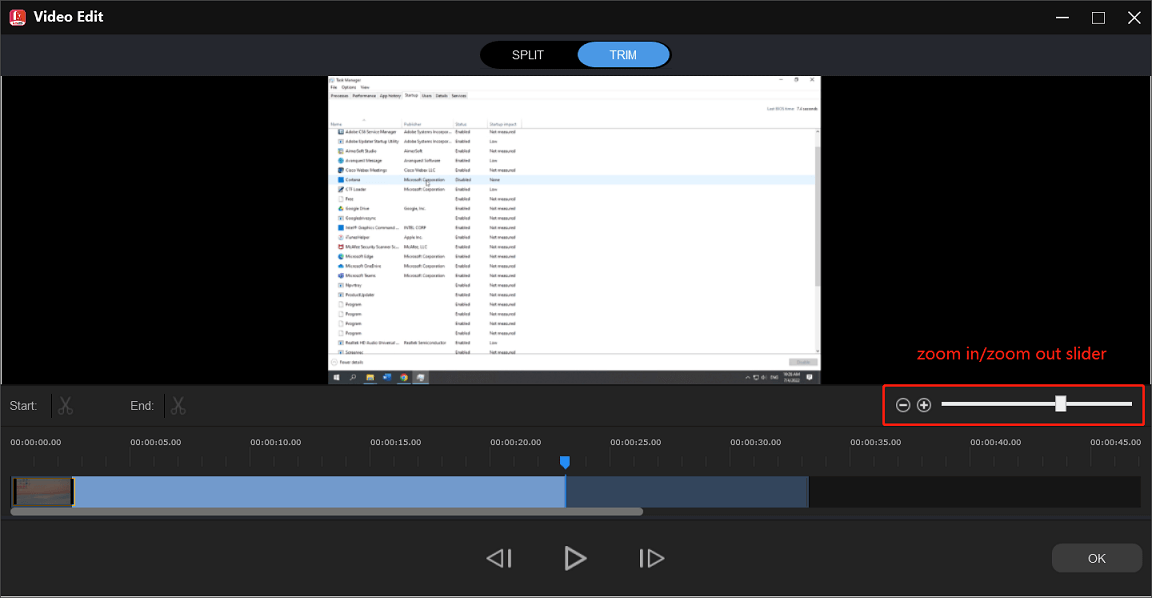 Step 4. To cut out the middle parts of a video, split it into several parts, and then delete the unwanted clip.To split a video, select it in the timeline, click the Split (scissor) icon, and select Full Split. Drag the playhead to the target place, click the scissor icon, continue to drag the playhead, and click the scissor icon.Repeat this step to split a video into multiple sections. Click OK to save changes.
 Then, right-click on a clip in the timeline and click Delete to delete it.Step 5. To speed up a clip, click it in the timeline, go to the Speed tab in the Video Property, and drag the speed slider to the right to increase the playback speed. Or, click the Speed icon, choose Fast, and click a speed setting.
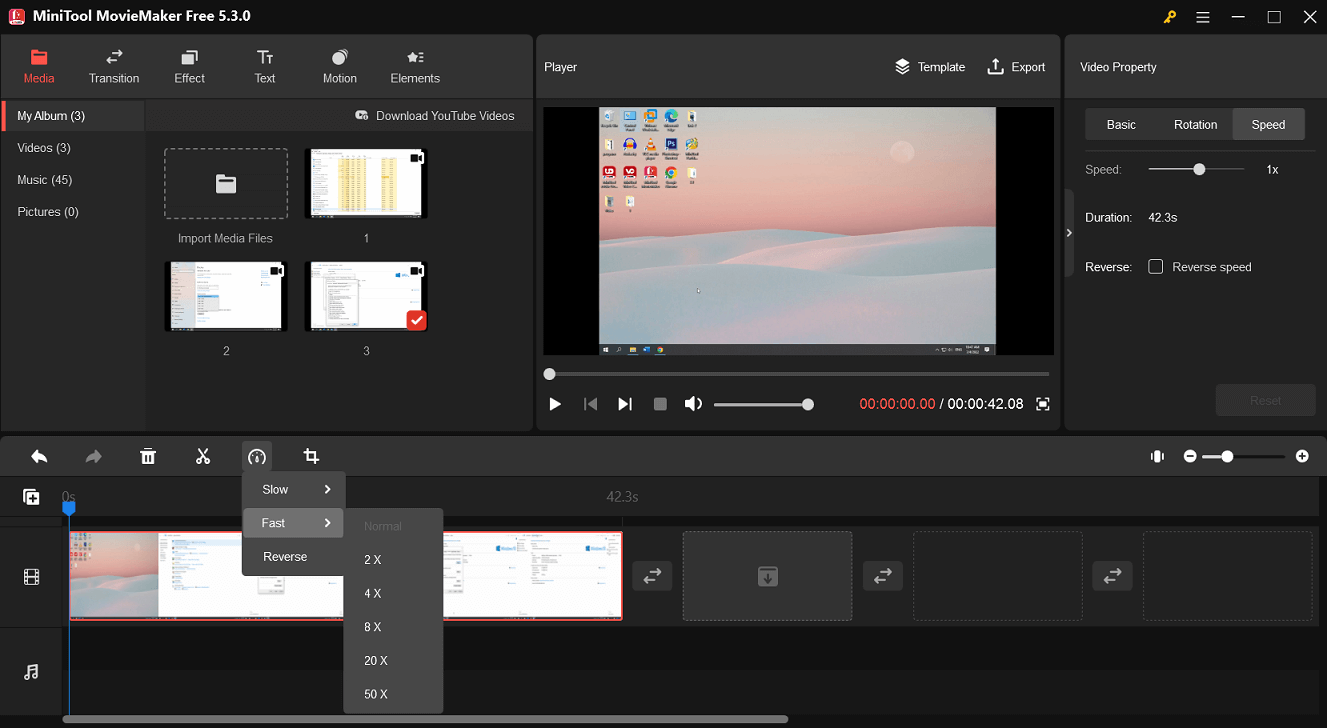 Step 6. After editing, click Export. Choose the output format, or click Settings to change the video resolution, frame rate, bitrate, etc. Click Export to export the video.
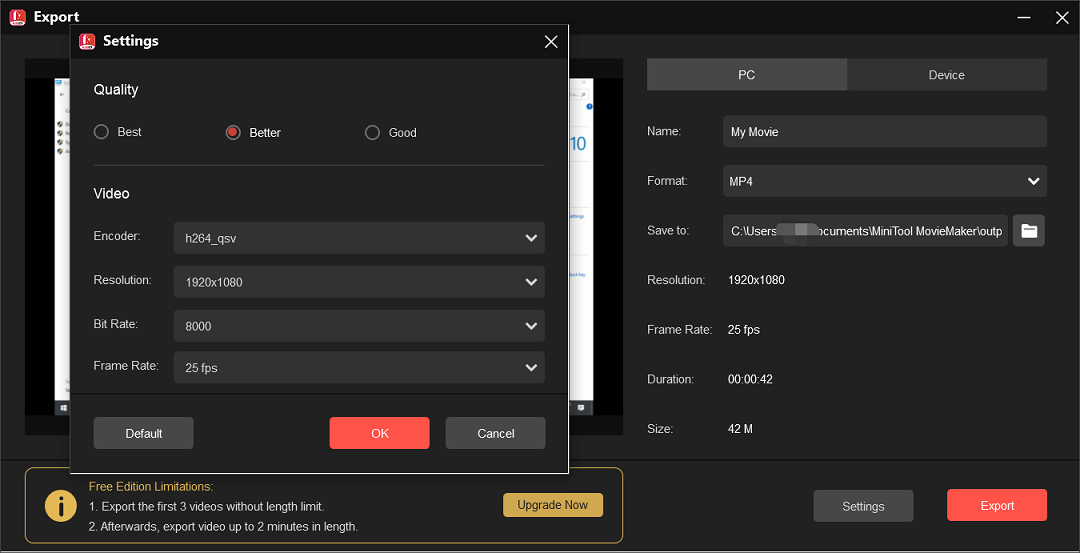
Step 6. Add Intro/Captions/Outro to the Video
After editing your video, you can add an intro to it and this will directly tell your viewers the purpose of this video. Also, you can add captions over the video to show which button to click and pay attention to the duration of the text. This way will help users know the exact steps.If your video consists of several clips, you can add a title card to each one and this helps the audience understand your video better.Step 7. Dub Your Video or Record Narration.
A video without sound is not perfect. You can dub the video or record the narration and add your voiceover to the video.With a video dubber application, you can easily do that. Alternatively, you can use a voice recording application to record and add your voiceover to the video.Step 8. Share Your Video
Here comes the final step. Share your video. There’re many video-sharing websites like YouTube, Vimeo, Dailymotion, and more. There’s no doubt that you should upload your video to YouTube because it’s the second largest search engine in the world and every day people search for diverse questions on this platform.It’s easy to upload a video to YouTube. But here’re some tips to help you get more views on YouTube.Write descriptions. In addition to the video title, you should write an effective description to explain the objective of this video and what questions your video will solve.Also, you can list the key moments and corresponding periods to help the audience quickly skip to a specific point.Add tags. To help users find your video, it’s necessary to add some tags. Tags help YouTube understand your video’s topic and help your video get discovered. There’re many YouTube tag generators you can try to find suitable tags.Edit subtitles. With speech recognition technology, YouTube can automatically generate captions for your video. You can duplicate and edit the automatic captions or manually upload your subtitles and adjust them to sync the video.![Why Is My Screen Recording Not Working? How to Fix it [Solved]](https://images.minitool.com/videoconvert.minitool.com/images/uploads/2022/08/why-is-my-screen-recording-not-working-thumbnail.jpg)
Conclusion
This post offers a complete guide on how to make a video tutorial. Hope the above tips help you create a good video tutorial. If you want to share other tips with us, you can leave a reply in the below comment section.If you have any questions while using MiniTool Video Converter or MiniTool MovieMaker, you can contact us via support@minitool.com for help. To find more computer tips and tricks, you may visit MiniTool official website.About The Author

Position: Columnist
Cora is a tech writer specializing in digital media workflows, with over six years of hands-on experience in video post-production, media transcoding, and screen capture. Her writing is always clear and practical. Cora also produces in-depth software reviews for users across skill levels to help them find the right tool and enjoy video editing.
User Comments :