This post from MiniTool Video Converter will teach you how to use Dropbox Capture to record videos and screenshots on your Windows 10 and 11 PCs.
What Is Dropbox Capture
Nowadays, people often share a video or screenshot to help others solve or understand a problem. With this trend, Dropbox has introduced a new tool called Dropbox Capture.
Dropbox Capture allows users to record the activities on the screen, record the camera, record the microphone, and take screenshots.
As for the recording time, Dropbox Basic, Plus, and Family accounts can record up to 2 hours in total, with no limit on individual recordings. Dropbox Professional, Standard, Advanced, and Enterprise customers have unlimited recording time.
![Why Is My Screen Recording Not Working? How to Fix it [Solved]](https://images.minitool.com/videoconvert.minitool.com/images/uploads/2022/08/why-is-my-screen-recording-not-working-thumbnail.jpg)
How to Use Dropbox Capture
Firstly, let’s learn how to use the Dropbox Capture desktop app on your Windows 10/11 PC to take screen recordings and screenshots.
Step 1. Download and Install the Dropbox Capture Desktop App
Firstly, you should install the Dropbox Capture desktop app on your PC. You can visit the Dropbox Capture website or Microsoft Store to download and install it.
Then, launch the Dropbox Capture desktop app and sign in with your Dropbox account or create a new account.
Step 2. Change Preferences in Dropbox Capture
If you want to change the video resolution of your recording, click the three dots button at the top right and choose Preferences.
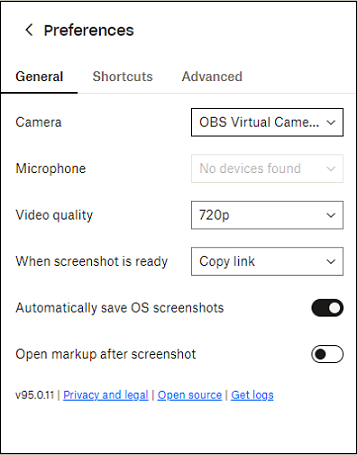
In the General tab, you can set the video resolution as 720p or 1080p, enable Auto-save screenshots, choose whether to copy image or link when your screenshot is ready, and more.
You can go to the Shortcuts tab view or change the shortcuts of recording and screenshots. Go to the Advanced tab to do other settings like Mute microphone for screen recording.
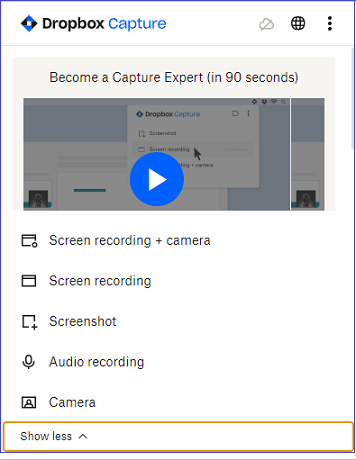
Step 3. Record Your Screen with Dropbox Capture
Click Screen recording + camera to record your screen and camera, or click Screen recording to record only your screen and microphone.
Click or press Enter to record the entire screen, press Space to record a specific window, or drag to choose the recording area.
Click the Record button to start recording. While recording, you can draw on the recording. When the recording stops, the video will open on the Dropbox Capture website. Then, you can trim the video, get a shareable link, or download it to your PC.
Alternatively, you can record your screen on Dropbox.com. Click Create and choose Screen recording, then choose to record a Chrome tab, a specific window, or your entire screen, and click Share. Then follow the instructions above.
Dropbox Capture has a GIF option for Mac users to record the screen as a GIF limited to 30 seconds. However, the GIF option is not available in the Dropbox Capture desktop app for Windows 11/10.
Step 4. Record Your Microphone/Camera or Take Screenshots
Click Audio recording to record your microphone. Click Camera to record your camera. Click Screenshot to screenshot your screen.
If you want to edit your screen recordings, you can try MiniTool MovieMaker. It lets you trim or split the video, add captions to the video, and more.
MiniTool MovieMakerClick to Download100%Clean & Safe

A Dropbox Capture Alternative to Record Your Screen
MiniTool Video Converter is a free screen recorder for Windows 10/11 to make video tutorials, and it won’t watermark your video and doesn’t have a recording time limit. It lets save recordings in MP4, WMV, MKV, AVI, MOV, FLV, and TS formats.
MiniTool Video ConverterClick to Download100%Clean & Safe
Here’s how to use MiniTool Video Converter to record your screen.
Step 1. Download and install MiniTool Video Converter on your Windows PC. Launch it and click the Screen Record tab, and tap the Click to record screen to activate MiniTool Screen Recorder.
Step 2. Click Full Screen to choose your recording area, choose whether to record system audio or your microphone, and click the Settings icon to choose an output folder, output format, and more.
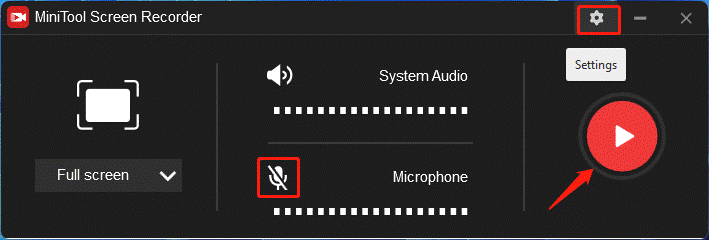
Step 3. Click the Record button or press F6 to start recording. Press F9 to pause/resume recording. To stop the recording, press F6.
Conclusion
You can follow the above steps to record your screen, camera, and microphone with Dropbox Capture. Alternatively, you can try MiniTool Video Converter to record your screen.
About The Author

Position: Columnist
Cora is a tech writer specializing in digital media workflows, with over six years of hands-on experience in video post-production, media transcoding, and screen capture. Her writing is always clear and practical. Cora also produces in-depth software reviews for users across skill levels to help them find the right tool and enjoy video editing.
User Comments :