Do you want to record your computer in AVI format? What’s the best AVI screen recorder? Luckily, you’ll learn about 5 AVI video recorders (including MiniTool Video Converter) in this post and learn how to record your desktop in AVI with them.
AVI is one of the best video formats. One of its advantages is that the AVI video format has high-quality audio fidelity. If you want to record your screen with high-quality audio, you can record in AVI format. In this post, we’ll cover 5 AVI screen recorders that allow you to record any activities on your computer screen in AVI format. Let’s get started.
Software | Operating System | Pricing | Supported Formats |
MiniTool Video Converter | Windows | Free | MP4, WMV, MKV, AVI, MOV, FLV, TS |
Bandicam | Windows | Free, Full version starts from $39.95/1 PC | MP4, AVI |
Captura | Windows | Free | MP4, AVI, WebM, GIF |
Screencast-O-Matic | Windows, Mac, Chromebook, web-based | Free, paid plans start from $48/year for SOLO DELUXE | MP4, AVI, FLV |
Acethinker Free Online Screen Recorder | Web-based | Free | AVI, MOV, WMV, FLV, MP4, MPEG, VOB, ASF, TS |
#1. MiniTool Video Converter
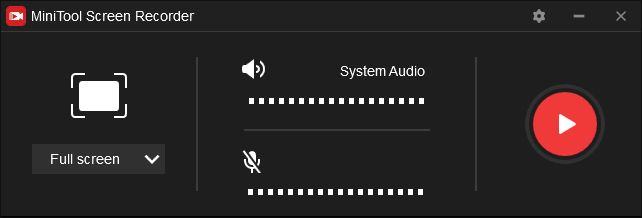
MiniTool Video Converter is a free AVI screen recorder for Windows. It’s free and simple to use. This screen recorder enables you to record any activities like online meetings or web videos on your desktop in full-screen or selected regions. And you have options to record system audio or audio from a microphone.
With MiniTool Video Converter, you can record your computer screen in different formats, including AVI, MP4, WMV, MKV, MOV, FLV, and TS format. And you can choose the video frame rate and quality (standard or high). During the recording, you can choose to show mouse cursor or mouse area or mouse clicks.
As a video converter, MiniTool Video Converter can perform 1,000+ conversions between video and audio files. Also, it can let you download videos from YouTube.
Pros:
- Free and easy to use, no watermarks.
- Record screen in different video formats.
- No recording time limit.
- Change video formats in batch.
Cons:
- Only work on Windows.
Also read: How to Record BlueJeans Meeting on Your Desktop – 6 Methods
Here’s how to record your screen in AVI format with MiniTool Video Converter.
Step 1. Click the Free Download button to get the installer of MiniTool Video Converter, then complete the installation, and launch this program on your PC.
MiniTool Video ConverterClick to Download100%Clean & Safe
Step 2. Go to the Screen Record tab, tap the Click to record screen to activate MiniTool Screen Recorder.
Step 3. Click the Full screen and choose the Select region and drag your mouse to choose the recording area, or just click the Full screen to record the entire screen.
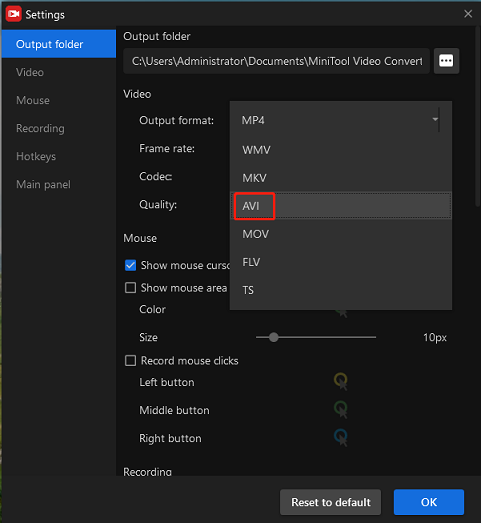
Step 4. Tap the Settings icon at the top right, click the MP4 and then choose the AVI from the dropdown list to record the screen in AVI. Also, you can change the output folder, frame rate, and other settings. Click the OK to save your changes.
Step 5. Tap the red Record button or press F6, and the recording starts after a three-second countdown. Press F9 to pause/resume recording. To stop the recording, press F6.
Step 6. The recorded AVI file will show in the MiniTool Screen Recorder Video list. Right-click it to preview, delete, rename the recording, or open its folder.
How to Convert Record AVI Video to Another Format?
- Go to the Video Convert tab, click the Add Files to add your AVI recording.
- Click the Edit icon at the end of the Target box. Go to Video, choose a format, and select the video quality.
- Click the Convert button to turn the AVI file into another format.
#2. Bandicam
Bandicam is a lightweight screen recorder for Windows to capture anything on your computer screen as a high-quality video in MP4 or AVI. Therefore, it’s also a good choice for AVI recorders.
During the recording, you can draw lines, boxes, or highlights, and write on the screen. This is helpful to make tutorial videos and online lectures. Bandicam also lets you add a webcam overlay of yourself on the video you’re recording, record system audio and your voice. And while the recording, you can add a mouse click effect and animation
In addition to screen recording, Bandicam can work as a high-performance game recorder that allows you to record 2D/3D games up to 4K UHD, while also compressing videos to save space.
As a webcam recorder, it enables you to record from external video devices like Xbox/PlayStation, smartphone, IPTV, etc.
Pros:
- Three recording modes: screen recording, device recording, game recording.
- Support for real-time drawing and webcam overlay.
- High video quality with good sound quality.
- Support for Chroma Key for webcam overlay.
Cons:
- The free version has 10 minutes time limit per recording and has watermarks.
Follow the steps to learn how to record your screen in AVI using Bandicam.
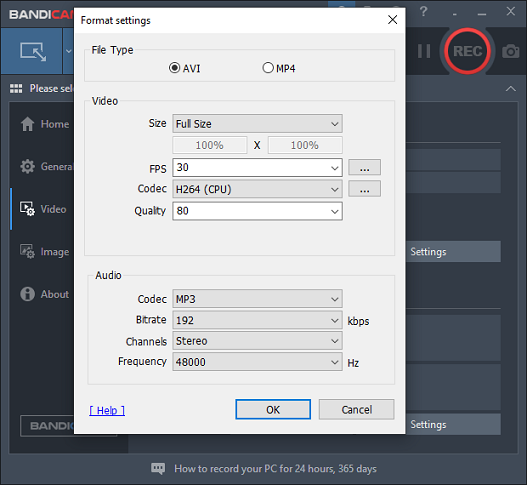
Step 1. Open Bandicam on your PC, click the Video tab, click the Settings in the Format section.
Step 2. Choose the AVI option. You can also choose the video FPS, codec, quality, and audio codec, bitrate, frequency, etc. Click OK to save changes.
Step 3. Optionally, click the General, then you can browse for another output folder, schedule a recording, etc.
Step 4. To choose recording areas, click the dropdown arrow next to the Screen Recording Mode.
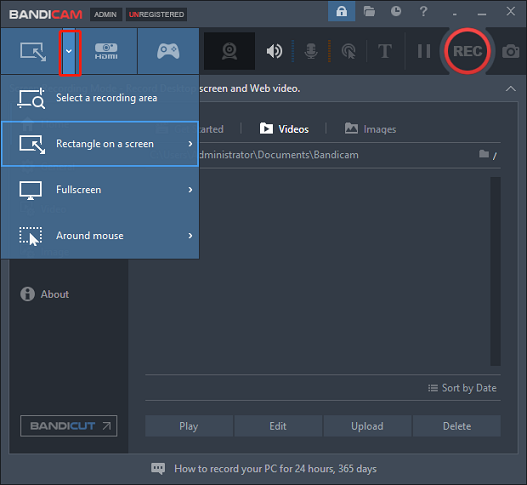
Click the Select a recording area, then drag your mouse to customize the recording region.
Choose the Rectangle on a screen to choose a video size and you can move this window on the screen, or click the Select a recording area to choose recording area manually.
Also, you can choose Fullscreen to record your screen in full-screen.
Step 5. Click the REC button to start recording. During the recording, you can click the pencil icon to draw on the video.
Step 6. Click the Stop button or press F12 to stop recording. Then go to Home > Video, right-click an AVI file to play, or upload it on YouTube or Vimeo.

#3. Captura
Captura is also a free AVI recorder to record your desktop. Also, it lets you record video in MP4 and WebM. With this screen recorder, you can record a full-screen, a specific window or screen, and a selected area. And you can also draw on the screen while recording.
And Captura also records your screen in GIF and records audio only. Besides, this program allows you to live stream to Twitch, YouTube Live, and other streaming sites.
Pros:
- Free and simple to use, no watermarks.
- Record from a webcam.
- Stream to Twitch, YouTube Live, and more sites using FFmpeg.
Cons:
- Only compatible with Windows.
Here’s how to record your desktop in AVI with Captura.
Step 1. Download and install Captura on your PC, then open this software.
Step 2. Under the FFmpeg tab, click the dropdown arrow and then choose the Avi(Xvid | MP3) option. Click the three dots icon at the bottom right to choose another output folder.
Step 3. Click the Fullscreen to record your desktop in full-screen or click the Region to choose the recording area.

Step 4. Click the Record button at the bottom left to start recording. To stop recording, click the Stop icon.
Also read: Does Bandicam Record Audio & How to Record Audio on Bandicam
#4. Screencast-O-Matic
Screencast-O-Matic is another AVI screen recorder you can try. It allows you to record screen and webcam or both. And you can record computer audio and add audio narration from your microphone. During the recording, you can doddle on the screen, add text, draw different shapes, zoom your screen, etc.
After recording, you can edit this video in the built-in video editor.
Pros:
- Fast and easy to operate.
- A built-in video editor.
- Draw lines, shapes, and annotate on the video.
Cons:
- The free version can record up to 15 minutes at a time.
Here’s how to record your screen in AVI format using Screencast-O-Matic.
Step 1. Go to the Screencast-O-Matic website, and sign in. Download and launch the recorder.
Step 2. Click the Size to change the video size and resolution. Then you can change the position of the recording window by dragging. Or click the Fullscreen to record in full-screen.
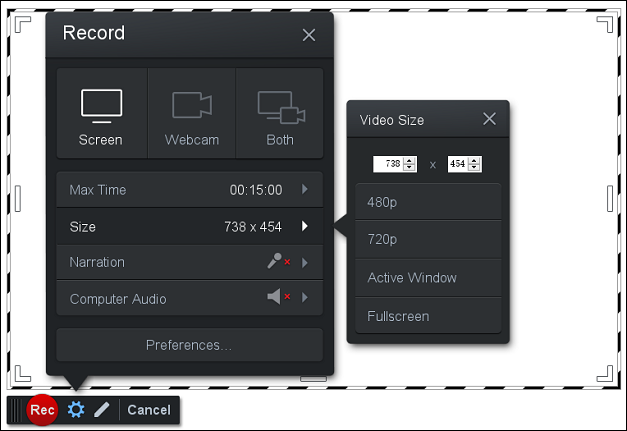
Step 3. Tap the red REC button to start recording. To stop recording, click the blue Stop button.
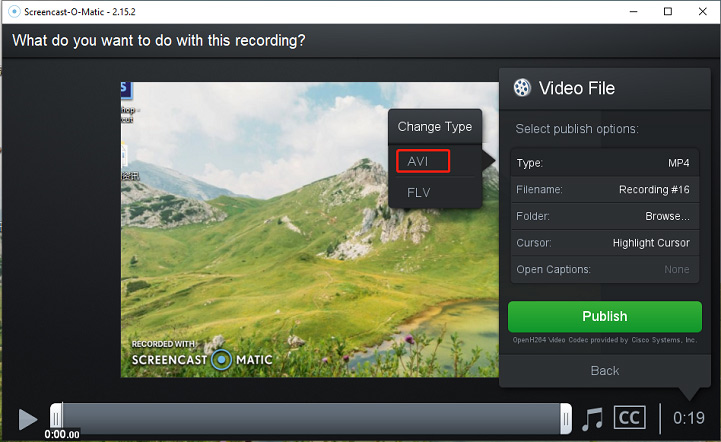
Step 4. Click the Done to save, upload, share, or edit video. Click the Save/Upload option, then click the Save as Video File, and choose AVI. Click the Browse to choose a folder, and click the Publish to save the AVI file.
#5. Acethinker Free Online Screen Recorder
This is an online free AVI screen recorder that helps you record video and audio via your webcam and system sound. And you can choose to record the entire screen or a selected area. You can record screen in many formats like AVI, MP4, WMV, and more.
During the recording, you can draw lines, shapes, icons, and notes to make a high-quality video. After recording, you can save the recording on your computer or upload it to YouTube, Vimeo, Google Drive, Dropbox.
Pros:
- Record screen in multiple video formats.
- Unlimited recording time.
- Export video without watermark.
Cons:
- No video editing tools.
Follow the steps below to learn how to record a screen in AVI with Acethinke Online Screen Recorder.
Step 1. Visit the Acethinker Online Screen Recorder website, click the Start Recording button, then download and run the Acethinker launcher.
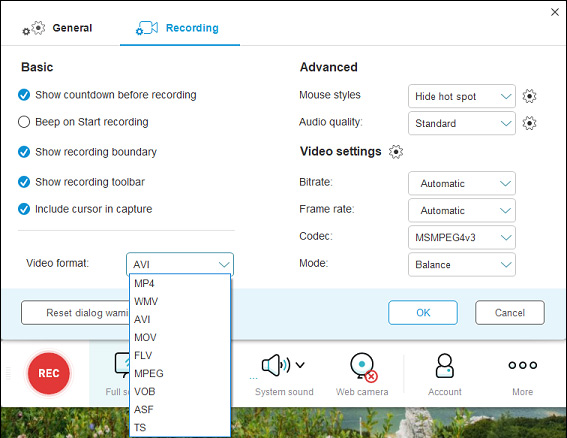
Step 2. Click the More > Settings, go to Video format, and choose AVI from the dropdown list. Also, you can edit the video bitrate, frame rate, codec, and more. Click OK to save changes.
Step 3 Choose the Full screen or click the Region and drag your mouse to choose the recording area.
Step 4. Tap the REC button to start recording after a three-second countdown. Click the Stop icon to stop recording.
Step 5. Click the Save video button, choose the save as Video File. Then click the Open folder to locate your AVI file.
Also read: How to Save Camtasia Video as MP4 & Where Is Camtasia Recording
How to Edit Recorded AVI Video
If you want a free video editor to edit your recorded AVI videos, you can try MiniTool MovieMaker, a free video editor without watermarks.
MiniTool MovieMakerClick to Download100%Clean & Safe
This AVI video editor allows you to trim, split, rotate, flip, speed up, slow down videos, add titles/captions/credits to the video, add background music, add animated stickers, and more.
MiniTool MovieMaker is simple to use and won’t watermark your videos. Just try it to edit videos as you like!
Conclusion
This post offers 5 AVI screen recorders. With them, you can record your computer screen in AVI format with great ease. What’s your favorite AVI video recorder? Would you like to share other AVI desktop recorders? Just leave your recommendations in the below comments area.
And if you have any questions while using MiniTool Video Converter or MiniTool MovieMaker, you can contact us via support@minitool.com.
About The Author

Position: Columnist
Cora is a tech writer specializing in digital media workflows, with over six years of hands-on experience in video post-production, media transcoding, and screen capture. Her writing is always clear and practical. Cora also produces in-depth software reviews for users across skill levels to help them find the right tool and enjoy video editing.
User Comments :